Photos
Manage and Transfer iPhone or iPad Photos and Videos with iMazing

💡iMazing 3
This guide is not yet complete or updated for iMazing 3. An update will be available soon.
Introduction Videos
iMazing's Photos tool was completely rebuilt in 2020. The videos embedded below showcase iMazing's main photo management features:
Windows Screencast
macOS Screencast
Table of Contents
- Browsing your Library
- Exporting Photos and Videos
- Importing Photos
- Deleting Photos and Videos
- Backing Up your Photo Library
- Downloading Photos from iCloud Photo Library
1. Browsing
Connect your iPhone, iPad or iPod touch to your computer and click the Photos icon. iMazing will start loading your photo library straight from your mobile device and let you browse it while it's still loading thumbnails in the background. If you've already paired your iOS device with iMazing, you can even access your device's photo library via Wi-Fi, no USB connection required.
1.1 Library View
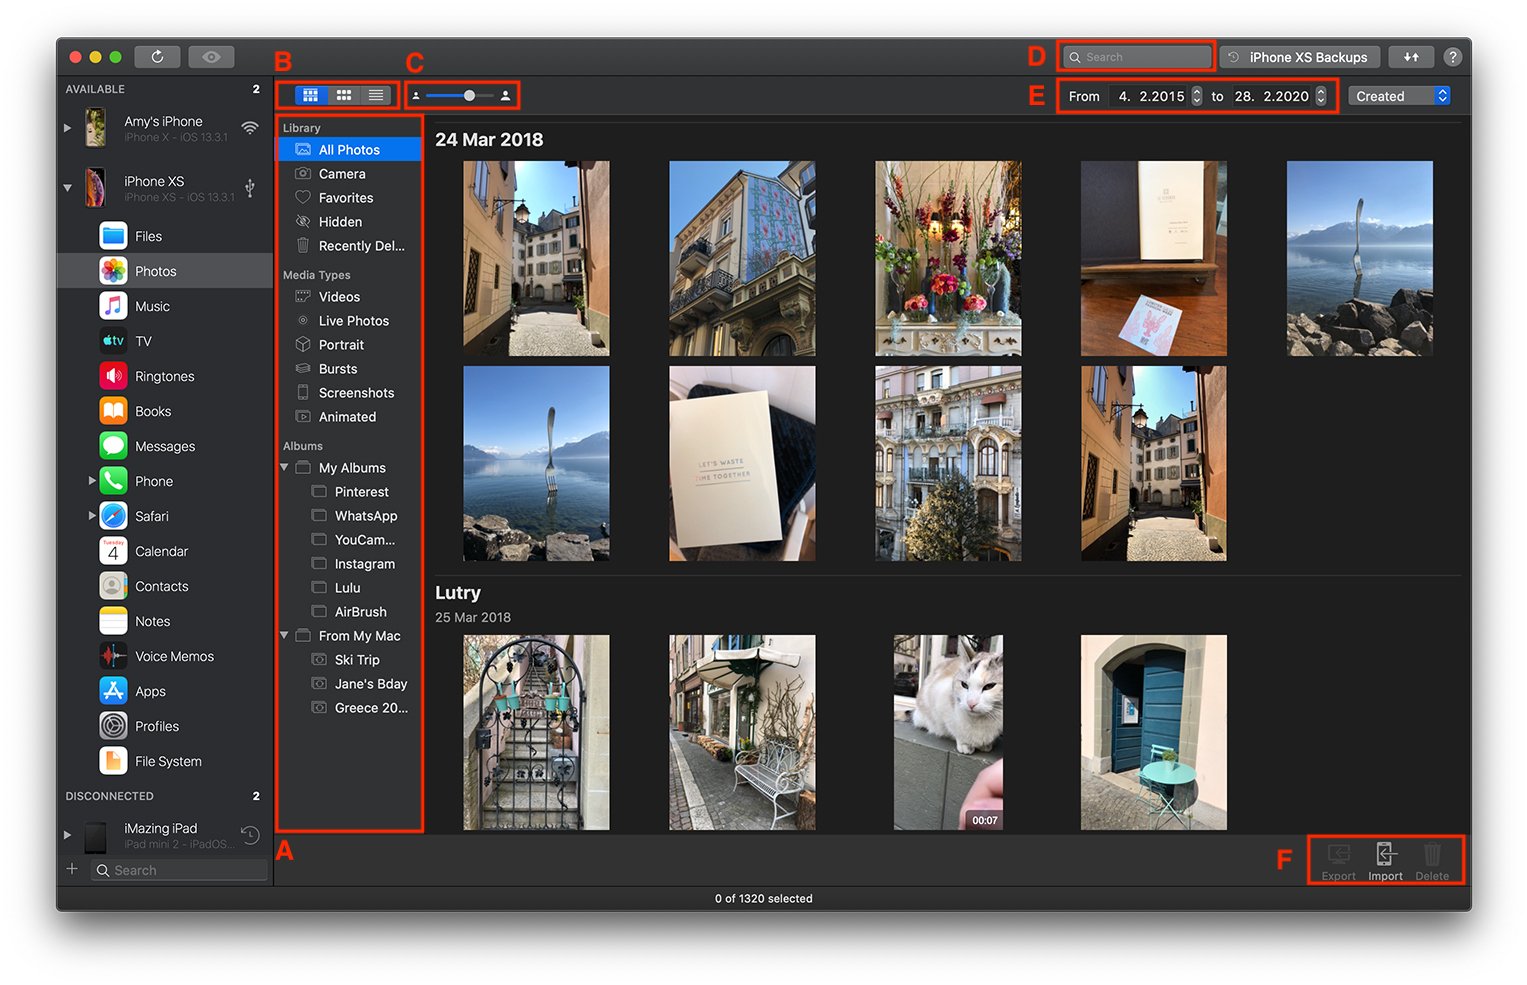
This is the default view iMazing displays once it has loaded your iOS device's photo library. It features the following components:
A. Sidebar
Here, you can select which album or smart album to browse. You can also export entire albums by dragging and dropping them to your desktop, or by opening a context menu on an album with a secondary click. Some albums have unique specificities:
- Camera represents the camera roll.
- Bursts will display all frames of burst photos (other albums will display the key frame only).
- From My Mac albums are albums which you've synced with iTunes or the Finder, or created with iMazing.
B. View Switcher
You can switch between 3 views:
- The Moments view displays photos aggregated by location and date.
- The Grid View displays photos in a grid, with a floating date range badge.
- The Table View displays photos in a table, ideal to see all available fields at a glance and sort by size, size, date or location.
C. Icon Size
Use this slider to adjust the size of icons in the view.
D. Search Bar
iMazing's search bar (top toolbar) is implemented in Photos. The following fields are indexed and will return search results:
- Filename
- Moment Title
- Title
- Description
- Keywords
The last 3 fields are generally empty. On macOS, they can be manually entered in the Photos app.
E. Date Range
You can instruct iMazing to only display photos from a specific date range using this control. By default, this range is set to encompass the date of the first and last asset in your device's photo library.
F. Actions
Export, Import and Delete action buttons are available here. If nothing is selected, only the Import action will be enabled.
⚡ Drag and drop workflow: Most actions can be performed by dragging and dropping items to or from iMazing's window. If you export assets to your Desktop in this way, default export settings will be applied. Use the Export button to gain additional options.
1.2 Selecting Items
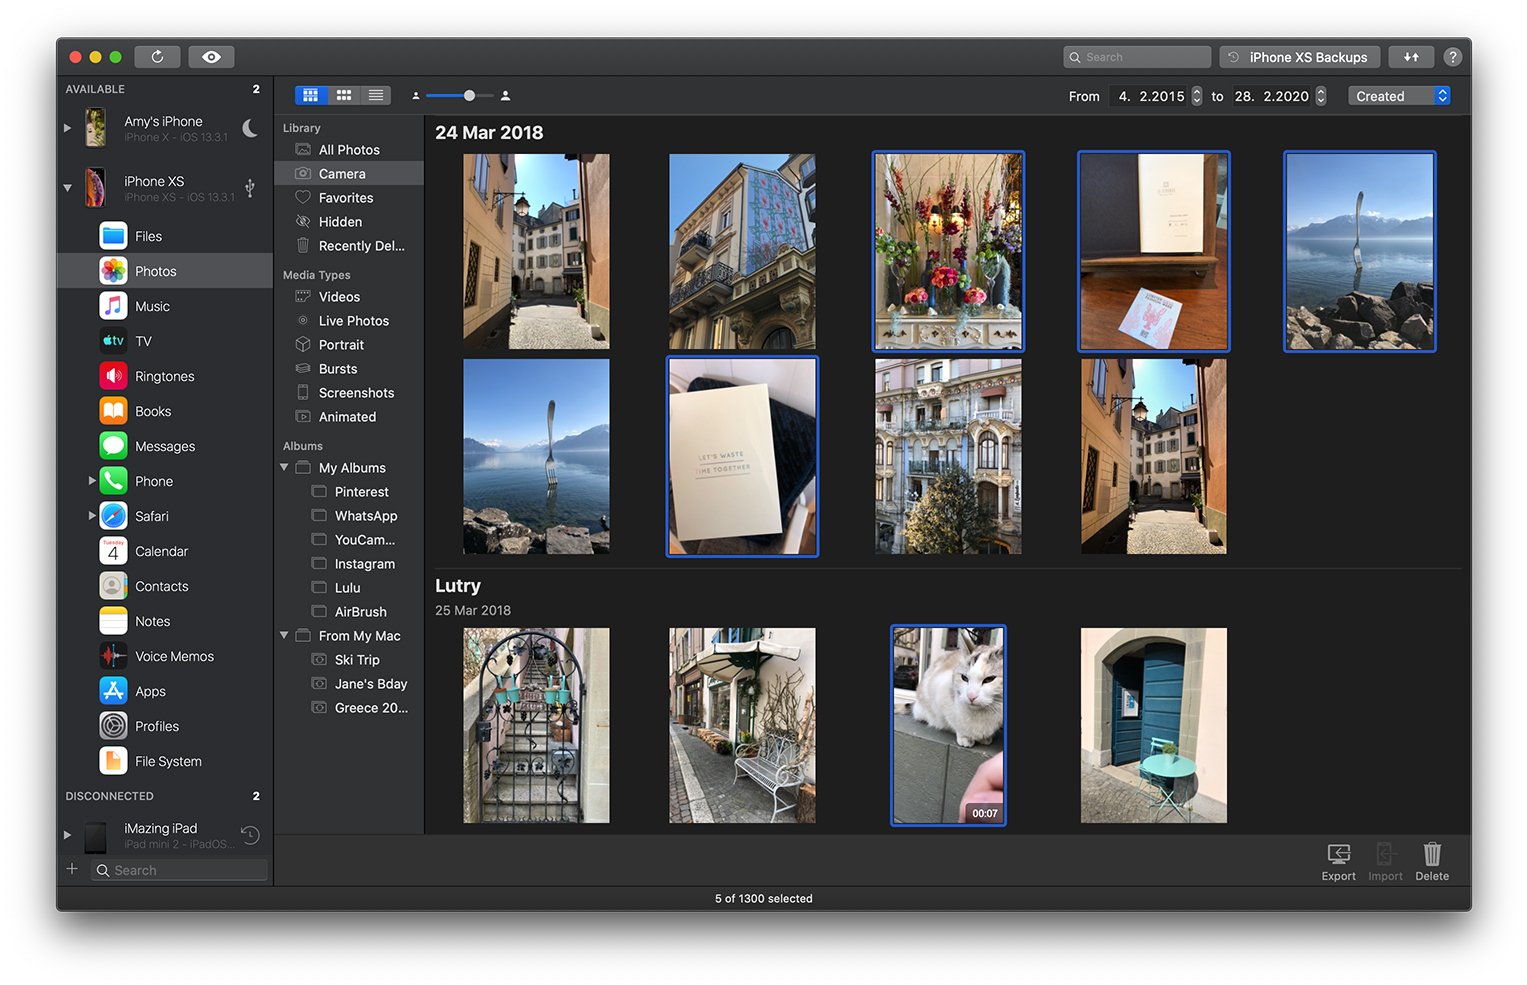
- To select an item, click on its thumbnail.
- To select a range of items, select the first item and hold the shift key while clicking the last item of the desired range.
- To add to your selection, hold the command key while selecting new items.
- To select all items, use the standard
⌘+Ashortcut, or the Edit menu's Select All action.
Actions are applied to selected items only. A selection of items can also be dragged out of iMazing's window for a quick export.
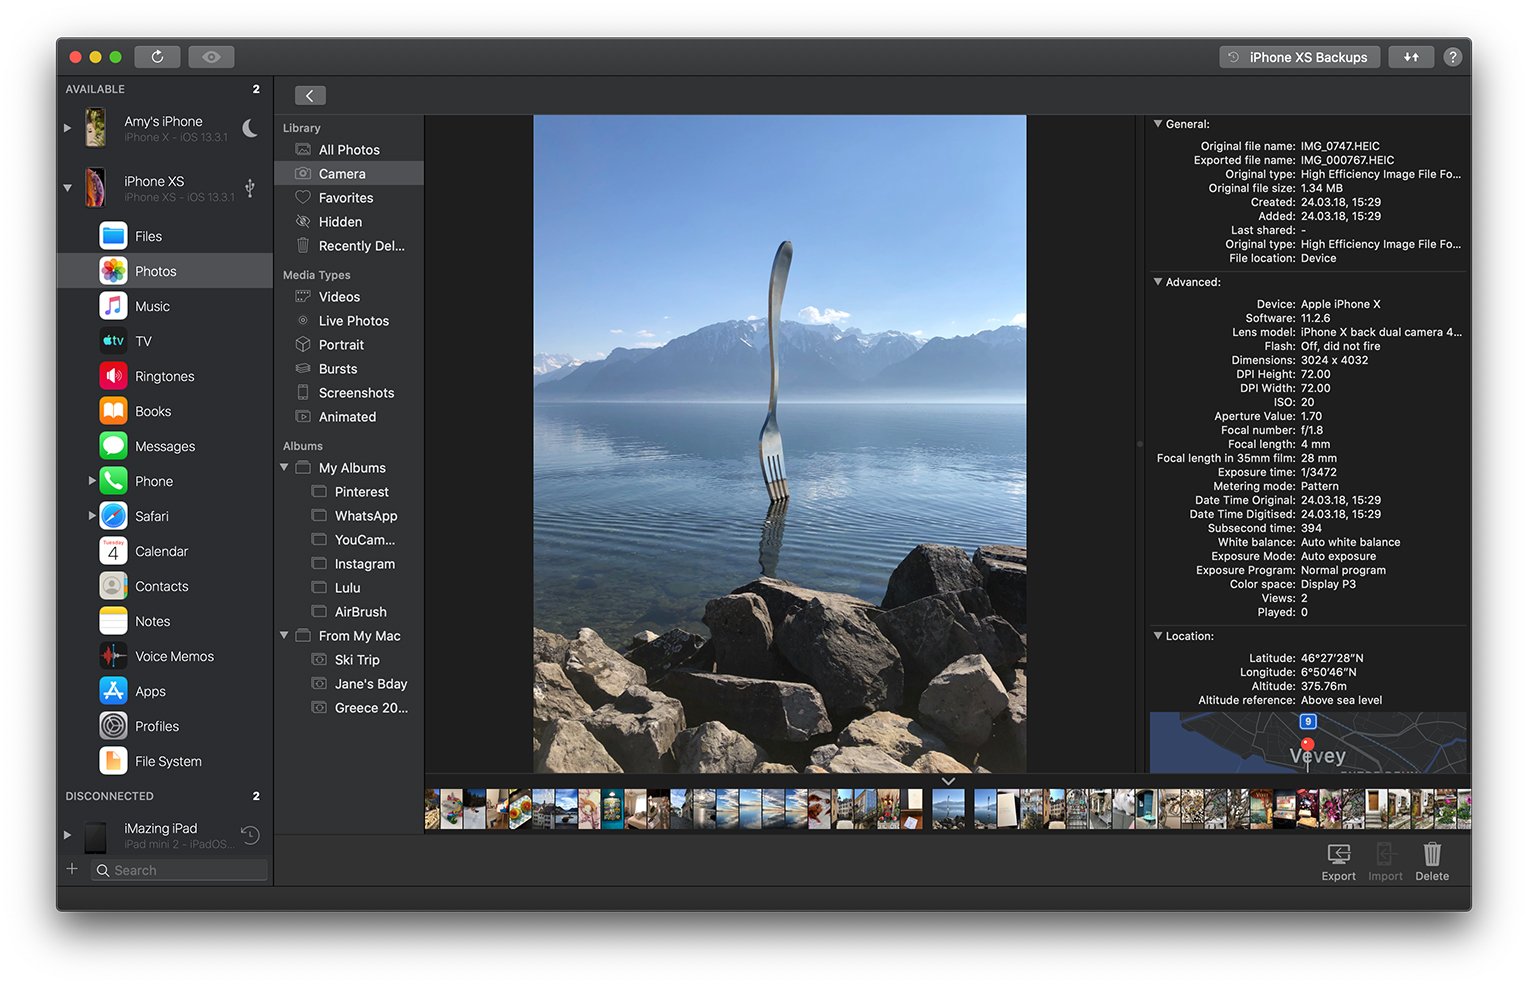
1.3 Detail View
double-click an item (or select it and press the spacebar) to zoom in on it:
Navigation
You can navigate without returning to the Library View in the following ways:
- Swipe with 2 fingers on the preview image (click and drag with a mouse)
- Click on the arrows which appear to the left and right of the preview image when you hover with the pointer in that area
- Use the keyboard's left and right arrow keys
- Use the carrousel below the preview image: you can click on a thumbnail to jump to it, or swipe on the carrousel with 2 fingers to scrub (click and drag with a mouse)
Full Screen Mode
Double-click the preview image to enter full screen mode. You can double-click again to exit, or press the escape key. Note that you can still navigate in full screen mode, using the same controls described above.
Assets and Metadata View
To the right of the preview image is a scrollable view containing any additional assets and metadata available for the current photo or video.
This view is divided in 4 collapsable sections:
- Assets displays thumbnails of available additional assets for the current item. This section is hidden if there are none.
- General section lists general information about the photo or video.
- Advanced section features metadata about the camera, exposure, depth of field and more
- Location section lists longitude, latitude and elevation, and displays a Google Maps capture of the location which you can double-click to open it in Google Maps. This section is hidden if no location data is available.
Additional assets include:
- All frames of bursts
- Original versions of edited items
- Originals of Portrait Mode photos (no bokeh effect)
- The photo and video components of Live Photos
- Original photo of automatically re-framed pictures (Smart Frame)
Here's a cropped live photo:
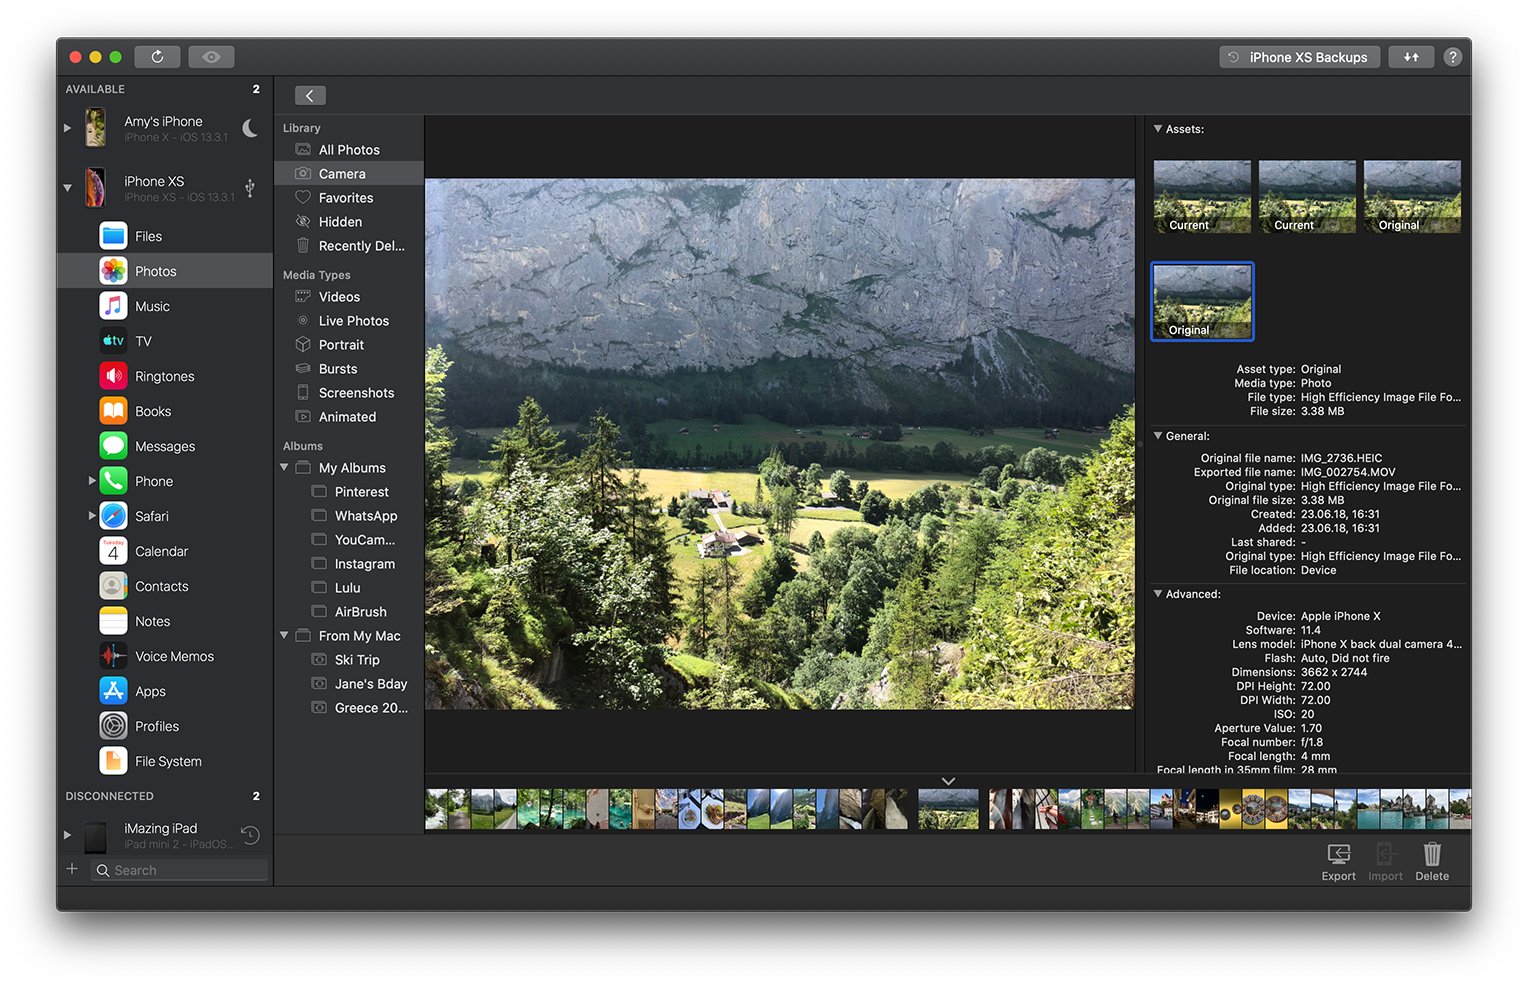 Notice that we've selected the original photo (4th thumbnail in the Assets section of the Metadata view here). By default, the edited live photo is displayed, it's the current asset which represents this item in your library.
You can select and export these assets by dragging and dropping them to your computer. The Export section of this guide below explains how you can bulk export additional assets, too.
2. Exporting Photos and Videos
As we mentioned before, any item (including entire albums in the sidebar) can be dragged and dropped to your computer to launch an export operation. For more control over what you export, use the Export button in the bottom toolbar, which will display a sheet of options summarizing exported items and letting you decide which assets to include or exclude from your export, as well as offer useful options to structure folders and naming schemes.
Here is what the export options sheet looks like after selecting all items in our test library and clicking Export:
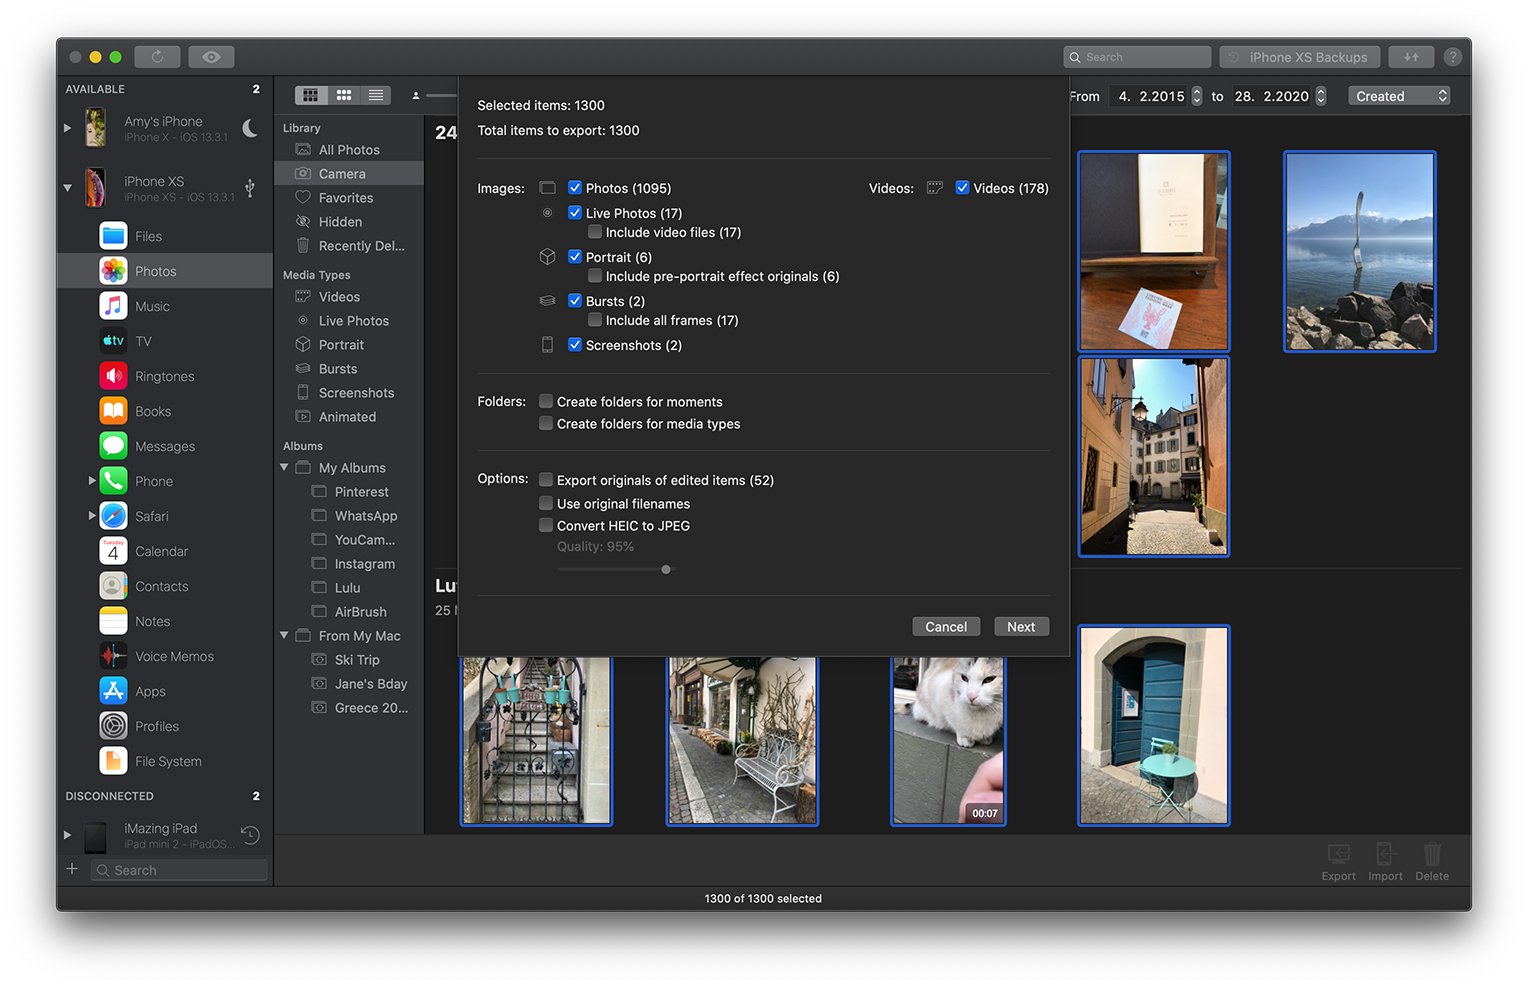
Options are grouped in 3 sections:
Media Types and Assets
In the first section, you can choose which types of media to export, photos, videos, screenshots, etc. You also can pick which extra assets are included:
- Video files of Live Photos
- Pre-portrait effect originals of Portrait Mode photos
- All frames of bursts
Using these options, you can easily export only the video files of live photos, for example, or all portrait mode photos without the original assets, as you like!
Folders
The second section is about folder hierarchy:
- Create folders for moments will create one folder per moment
- Create folders for media types will create one folder per media type
If both options are checked, Media Type folders will be nested in Moments folders as illustrated below:
New York - 2020-03-01PhotosLive Photos
San Jose - 2020-02-10PhotosVideosScreenshots
Other Options
- Export originals: If selected, iMazing will also export the original version of edited photos or videos.
- Use original filenames: Filenames used by your device are non-descriptive, so iMazing uses its own naming scheme. Check this box to stick to preserve the original filenames.
- Convert HEIC to JPG: Check this option and adjust the quality slider if you'd like iMazing to automatically convert images in High Efficiency Format (HEIC/HEIF) to JPEG. (JPEG images are larger in file size, but more widely compatible.)
Once you've configured export options, click Next and choose a target location on your computer or external drive. iMazing will begin exporting and report progress in the Operations Window, which will pop open automatically.
3. Importing Photos
To import photos, you can drag and drop image files or folders anywhere in iMazing's Library view. iMazing will prompt you to enter an album name:
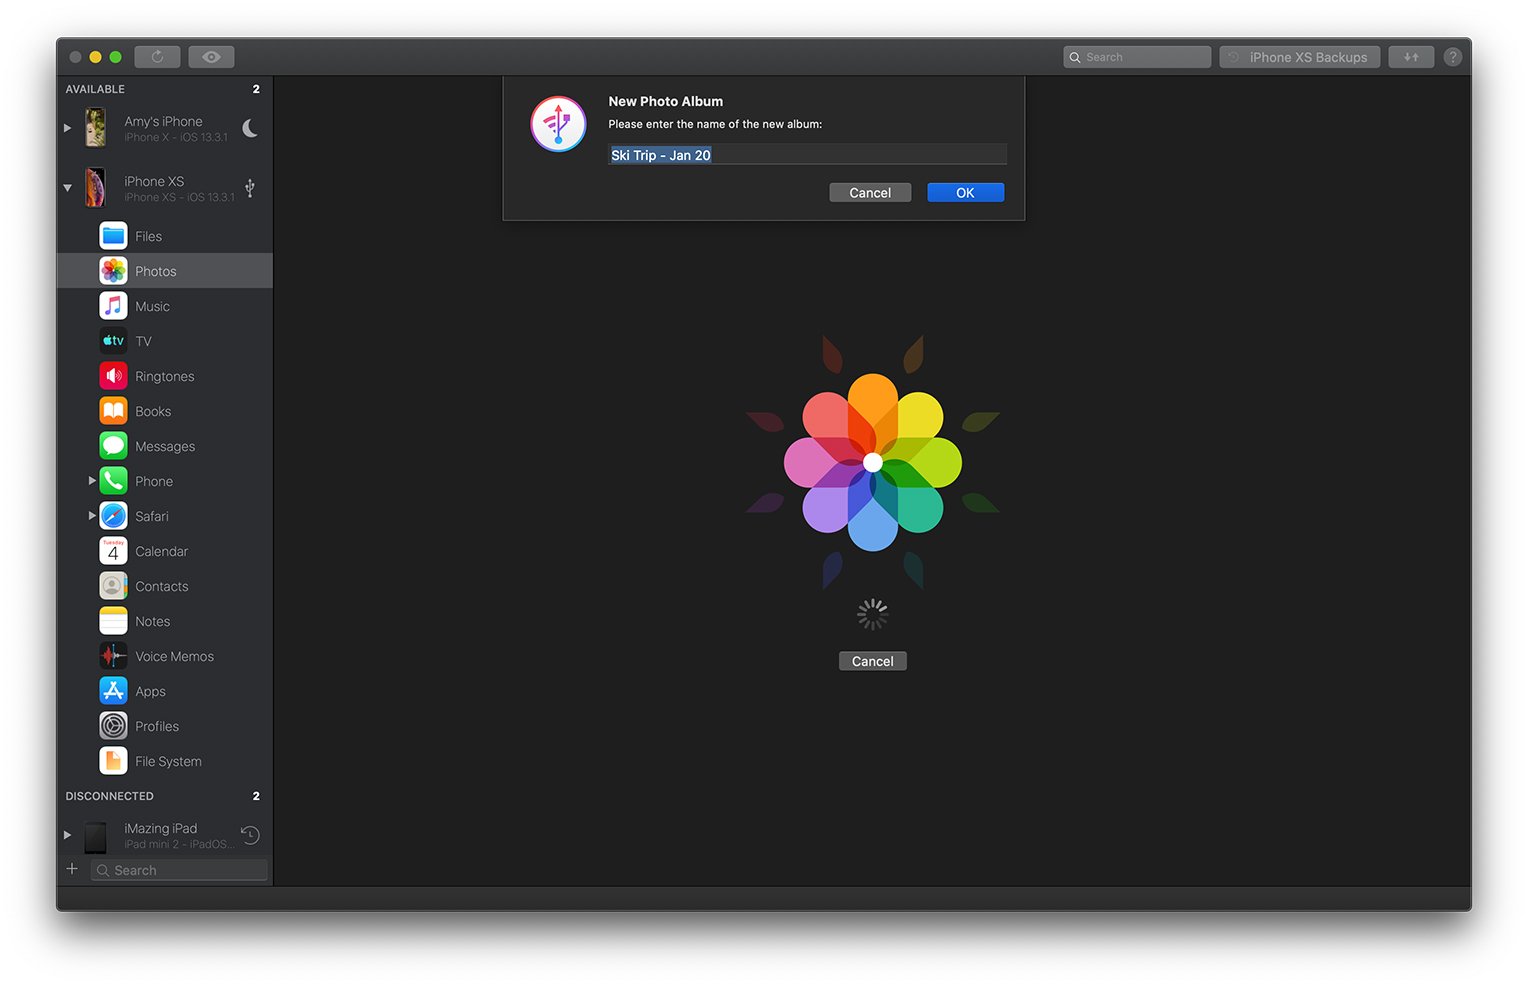
All imported albums are listed under the From My Mac section of the sidebar.
You can also import photos by clicking the Import button in the bottom toolbar and selecting image files or folders. In both cases, iMazing will prompt you to name your album.
Managing Items in Existing Albums
- To add items: Select an existing From My Mac album in the sidebar, and drag and drop new media files.
- To delete items: Select specific images in an album, then click the Delete button. Delete an entire album by either deleting all images it contains, or deleting the album itself.
⚠ Important: Synced albums, whether they are managed by iTunes, the Finder, or iMazing, are always listed under the From My Mac section, which is how the iOS/iPadOS Photos app labels them. They cannot be edited on the mobile device itself, a restriction imposed by Apple that iMazing cannot workaround.
⚠ Also Important: Photos added with iMazing do not become part of a device's Camera Roll, and are therefore excluded from device backups. This behavior is consistent with other computer-synchronized albums.
4. Deleting Photos and Videos
You can only delete photos from the camera roll (if iCloud Photo Library is disabled) or from From My Mac albums.
To delete from the camera roll, select Camera in the sidebar, then the items you wish to delete, then click the Delete button in the bottom toolbar. iMazing will ask you to unlock your iPhone or iPad – this is necessary for deleting only.
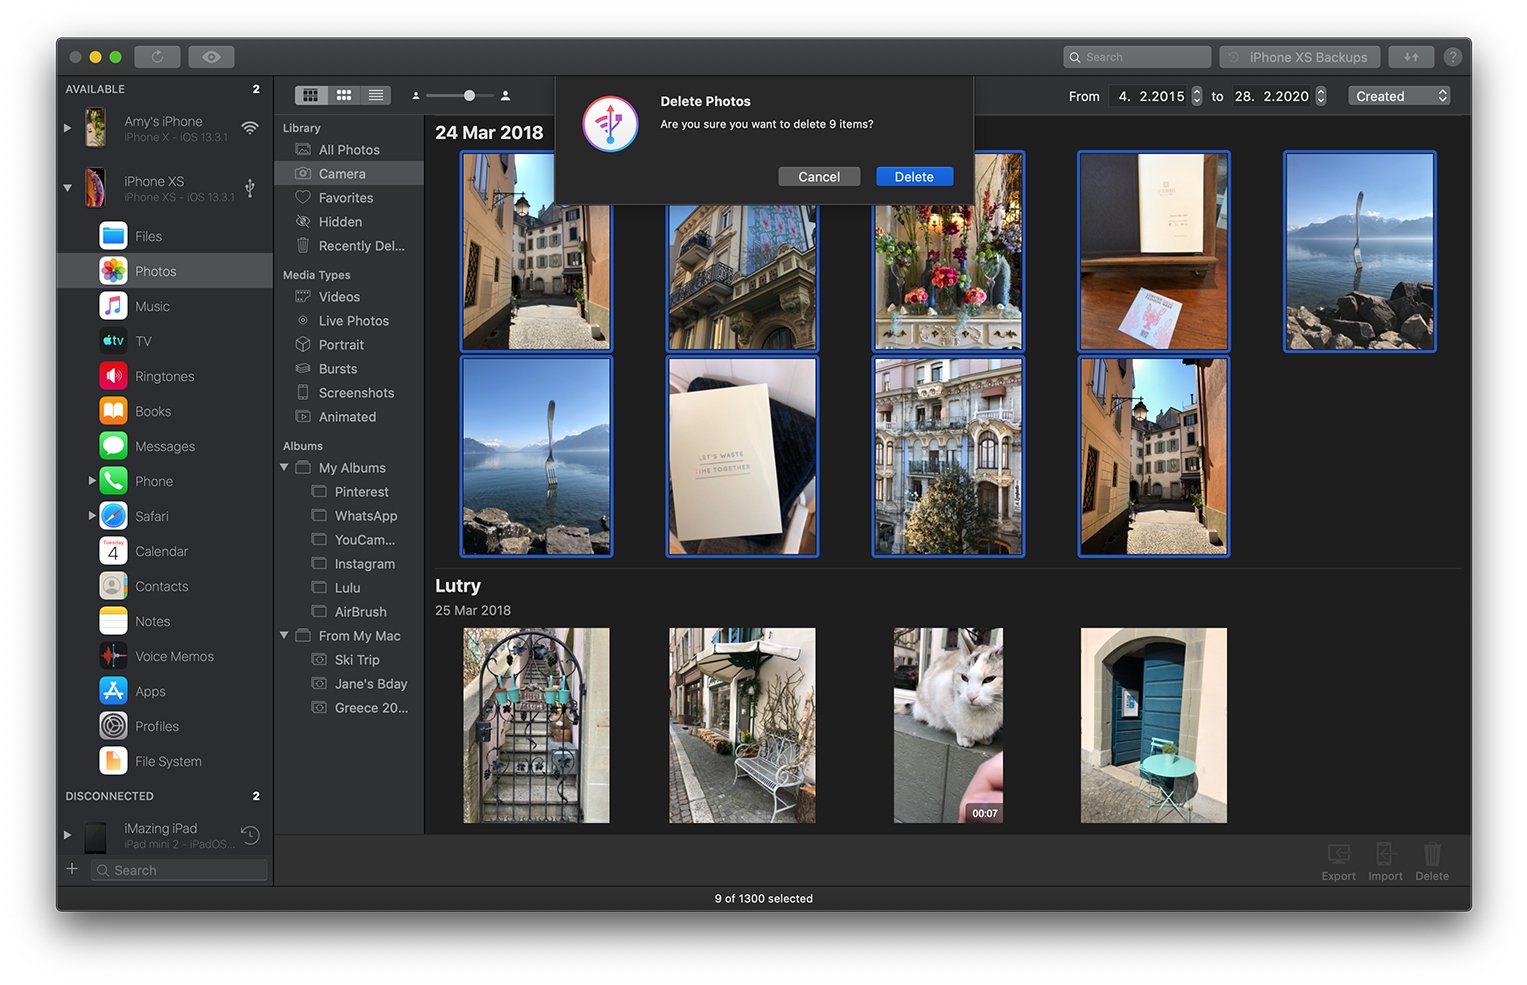
Please note: Photos deleted this way do not go to the Recently Deleted album, so make sure you have a backup of your mobile device before proceeding.
⚠ macOS Privacy: Since macOS 10.15.3, Apple increased the security protecting access to connected digital cameras. When deleting photos from your iPhone's camera roll, macOS considers the phone as a digital camera and will prompt you to authorize iMazing to access your Photo library and external volumes. iMazing will not access your Mac's photo library, but you still must give this authorization in order for iMazing to be allowed by macOS to delete photos from a connected iPhone or iPad.
5. Backing Up your Photo Library
Your iPhone or iPad's photo library is included when you perform a full backup of your device in iMazing. However, if you use iCloud Photo Library and have enabled the Optimize Storage setting, some photos and videos maybe be stored on iCloud and not on your device. (See the next section for more details about iCloud Photo Library assets.)
Recovering Photos from a Backup
You can browse your photo library from any backup in the exact same way as you browse the photo library of a device. Learn how to browse backups in iMazing.
If you are using iMazing's Backup Archives feature, you can jump in the past to any snapshot of your backup and easily recover accidentally deleted photos, as shown in this screenshot:
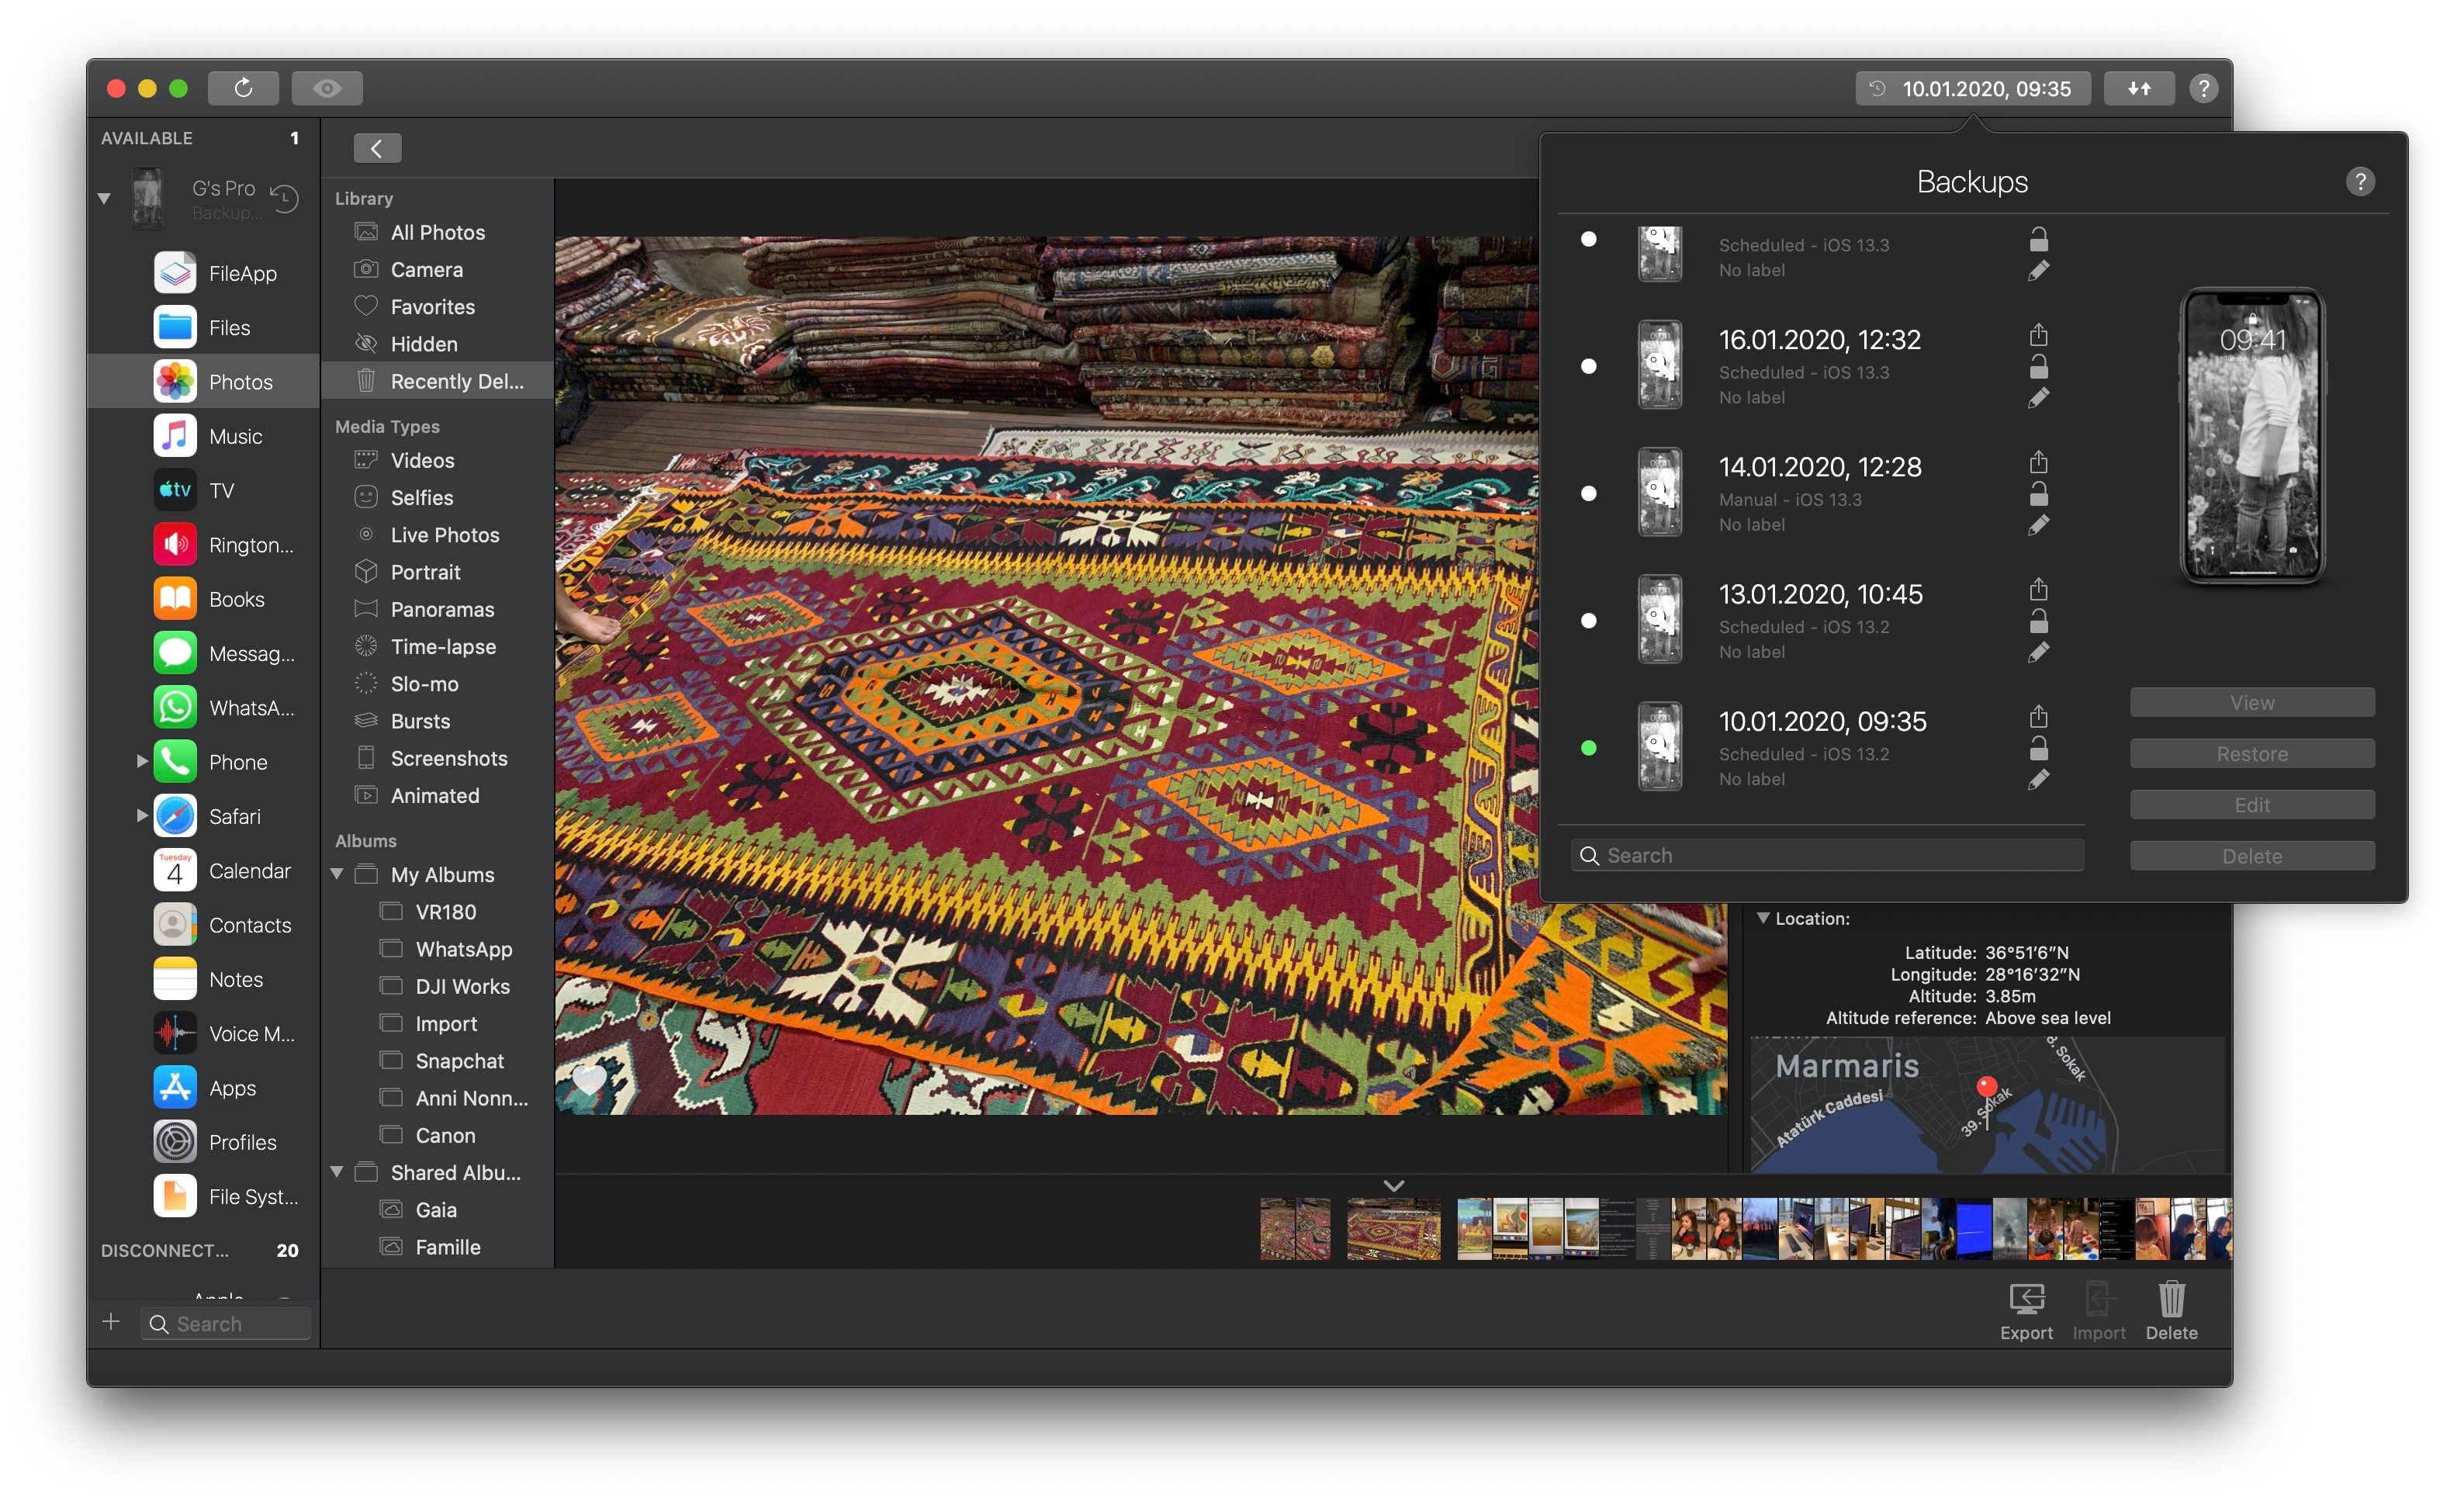
Here, we're browsing the Recently Deleted album of a 90 day old backup snapshot. That photo was automatically deleted from iCloud and the device since, but is easily recovered thanks to iMazing's Time Machine-like backup archives.
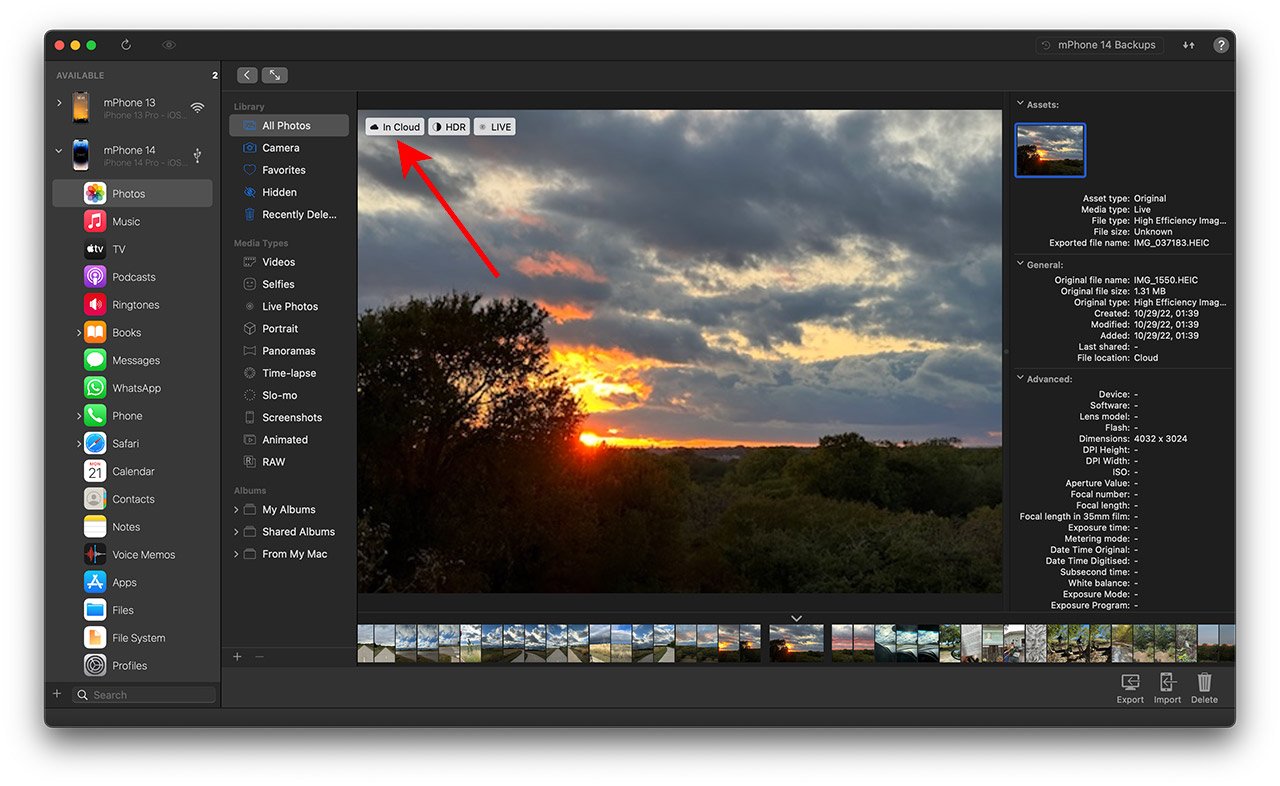
6. Downloading Photos from iCloud Photo Library
Since October 2022, with the release of version 2.16, iMazing supports downloading photos and videos that are stored on iCloud.
Such media can be identified in iMazing by the In Cloud label overlayed in the top left corner of a photo or video. In addition, only the lower-resolution thumbnail of the item, which is still stored on the device, will be viewable in iMazing until the photo has been downloaded.
If you attempt to export media stored on iCloud, iMazing will prompt you to log in to iCloud with your Apple ID to download them.
💡 Your Apple ID and password are only used to connect to Apple servers and will remain protected in your macOS keychain or Windows credentials. Learn more about how we value Security & Privacy.

Related Articles
Support Center
Related Videos


Enterprise License Information Request
Thank you! We'll be in touch shortly.