Device Management
Sign Apple Configuration Profiles

Configuration profiles are the primary mean for managing policies, restrictions, and configurations on end-user Apple devices. When organizations need to configure a large number of devices with services such as email, network settings, custom certificates, or other preferences, configuration profiles are a safe and secure way to do so.
Profiles can be digitally signed to guarantee their authenticity and protect against tampering. Furthermore, certain MDM providers actively modify profiles pushed to devices through their platforms, in which case signing profiles protects against such unwanted modifications.
1. Requirements for signing profiles
1.1. Digital certificate
In order to sign configuration profiles, a digital certificate is required. These are a type of electronic document that uses digital signatures to verify that a public key belongs to a particular entity.
Certificates are issued by certificate authorities (CA) and contain information about the identity of the certificate holder, the serial number of the certificate, the expiration date, and more.
1.2. Signing tool
A digital certificate by itself is just a string of data. In order to use it to sign files such as configuration profiles, a signing tool is required. The tool combines the certificate with the file being signed, and generates a digital signature that cannot be forged.
2. Choosing a certificate
There are various sources for obtaining signing certificates, and in this section we will discuss the main three used by Apple system admins.
2.1. Apple Developer Program
Members of the Apple Developer Program can obtain digital certificates quickly and easily through the program's portal at no additional cost. These certificates are normally meant for signing code or application installers but are also suitable for signing profiles as well.
Apple makes different types of certificates available to developers, and the preferred one for signing profiles is the Developer ID Application certificate. That is because profiles signed with this certificate will immediately appear as Verified without taking any additional steps.
However, if you're not the owner of the developer program account, you may not have access to this certificate. You could instead use one of the other certificates offered, but note that profiles signed with the other certificates will appear as Unverified, unless the developer program's intermediate certificates are available on the device, or are used in the process of signing (more on this below).
No matter which Apple Developer Program certificate you end up using, it is important to note that there is no support or warranty from Apple provided with these certificates. This makes them less preferable in production settings.
💡 Note that the common name (CN) of the certificate will be displayed to end users when interacting with signed profiles. This means that besides the type of certificate mentioned above, a signed profile will also display the name of the account that obtained the certificate. With personal accounts linked to an organization developer account this will include the account holder name.
2.2. Third party certificate authority
Third-party certificates are issued by reputable certificate authorities (CAs) that have strict requirements to verify the identity of the certificate holder. For this reason, they are generally the most secure and are considered the gold standard for production use.
Devices usually come with root certificates of reputable certificate authorities preinstalled, and therefore trust chains can be established without requiring that additional intermediate certificates are installed.
In general, third-party certificate solutions also come with 24/7 support and warranty options, if needed.
Apart for their cost, the main drawback of these certificates is that obtaining them is relatively more time consuming owing to the need for an identity verification process with the provider. However, the strict identification can also be seen as an advantage in scenarios such as when distributing profiles for manual installation, for example, from a corporate portal.
The recommended certificate type for signing configuration profiles is one intended for code signing, however SSL/TLS certificates will work too. These can be obtained from any major certificate vendor.
2.3. Self-signed certificates
Self-signed certificates, as the name suggests, are certificates that anyone can create on their computer at no cost with built-in solutions such as Keychain (macOS) or IIS (Windows). While they can be used to sign profiles just like all other certificates, devices cannot verify those signatures without having the certificate also installed alongside as root, or manually trusted by the user.
These certificates, while fast and easy to create, are generally less secure than CA-issued certificates because they don't undergo the same level of identity verification. They also come with no support or warranty options, naturally.
This makes self-signed certificates suitable for pre-production testing and for preventing MDM changes to profiles, but less so for establishing trust and identifying profile authors.
Overall, self-signed certificates can be a convenient and cost-effective option for testing and development purposes, but they may not be suitable for a production environment.
3. Before requesting a certificate
The process of requesting a certificate from a certificate authority involves generating a Certificate Signing Request (CSR). This applies for both Apple Developer Program certificates and third party ones (Xcode can perform this step behind the scenes however for system admins without Xcode already installed it may take less steps to manually generate a CSR).
A private-public key pair is crucial for generating a certificate request, and in the following instructions a pair will be automatically created for you and saved to your computer's certificate store.
3.1. Generating a CSR on macOS
Launch the Keychain Access app from your Applications folder or using Spotlight
When the application is launched, click on the Keychain Access menu on the menu bar and select Certificate Assistant > Request a Certificate from a Certificate Authority
💡 Before selecting this menu option, make sure that list selection (in other words the highlighted item) in the main window is not a private key. Otherwise, the CSR generation flow will use that key instead of creating a new pair from scratch. If no checkbox titled Let me specify key pair information is displayed in the window that will open – a private key was selected.
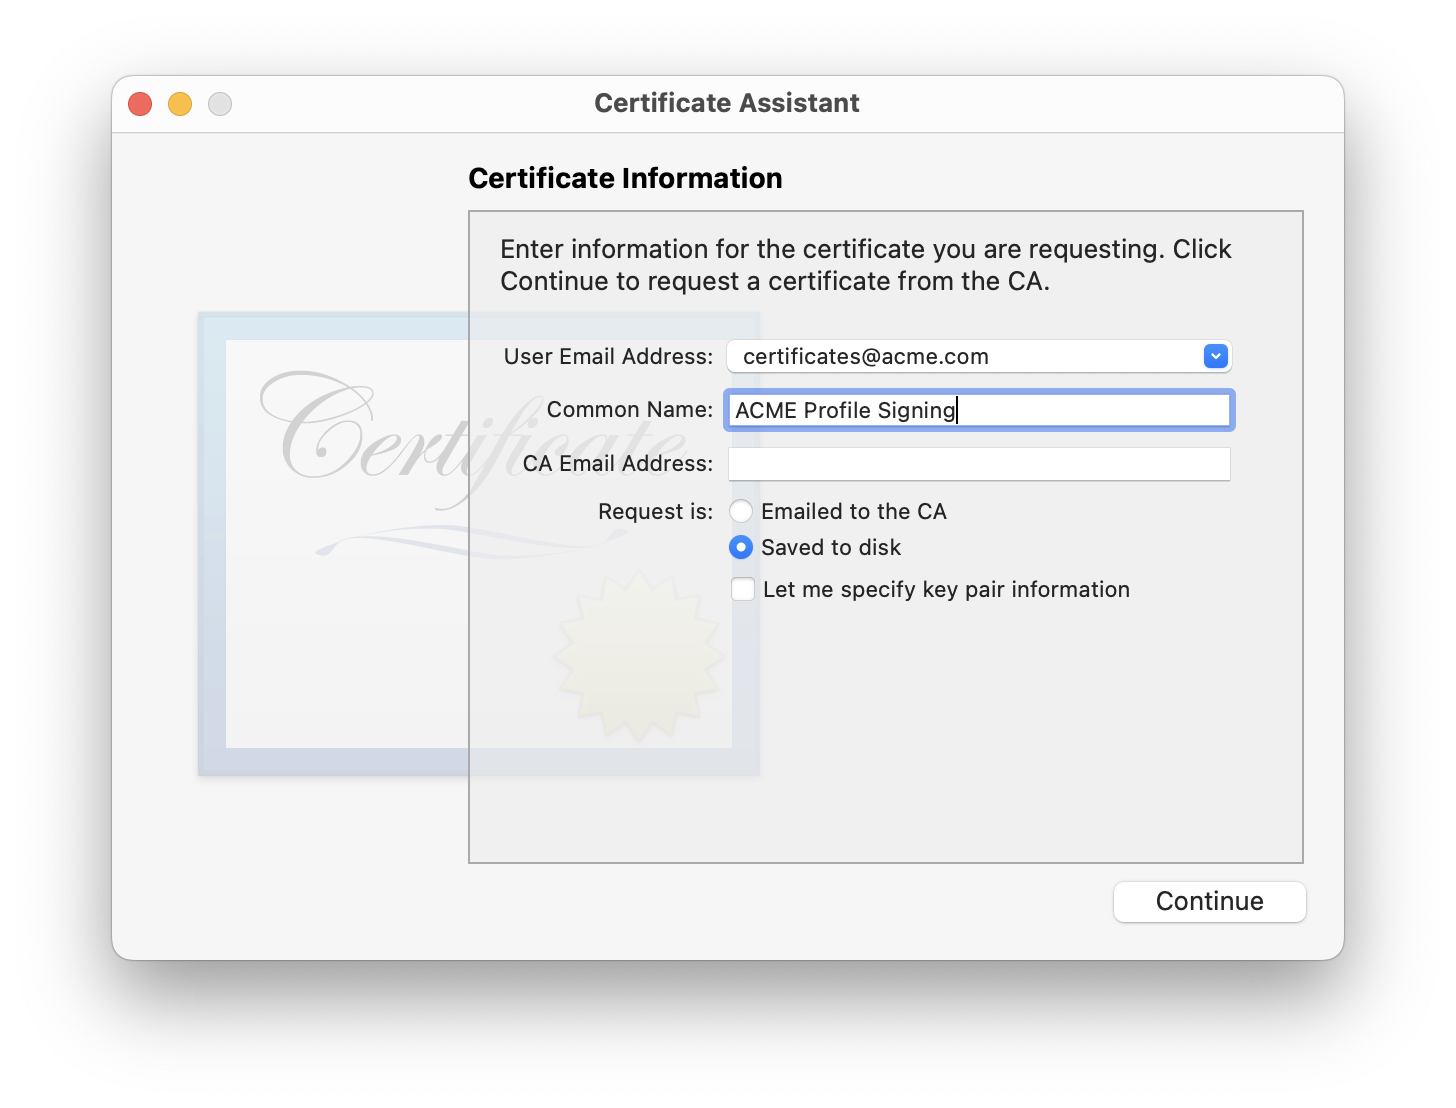
At the next window you will be asked to enter your information in order to generate the CSR. Note that you do not need to provide a CA email address (even if the field is enabled). When done please select Save to disk and choose a location to store the generated file.
The private-public key pair generated for this request will now be stored in your Mac's Keychain, under the name you provided for the CSR in the steps above.
3.2. Generating a CSR on Windows
Prerequisites
As on macOS, Windows also allows to generate a CSR using a built-in GUI tool. However, before you can access this tool you will have to activate a system add-on in Control Panel.
Launch Control Panel using the Start menu or the search box
Inside Control Panel, click Programs and Features, then click Turn Windows Features On or Off
When Windows Features dialog box appears, click Internet Information Services to install the default features
CSR creation
Click on the Start menu and in your programs list search for the Windows Administrative Tools folder and launch Internet Information Services (also called IIS)
Once IIS is started, locate the Server Certificate control panel in the center window
From the right-side Actions menu, click Create Certificate Request. The Request Certificate wizard will open in a new window
Fill out all the requested information such as Common Name (CN), Organization, etc. Note that you have to select your country from drop-down list
Click Next when you are ready to generate the CSR file
At the Cryptographic Service Provider Properties page, select the following options from the drop-down menus:
Cryptographic service provider:
Microsoft RSA SChannel Cryptographic ProviderBit length:
2048
On the File Name page, click the '…' box to choose a file name and a location to save it, and then click Finish
The private-public key pair generated for this request will now be stored in your computer's Windows Certificates Store, under the name you provided for the CSR in the steps above.
Unless you specifically set one, the generated file will have no file extension. However, it is essentially a text file that you can open using any text editor such as Notepad.
4. Requesting a certificate
The CSR generated using the steps in the previous section can now be used for requesting a certificate authority to generate a signing certificate for you.
4.1. Requesting an Apple Developer Program certificate
Open the Create a New Certificate page of the Apple Developer Program website
If you were not already logged-in with your account, the website will prompt you to do so
Once on the page, select Apple Distribution and click on Continue
Click on Choose File and located your CSR for upload. Then click on Continue
You are now able to download the Apple certificate to your computer (on both macOS and Windows)
4.2. Requesting a third party certificate
As the procedure for acquiring an third party certificate may differ from one vendor to another, we recommend that you follow the steps proposed by your chosen vendor.
In any case, at some point you will be prompted to upload the CSR that you have previously generated or to copy/paste the request in text format into a dialog box.
5. Generating a self-signed certificate
If instead of requesting a certificate from a certificate authority as described above, you prefer generating your own certificate, you can do so with the following steps.
Please note that the Private Key will be automatically generated during the process and will appear next to your certificate in macOS Keychain or in Windows Certificate Store depending on your OS.
5.1. Generating a certificate on macOS
Open the Keychain Access app
Click the Keychain Access menu in the menu bar, hover over Certificate Assistant, then select Create a Certificate
In the Certificate Assistant window that appears, enter a sensible name such as, for example, "Management Certificate". Under Identity Type, select Self Signed Root and Certificate Type of Code Signing
Check the box beside Let me override defaults and click on Continue
In the window titled You are about to create a self-signed certificate click on Continue
Leave the Serial Number set to
1, and increase the Validity Period to something like1096days (3 years) for convenience. Finally click on ContinueOn the next screen, enter relevant values for your organization. Make sure to specify a descriptive Common Name for the certificate, as this will be viewable when inspecting profiles signed by this certificate. Then, click on Continue
Leave the default values of
2048bits for Key Size and RSA for Algorithm.Ensure Signature is selected for the Key Usage Extension and click on Continue
Ensure Certificate Signing is selected for the Extended Key Usage Extension and click on Continue
In the following screens, leave Include Basic Constraints Extension and Include Subject Alternate Name Extension unchecked. Pass the steps by clicking each time on Continue
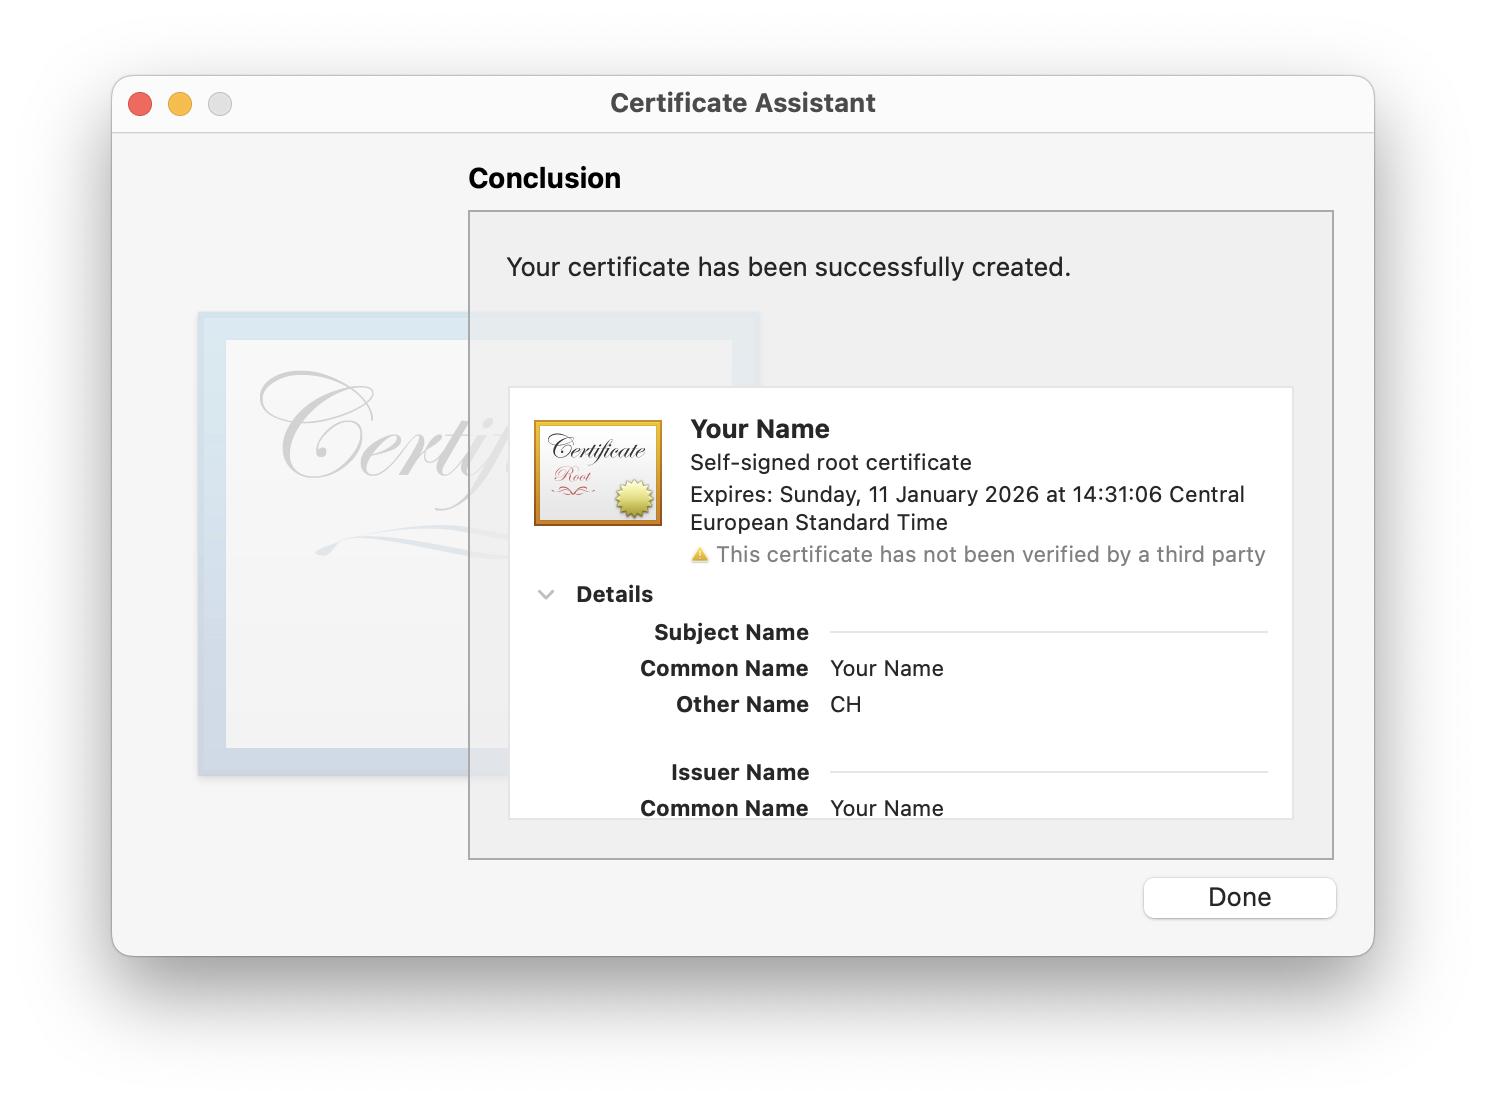
When prompted, ensure the certificate is set to be stored in your login keychain. After clicking Create you should see that the new certificate has been successfully created
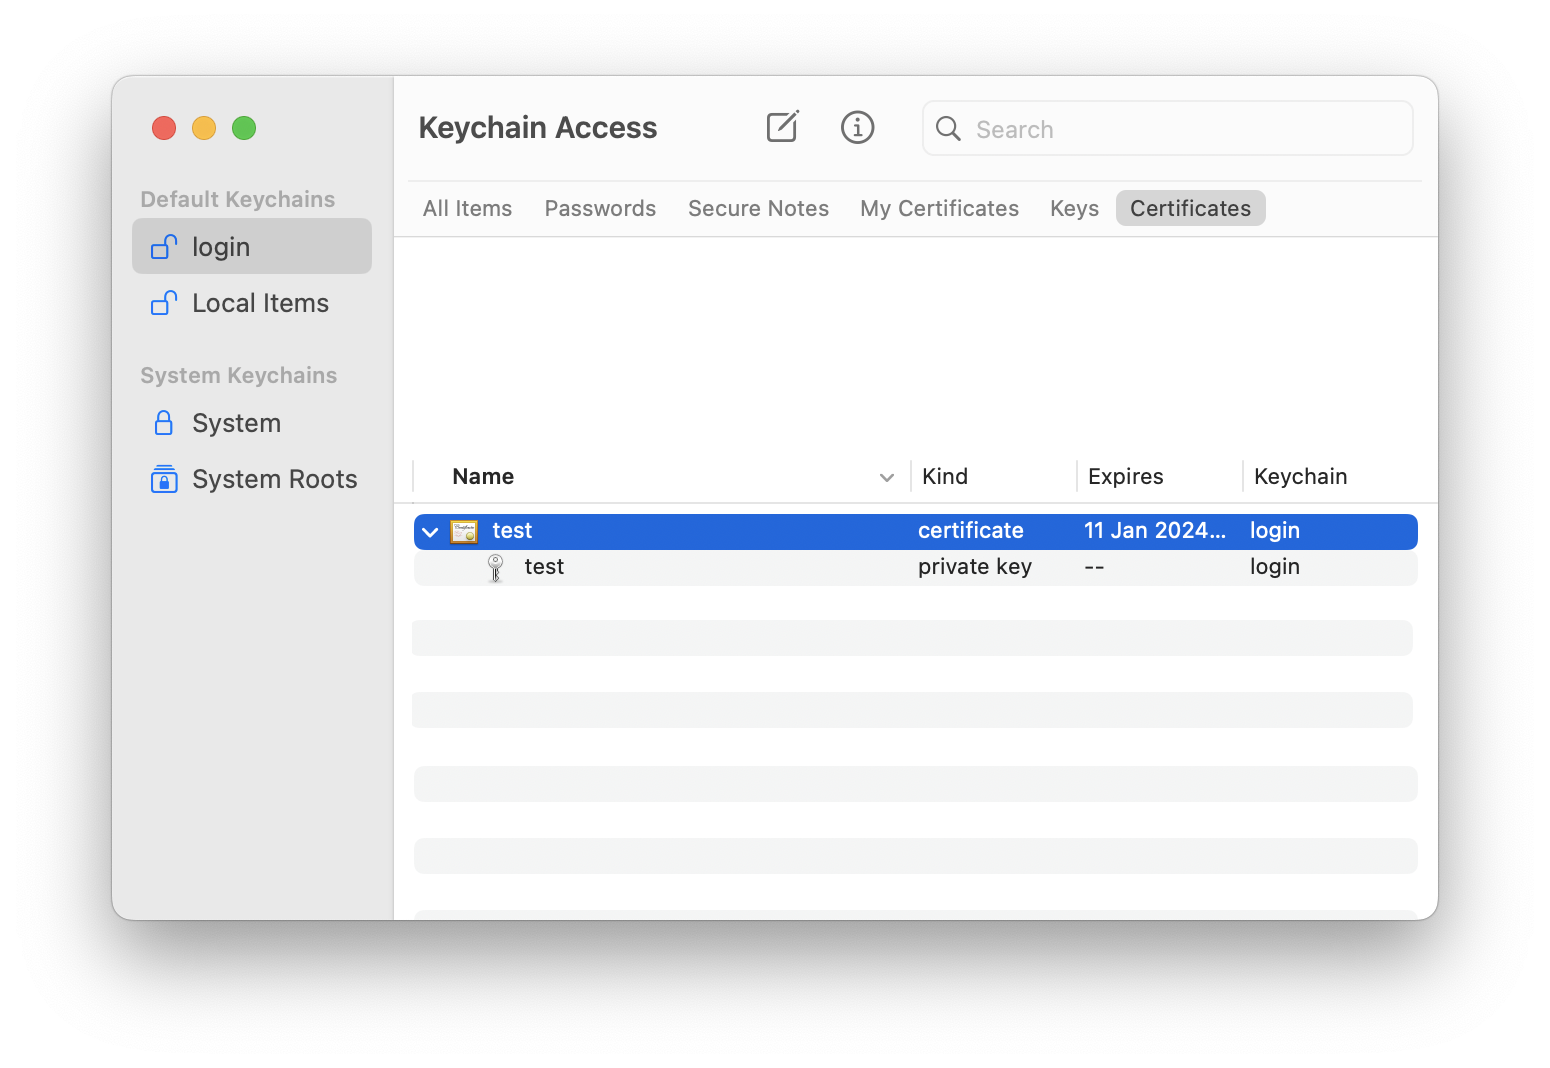
Verify that the new certificate is listed in your login keychain and appears as in the following screenshot:
5.2. Generating a certificate on Windows
As in the CSR generation procedure above, you will need to use the Windows IIS feature to create your self-signed certificate.
Click on the Start menu and in your programs list search for the Windows Administrative Tools folder and launch Internet Information Services (also called IIS)
Once IIS is started, locate the Server Certificate control panel in the center window
From the right-side Actions menu, click Create Self-Signed Certificate. The Create Self-Signed Certificate wizard will open in a new window
Write the chosen name and then click OK to validate
Click OK. You should now see your generated file in the list of Self-Signed Certificates
💡 Note that by default, self-signed certificates on both macOS and Windows have an expiration date of one-year.
6. Installing a certificate
If you followed all of the previous steps in this guide, you should now be in possession of a valid signing certificate. The last thing you need to do with your certificate before actually signing profiles is to install it in your computer certificate store – Keychain on macOS, and Windows Certificate Store on Windows. From there, signing tools can access it in a secure manner.
6.1 Installing a certificate on macOS
Using Finder, double-click the certificate file
The Add Certificate window will appear. Click Install Certificate
Choose a Keychain. Certificates are typically stored in the login Keychain
You will be asked to verify your password to modify the Keychain. Enter your password and click Modify Keychain
The certificate should now be added to the Keychain as in the following screenshot:
6.2 Installing a certificate on Windows
Using File Explorer, double-click the certificate file
Select the type of account (here you can leave the default one) and click Next
If the path to the certificate is not already entered, enter it. Then click Next
Select a Store (if you are not sure keep the default location) and click on Finish
The certificate should now be added to the Window Certificate Store.
7. Signing profiles
7.1. Signing Profiles with iMazing Profile Editor
iMazing Profile Editor lets users create and edit Apple configuration profiles with a friendly user interface instead of manually coding them in XML. The app also features an integrated signing tool, so a separate one is not necessary, making signing your profiles as easy as simply saving them.
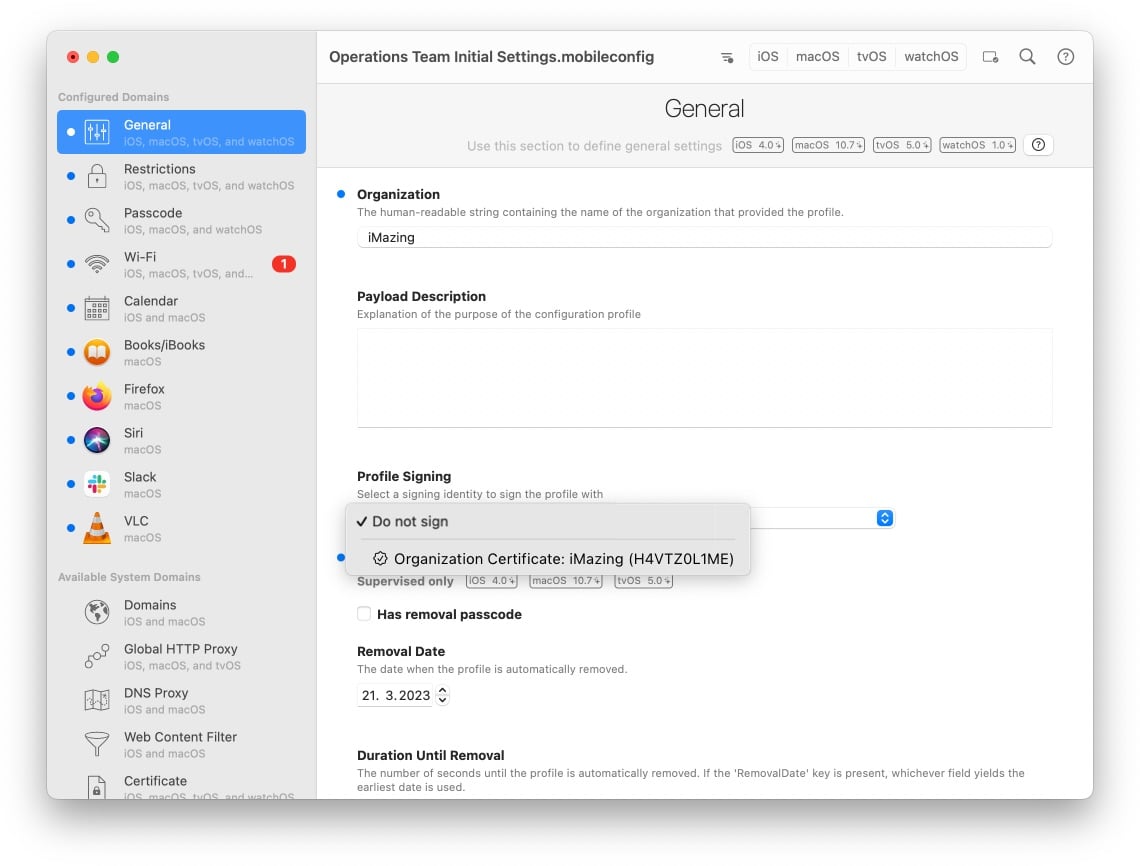
To sign a profile with the app, first select the correct certificate (or signing identity) in the Profile Signing field of the General section of the profile. Then save the profile. The profile will be saved and signed with the selected certificate.
💡 Tip: On macOS, you will have to enter your credentials in order to grant iMazing Profile Editor access to the identity in Keychain. Click Always Allow if you foresee using an identity multiple times and wish to skip the credentials prompt in the future.
The certificate is now also set in the profile and will be used for future save operations as well. This is also true for already-signed profiles loaded from the drive as long as the certificate that was used to sign them is still available in the computer certificate store.
A quick word about the Signing Identity terminology – a signing identity is simply a certificate that contains a private key in addition to a public one. Only such certificates can sign documents, and because of that only such certificates from your computer certificate store (Keychain on macOS and Certificate Store on Windows) will appear in the Profile Signing field. All of the instructions in this guide were for generating such certificates.
For more information about using iMazing Profile Editor, visit our Getting started with iMazing Profile Editor click here guide.
💡 Tip: Users of iMazing Configurator who use a blueprint to push profiles, can have those profiles signed on the fly by ticking the checkbox Sign profiles with organization identity in the Profiles section of the blueprint editor.
7.2. When using Apple Developer Program certificates on Windows
Users who sign their profiles on Windows should have Apple's root certificate installed because it is required in order to establish a complete trust chain. On Apple devices, that certificate comes preinstalled. However, on Windows it naturally doesn't. Download and install the following certificate from the Apple PKI page:
- Apple Inc. Root
To install the certificate on Windows follow the steps for Installing a certificate on Windows, but instead of the default certificate store choose Trusted Root Certification Authorities (you may also use the Intermediate Certification Authorities store if you don't want to fully trust the certificate on your computer).
7.3. When using certificates that require intermediates
In section 2.1 Apple Developer Program we discussed the necessity for intermediate certificates when using Apple Developer Program certificates other than Developer ID Application, so that profiles appear as verified. Choose one of the following two options to address this and make profiles appear as verified when using those certificates:
Include the intermediate certificates in the profile signature, forming a chain of trust. iMazing Profile Editor does this automatically for you if you have the intermediate certificates installed in Keychain on the Mac or in the Windows Certificate Store on Windows.
Install the intermediate certificates on any device which your profiles are going to be installed on. This can be done with a separate configuration profile containing the certificates in Certificate payloads and installed ahead of your main profile.
The necessary intermediate certificates of the Apple Developer Program are available for download from the Apple PKI page. That page generally lists many of the company's root and intermediate certificates, but the exact ones that you need as discussed above are as follows:
- Worldwide Developer Relations – G1
- Worldwide Developer Relations – G3
- Worldwide Developer Relations – G4
- Developer ID – G2
To install the certificates follow the steps for Installing a certificate that are appropriate to your operating system. Windows users should not use the default certificate store and instead choose Intermediate Certification Authorities.
8. Identifying profile signatures
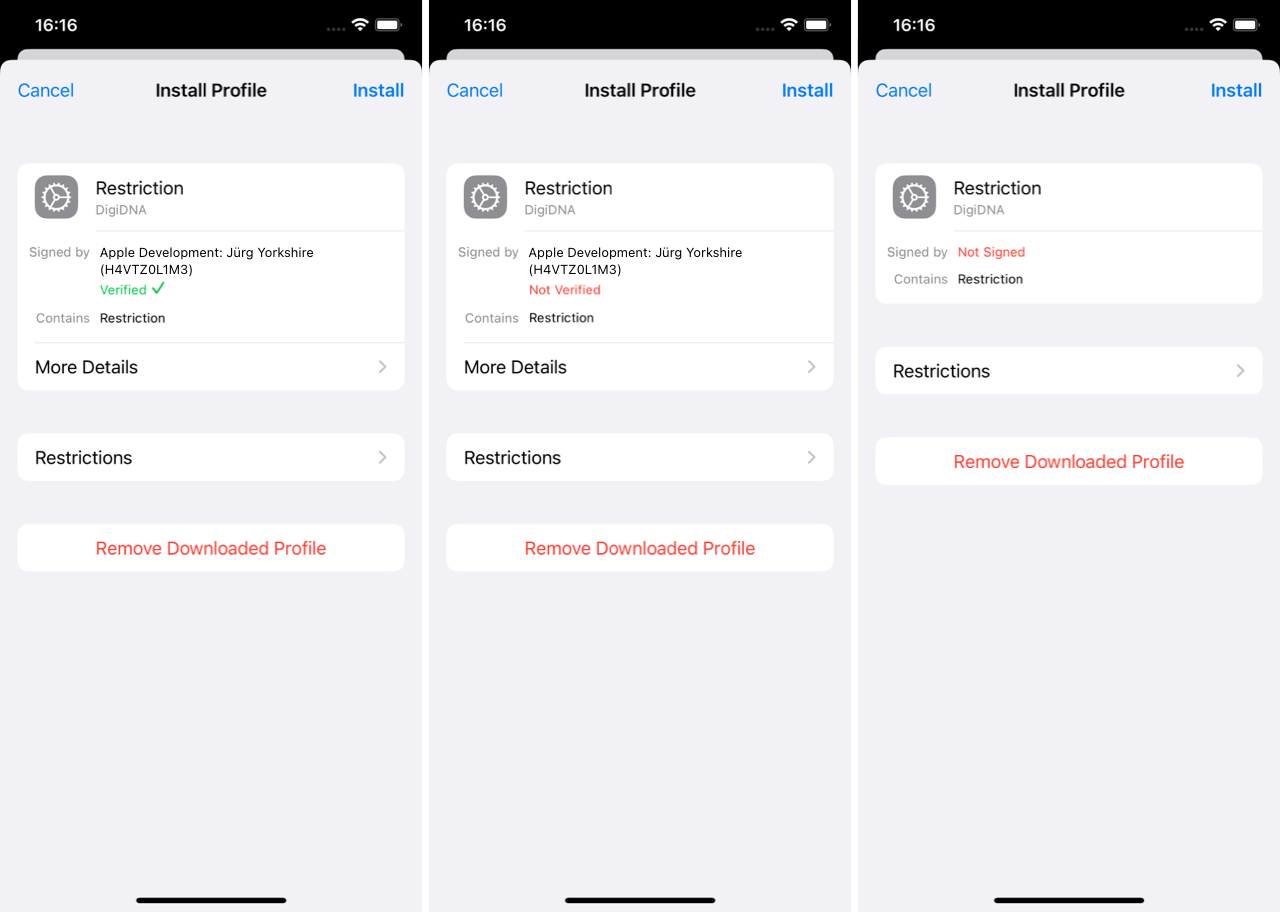
The following screenshots show the prompts that users see during interactive installation of three different profiles on iOS (the same principles below apply to profiles deployed on macOS as well).
On the left, a profile that has been signed with a trusted certificate issued by a third party certificate authority. The Signed by item indicates the name of the certificate used to sign the profile. Interestingly, prior to iOS 18 and macOS 15, this would be joined by a green Verified label and check mark but those have since been removed.
In the center, another signed profile but this one was signed with a certificate for which a trust chain could not have been established. This could have been a self signed certificate or an Apple Developer Program certificate for a device which lacks the certificate's intermediates. As can be seen, the signature is marked with a red Not Verified label.
Lastly on the right, a profile that has not been signed at all and is marked as so accordingly with a Not Signed label.
Signature status of profiles can also be checked after installation. To check, open the Settings app and navigate to General > VPN & Device Management > Configuration Profiles.
For each profile in there, you will see similar labels describing the installed profile's signature.
9. Exporting a certificate (identity)
If you want to export your signing identity (certificate and its private key) in PKCS #12 format (.p12 or .pfx), it is possible using the macOS Keychain or Windows Certificate Store.
9.1 Exporting a certificate using macOS Keychain
- Launch the Keychain Access App and locate the certificate to export
- Right-click on the certificate to export and select Export "[your certificate name]"...
- Name the file to export, choose a directory where to save the file, choose a
.p12as the file format at the bottom of the window and click Save - Enter a strong password to protect the identity (which contains the certificate and its private key) and click Save
The certificate should have now been successfully exported in the chosen format.
9.2 Exporting a certificate using Windows Certificate Store
- Click the search box on your taskbar and type manage user certificates
- Click on Manage user certificates in the results
- Locate the certificate that you would like to export. It would typically be located in the Certificates > Personal > Certificates store
- Right-click on the certificate and select All Tasks > Export...
- Click Next in the first screen
- In the Export Private Key screen select Yes, export the private key and click Next
- In the Export File Format screen select Personal Information Exchange if it is not already selected, leave the default checkboxes ticked, and click Next
- In the Security screen tick the Password: checkbox, enter a strong password to protect the identity (which contains the certificate and its private key) and click Next
- In the File to Export screen name the file and click Next
- In the last screen click Finish
The certificate should have now been successfully exported in the chosen format.
10. Importing a certificate (identity)
To import a PKCS #12 into your system certificate store, double click the .p12 or .pfx file and follow instructions. You will have to enter the password that was defined when the certificate was exported.

Related Articles
- This guide for iMazing Version 2.
- Getting started with iMazing Profile Editor
- How to Get App Bundle ID, Team ID, and Code Requirement
- Getting started with iOS configuration profiles
- iMazing Profile Editor: Working with Custom Manifests
- Understanding Supervision, MDM, ADE (DEP), and Volume Purchase (VPP)
- Apple Device Management Glossary
Support Center
Enterprise License Information Request
Thank you! We'll be in touch shortly.