Device connection issues fall into two categories: USB connection issues and Wi-Fi connection issues. Always troubleshoot USB first. Wi-Fi requires pairing your device with your computer via USB.
USB and Wi-Fi issues can sometimes also affect iTunes or Finder on macOS. iMazing includes the necessary Apple drivers and installs them automatically. If connecting via iTunes also fails, the problem is likely at the system level rather than with iMazing.
If iMazing does not detect your device over USB, follow the steps below for your platform and device type.
Note: Starting with the 2018 iPad Pro, some Apple devices use a USB-C port instead of Lightning. If iMazing does not detect your USB-C device, the cable you are using may not support data transfer. Use the cable that came with your device, or any data-transfer-capable USB-C cable.
On Mac
iPhone, iPad, and iPod touch
Restart your device and computer.
Unlock your device using your passcode, Face ID, or Touch ID.
Try a different USB port and cable. If you normally connect through a USB hub, connect your device directly to your computer instead.
Check for macOS updates: System Settings > Software Update. System updates sometimes include driver fixes that resolve connection issues.
On your iPhone or iPad, go to Settings > General > Transfer or Reset iPhone > Reset > Reset Location & Privacy. Enter your passcode when prompted.
Check your third-party security software. Antivirus or firewall tools can block iMazing from communicating with your device. Temporarily disable any such software to test whether it is the cause.
Tip: If none of the steps above resolve the issue, contact iMazing support and mention that you have already followed these steps.
iPod nano and iPod classic
Restart your device and computer.
Try a different USB port and cable. If you normally connect through a USB hub, connect your device directly to your computer instead.
Enable Disk Use in Finder or iTunes:
Open Finder (macOS Catalina or later) or iTunes (macOS Mojave or earlier) and confirm your iPod appears.
Select your iPod and check Enable Disk Use.
Restart iMazing. Your iPod should appear after a few seconds.
Important: iPod Shuffle is not supported on macOS. Use a Windows PC to connect an iPod Shuffle to iMazing.
Tip: If none of the steps above resolve the issue, contact iMazing support and mention that you have already followed these steps.
On Windows
iPhone, iPad, and iPod touch
Restart your device and computer.
Try a different USB port and cable. If you normally connect through a USB hub, connect your device directly to your computer instead.
Reinstall Mobile Device Services from iMazing's preferences: Edit > Preferences > General > Reinstall Mobile Device Services.
Check your security software. VPN clients, firewalls, and antivirus tools can prevent iMazing from detecting Apple devices. Whitelist the following, or temporarily disable your security software:
If none of the steps above resolve the issue, contact iMazing support and mention that you have already followed these steps.
Wi-Fi connection issues
Wi-Fi connections between iMazing and your device rely on mDNS for device discovery over the local network. If you have not yet confirmed that your device connects via USB, start with section 1 above.
If your computer is connected to your local network via ethernet, additional configuration may be needed for device discovery to function. See this Apple Discussions thread for more information.
First steps
Work through these steps in order. Most Wi-Fi connection issues are resolved at this stage.
Connect your device via USB, wait a few seconds, then disconnect. This resets the connection state and resolves most detection issues.
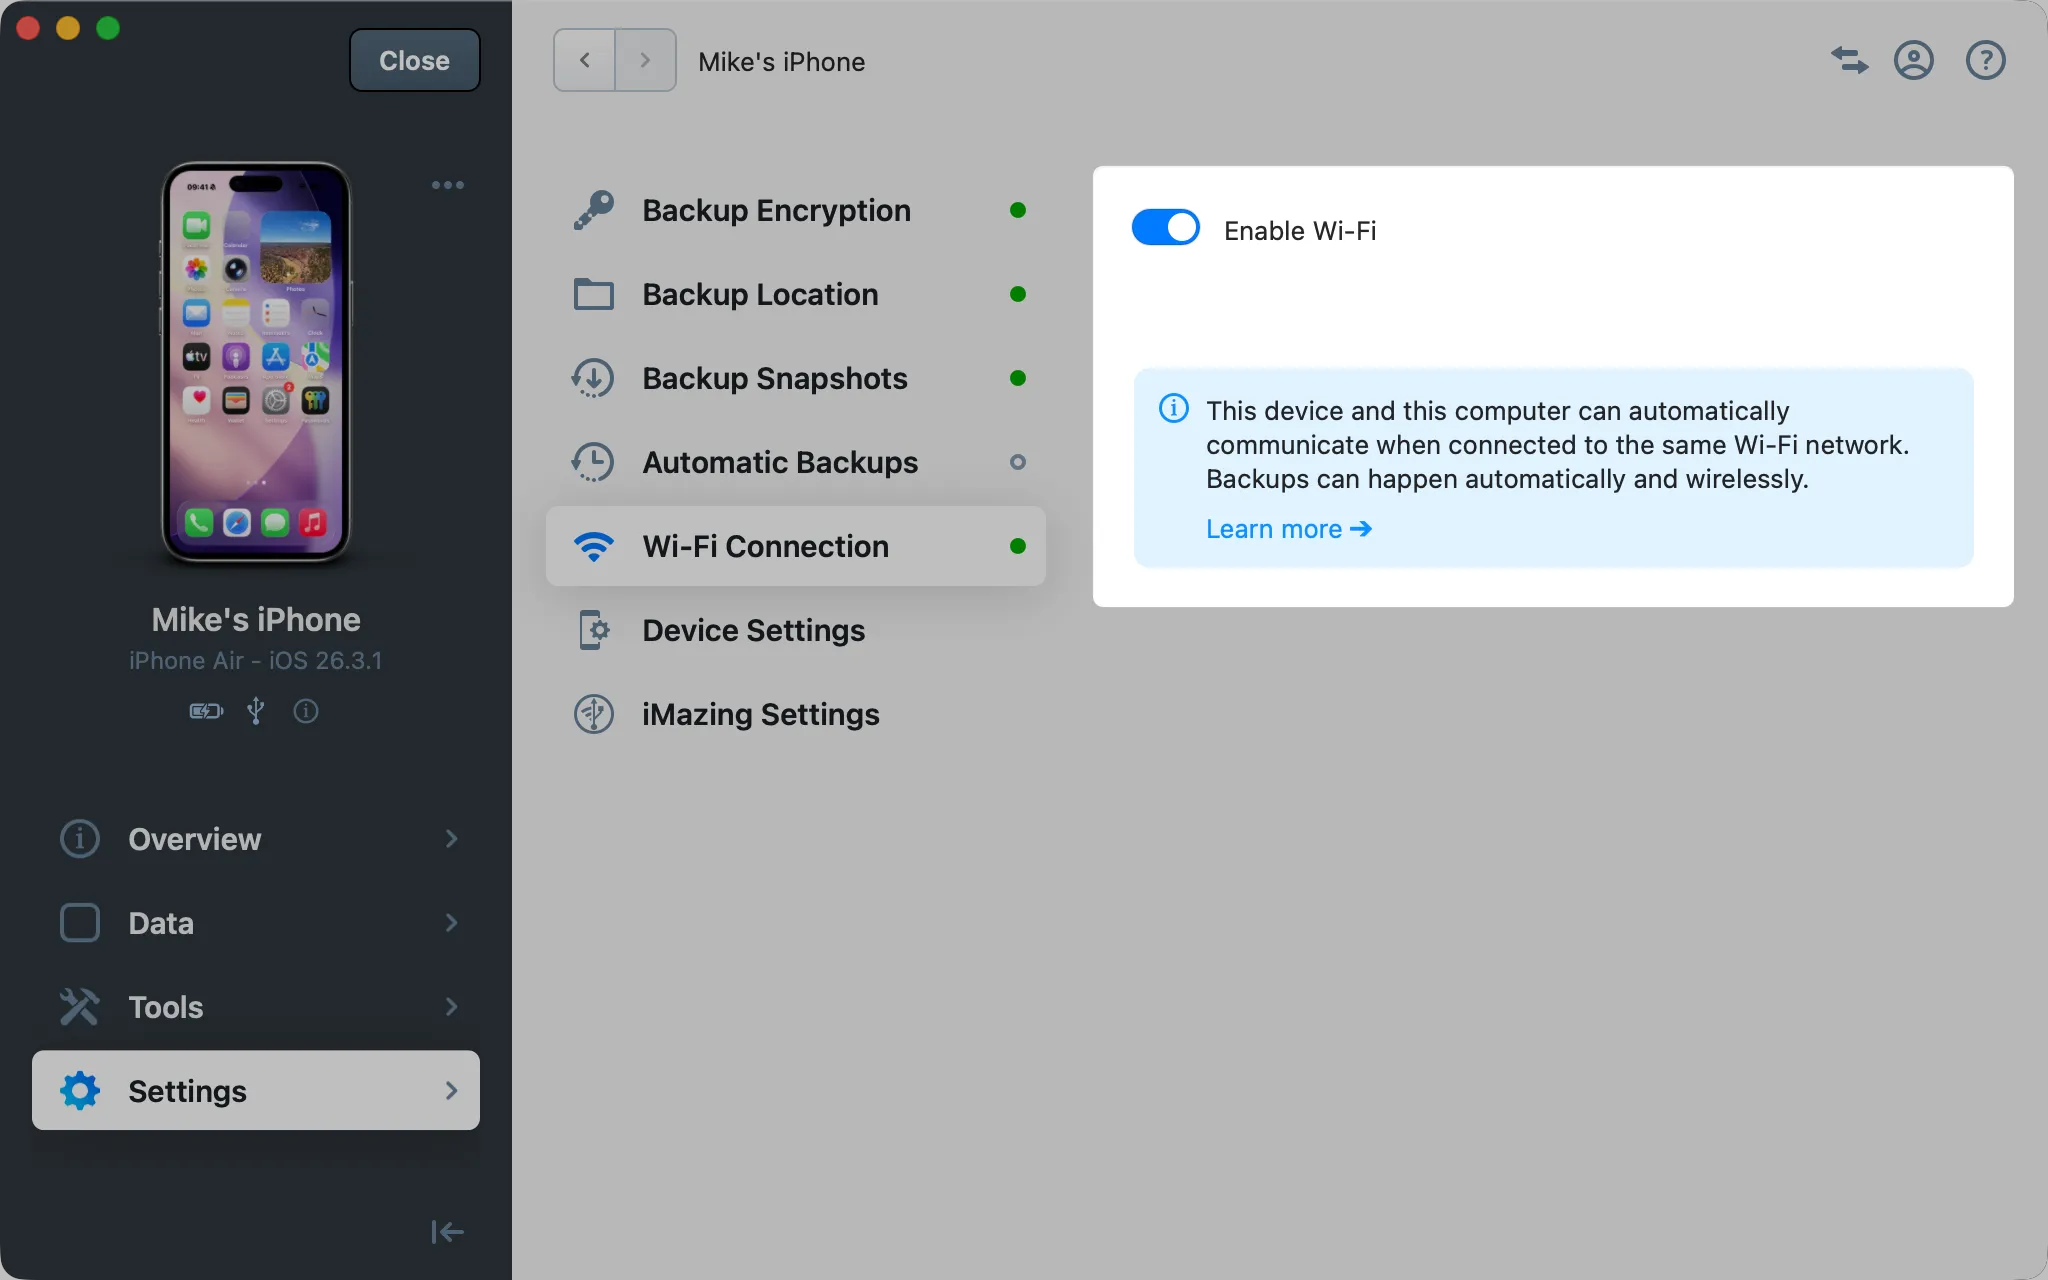
Verify that Wi-Fi Connection is enabled for your device. In iMazing, connect your device via USB, select it, and go to its Settings section. Find Wi-Fi Connection and disable, then re-enable it.
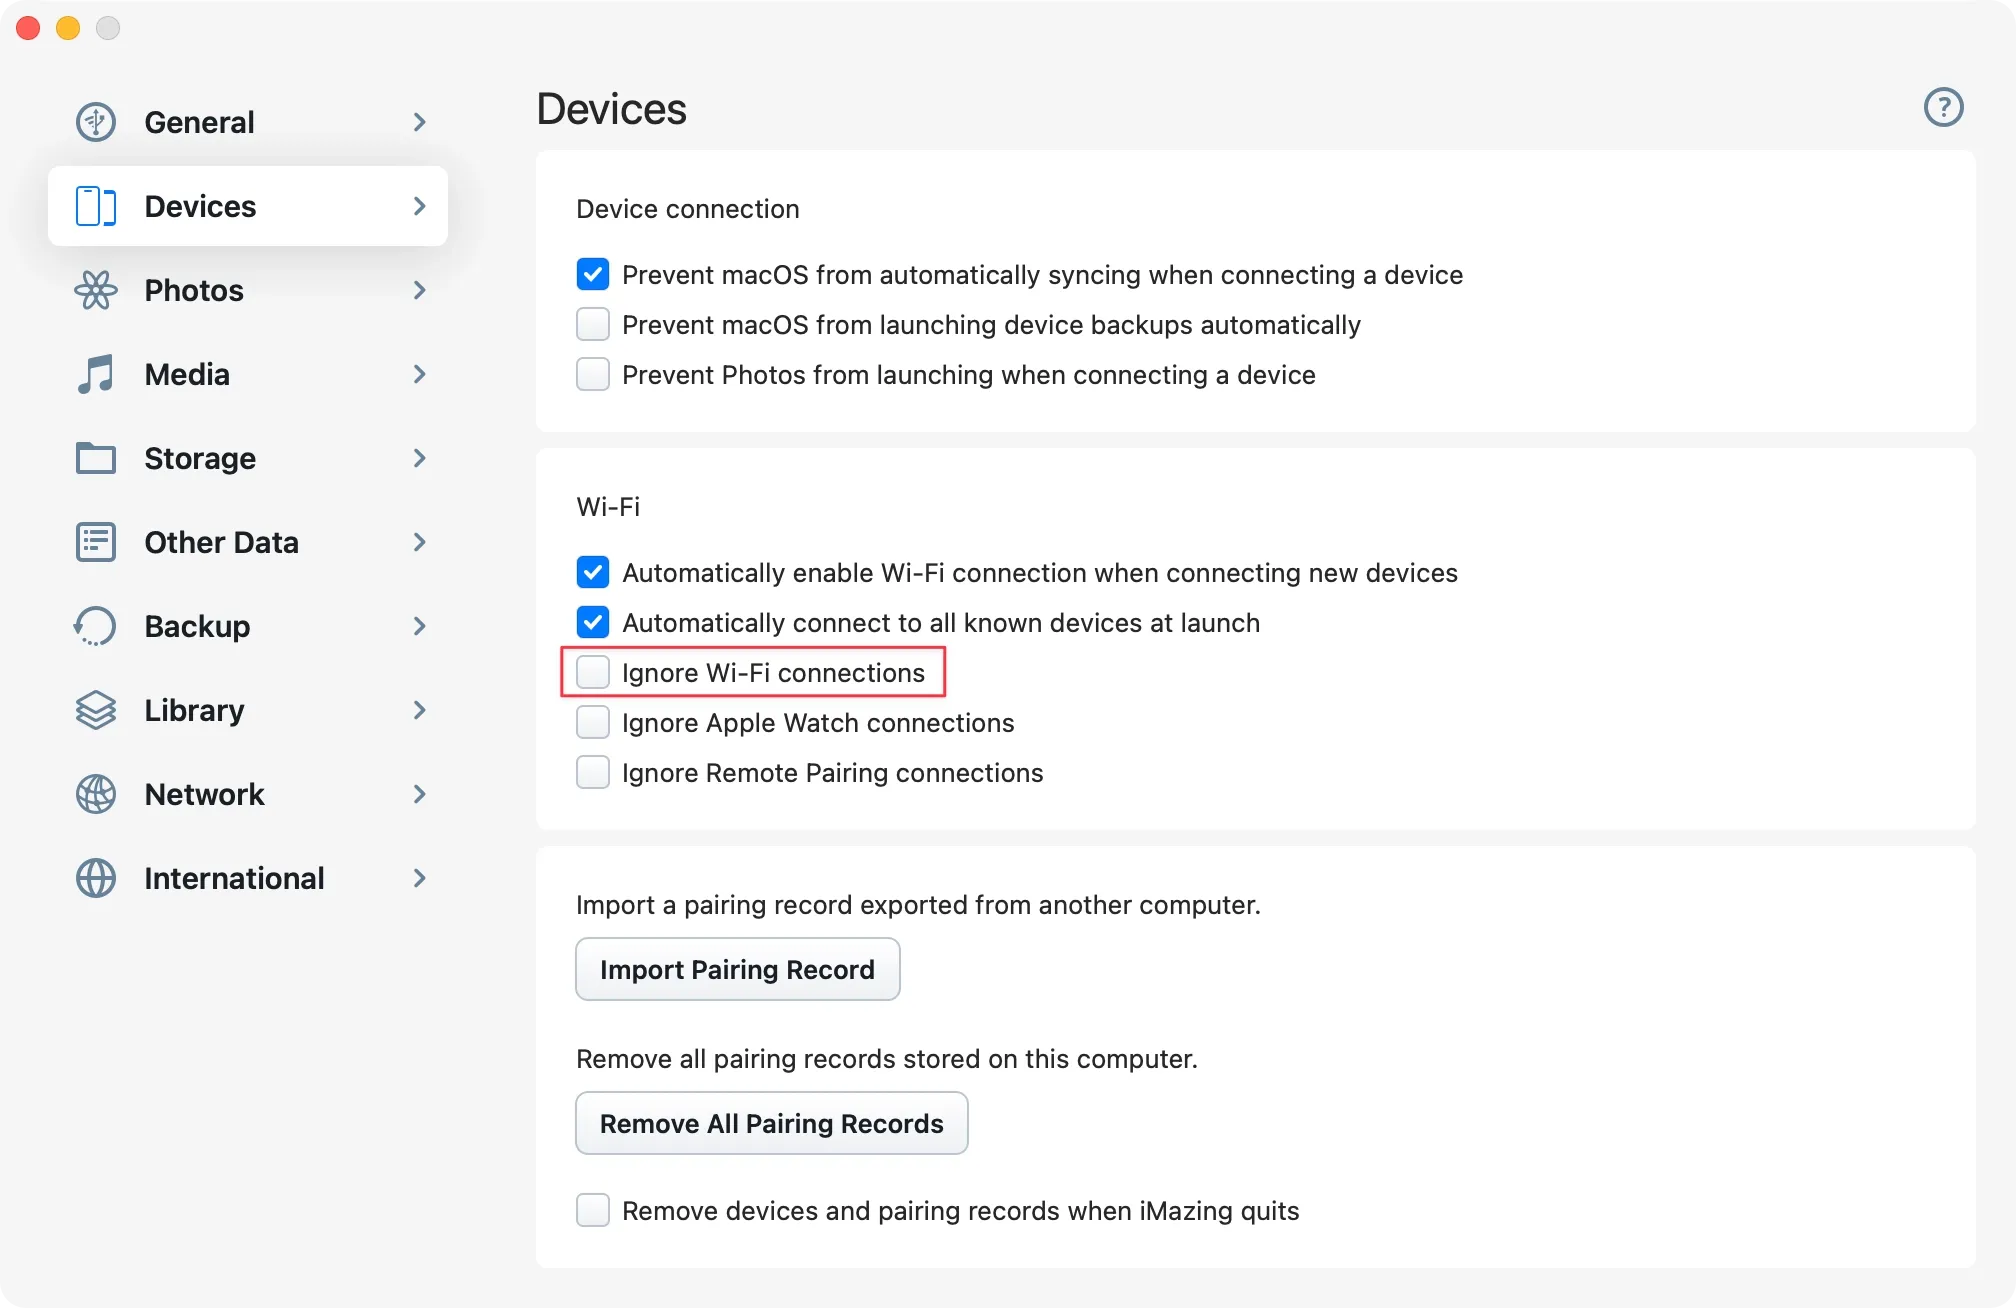
In iMazing Preferences, make sure Ignore Wi-Fi Connections remains unchecked.
Confirm that your device and your computer are on the same Wi-Fi network and subnet.
Turn Wi-Fi off and back on on your device and computer. Make sure they reconnect to the correct network.
In some cases, turning off the iOS Private Wi‑Fi Address option may also help (iOS Settings app > Wi‑Fi > Select Wi‑Fi network > Private Wi‑Fi Address > Select Off). Then connect your device via USB so iMazing can acquire the new address.
Restart your Wi-Fi router.
Restart your device, restart your computer, and relaunch iMazing.
If a VPN is active on your device, disable it: Settings > VPN.
macOS
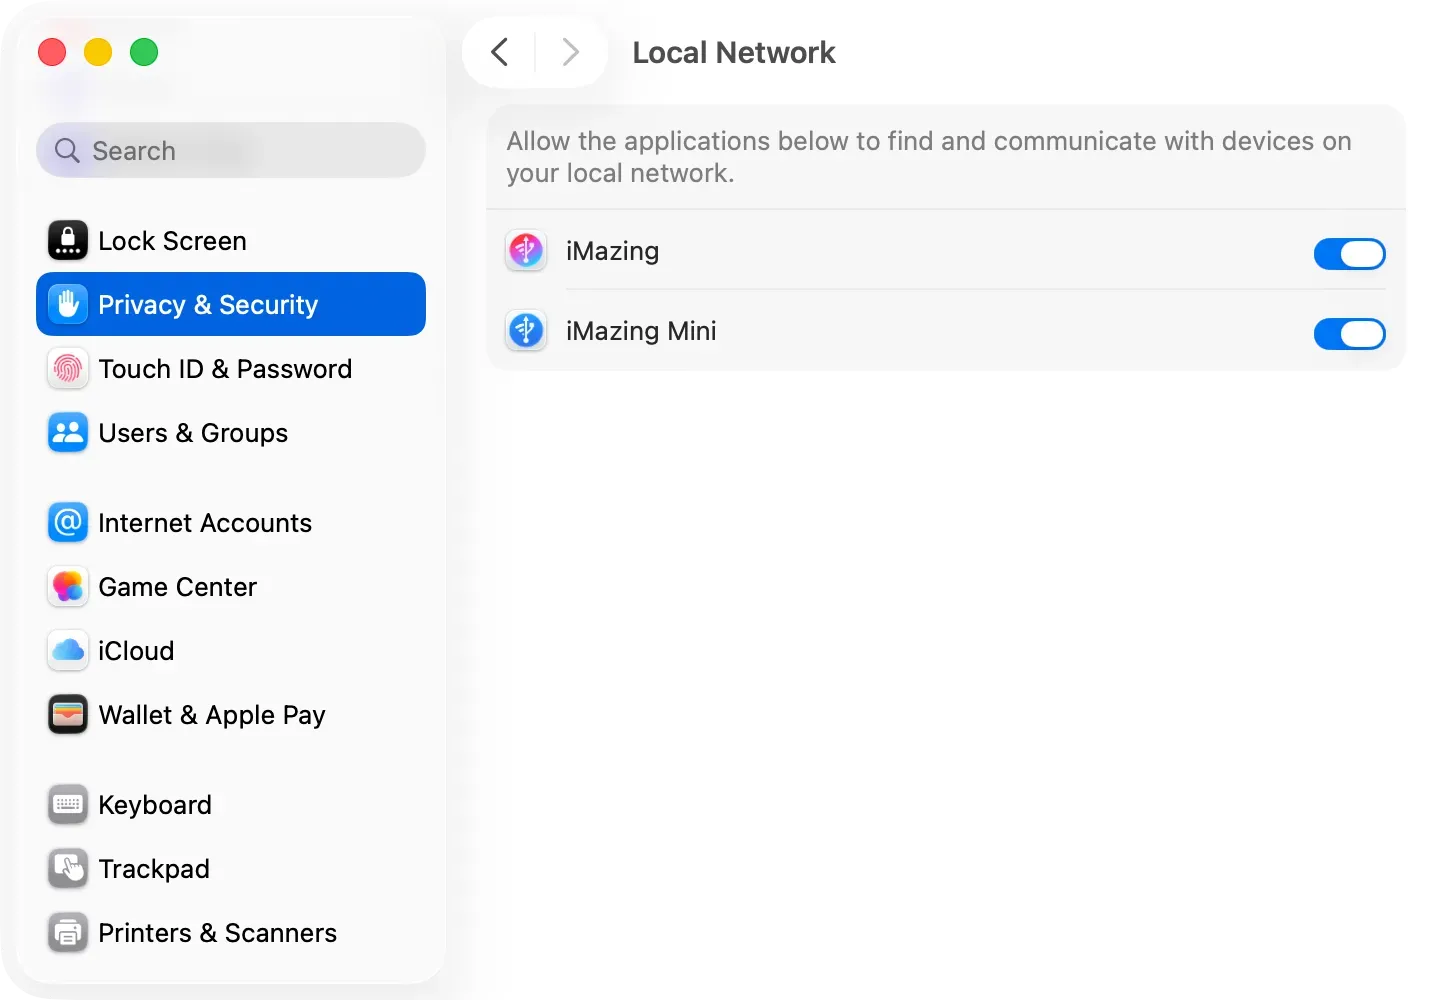
Important: On macOS Sequoia 15 or later, go to System Settings > Privacy & Security > Local Network and allow iMazing and iMazing Mini to communicate with devices on your local network.
Windows
If your device is still not detected via USB or Wi-Fi, reinstall Apple Mobile Device Services: Edit > Preferences > General > Reinstall Mobile Device Services.
If you’re using Windows 7 or 8, make sure Apple's Bonjour package is installed. Download Windows 64-bit or Windows 32-bit. Bonjour is not needed on Windows 10 and 11. (The iMazing installer should install it automatically on Windows 7 or 8.)
If you're using Windows 10 or 11, uninstall Bonjour. Windows 10 and 11 support mDNS natively, and installing Bonjour can cause conflicts and other issues.
If the issue persists, the Windows ARP cache may be corrupted. Follow the steps in Clear and Refresh the ARP Cache to reset it.
System firewall
iMazing requires incoming connections to function correctly. Check your firewall settings if the steps above did not resolve the issue.
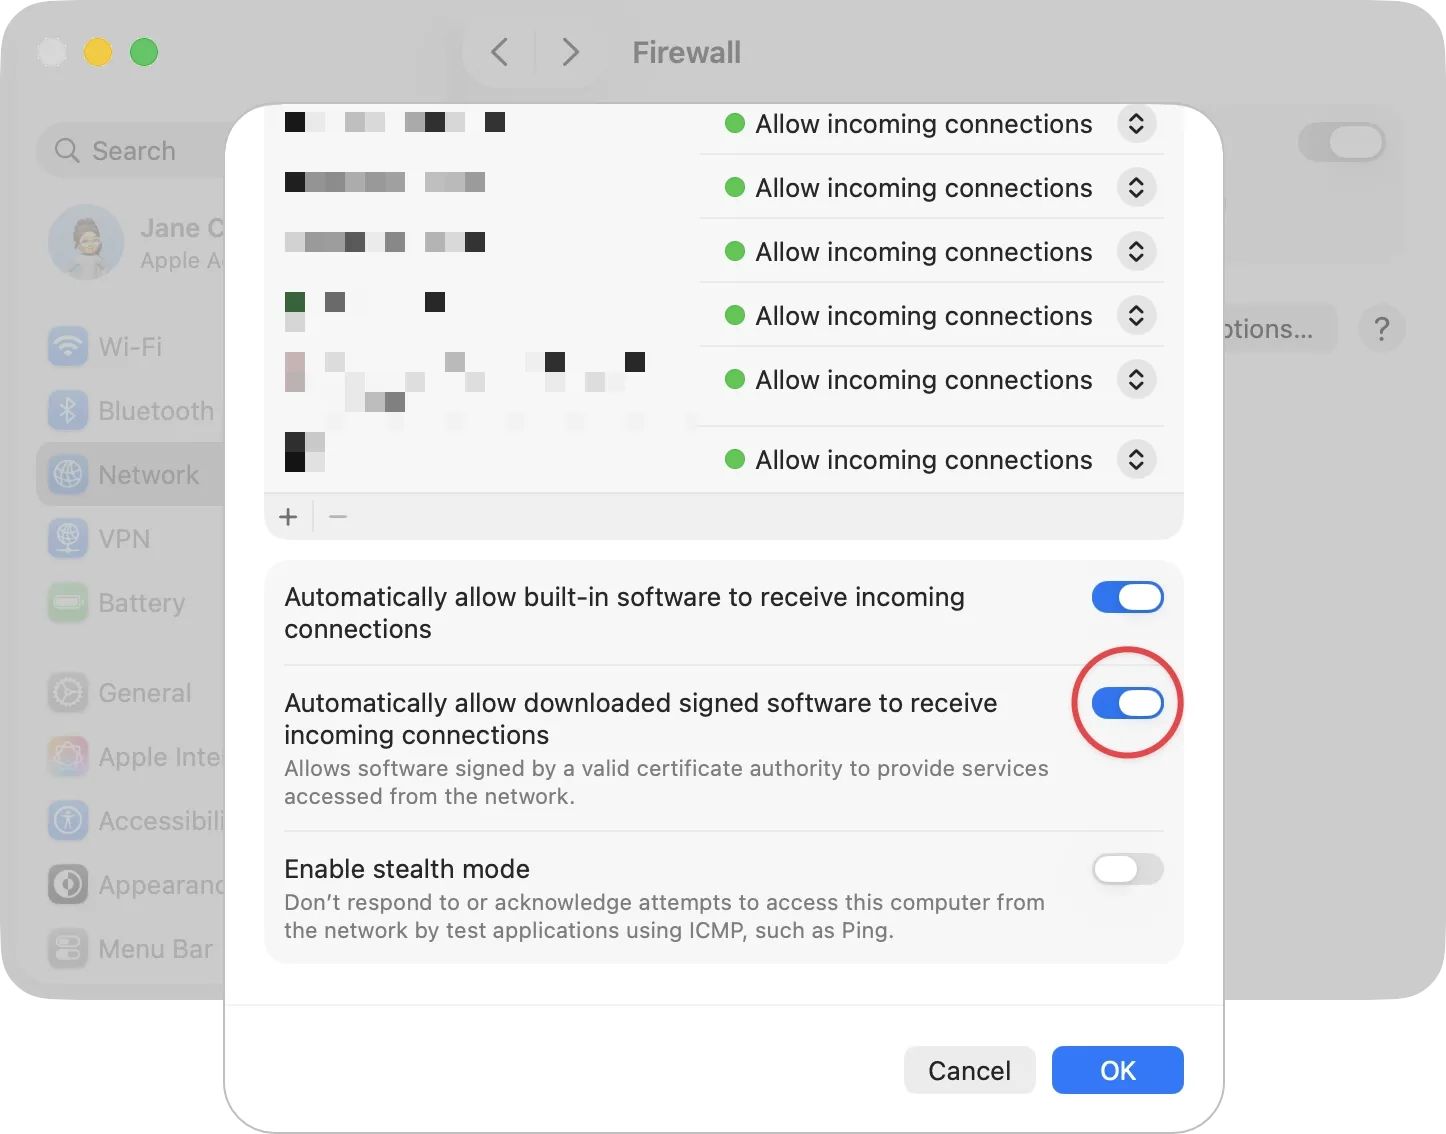
macOS
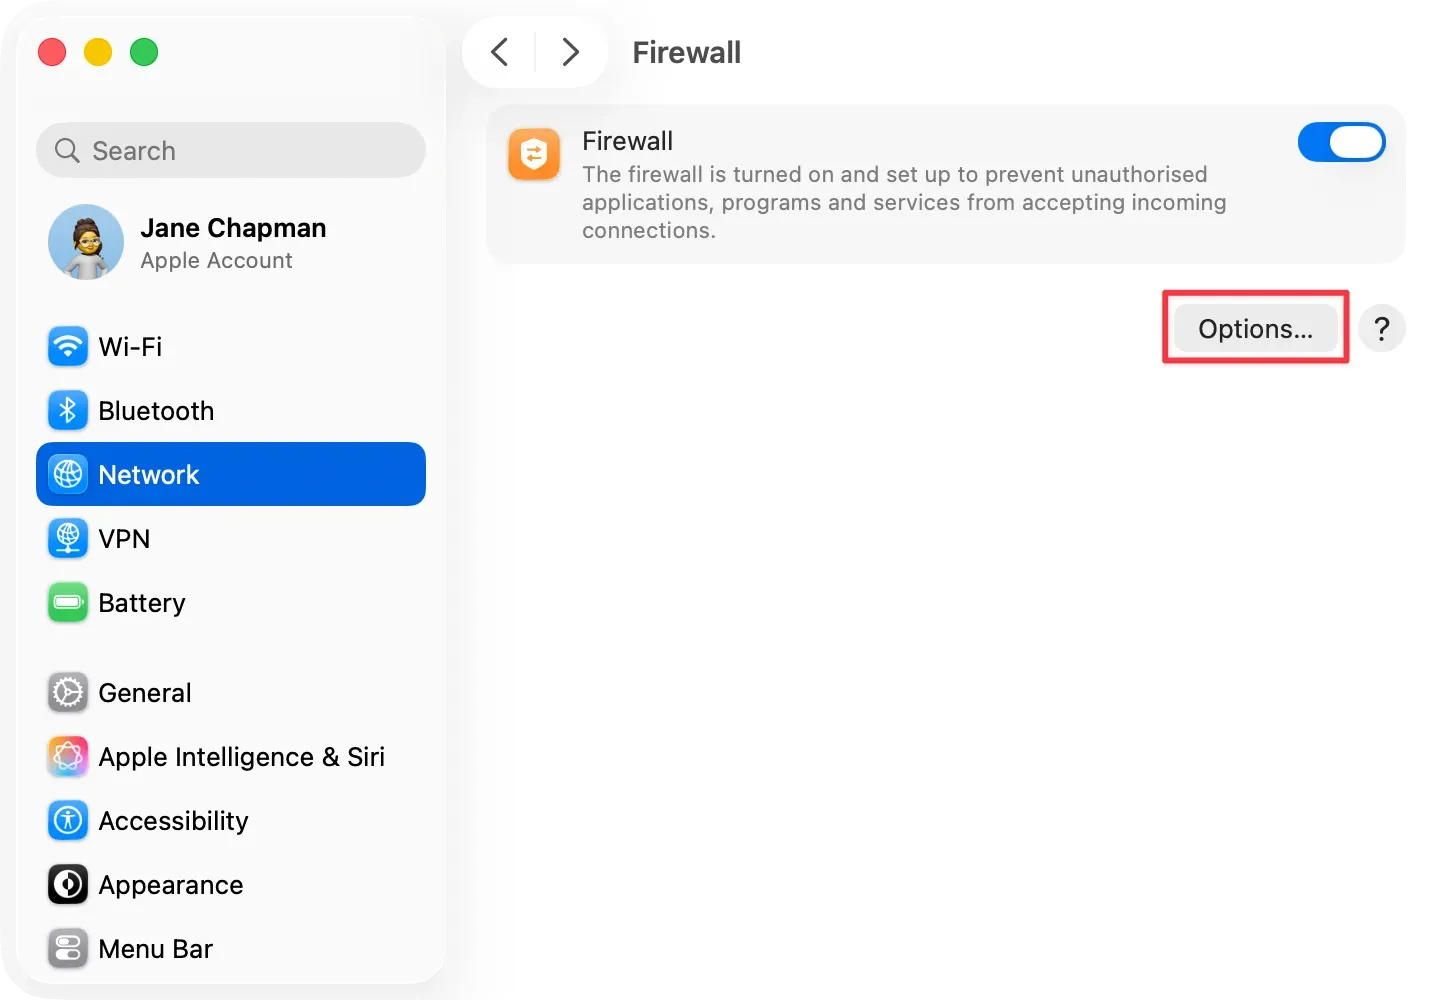
Open System Settings > Privacy & Security > Firewall.
Click Options to open the firewall rules.
Enable Automatically Allow Signed Software to Receive Incoming Connections.
If you prefer not to enable this option, add iMazing and iMazing Mini to the allowed apps list manually.
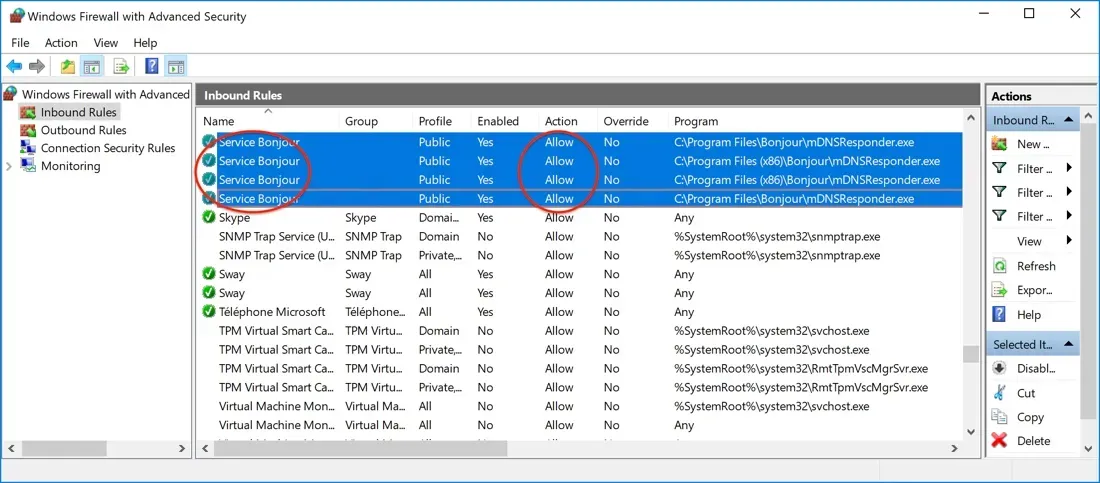
Windows 7 and 8
Apple's Bonjour package is required on Windows 7 and 8 to support mDNS for device discovery over the network.
Open Windows Security (search in the Start menu, or go to Settings > Privacy & Security > Windows Security).
Click Firewall & network protection.
At the bottom of the page, click Advanced settings. This opens the Windows Defender Firewall with Advanced Security interface.
Select Inbound Rules in the left panel and confirm that Apple's Service Bonjour rules are enabled and set to Allow.
Select Outbound Rules and confirm that Service Bonjour rules are also enabled and set to Allow.
Windows 10 and 11
mDNS for device discovery over the network is natively supported by Windows 10 and 11. However, make sure that the inbound mDNS (UDP-In) rules are enabled.
Open Windows Security (search in the Start menu, or go to Settings > Privacy & Security > Windows Security).
Click Firewall & network protection.
At the bottom of the page, click Advanced settings. This opens the Windows Defender Firewall with Advanced Security interface.
Select Inbound Rules in the left panel and confirm that mDNS (UDP-In) rules are enabled and set to Allow.
Select Outbound Rules and confirm that mDNS (UDP-In) rules are also enabled and set to Allow.
Tip: Press Windows + R, type wf.msc, and press Enter to open the advanced firewall interface directly.
Note: On Windows 10, or if you prefer the legacy path, go to Control Panel > System and Security > Windows Defender Firewall, then click Advanced settings.
Third-Party security software
Antivirus suites, VPN clients, and traffic monitoring tools can interfere with device discovery over the local network via mDNS. On macOS, apps like Little Snitch are a common cause. On Windows, any tool that filters network traffic may block Bonjour.
Add the following to the whitelist of any third-party security software installed on your computer:
iMazing
iMazing Mini
Apple Bonjour (Windows 7 and 8)
Apple Mobile Device Services (Windows)
Note: ACDsee Mobile Sync is known to cause connection issues in iMazing Mini due to a non-standard Bonjour implementation. If you have ACDsee Mobile Sync installed, quit it and test the connection again.
Advanced router and firewall settings
Check the following in your router and firewall if the issue persists.
Open ports: Confirm that TCP ports 123 and 3689, and UDP ports 123 and 5353 are open. These are open by default, but corporate or custom network configurations may block them.
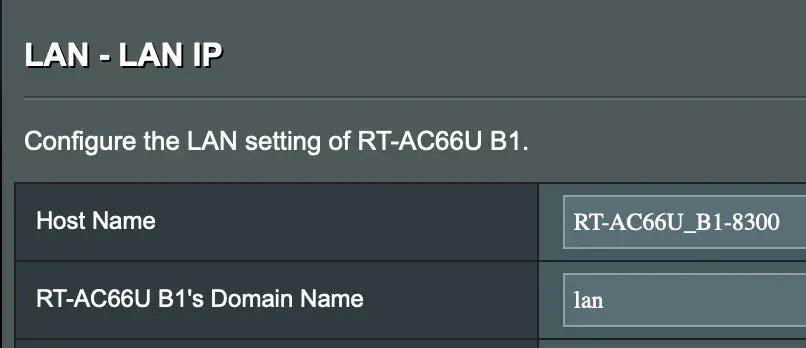
Subnet name conflict: Some routers come preconfigured with a local subnet named .local, which conflicts with Bonjour's mDNS hostname resolution. Rename the subnet to lan to resolve the conflict.
WPA3: Some routers do not support WPA3 reliably, which can cause connection failures. If WPA3 is enabled on your router, switch to WPA2 and test again.
Inter-device communication: Some routers include a setting that prevents devices on the same network from communicating with each other. Make sure this option is disabled.
Verify Bonjour with a browser: Install a Bonjour browser on your computer to confirm that your network supports mDNS discovery:
Launch the browser and verify that your device appears in the list. If it does not appear, temporarily disable your router's firewall to test, or proceed to the next section.
Enterprise and mesh Wi-Fi networks
iMazing uses mDNS (multicast Domain Name System) to discover devices over Wi-Fi. Mesh and enterprise networks often block or limit mDNS traffic, which prevents device discovery.
Check the following:
Confirm that your network supports Multicast DNS (mDNS). Bonjour cannot function without it.
If your network uses IGMP snooping, try disabling it. See What Is IGMP Snooping for background.