Safely wipe your iPhone or iPad before trading it in or reselling it
Updated on Mar 9, 2026
Reading time ~7 minutes
When you upgrade to a new iPhone or iPad, you may want to sell or give away your old device, or pass it on to a friend or family member. When you do this, you need to make sure that the device is erased so the new user can't access any of your data. At the same time, you need to ensure that you can transfer your existing data to the new device. These operations are simple, but it's important to prepare for the change.
Your entire iPhone or iPad is encrypted; all the data is protected, and only when you unlock the device can you access any of it. As such, erasing the device - as we explain below - ensures that no one can access the data. There is no need to use apps that claim to "fully erase" the device, since all the data that remains is inaccessible because of this encryption. In addition, these apps cannot access the file system, so they can't even erase all the data.
But iMazing can help you back up your device before wiping it, making sure that your backup does indeed contain all your data.
Here's how to safely wipe your iPhone or iPad before selling it:
- Launch iMazing on your computer and connect your device
- Back up your device
- Disable Find My iPhone
- Sign out from iCloud on the device
- Remove the device from your iTunes associated devices
- Remove the device from your Trusted Devices list
- Erase the device
- Check on iCloud.com that the device is no longer listed
- Remove the carrier lock, and check the ESN/IMEI/MEID
- Remove the SIM card
Before you begin
Always make sure you are running the latest iMazing version, to do so select Check for Updates from the iMazing menu, or just download the latest available version for your computer below.
Download and install iMazing
In-Depth Tutorial
Launch iMazing on your computer and connect your device
Download and install iMazing. Launch the app, and connect your device to your Mac or PC.
Back up your device
While you may back up your device to iCloud, it is much safer to also back it up to your computer. You can do this for additional protection, and if you have a local backup, this makes setting up the new device much faster (since you don't have to download everything from the cloud). You can use iTunes, but it's best to use iMazing to back up your device. It allows you to keep multiple backups, and you can check the backup for errors, and even browse the backup, in case the setup of the new device doesn't go smoothly, to extract data from it and copy it to the new device.
See this guide for full instructions on backing up your iPhone or iPad with iMazing.
And this one to learn how to browse your backup's contents.
Disable Find My iPhone
Find My iPhone allows you to find a lost or misplaced iOS device, or to remotely wipe it so no one can access your data. Before you can erase an iPhone or iPad, you must disable this.
Go to the Settings app, then tap your name near the top of the screen. Tap iCloud, then scroll down to Find My iPhone. If it is On, tap it and toggle the Find My iPhone setting off.
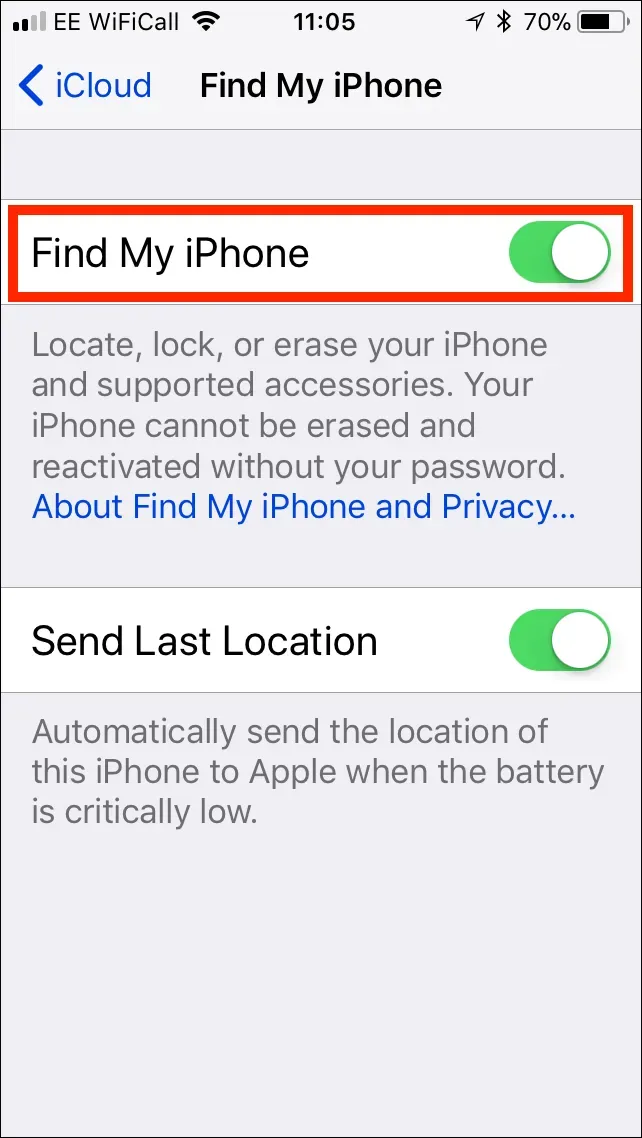
You'll need to enter the password associated with your Apple ID to disable Find My iPhone.
Sign out from iCloud on the device
Go to Settings, then tap your name at the top of the screen. Scroll down to the bottom of the next screen and tap Sign Out. You'll be asked for the password associated with your Apple ID.
Remove the device from your iTunes associated devices
Each device that you use is also added as one of your iTunes Associated devices. There is a limit of ten devices, five of which can be computers, that can be associated with your Apple ID for iTunes and other online content.
To remove a device from your associated devices on an iPhone or iPad, go to Settings, then tap your name near the top of the screen. Tap a device, then enter your Apple ID password and answer the security questions, if they are presented.
At the bottom of the device screen, tap Remove from Account.
If you want to remove a device using iTunes, do the following.
- Launch iTunes.
- Choose Account > View My Account. You'll be asked to enter your Apple ID password.
- In the iTunes in the Cloud section of your Account page, click Manage Devices.

- Click Remove to the right of a device's name.
Note that if you are unable to disassociate a device, you may need to wait a certain number of days. If this is the case, you may see a message saying, "This device is associated with another Apple ID. You cannot associate this device with another Apple ID for [number] days." You might need to wait up to 90 days to remove the device. iTunes tells you how many days you have to wait, if this is the case.
Remove the device from your Trusted Devices list
If you use Apple's two-factor authentication, your device might be considered a trusted device. If this is the case, you should remove it.
Go to AppleID.apple.com, and sign in. Click Password and Security, then, in the Manage your trusted devices section, tap Add or Remove Trusted Devices. Find your iPhone or iPad, then tap Remove.
Erase the device
If you're sure that you've backed up the device, and you've checked the backup for errors with iMazing, you can now erase the device. To do this, go to Settings > General > Reset, and tap Erase All Content and Settings.
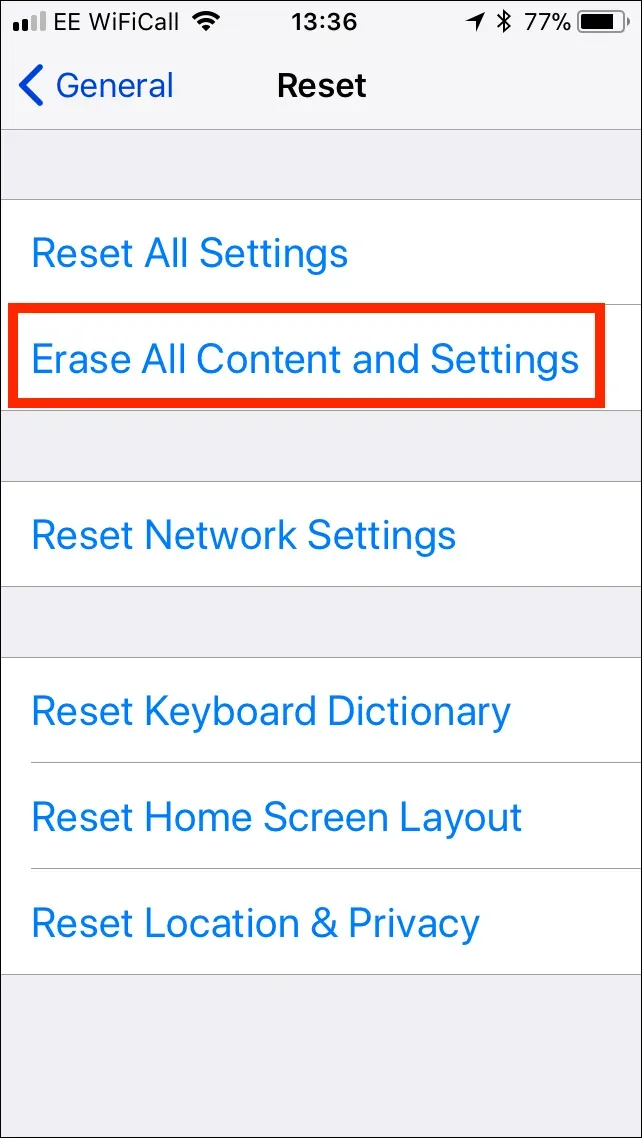
You'll need to enter your passcode to allow the device to erase.
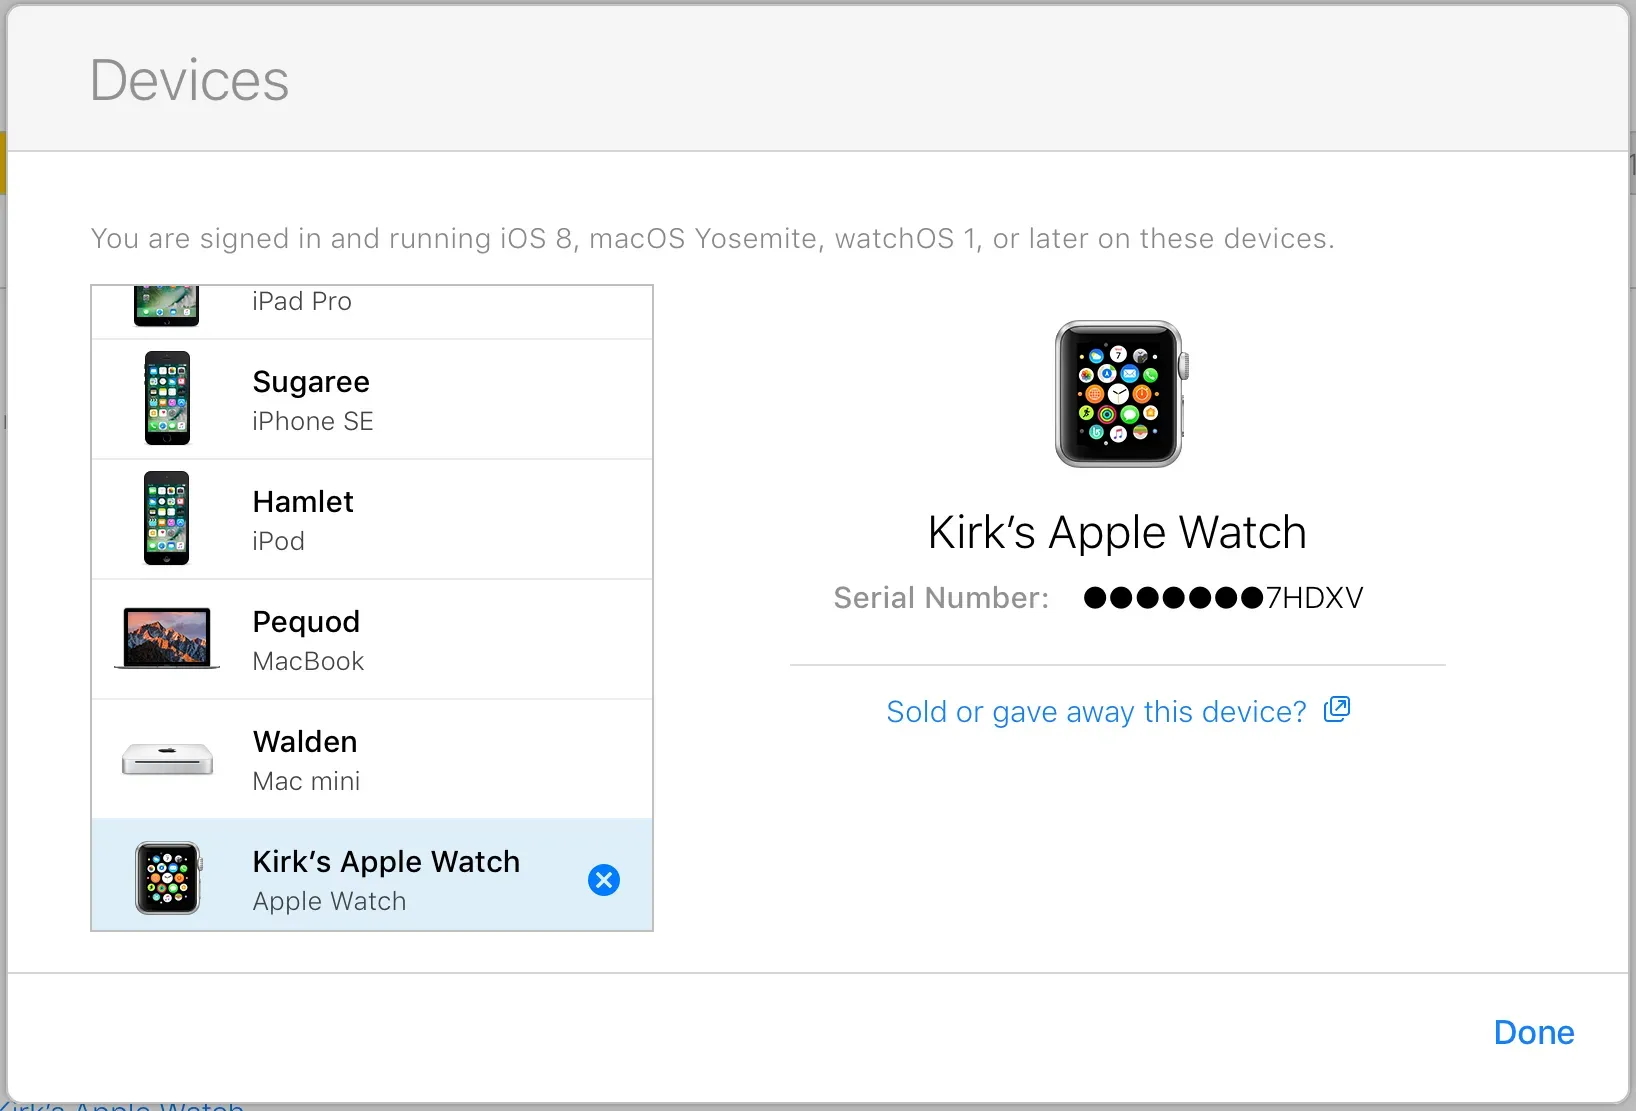
Check on iCloud.com that the device is no longer listed
Go to iCloud.com, log in, and click Settings. You'll see all your devices - iOS devices, Macs, Apple Watches, and Apple TVs in the My Devices section. Check that the device you just erased is no longer listed. If it is, click the device, then click the x to the right of its name.
Remove the carrier lock, and check the ESN/IMEI/MEID
If you purchased your device from a carrier, it might be locked so it can only be used with that carrier. If you have paid off the device, or ended your contract, you can get in touch with the carrier and ask them to remove the carrier lock. Some carriers allow you to do this on their websites; others require that you call them. If you don't do this, no one will be able to use the device with a different carrier. (This is only important for a device with cellular access, such as an iPhone or cellular iPad).
You can also check the ENS, IMEA, or MEID. These are different numbers used as unique identifiers for devices. You'll find yours in Settings > General > About.
Stolen devices may be blacklisted using one of these identifiers. You can check online at a number of websites, including this one. The check will tell whether Find My iPhone is on, and say whether its iCloud status and blacklist status are clean, meaning that the device has not been set as Lost using Find My iPhone. This site can even tell if your warranty is still valid, and if AppleCare is active too.
If you're buying a used device, it's a good idea to check it on this site to make sure it's not stolen, and you can use it.
Remove the SIM card
If you have an iPhone or a cellular iPad, remove the SIM card. Clean the device, and box it, if you're planning to sell it, or pass it on to the friend or family member who will be using it.
Going further
iMazing can also help you set up your new device, restoring your backup so you can access all your data. See this article for more on restoring a backup using iMazing.