


Streamlined MDM Enrollment and Migration with iMazing
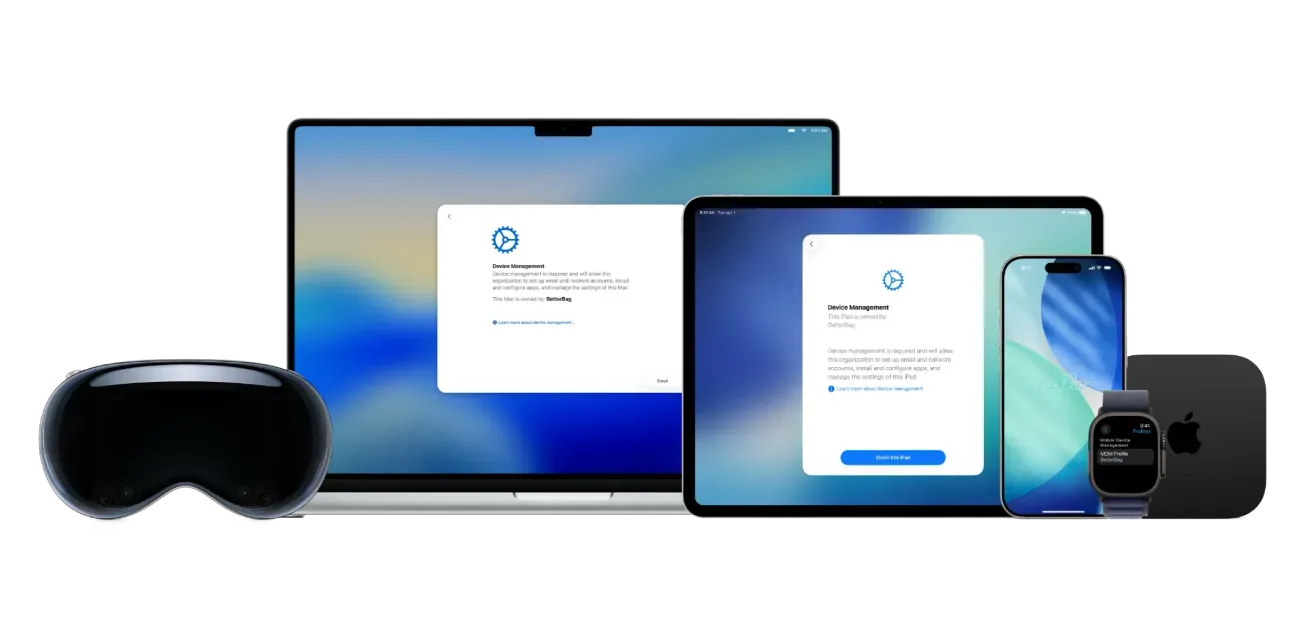
iMazing and iMazing Configurator streamline MDM enrollment with powerful tools for local iOS device provisioning, supervision, and zero-touch enrollment, supporting both Automated Device Enrollment and profile-based enrollment. With iMazing, you can prepare devices via USB (and local Wi-Fi) that are ready to use, fully supervised (ensuring ownership), enrolled in your MDM, and configured without ever sharing Wi‑Fi credentials with users. iMazing also helps back up and preserve device data when enrolling iOS devices in an MDM.
MDM enrollment is a broad topic with many methods and constraints. If you use Automated Device Enrollment (ADE) for devices registered in Apple Business, there are additional considerations when enrolling devices that already contain data, or when backing up that data locally with iMazing.
iMazing helps preserve iOS device data when enrolling a device for the first time or migrating from one MDM to another, while still enabling enrollment through Automated Device Enrollment.
By default, enrolling a device via Automated Device Enrollment requires erasing it. This applies to all Apple non‑macOS devices (iOS, iPadOS, tvOS, visionOS). iMazing can preserve device data by creating a backup, restoring it, and then allowing enrollment in a new MDM via ADE after the device restarts. Since iOS 26, Apple has introduced a simpler way to migrate devices from one MDM to another, using Apple Business and assigning another device management service, but iMazing’s approach remains useful because it ensures a backup is performed before migration.
In this guide, we provide a clear overview of the various enrollment methods and what they mean for iMazing when backing up devices, enrolling new devices, or migrating devices from one MDM solution to another.
- Understanding MDM enrollment
- Streamline MDM enrollment using iMazing
- Backing up devices that are enrolled in a MDM
- Understanding MDM capabilities by enrollment method
Understanding MDM enrollment
There are two types of enrollment: User Enrollment and Device Enrollment that offer not the same control over the device. The primary difference between User Enrollment and Device Enrollment is ownership and data separation: User Enrollment is designed for Bring Your Own Device (BYOD) scenarios to protect personal privacy, while Device Enrollment is built for organization-owned devices requiring full management control.
With Device Enrollment, especially when paired with device supervision, organizations gain stronger ownership and control over the device, even if the device passcode is unknown or Activation Lock (Find My) is enabled. Many of the most powerful configuration options, such as privacy controls, sharing features, computer (host) pairing, app allow/deny rules, Single App Mode, and more, are available only on devices enrolled with Device Enrollment (supervised devices).
User Enrollment (user-owned devices / BYOD)
User Enrollment should be used when enrolling a device that is not owned by the organization, for example, when a user brings their own device (BYOD). In this case, iOS creates two partitions on the device’s storage to separate work and private data. It also separates the private Apple Account from the company’s managed Apple Account, allowing iCloud data (and App Store apps) to remain distinct between private and work use. This type of enrollment is typically done by manually downloading and installing a configuration profile or via Account-Driven enrollment.
Learn more in Apple’s documentation: User Enrollment and device management
Device Enrollment (organization-owned devices)
Device Enrollment implies that the device is owned by the organization. It can be performed either by supervising the device locally with software such as iMazing or Apple Configurator, before enrollment or via Automated Device Enrollment when devices are registered in Apple Business. Account-Driven enrollment can also be used.
Learn more in Apple’s documentation: Device Enrollment and device management
Supervision
Supervision is separate from MDM and happens before the device is enrolled in MDM. It is usually paired with Device Enrollment. On macOS, a Mac becomes supervised when enrolled by a user with admin privileges. On iOS, iPadOS, tvOS, and visionOS, the device becomes supervised only if you use Automated Device Enrollment or locally supervise the device with iMazing or Apple Configurator.
Many MDM commands and configuration options are available only on supervised devices enrolled using a Device Enrollment method.
Enrollment modes comparison table
Feature | User Enrollment (BYOD) | Device Enrollment (Org-Owned) |
|---|---|---|
Device Ownership | Employee / Personal | Organization / Corporate (Supervision) |
Privacy Safeguards | Strict separation; MDM cannot access personal user’s data. | No separation: the MDM has full control, can inventory all apps, and can wipe the entire device. |
Data Separation | Creates a distinct, cryptographically separated APFS volume for managed data. | All data exists on a single system volume managed entirely by the organization. |
Management Depth | Limited command set; cannot clear device passcodes or restrict personal features. | Full command set; can enforce supervised restrictions, silently install apps, and lock features. |
Apple Account Requirement | Requires a Managed Apple Account (provided by the organization via Apple Business) alongside a personal Apple Account. | Does not require an Apple Account; optionally supports Managed or personal Apple Accounts. |
No | Yes (with Apple Business) | |
Device Enrollment with Local Supervision | No | Yes (with iMazing or Apple Configurator) |
Yes | Yes (with iMazing or Apple Configurator) | |
Yes | Yes (with Managed Apple Accounts via Apple Business) | |
Local iOS Backup with iMazing | Yes | Yes |
iCloud Backup | Yes (managed and personal Apple Accounts are backed up separately) | Yes |
Enrollment methods comparison table
Enrollment method | Minimum supported OS versions | Supervised upon enrollment? | iMazing and Apple Configurator supported methods |
|---|---|---|---|
iOS 13 iPadOS 13.1 tvOS 13 visionOS 2.0 macOS 10.14.4 | Yes | Yes | |
iOS 5 | Yes | Yes | |
iOS 4 | No: iOS, iPadOS, tvOS, visionOS | Yes | |
iOS 15 | No | No | |
iOS 17 | No: iOS, iPadOS, tvOS, visionOS | No |
Learn more in Apple’s documentation: Enrollment methods for Apple devices
Streamline MDM enrollment using iMazing
iMazing can streamline MDM enrollments by automatically applying enrollment, so the user doesn’t need to accept it in the iOS Setup Assistant “Device Management” screen (formerly known as “Remote Management” prior to iOS 26). This enables zero-touch enrollment. However, if you enroll a device through Automated Device Enrollment and need to preserve its data, zero-touch enrollment isn’t possible, and the user must accept enrollment in Setup Assistant.
Alongside MDM enrollment, an iMazing Configurator blueprint can carry the rest of a device's configuration and a set of automated actions, so enrollment, provisioning, and maintenance run in a single pass.
Beyond enrollment itself, a blueprint can:
- Apply Setup & Accessibility settings: device naming, language and region, wallpapers, connectivity, iCloud Backup, and which Setup Assistant steps appear.
- Run Pre-Configuration actions such as Back up, Fail if battery health is poor, Erase all data settings, Restore OS, or Update OS to latest available version.
- Run Post-Configuration actions such as Restore device's last backup, Set backup encryption password, Skip Setup Assistant, Wait for full battery charge, or Shutdown device.
For the full list of blueprint sections and actions, see the iMazing Configurator: Blueprints Deep Dive guide.
Below, we explain how to streamline enrollment with iMazing for each method.
Automated Device Enrollment
This feature is used by organizations that manage devices through Apple Business. It’s the most straightforward and modern way to enroll devices. Devices simply need to be connected to the internet during initial setup to receive their ADE profile (assigned by the MDM in Apple Business). This enables MDM enrollment, as well as supervision and computer(host)-pairing restrictions, thanks to supervision certificates.
Important: Device supervision is separate from MDM enrollment and occurs before a device is enrolled in MDM. Automated Device Enrollment enforces supervision.
Keep in mind that you should never prevent device pairing with a computer (host) via the ADE profile created by your MDM server (
allow_pairing) – instead, use a Restriction configuration profile with theallowHostPairingproperty. This allows your MDM to enable or disable pairing at any time for computers (hosts) that don’t have the supervising identity (organization). More details in: Supervision Prohibited Pairing.If your MDM solution supports importing a supervising host certificate for the ADE profile it generates, we recommend creating an organization in iMazing, exporting the supervising host certificate, and importing it into your MDM. This prevents the issue mentioned above and ensures your devices will always be pairable using the supervising organization. More details: Organizations in iMazing Configurator
Learn more in Apple’s documentation: Automated Device Enrollment and device management
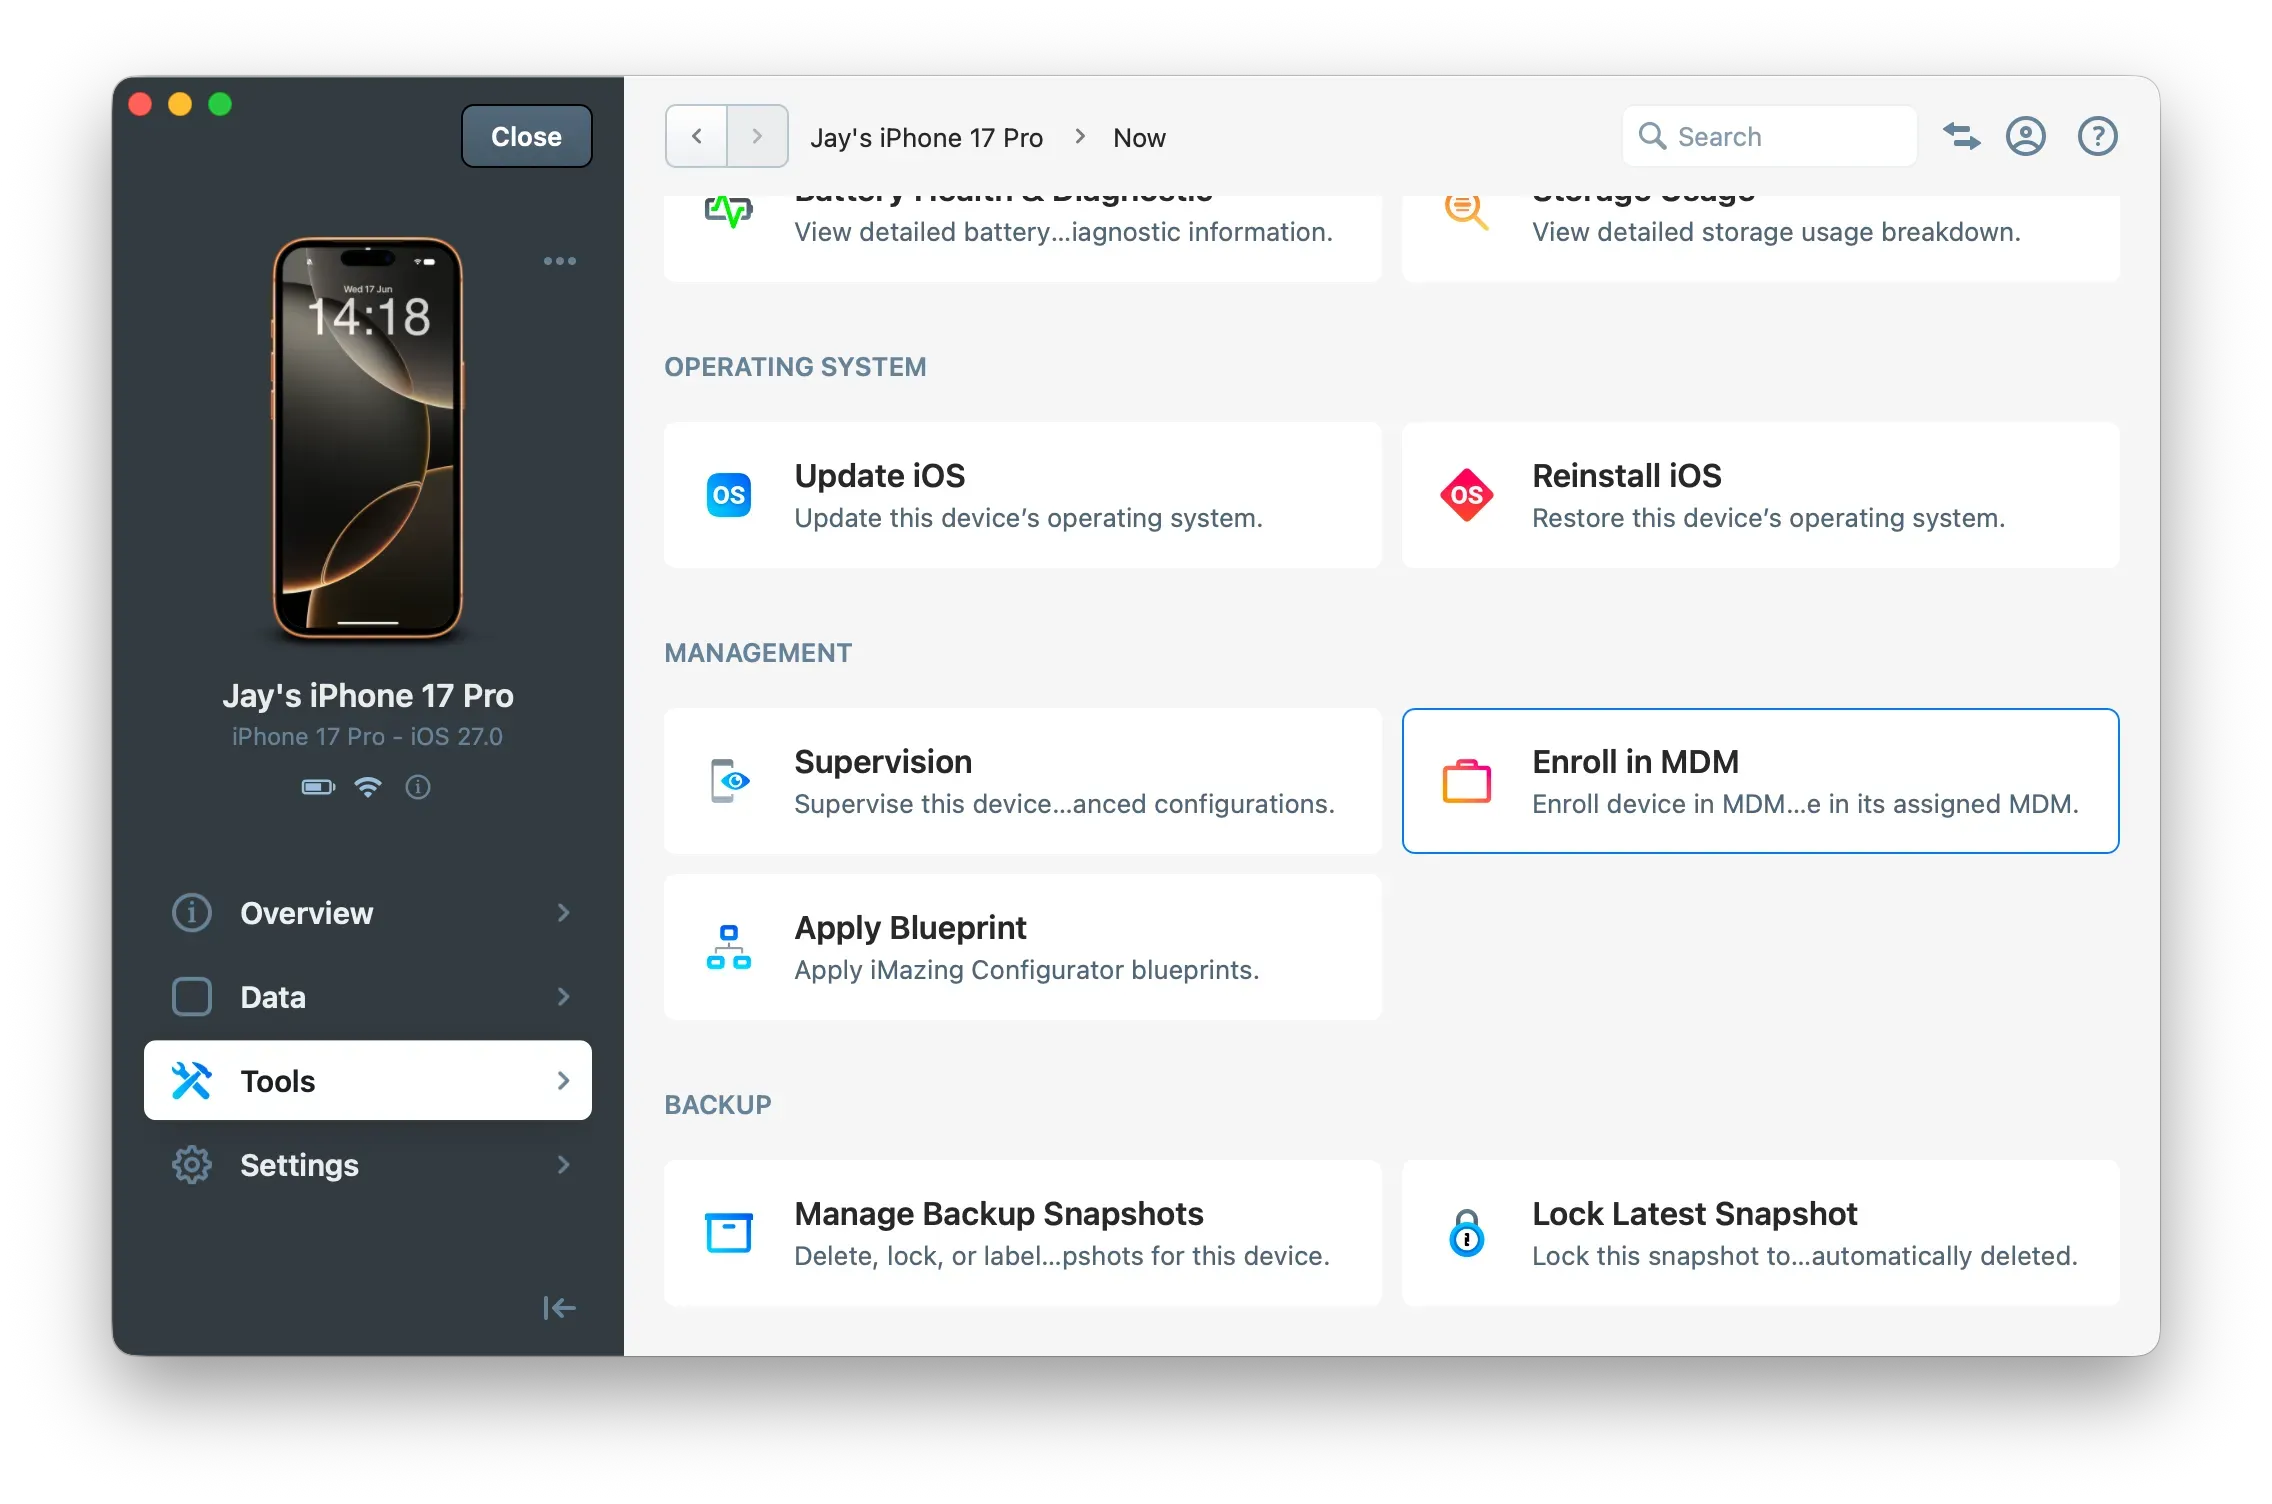
Single-device enrollment with iMazing via ADE while preserving device data
In iMazing, connect and select the device you want to enroll via Automated Device Enrollment, then go to Tools and click Enroll in MDM.
This will back up the device and then restore the backup. After the restore completes, the device restarts, shows the iOS Setup Assistant, and downloads its ADE profile. You then just need to approve enrollment in the “Device Management” (formerly “Remote Management”) screen.
Bulk enrollment with iMazing via ADE while preserving device data
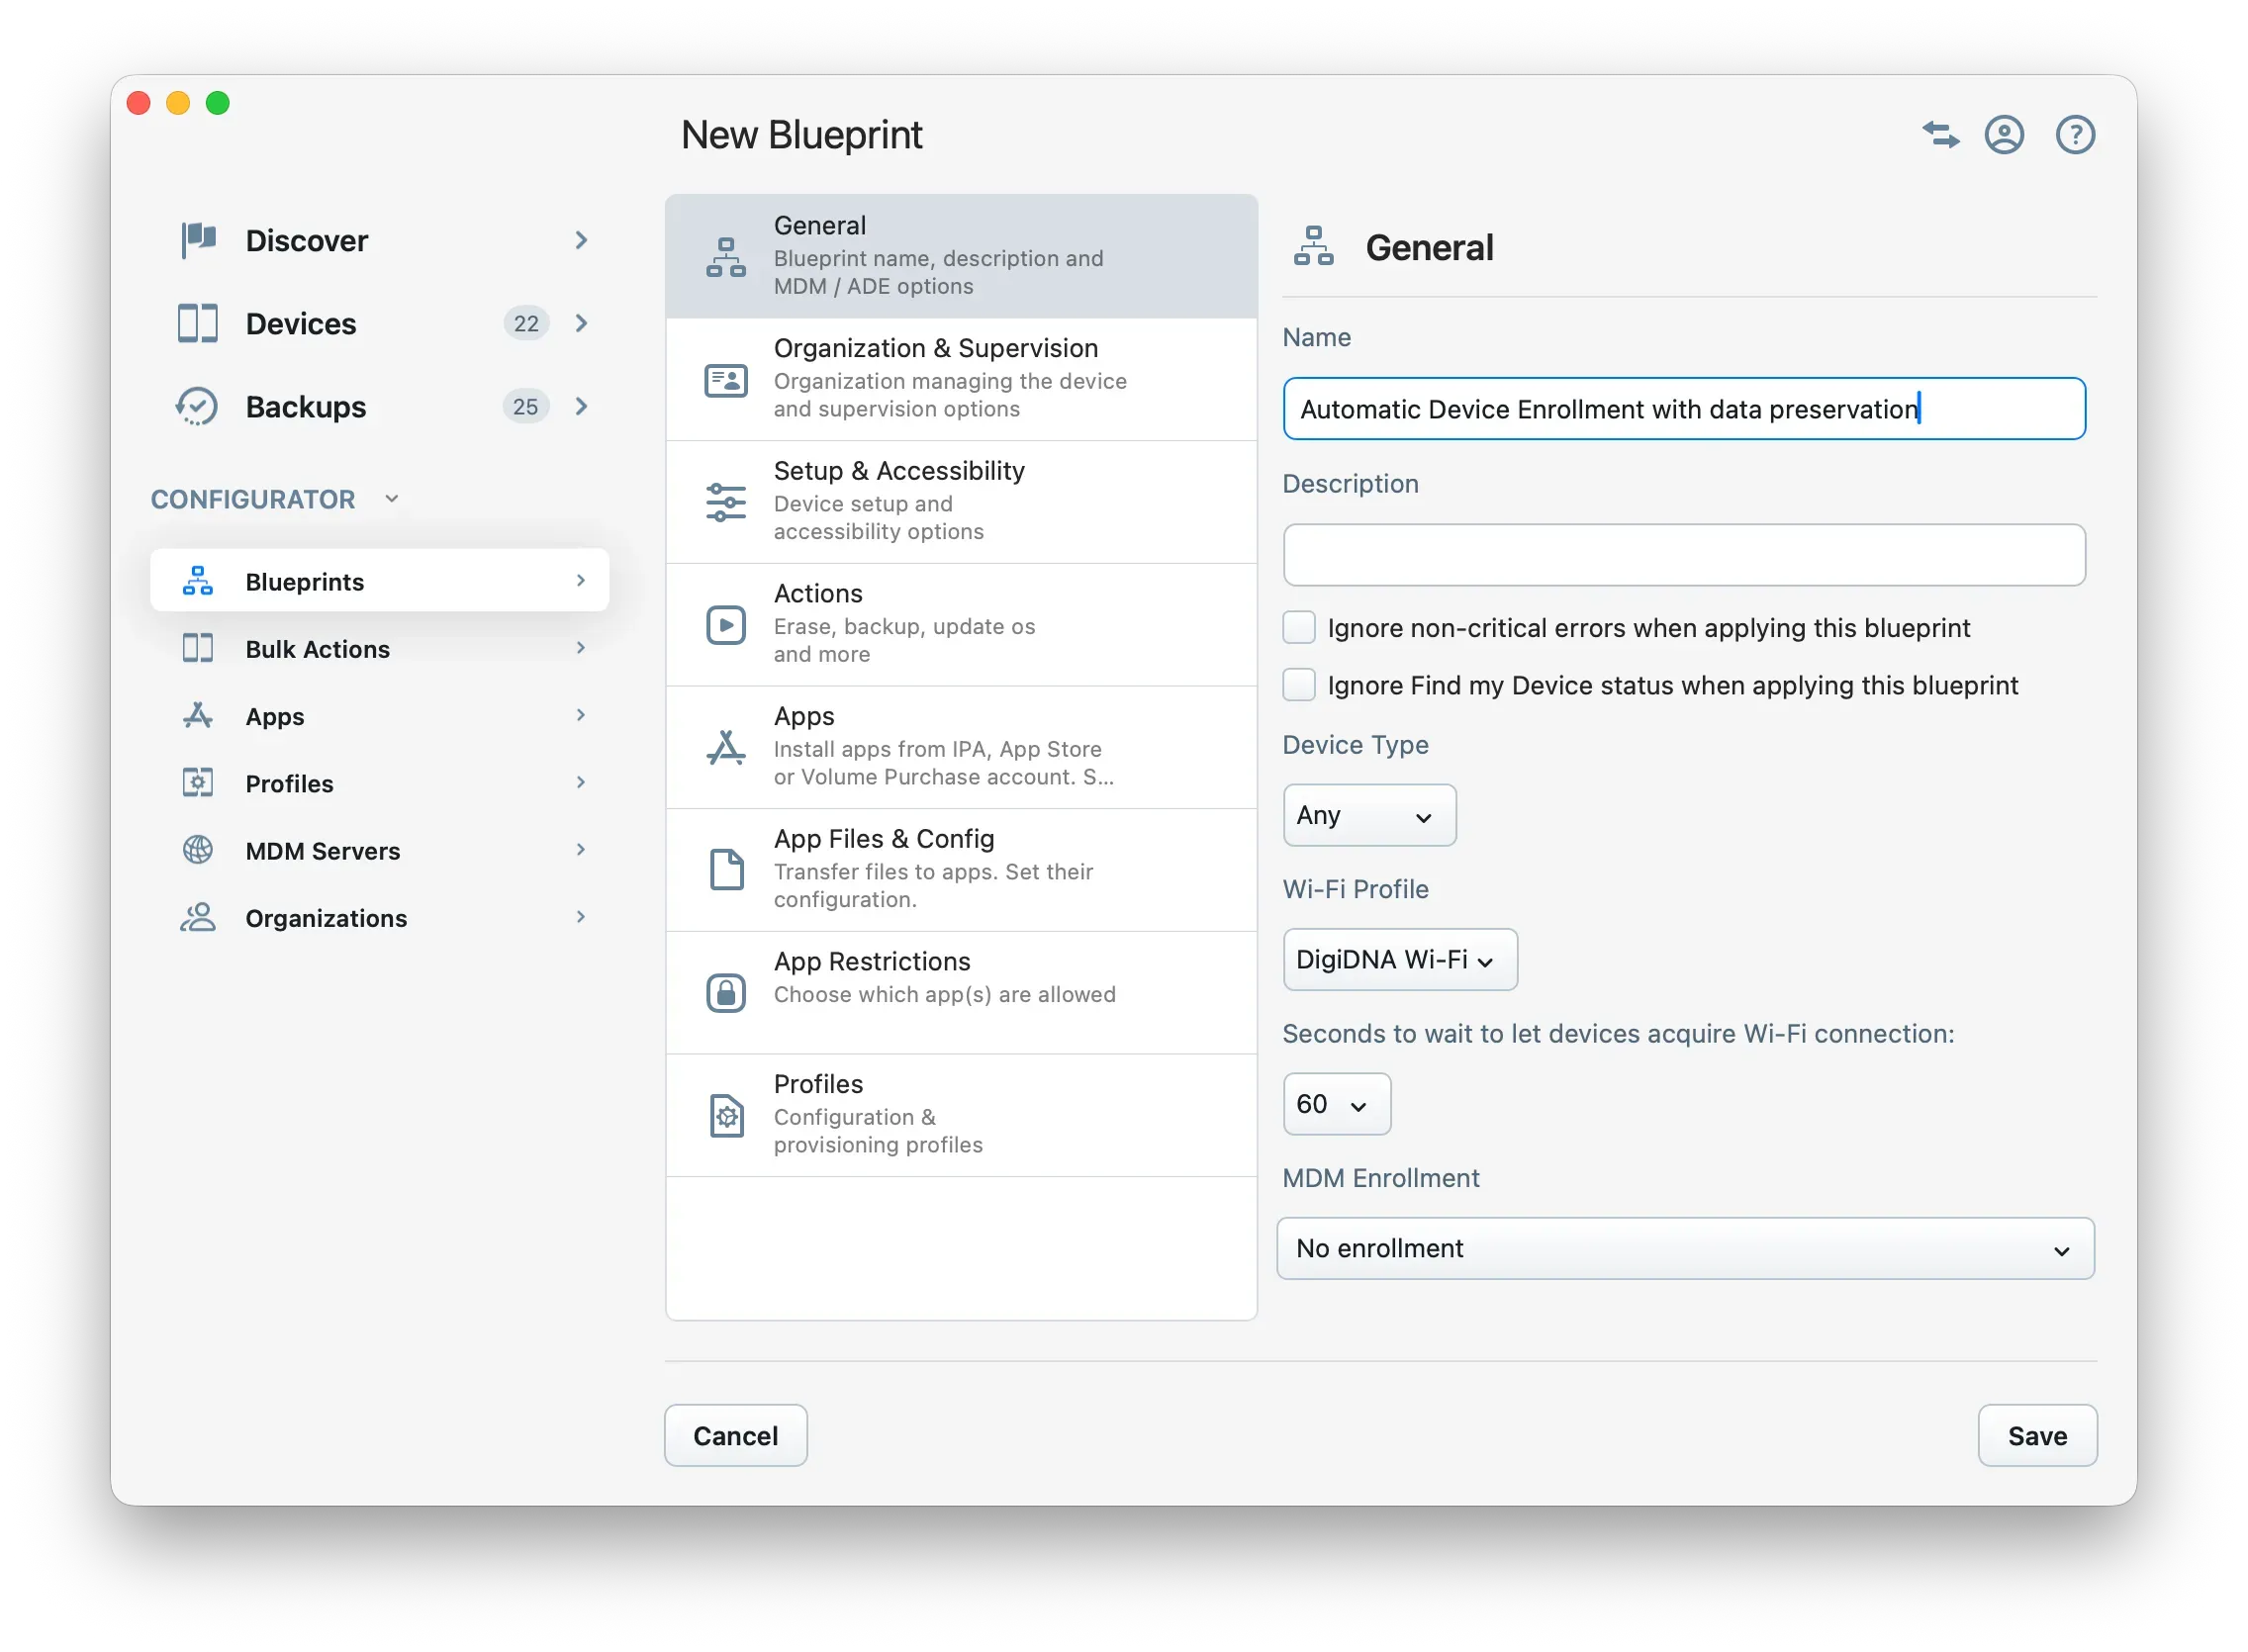
To do this, create an iMazing Configurator blueprint and select:
- General:
- Wi‑Fi Profile: Select a Wi‑Fi profile so the device can immediately download its configuration from Apple servers and enroll in the MDM, without requiring manual Wi‑Fi setup in the iOS Setup Assistant.
- MDM Enrollment – No Enrollment: This is counterintuitive, but if you need to preserve device data while using Automated Device Enrollment, you must select this option.
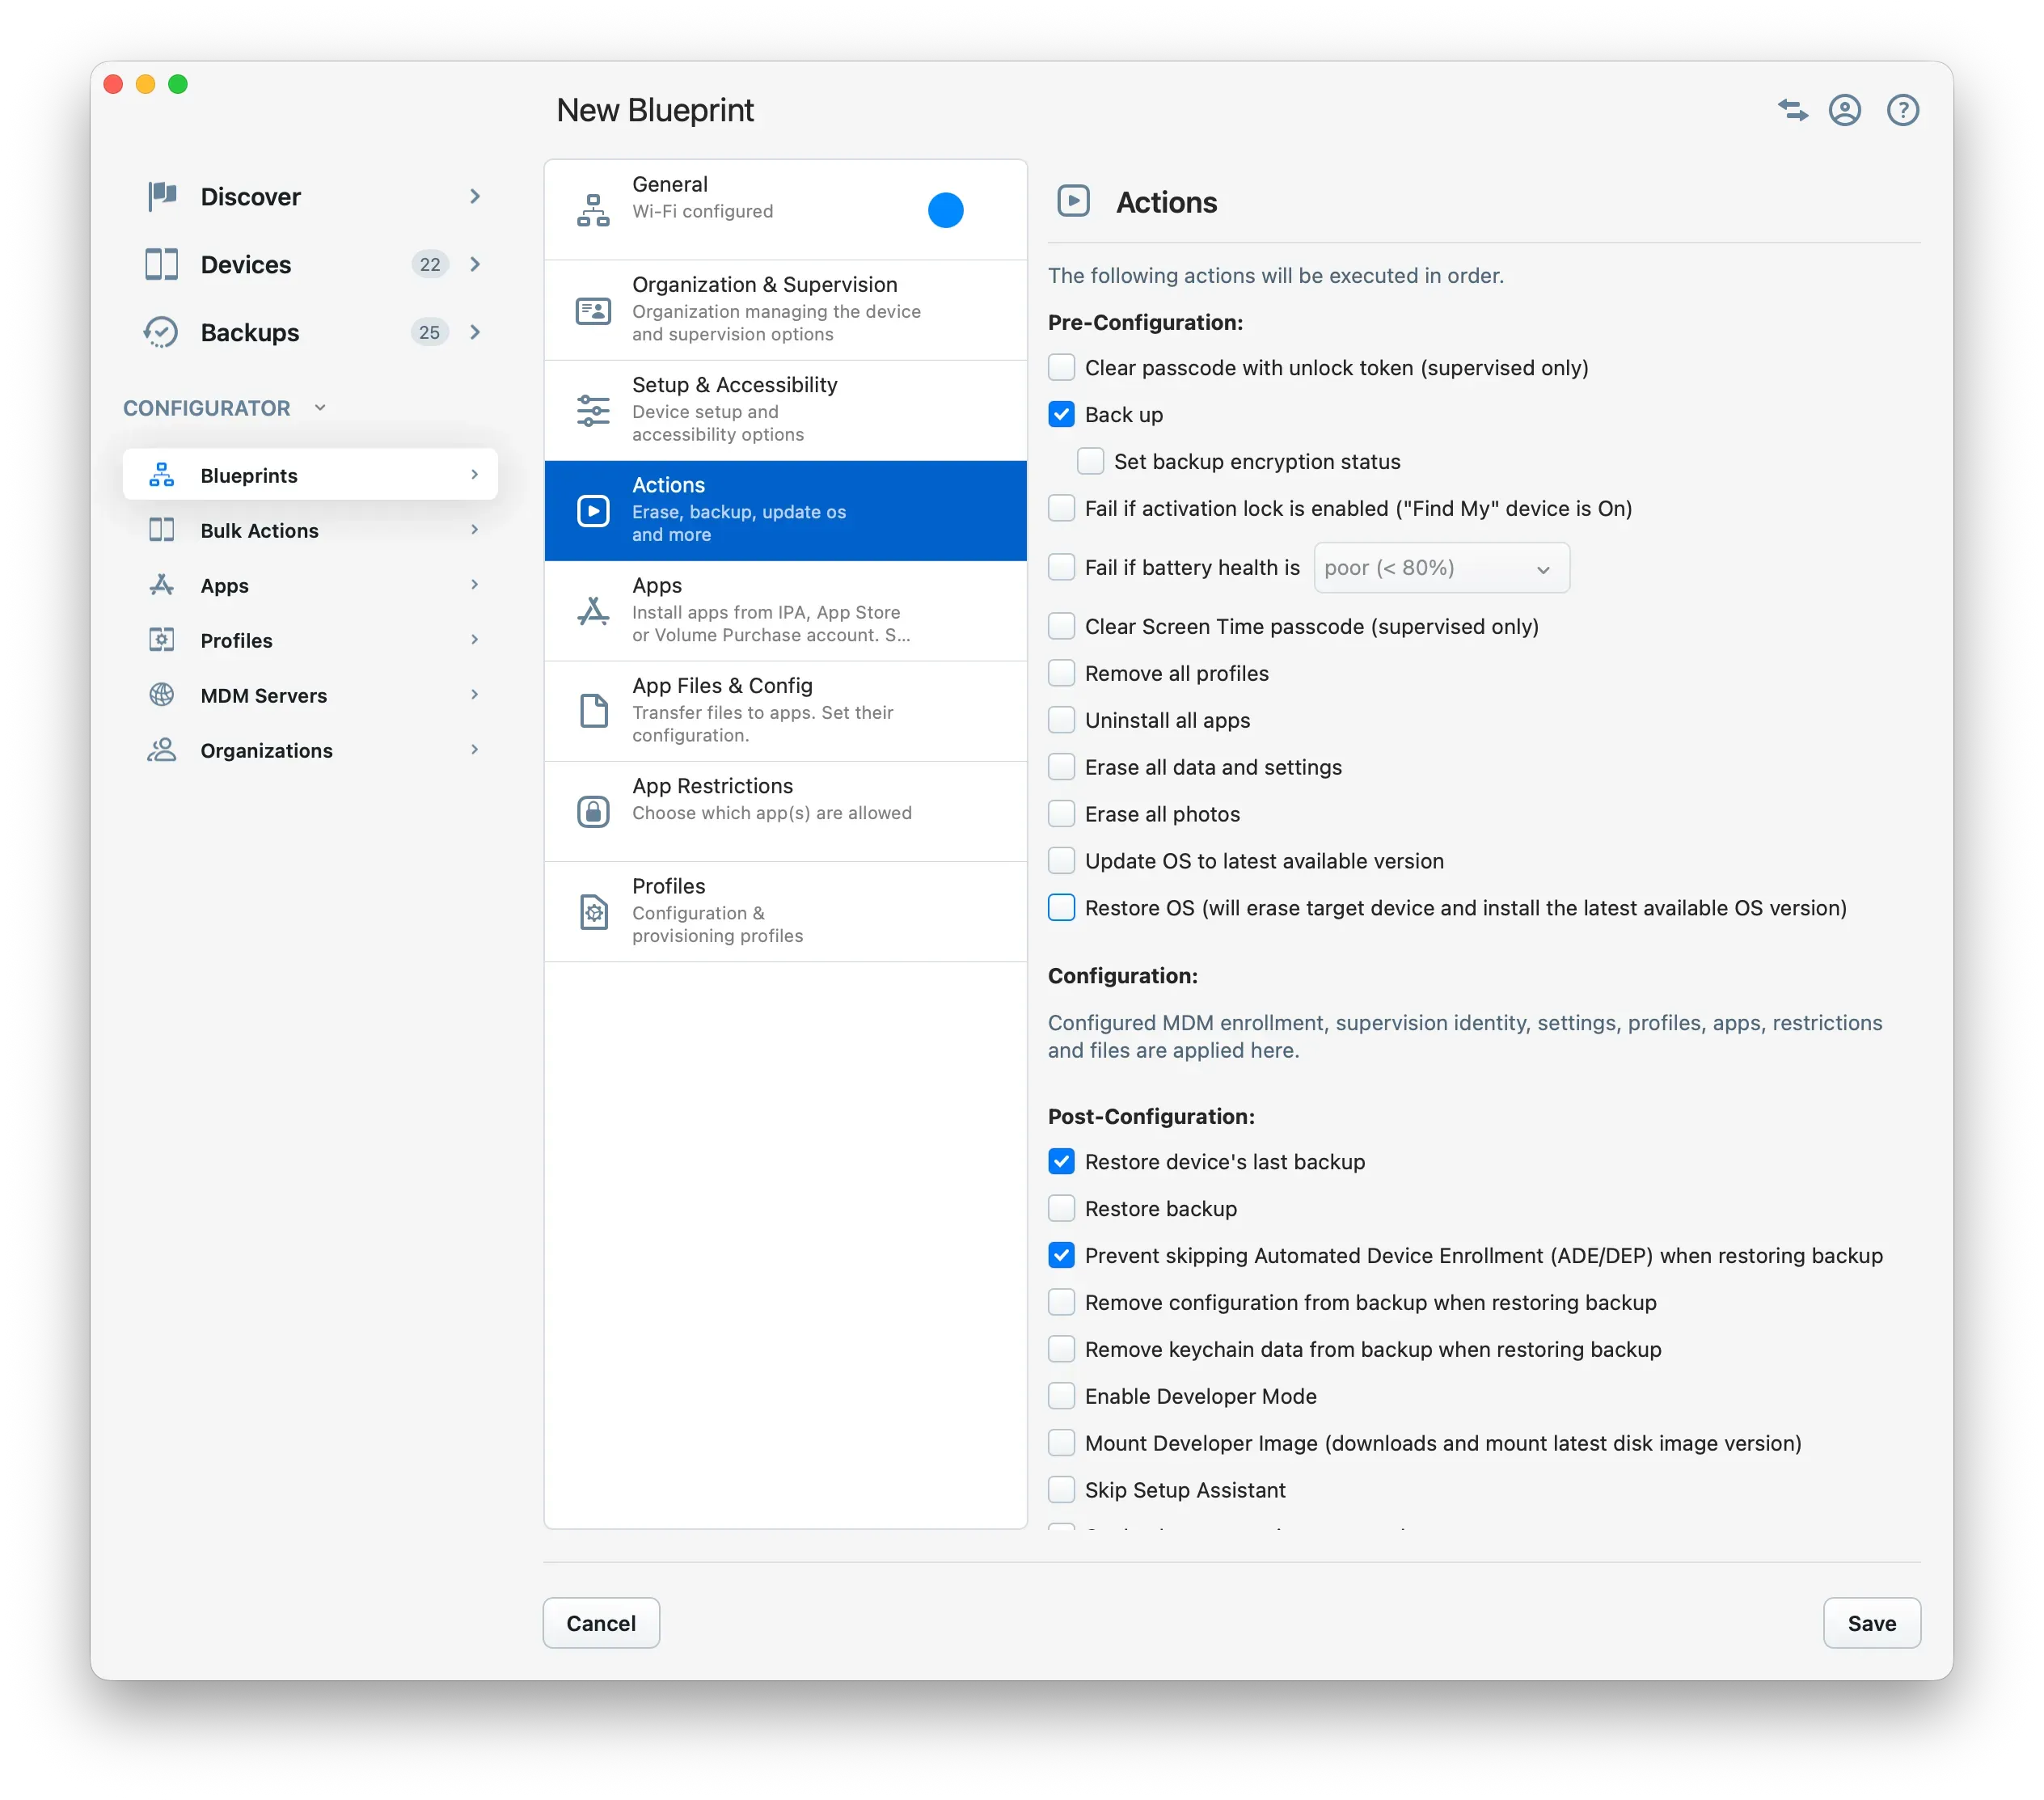
- Actions:
- Pre-Configuration:
- Back up
- Post-Configuration:
- Restore device’s last backup
- Prevent skipping Automated Device Enrollment (ADE/DEP) when restoring backup
Streamlined bulk enrollment with iMazing via ADE (no need to preserve device data)
You can greatly streamline Automated Device Enrollment with iMazing Configurator by removing the need for the user to accept enrollment in the iOS Setup Assistant “Device Management” (formerly “Remote Management”) screen. This is useful when you want to hand users devices that are already fully configured, so they only need to set a passcode.
To do this, create an iMazing Configurator blueprint and select:
- General:
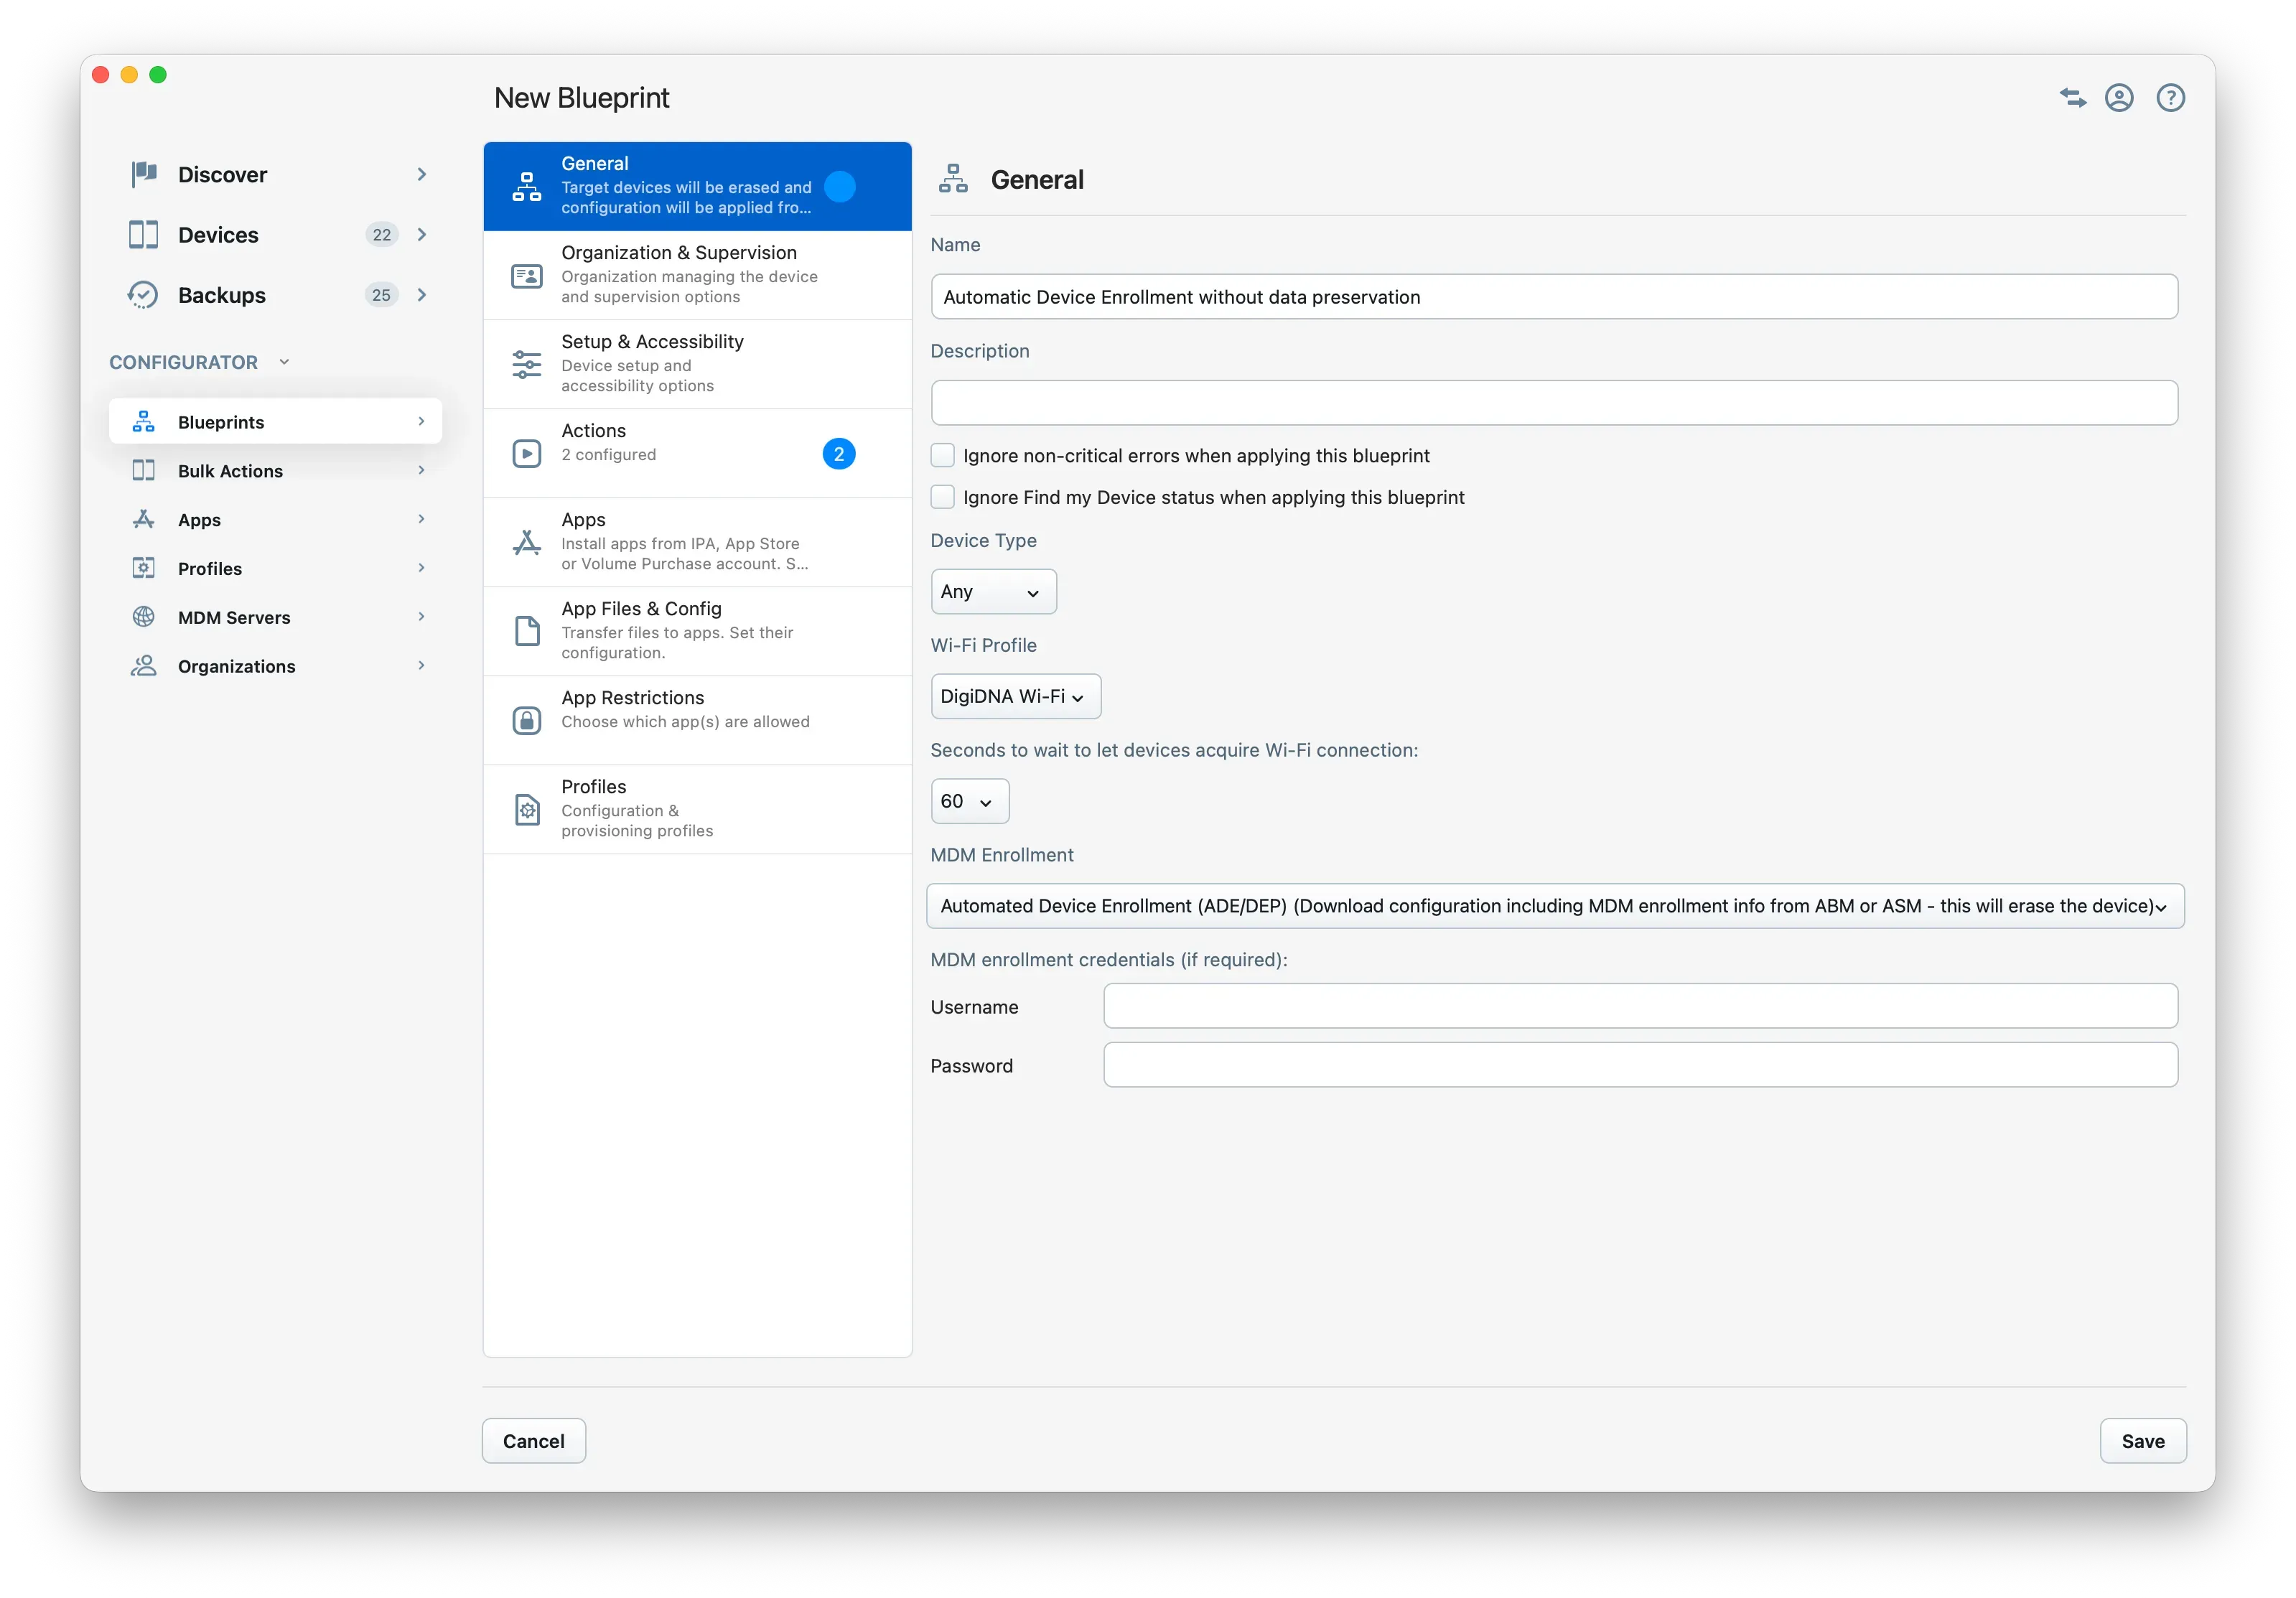
- Wi‑Fi Profile: Select a Wi‑Fi profile so the device can immediately download its configuration from Apple servers and enroll in the MDM, without requiring manual Wi‑Fi setup in the iOS Setup Assistant.
- MDM Enrollment – Automated Device Enrollment (ADE/DEP): This mode forces the device to erase if it already contains data and triggers the ADE profile download from Apple servers. It also prevents applying certain configurations or actions via the blueprint and is not compatible with restoring a backup. When selecting this mode, you should configure your devices as much as possible through your MDM. iMazing simply removes the need for the user to accept enrollment.
Device enrollment with local supervision with iMazing
Device supervision is a separate process from MDM enrollment and is performed before devices are enrolled in MDM.
You can supervise iOS devices locally using Apple Configurator 2 on macOS, or iMazing on macOS and Windows. With iMazing, you can create supervising organizations tied to a digital certificate identity. Having access to the identity’s private key allows pairing even when pairing is restricted, or without needing to enter the device passcode after BFU (Before First Unlock). It also grants elevated privileges to perform certain actions or install configurations that aren’t otherwise available without the supervising organization.
For more details:
- Supervision Prohibited Pairing
- Supervise iPhone, iPad and iPod touch (Single device)
- Organizations in iMazing
- Understanding Supervision, MDM, ADE (DEP), and Volume Purchase (VPP)
General
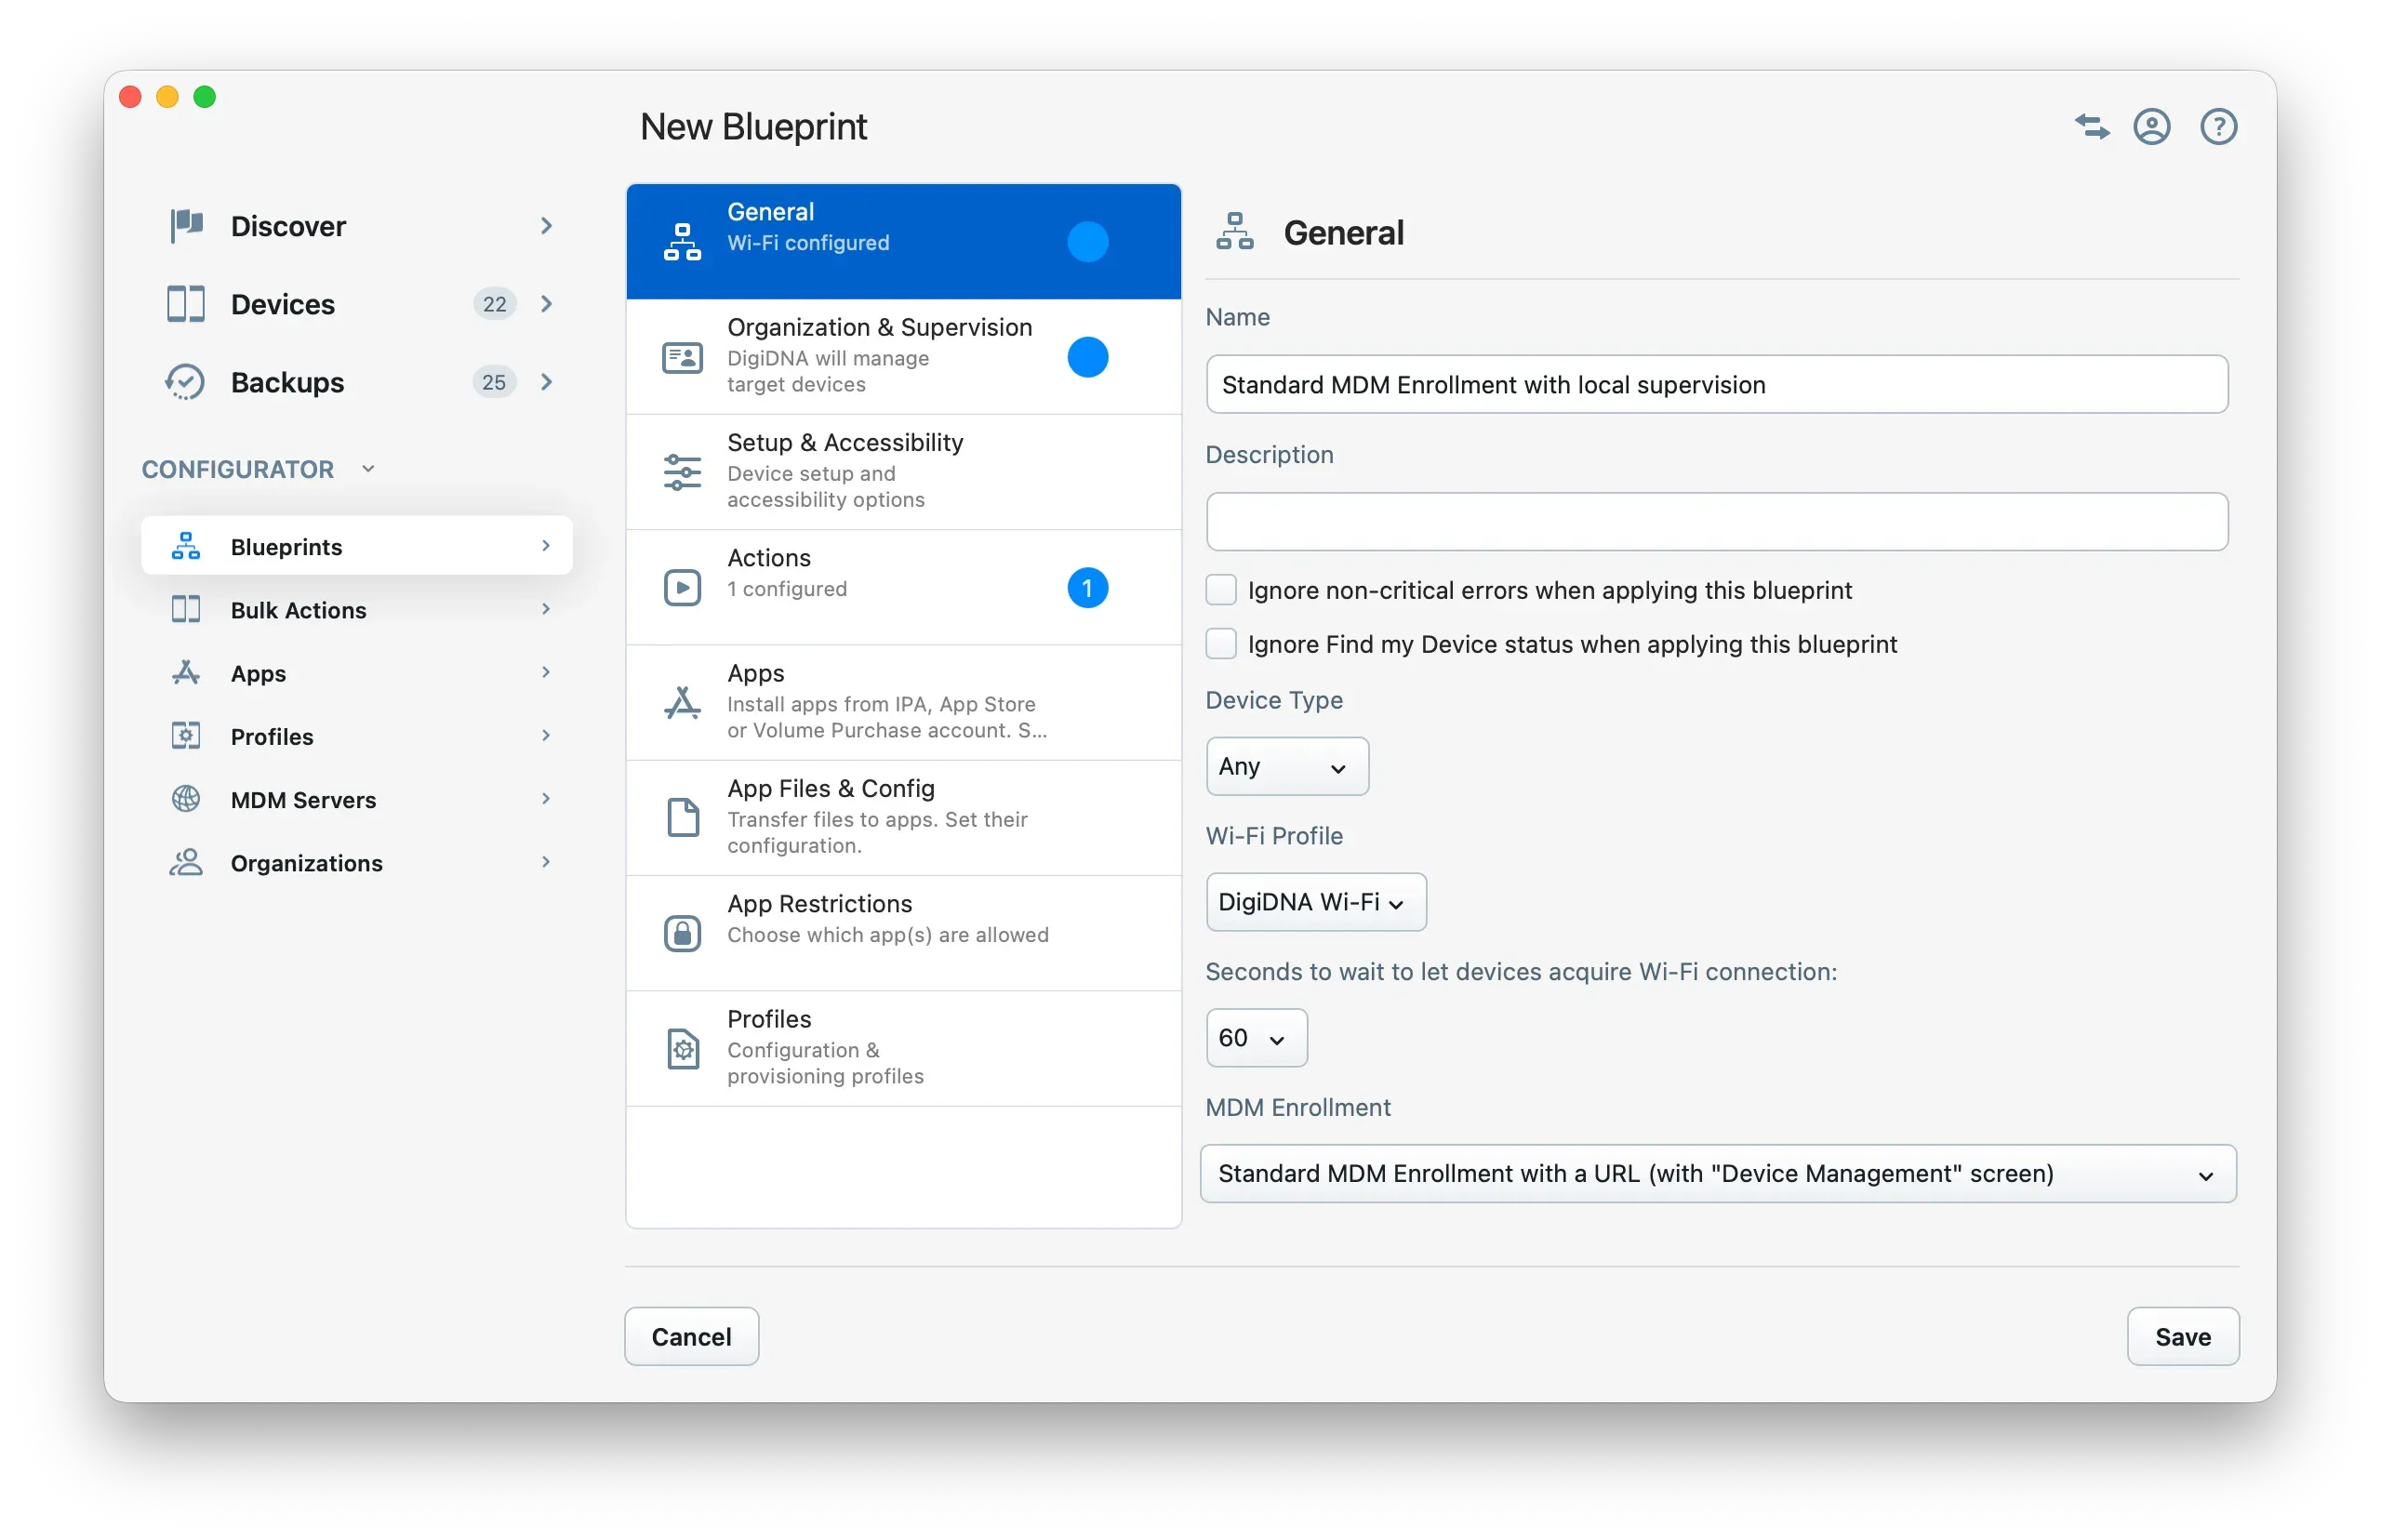
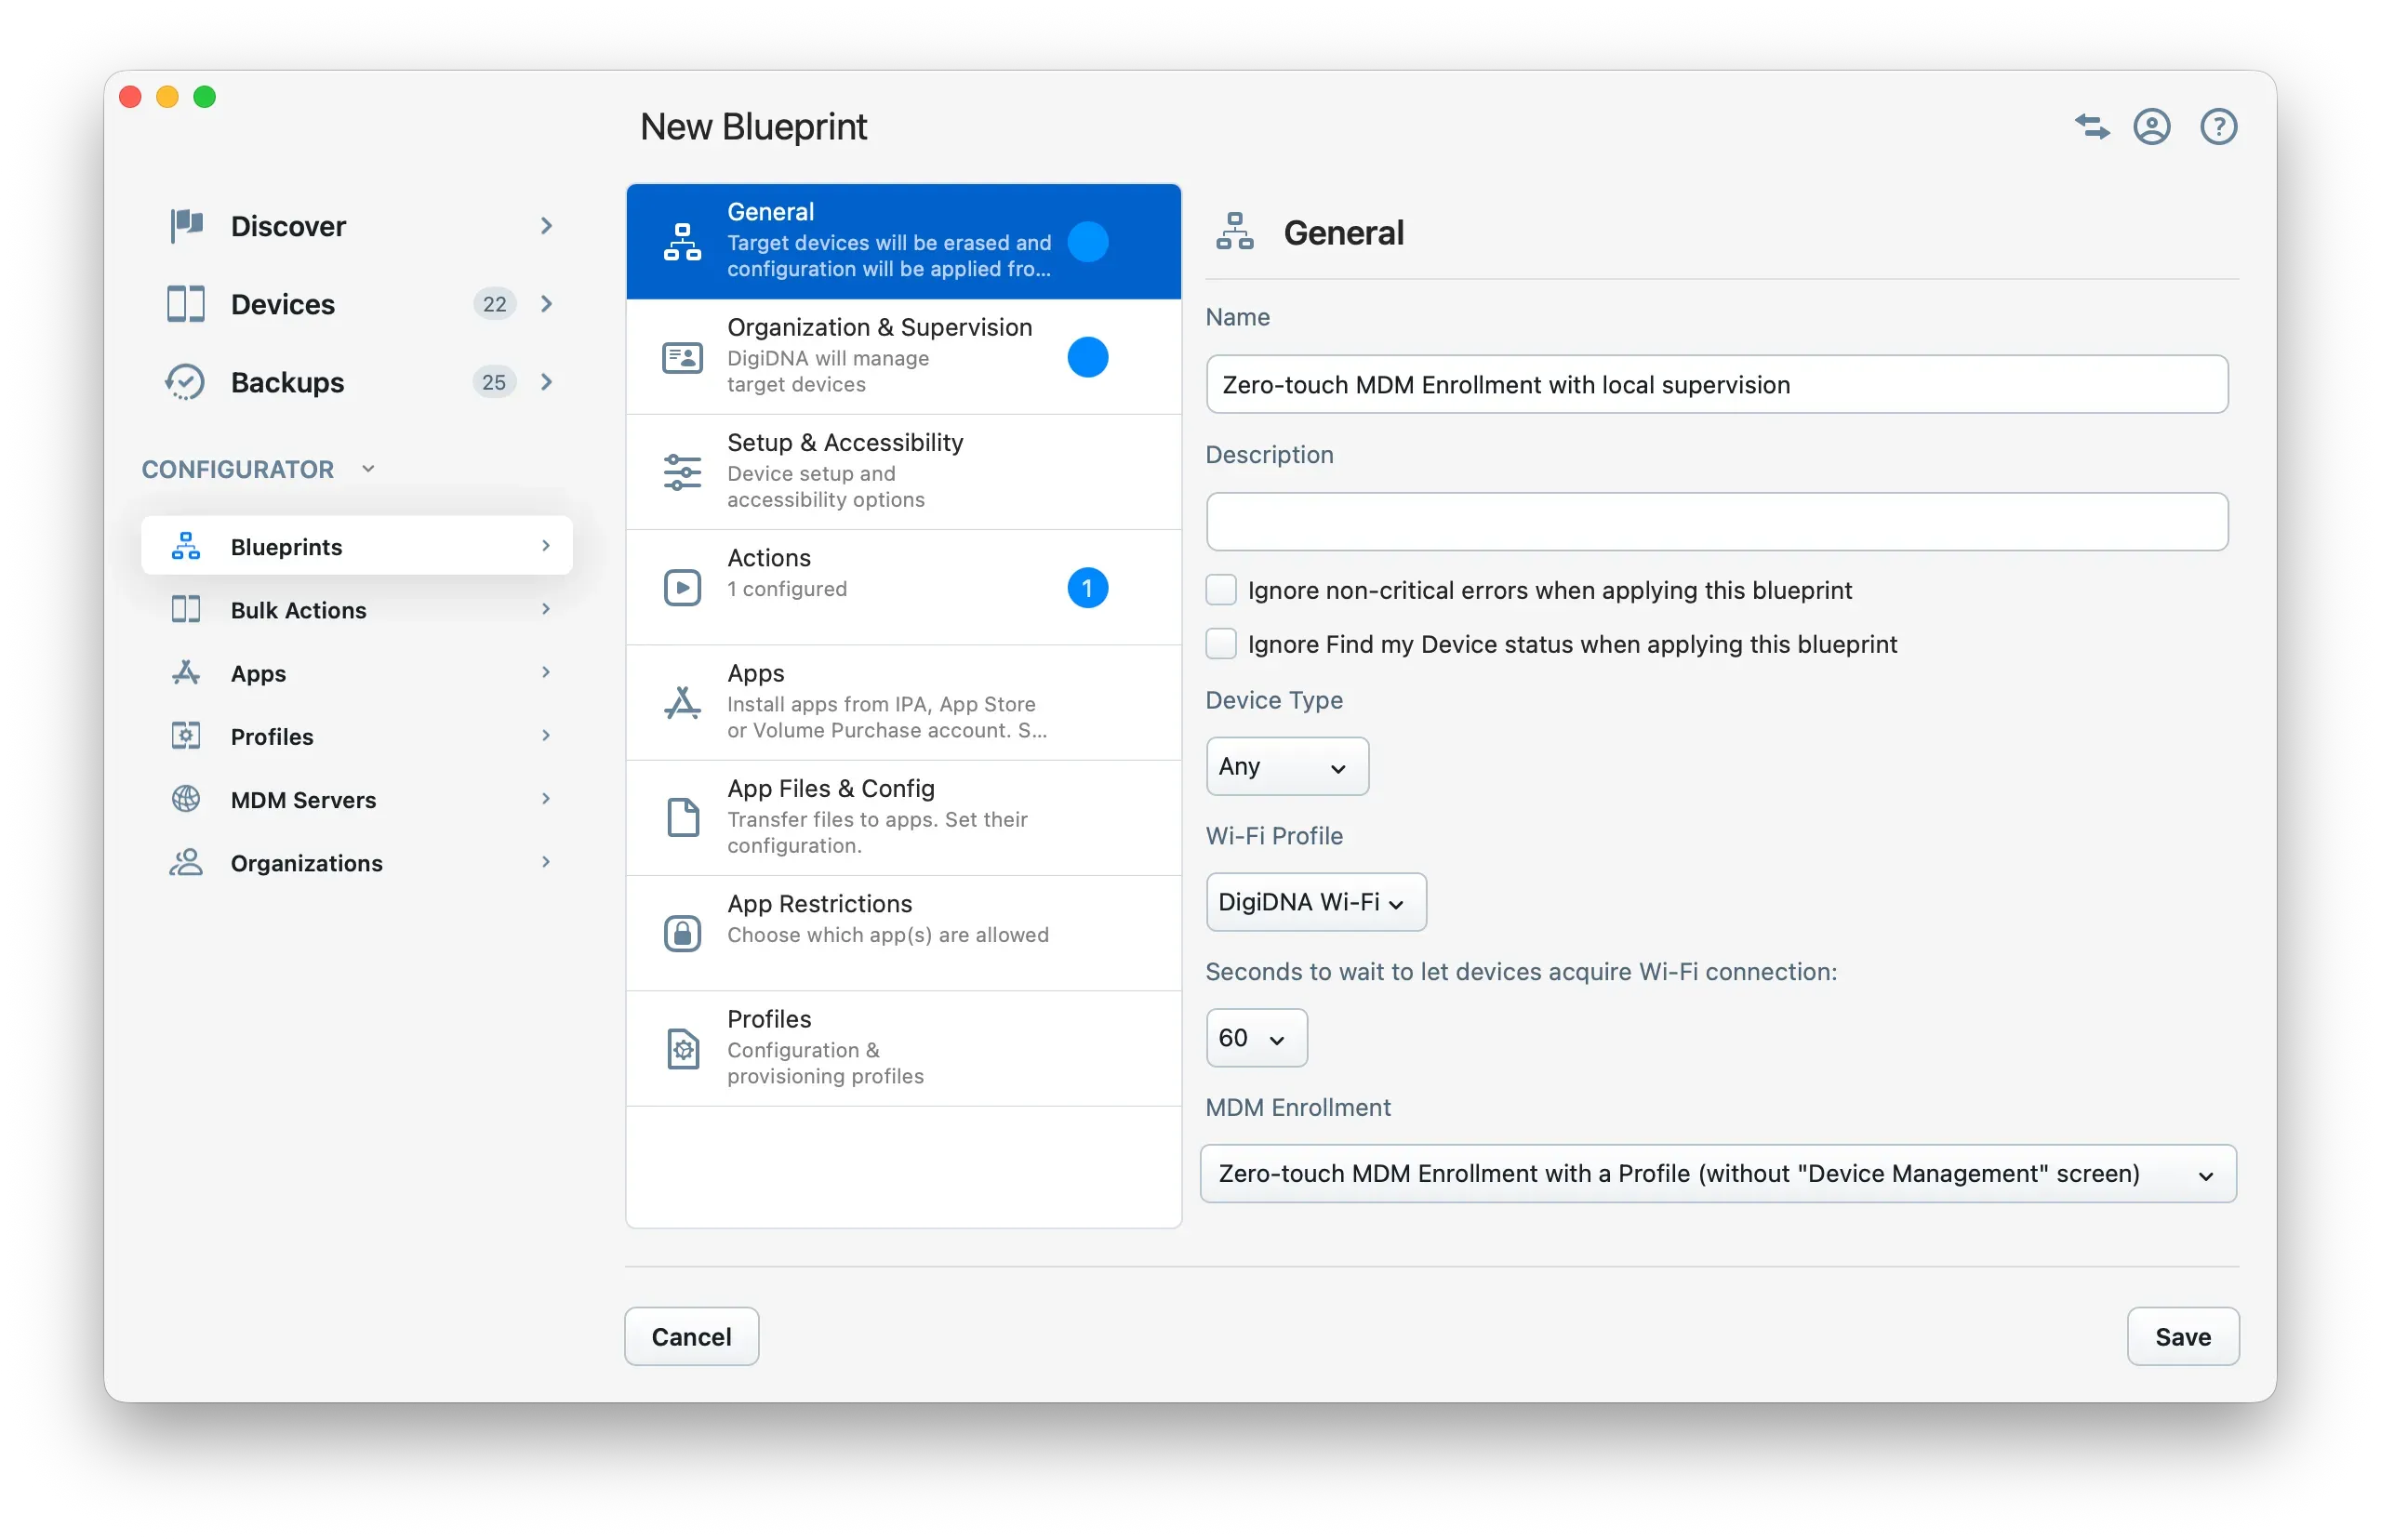
- Wi‑Fi Profile: Select a Wi‑Fi profile so the device can immediately enroll in the MDM, without requiring manual Wi‑Fi setup in the iOS Setup Assistant.
- MDM Enrollment: You can either choose:
- Standard MDM Enrollment with a URL: This lets you select an MDM server for which your MDM solution has provided an MDMServiceConfig endpoint. With this method, the iOS Setup Assistant “Device Management” (formerly “Remote Management”) screen is displayed, so the user must accept enrollment.
- Zero-touch MDM Enrollment with a Profile: This allows you to select an MDM server for which your MDM solution has provided an enrollment profile. Enrolling devices with this method bypasses the iOS Setup Assistant “Device Management” (formerly “Remote Management”) screen, so the user doesn’t need to accept enrollment. Enrollment can be completed without touching the device. This is a great solution if you don’t use Automated Device Enrollment in conjunction with iMazing Configurator (2.1.3. Streamlined bulk enrollment via ADE without needing to preserve device data).
- Standard MDM Enrollment with a URL: This lets you select an MDM server for which your MDM solution has provided an MDMServiceConfig endpoint. With this method, the iOS Setup Assistant “Device Management” (formerly “Remote Management”) screen is displayed, so the user must accept enrollment.
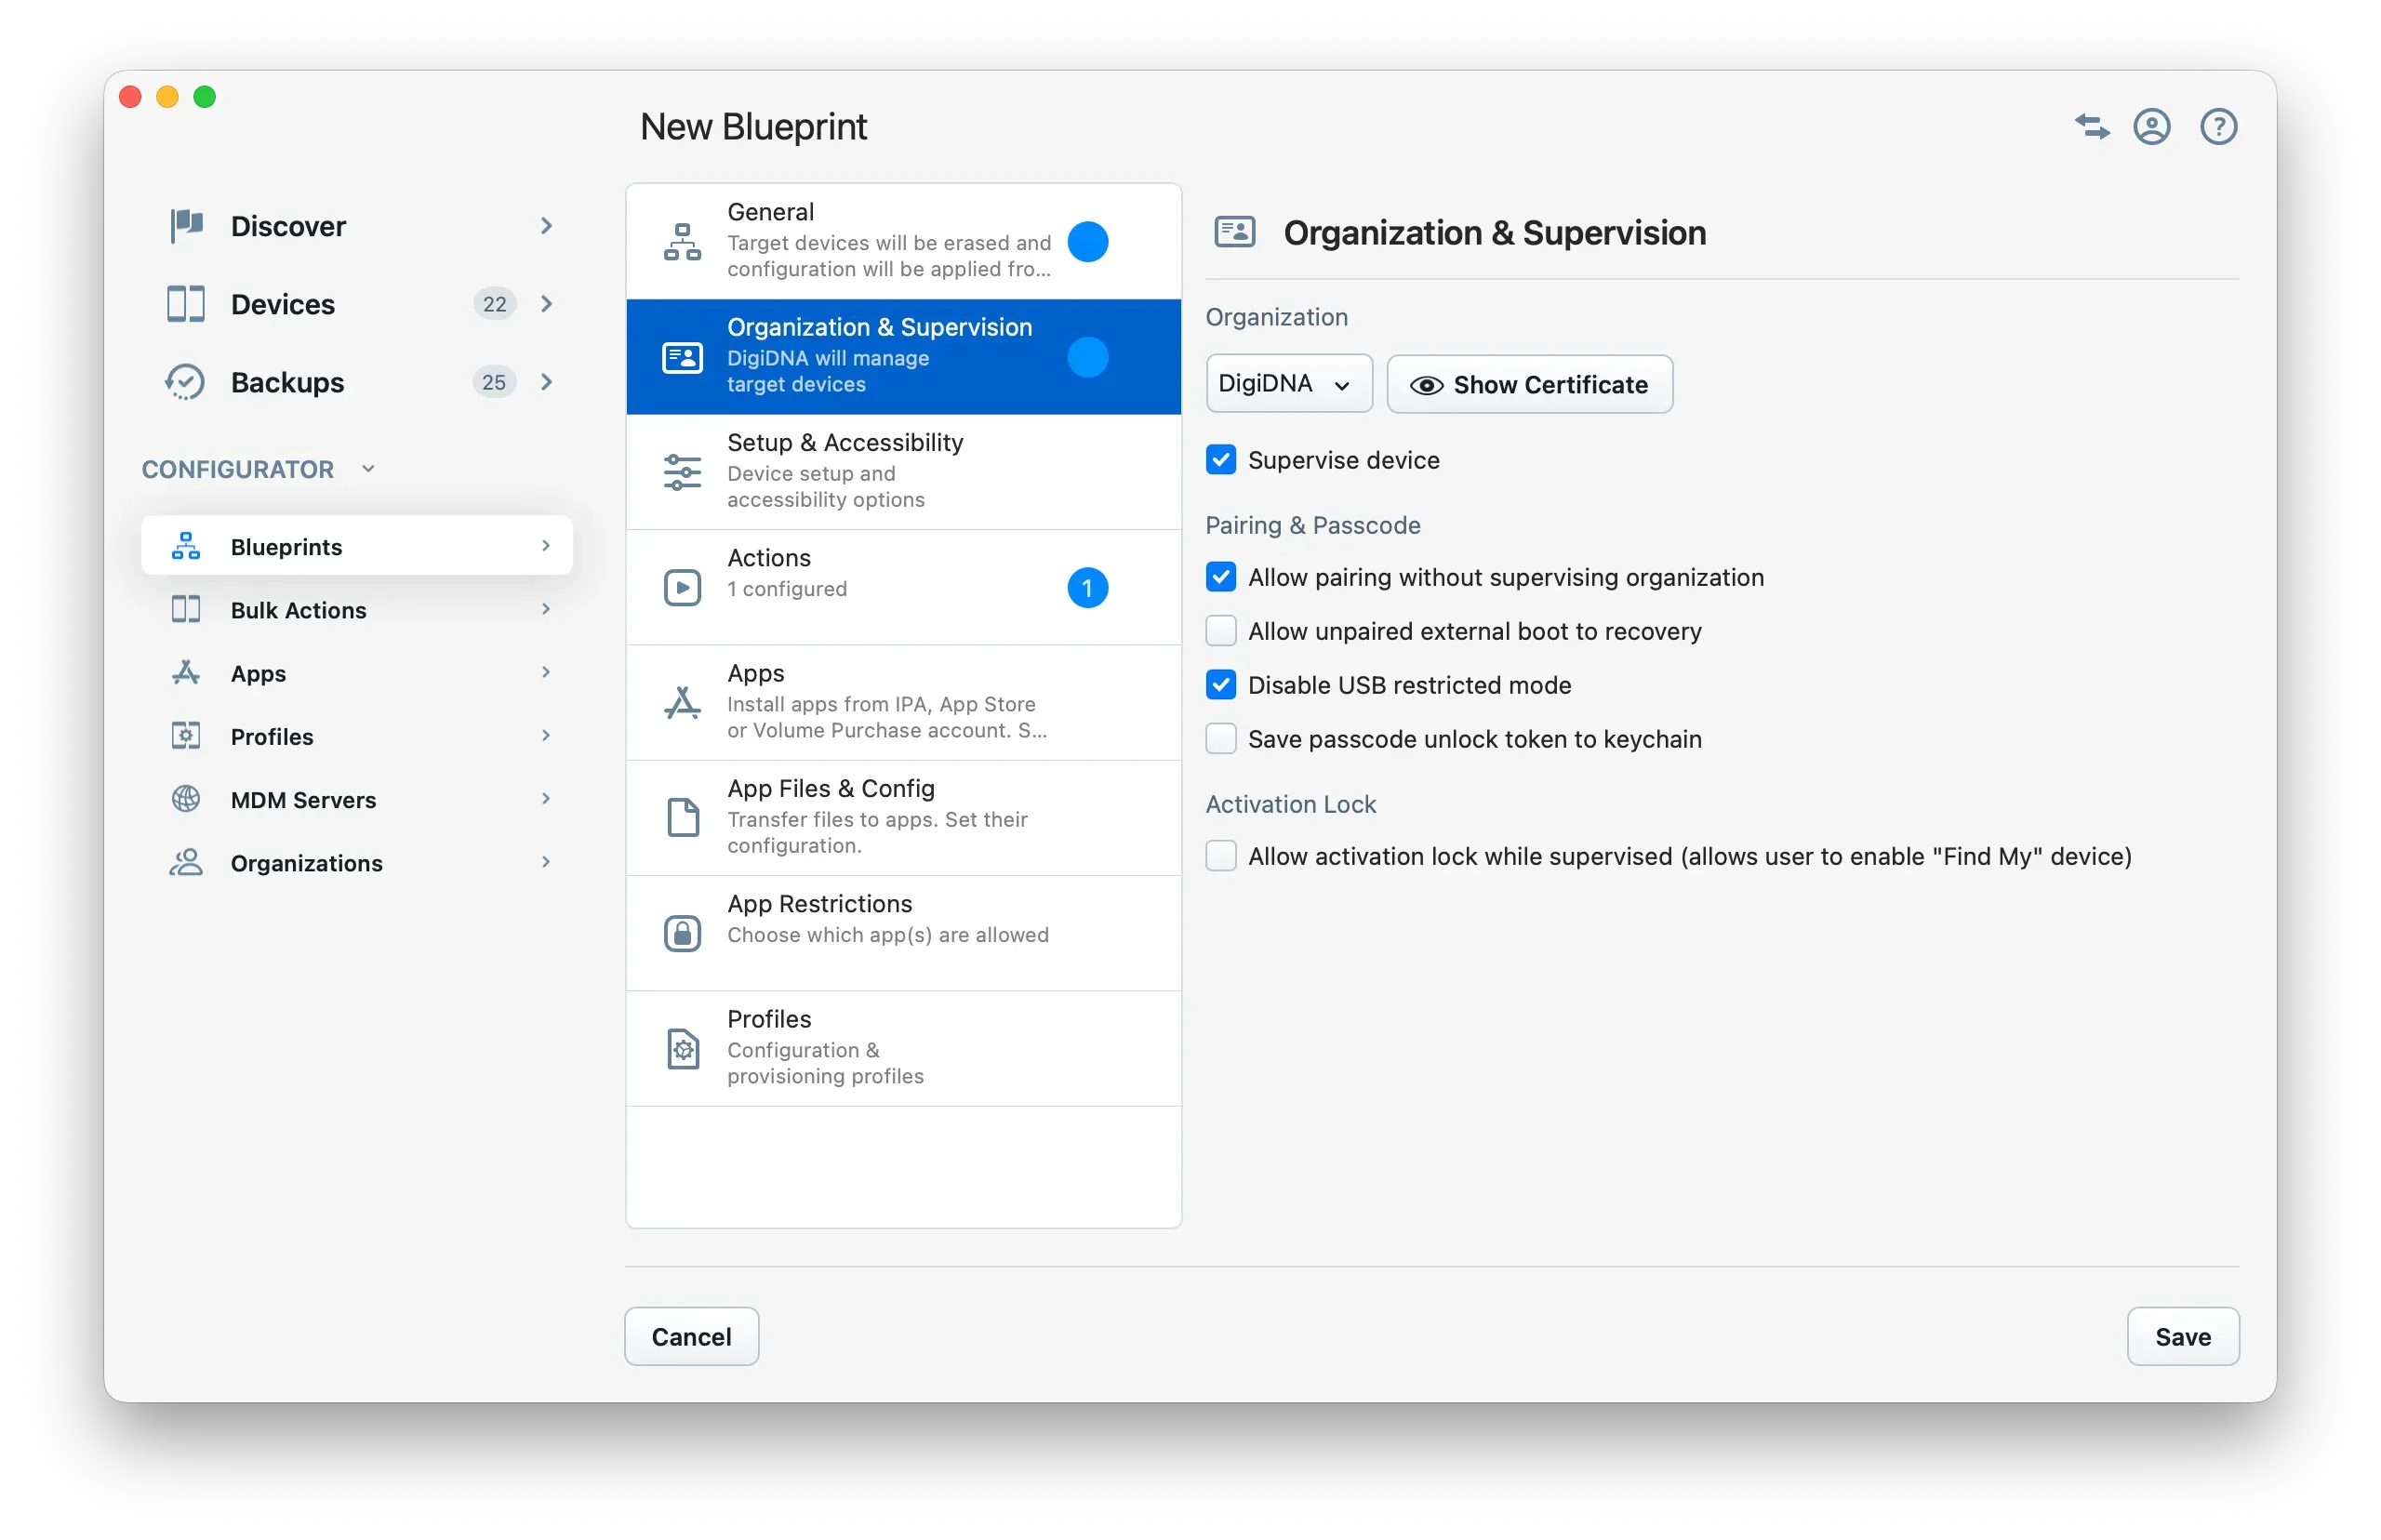
Organization & Supervision
In this section, if you want to supervise the device using a supervising organization identity, select a supervising organization to ensure full ownership of the device managed by your organization. With the supervising organization’s identity, you can always perform actions such as pairing the device in BFU (Before First Unlock) to back up its content, clearing the device passcode, or disabling Activation Lock (Find My).
Important: If your devices are registered in Apple Business and you enroll them in your MDM through Automated Device Enrollment, refer to 2.1. Automated Device Enrollment instead.
Profile-based enrollment with manual profile installation
Most MDM solutions provide enrollment configuration profiles (.mobileconfig) that you can manually download and install in the Settings (iOS) or System Settings (macOS) app.
On iOS, iPadOS, tvOS, and visionOS, this type of enrollment performs a User Enrollment, so the device won’t be supervised, unless you supervise it beforehand with iMazing, and optionally use iMazing to install the profile.
Note: Refer to 2.2.1. General – Zero-touch MDM Enrollment with a Profile to learn how to streamline profile-based enrollment with iMazing and make your devices supervised.
On macOS, the Mac will be device enrolled (supervised) if the user installing the configuration profile has admin permissions; otherwise, it will be user enrolled.
Learn more in Apple’s documentation: Profile-based Device Enrollment
Account-driven enrollment
This type of enrollment involves users signing in with their managed Apple Account (created in Apple Business) in iOS Settings or macOS System Settings. This method lets you enroll a device at any time, either as Device Enrollment (organization-owned devices) or User Enrollment (user-owned devices).
iMazing doesn’t offer a streamlined way to enroll devices using this method. It requires manual user actions.
Note: Not all MDM solutions support this method yet.
Learn more in Apple’s documentation:
Backing up devices that are enrolled in a MDM
Devices enrolled in an MDM can be backed up locally with iMazing, as long as computer (host) pairing is allowed by the MDM.
For devices enrolled via Automated Device Enrollment, make sure the ADE profile generated by your MDM does not prevent computer (host) pairing. See section 2.1 for details. In particular, do not set the allow_pairing property in the ADE profile generated by your MDM (this cannot be changed and will prevent pairing with any computer that doesn’t have the supervising organization identity installed). If you want to restrict pairing, use a Restrictions configuration profile with the allowHostPairing property instead, so it can be toggled from your MDM when needed. Read Supervision Prohibited Pairing for more details.
For devices enrolled with User Enrollment (which are not supervised), both private and work partitions are included in the same local iMazing backup. This differs from iCloud backups, where work and private partitions are backed up separately by the corresponding Apple Accounts (managed and personal). In other words, iMazing can create full device backups.
Understanding MDM capabilities by enrollment method
An MDM solution is meant to manage devices, not to access device data. It lets system administrators remotely configure devices by pushing apps and configurations to them. Enrolling a device in MDM does not provide access to its data through the MDM channel, this isn’t MDM’s purpose.
Below is a list of MDM capabilities available depending on the enrollment method used.
Ability | Automated Device Enrollment | Device Enrollment with Local Supervision | Profile-based Device Enrollment | Account-driven Device Enrollment | Account-driven User Enrollment |
|---|---|---|---|---|---|
Enforceable restrictions | All | All | Unsupervised only | Unsupervised only | Curated list |
Require passcode | ✅ | ✅ | ✅ | ✅ | ✅ |
Remotely erase managed data | ✅ | ✅ | ✅ | ✅ | ✅ |
Configure per-app VPN | ✅ | ✅ | ✅ | ✅ | ✅ |
Install and configure managed apps | ✅ | ✅ | ✅ | ✅ | ✅ |
Query the operating system version number | ✅ | ✅ | ✅ | ✅ | ✅ |
Query unique device identifiers (like serial number) | ✅ | ✅ | ✅ | ✅ | ❌ |
Query the device’s time zone | ✅ | ✅ | ✅ | ✅ | ❌ |
Query the device phone number | ✅ | ✅ | ✅ | ✅ | ❌ |
Query the device roaming status | ✅ | ✅ | ✅ | ✅ | ❌ |
Query list of all apps | ✅ | ✅ | ✅ | ✅ | ❌ |
Configure VPN | ✅ | ✅ | ✅ | ✅ | ❌ |
Remotely erase all content and settings | ✅ | ✅ | ✅ | ✅ | ❌ |
Require complex passcode or password | ✅ | ✅ | ✅ | ✅ | ❌ |
Enforce software updates | ✅ | ✅ | ✅ | ✅ | ❌ |
Enforce and manage FileVault | ✅ | ✅ | ✅ | ✅ | ❌ |
Set the device name in macOS | ✅ | ✅ | ✅ | ✅ | ❌ |
Manage Activation Lock in macOS | ✅ | ✅ | ✅ | ✅ | ❌ |
Take over management of a personal app | ✅ | ✅ | ✅ | ❌ | ❌ |
Manage Activation Lock in iOS, iPadOS, and visionOS | ✅ | ✅ | ❌ | ❌ | ❌ |
Configure Always On VPN | ✅ | ✅ | ❌ | ❌ | ❌ |
Configure a global HTTP proxy | ✅ | ✅ | ❌ | ❌ | ❌ |
Set the device name in iOS, iPadOS, and visionOS | ✅ | ✅ | ❌ | ❌ | ❌ |
Turn on Managed Lost Mode | ✅ | ✅ | ❌ | ❌ | ❌ |
For a complete overview of which features are available for each enrollment method, please refer to Apple’s documentation: How enrollment methods help to protect the user’s privacy