Device Management
Supervise iPhone, iPad and iPod touch

💡iMazing 3
This guide is for the legacy iMazing version 2. For information on version 3, please visit this page.
Supervision is a mobile device management technology which enables businesses and institutions to take full ownership over their iOS and iPadOS devices. Once a device is supervised, powerful configuration and security options become available:
- Single App mode
- Advanced restrictions
- Security policies
- Restrict pairing with other computers
- And more...
Supervising iPhone, iPad and iPod touch is easily achieved with iMazing's Supervision wizard, available in iMazing 2.12 and above on both macOS and Windows. Here's how:
- Install and launch iMazing, and connect the target iOS device to the computer.
- In iMazing's Actions list, scroll down and click the Supervision button.
- Review supervision options and confirm.
💡 This guide covers supervision features available in the standard version of iMazing. For more advanced requirements, we also offer iMazing Configurator Edition, a suite of tools which enable powerful automations and finer grained control over company devices, including supervising devices without losing existing data. iMazing Configurator is strictly licensed for professional use only. Learn more about iMazing Configurator
For a quick overview of supervision and other useful features for your business, take a look at the following video:
Before you begin
Download and install iMazing on your Mac or PC computer.
In-Depth Tutorial
1. Launch iMazing and connect your device
To supervise iPhone, iPad or iPod touch with iMazing, the device must be connected via USB, and run at least iOS 10.
2. Scroll down in the Actions list and click Supervision
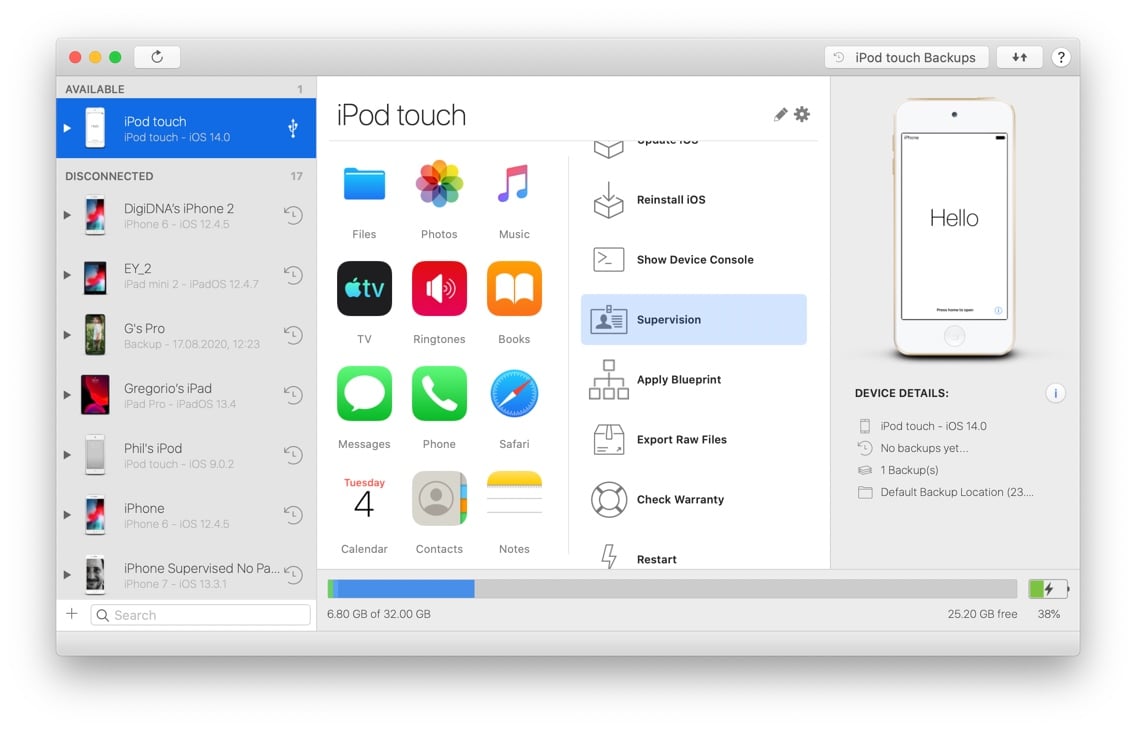
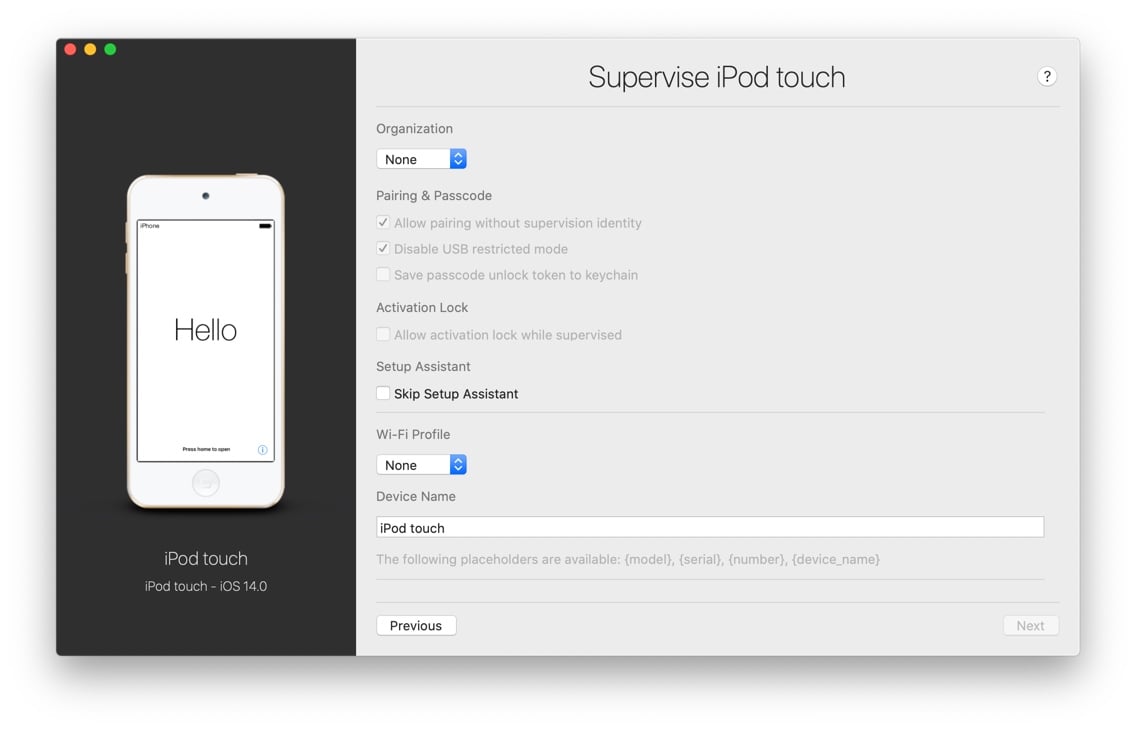
iMazing will display an informative screen about supervision. Click Next and you'll be taken to the supervision options screen:
💡 If the iOS device is already supervised, clicking the Supervision action will open another screen presenting actions which are specific to managing supervised devices, such as setting wallpapers or enabling/disabling Single App Mode. Learn more in our Managing Supervised Devices guide.
3. Choose a supervising organization
The first thing to do is to pick a supervising organization. In technical terms, an organization is a digital certificate (the supervision identity) associated with information about the organization. Creating or importing an existing organization with iMazing is very simple and can be done inline in the Supervision wizard.
- Click the Organization drop down and select Choose..., iMazing will display its organizations library:
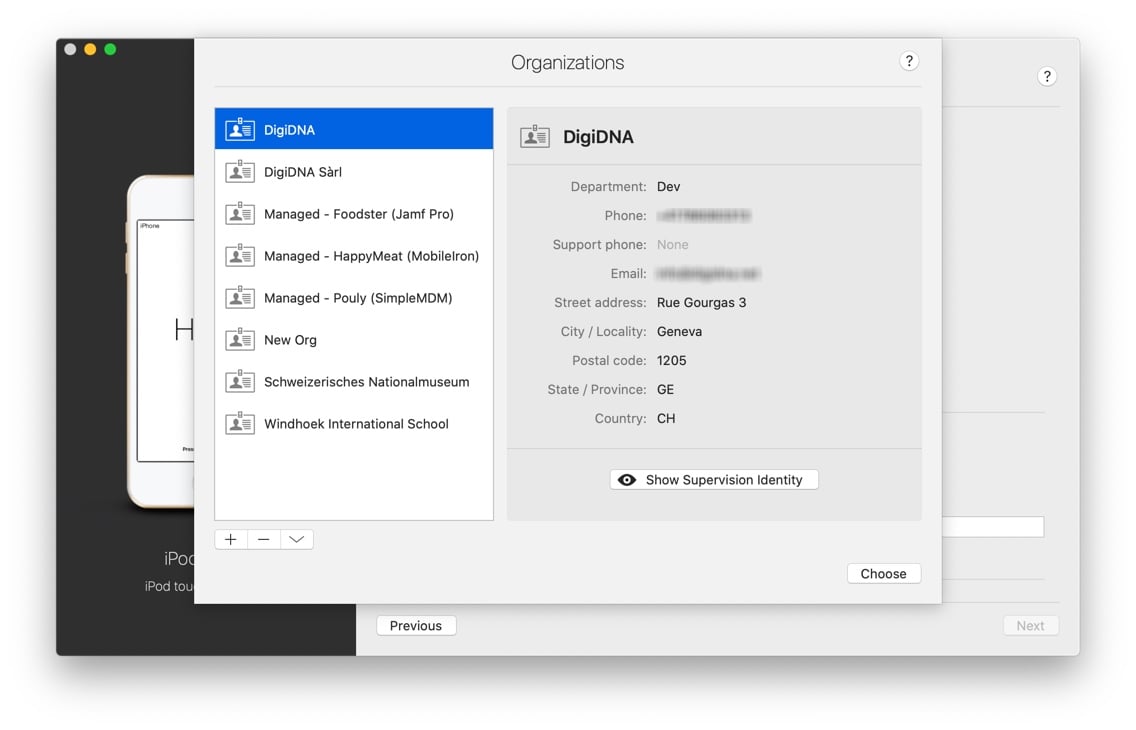
- If your organization library is empty, click the + button to create one.
- Once you have at least one organization in your library, select one and click Choose.
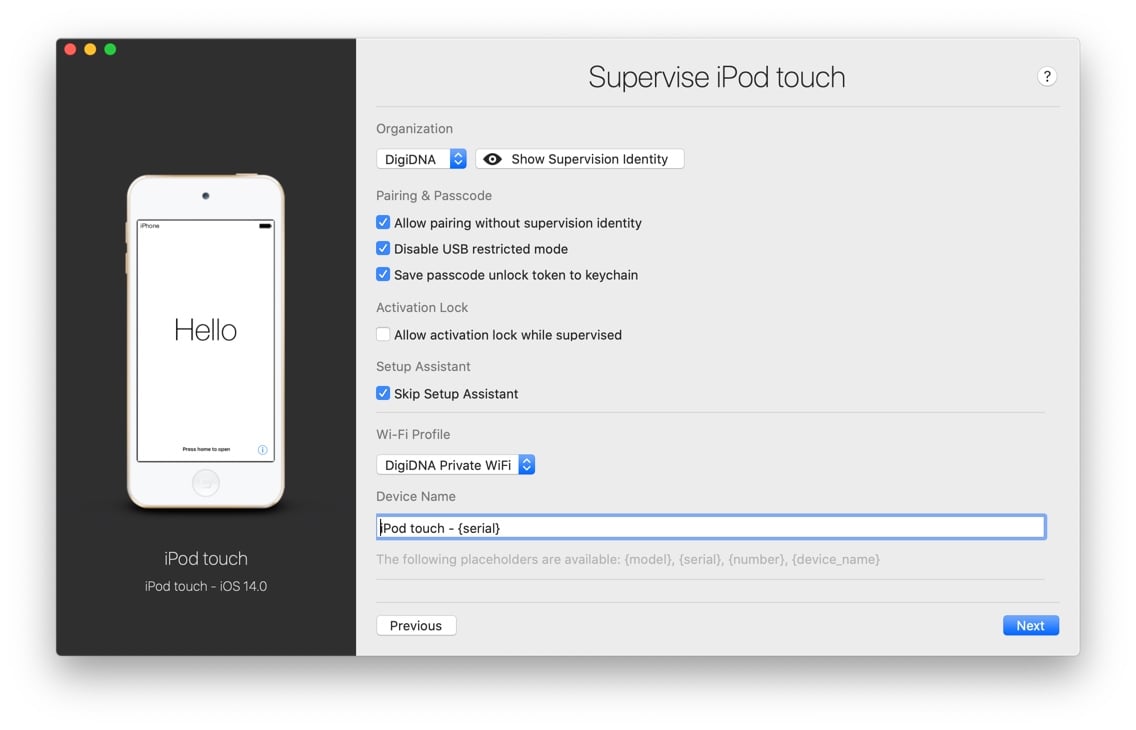
As soon as you have selected an organization, you can supervise the target device, or configure additional options.
💡 The organization's supervision identity is stored in the macOS Keychain or in the Windows Certificate Store. We recommend that you also keep a safe copy by exporting your organization from iMazing's library and storing it safely. Exported organizations are password protected (AES 256 encryption).
4. Understand and configure the supervision wizard's options
Most of the options exposed here can also be configured at a later stage. Special attention must be given to the Allow pairing and Allow activation lock settings which cannot be changed once the device is supervised.
Allow pairing without supervision identity: true by default. If you set this option to false, the supervised device will be prohibited from pairing (and hence communicating) with unauthorized computers. Pairing will only be possible if the supervising organization is imported in iMazing or Apple Configurator.
⚠ The supervising organization becomes extremely important if you disable this option. Losing the supervising organization will result in admins being unable to access data on the device permanently.
On iOS 13 and above, this setting can also be controlled with a configuration profile once the device is supervised. If you wish to control the setting via a profile, you should leave it to true here.
Disable USB Restricted Mode: true by default. In iOS 11.4.1, Apple introduced a new security feature which automatically disables iOS and iPad OS devices' USB port if the device isn't unlocked for more than an hour. Just like Apple Configurator, iMazing will by default disable this behaviour since it prevents admins from locally managing company devices.
Save passcode unlock token: false by default. Enable this option and iMazing will save a special token allowing you to clear the passcode of the device. Saving a passcode unlock token can also be done at a later stage, but only if the device is not passcode protected.
⚠ If the device is rebooted, or inactive for more than 24 hours, it will enter a special secure mode known as BFU (Before First Unlock). In that mode, communication with the device becomes impossible without unlocking it first, even if supervised.
Allow activation lock: false by default. Usually, signing in to iCloud has the side effect of enabling Apple's activation lock feature: the device, even if erased, will be permanently tied to a specific Apple ID unless the user signs out by providing his Apple ID credentials. This feature can cause company devices to become unusable, and is by default disabled on supervised devices.
Skip setup assistant: false by default. Enable this option to skip iOS setup assistant post configuration. Note that skipping the setup assistant will also skip important security steps such as passcode protection and Touch ID / Face ID configuration, and is consequently appropriate only in very specific use cases, such as setting up devices in fully locked Single App Mode for example.
Wi-Fi profile: choose a Wi-Fi configuration profile which iMazing will install on the target device, letting it connect to your network without any user interaction. You can directly create a Wi-Fi profile from here if you do not have one already configured in iMazing's Profile Library – simply click Choose... in the Wi-Fi profile dropdown to display the Profile Library, then the + button to create a new Wi-Fi profile.
Device name: self explanatory. Name the target supervised device in advance.
From here, scrolling down reveals a few more options:
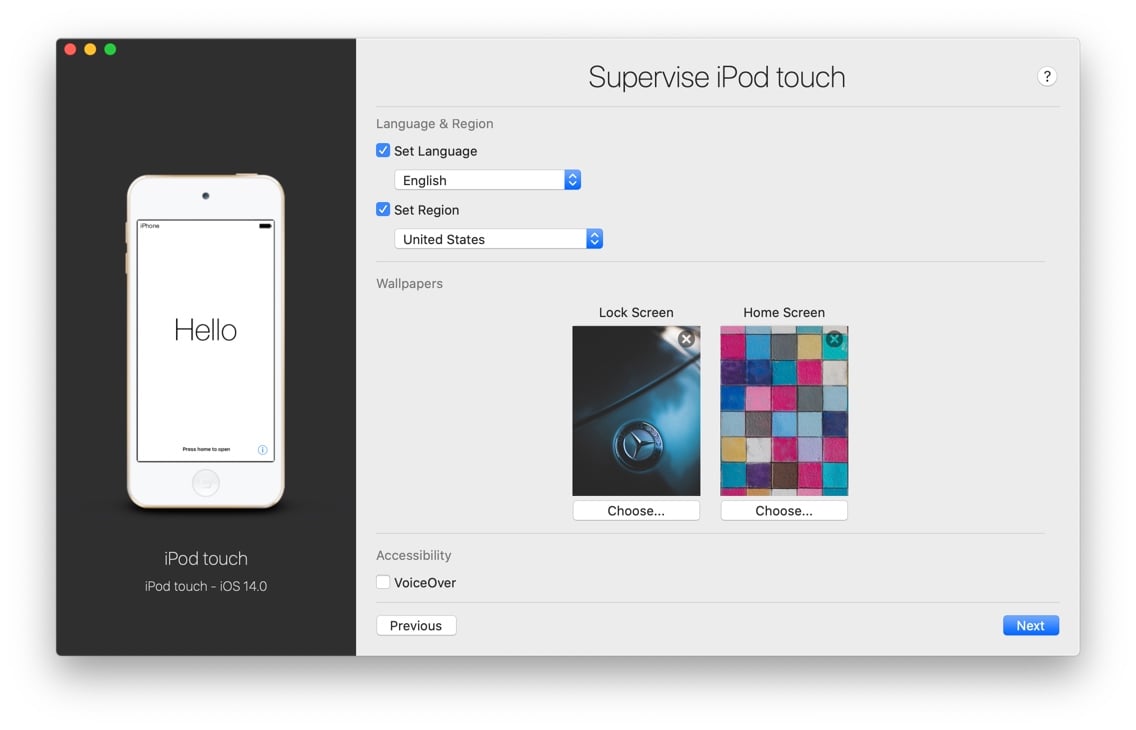
Language & Region: self explanatory. Set the device's language and region, especially useful if you opt for skipping the setup assistant.
Wallpapers: self explanatory. Drag and drop images to the lock screen and home screen drop zones, or click the Choose... buttons to open a file picker. Somewhat puzzlingly, setting an iPhone or iPad wallpaper from a computer is only possible if the device is supervised.
Accessibility: enable built-in accessibility features such as Zoomed mode, inverted colors or Voice Over.
5. Click Next and Confirm
When you're satisfied with your configuration, click Next. iMazing will present a final confirmation screen:
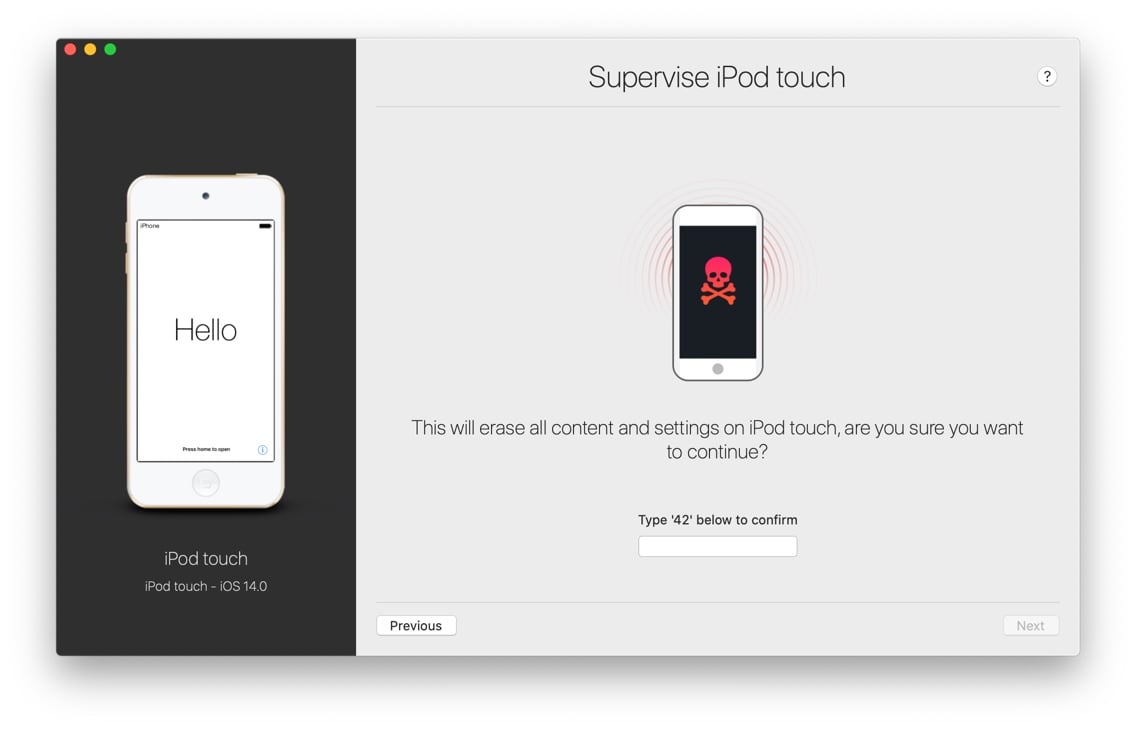
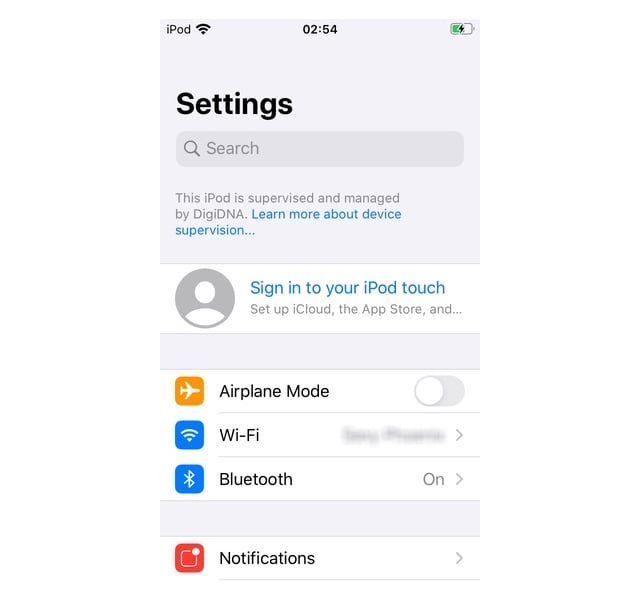
Supervising with iMazing or Apple Configurator will always fully erase the target device first. This is by design and is meant to protect user privacy and limit abusive use of supervision in non-professional contexts. Furthermore, once a device is supervised, the iOS Settings app displays a notice at the top of the Settings app:
Going Further
Once a device is supervised, clicking the same Supervision action button in iMazing will open an options panel letting you directly enable Single App Mode, set wallpapers, clear the passcode and more. Please refer to our Managing Supervised Devices guide for more information, or jump straight to our Single App Mode tutorial if that's your main use case.
Configuration Profiles
Configuration profiles enable advanced configuration of iOS devices. Many settings exposed in profiles are only applicable to supervised devices: advanced restrictions, web content filters, setup assistant configuration and more become available in a supervised context only. iMazing can push configuration profiles to your devices, store them in a library, and even create and edit them. Head to Getting started with iOS configuration profiles to learn more.
Removing Supervision
You must erase the device to remove supervision. Once the device is erased, it can be supervised again.


