iMazing Configurator: Blueprints Deep Dive
Updated on Mar 11, 2026
Reading time ~29 minutes
General Remarks
Configuration vs Automation
Blueprints can be leveraged to configure Apple mobile devices before handing them out to their end user. This process usually involves taking ownership of the target devices via supervision, installing configuration profiles to pre-configure Wi-Fi access and enforce security policies, and pre-installing 3rd party or company apps.
On the other hand, blueprints can also perform quite a few automation tasks: a typical 'refurbish' workflow would perform a battery health check, erase all data and settings, and update the OS before waiting for a full battery charge. Another type of workflow may require the blueprint to copy documents to a specific app, sync contacts, books, music or photos, or even configure an app's settings before launching it in Kiosk mode.
In any case, iMazing Configurator will take into account the entirety of the blueprint and the state of the target devices to skip redundant actions:
- Apps which are already installed will not be installed again if up to date
- Update OS will not be performed if the device is already running the latest available OS
- Erase All Data and Settings will be skipped if the device is already erased
- Erase All Data and Settings will be replaced by an OS restore if the blueprint also contains the Update OS action
- Etc.
Supervision Essentials
To supervise an iOS, iPadOS or tvOS device means to configure it in a way that guarantees a form of ownership of the device by it's supervising organization, via a certificate often called the supervising identity. Supervision unlocks a whole suite of device management capabilities:
- Save passcode unlock token and Clear passcode actions
- Clear Screen Time passcode action
- Set wallpapers
- Single App Mode (also called Kiosk Mode)
- Whitelist or Blacklist apps
- Zero-touch installation of configuration profiles
- Pairing without interacting with the target device
- Pairing even if Allow pairing is set to false
- Many other configuration profile settings
Apple and 3rd party vendors usually denote these capabilities by the "supervised only" mention, both in the UI of their solutions and in technical documentation. iMazing Configurator follows this practice.
Important: to execute a "supervised only" action, the same supervising identity must be configured on the host and on the target device. In Apple Configurator and iMazing, supervising identities can be imported by importing an organization.
ADE devices: devices configured via Apple's Automated Device Enrollment (ADE/DEP) retrieve their configuration from Apple's servers, via the download and installation of an ADE profile. To perform "supervised only" actions on such devices, you must add your organization's certificate to the ADE profile's Host Supervision Certificates field. See the Uploading Supervising Identities section of JAMF's documentation on the subject for a good example of how MDM vendors expose this setting.
User Data
When configuring a blueprint which does not erase target devices, you may see the following inline warning:
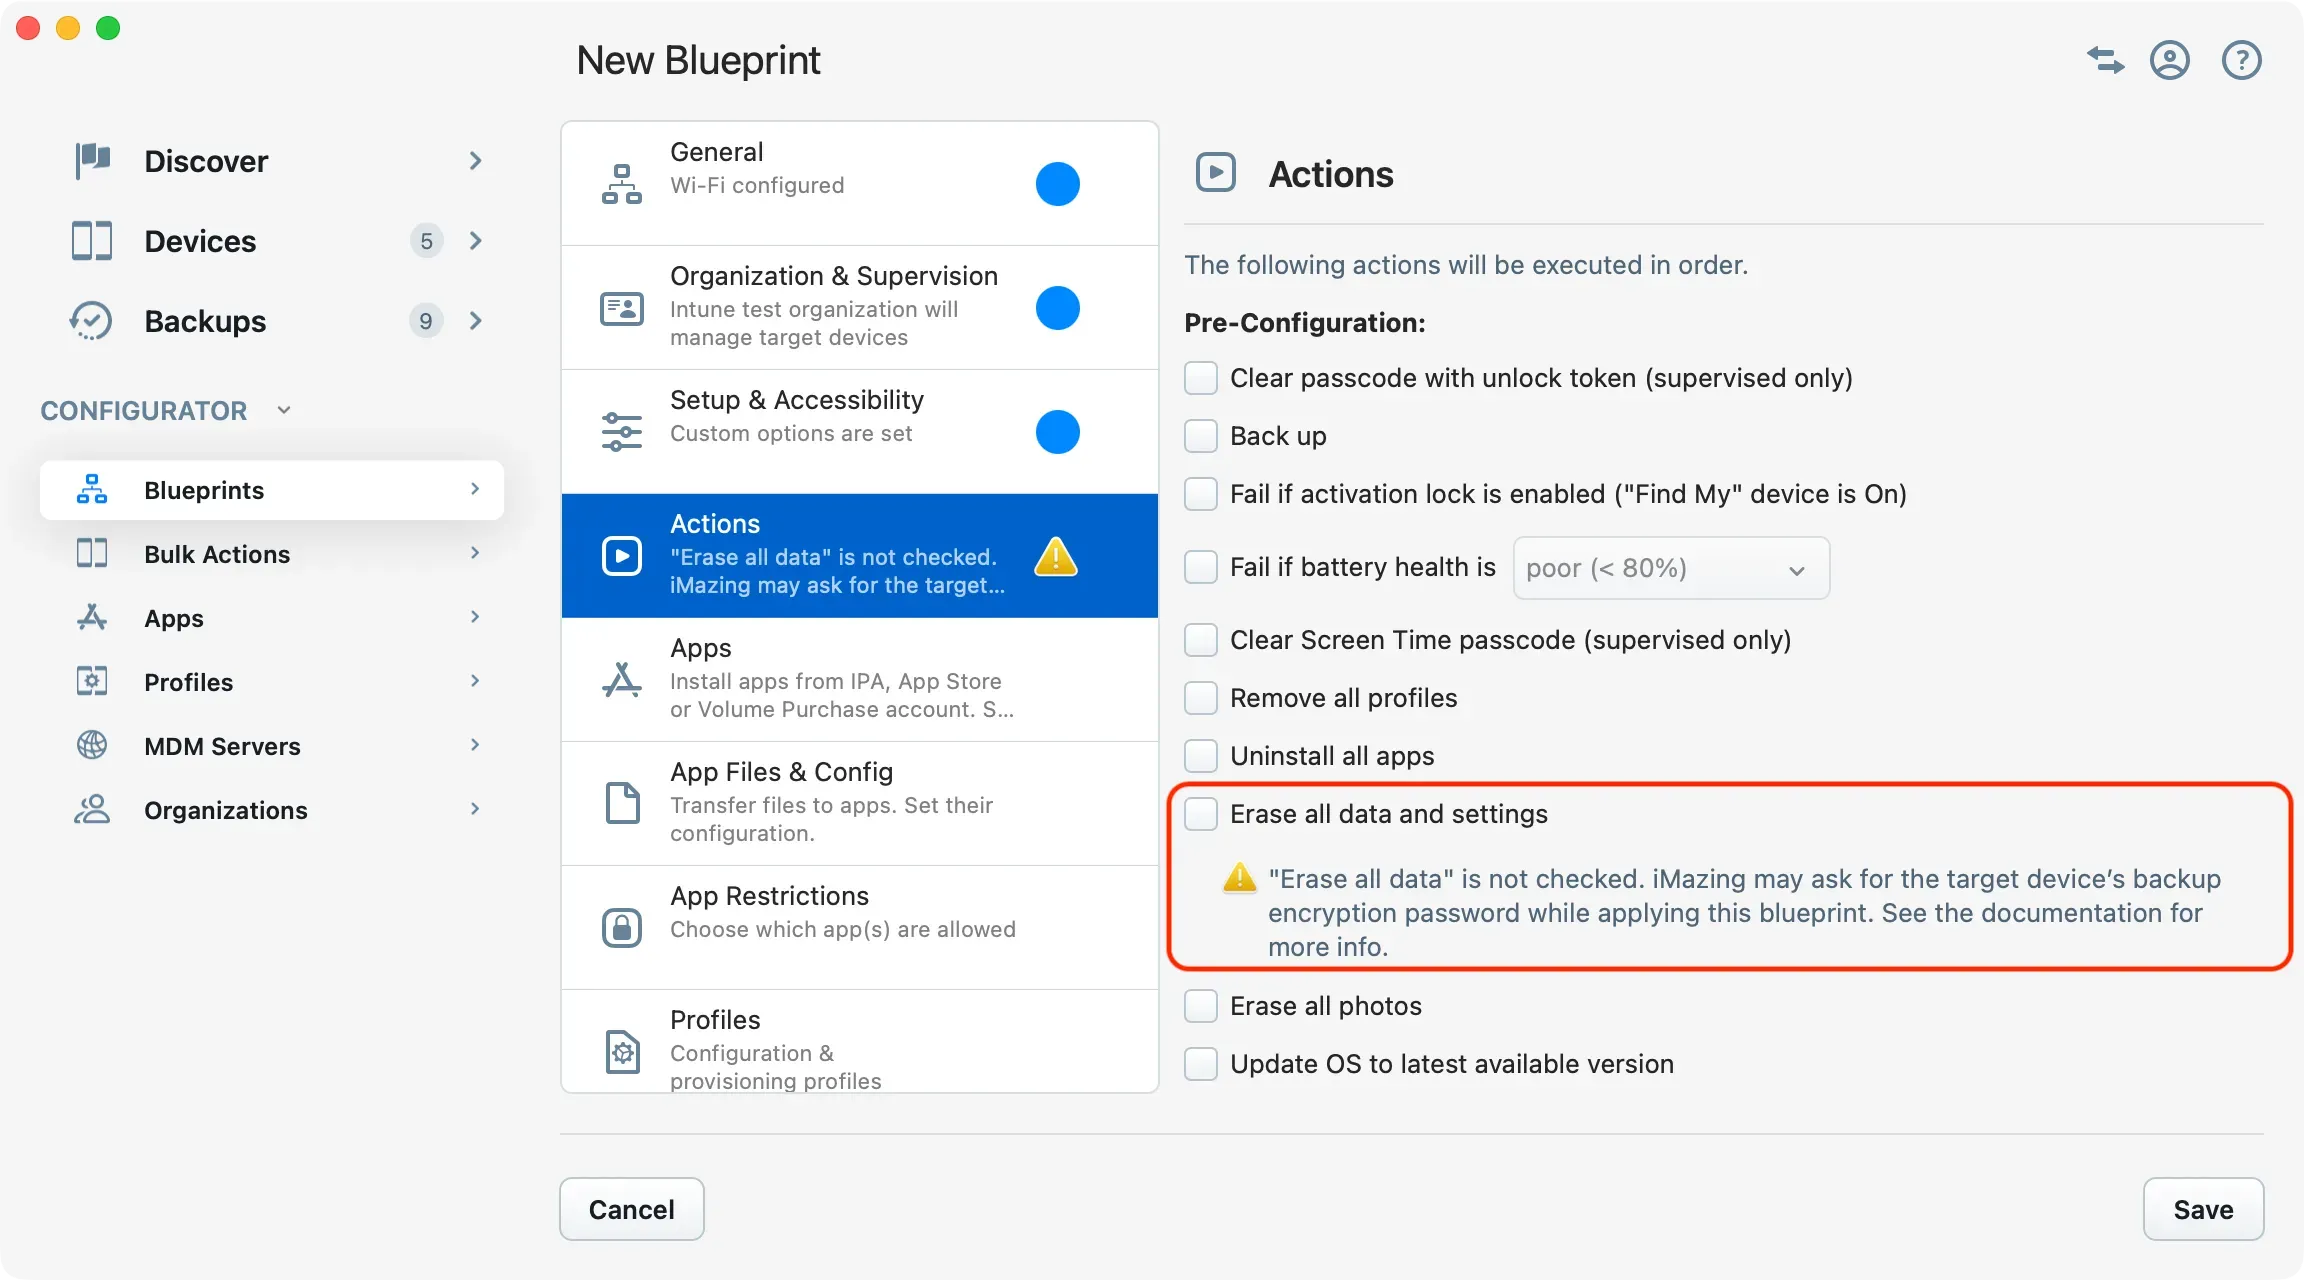
Important: Erase all data is not checked: iMazing may ask for the target device’s backup encryption password while applying this blueprint. See the documentation for more info.
iMazing Configurator can do quite a bit more than Apple Configurator without erasing the target device, but will always honor data ownership: if a backup password has been set, some actions will become impossible without erasing the device or providing the backup password.
Validation
Because the state of the target devices to which a blueprint is applied cannot be known in advance, the blueprint editor performs only minimal validation. Here are a couple examples:
- Adding supervised only actions to a blueprint which does not supervise devices is not an error: the target device may be already supervised. If it is not, these actions are ignored.
- Pushing files to an app which is not configured to be installed is not an error. The app may be already present on the target device. If it is not, the action is ignored.
That being said, the blueprint editor will inform you inline of important contradictions or limitations, and features a contextual help button pointing to the relevant article of our online documentation.
The Blueprint Editor
The blueprint editor is structured in a way that allows in place configuration of every aspect of a blueprint, from the generation of a supervision identity to the creation of configuration profiles – because of this, you do not need to lay any preparatory ground work before creating a new blueprint in iMazing Configurator's library.
To get started, select the Blueprints tab in iMazing Configurator and click the '+' button: this will create a fresh blueprint and open it in the blueprint editor.
Available preferences are divided in the 8 separate sections detailed below. Aside from naming the blueprint, there are no mandatory fields.
General
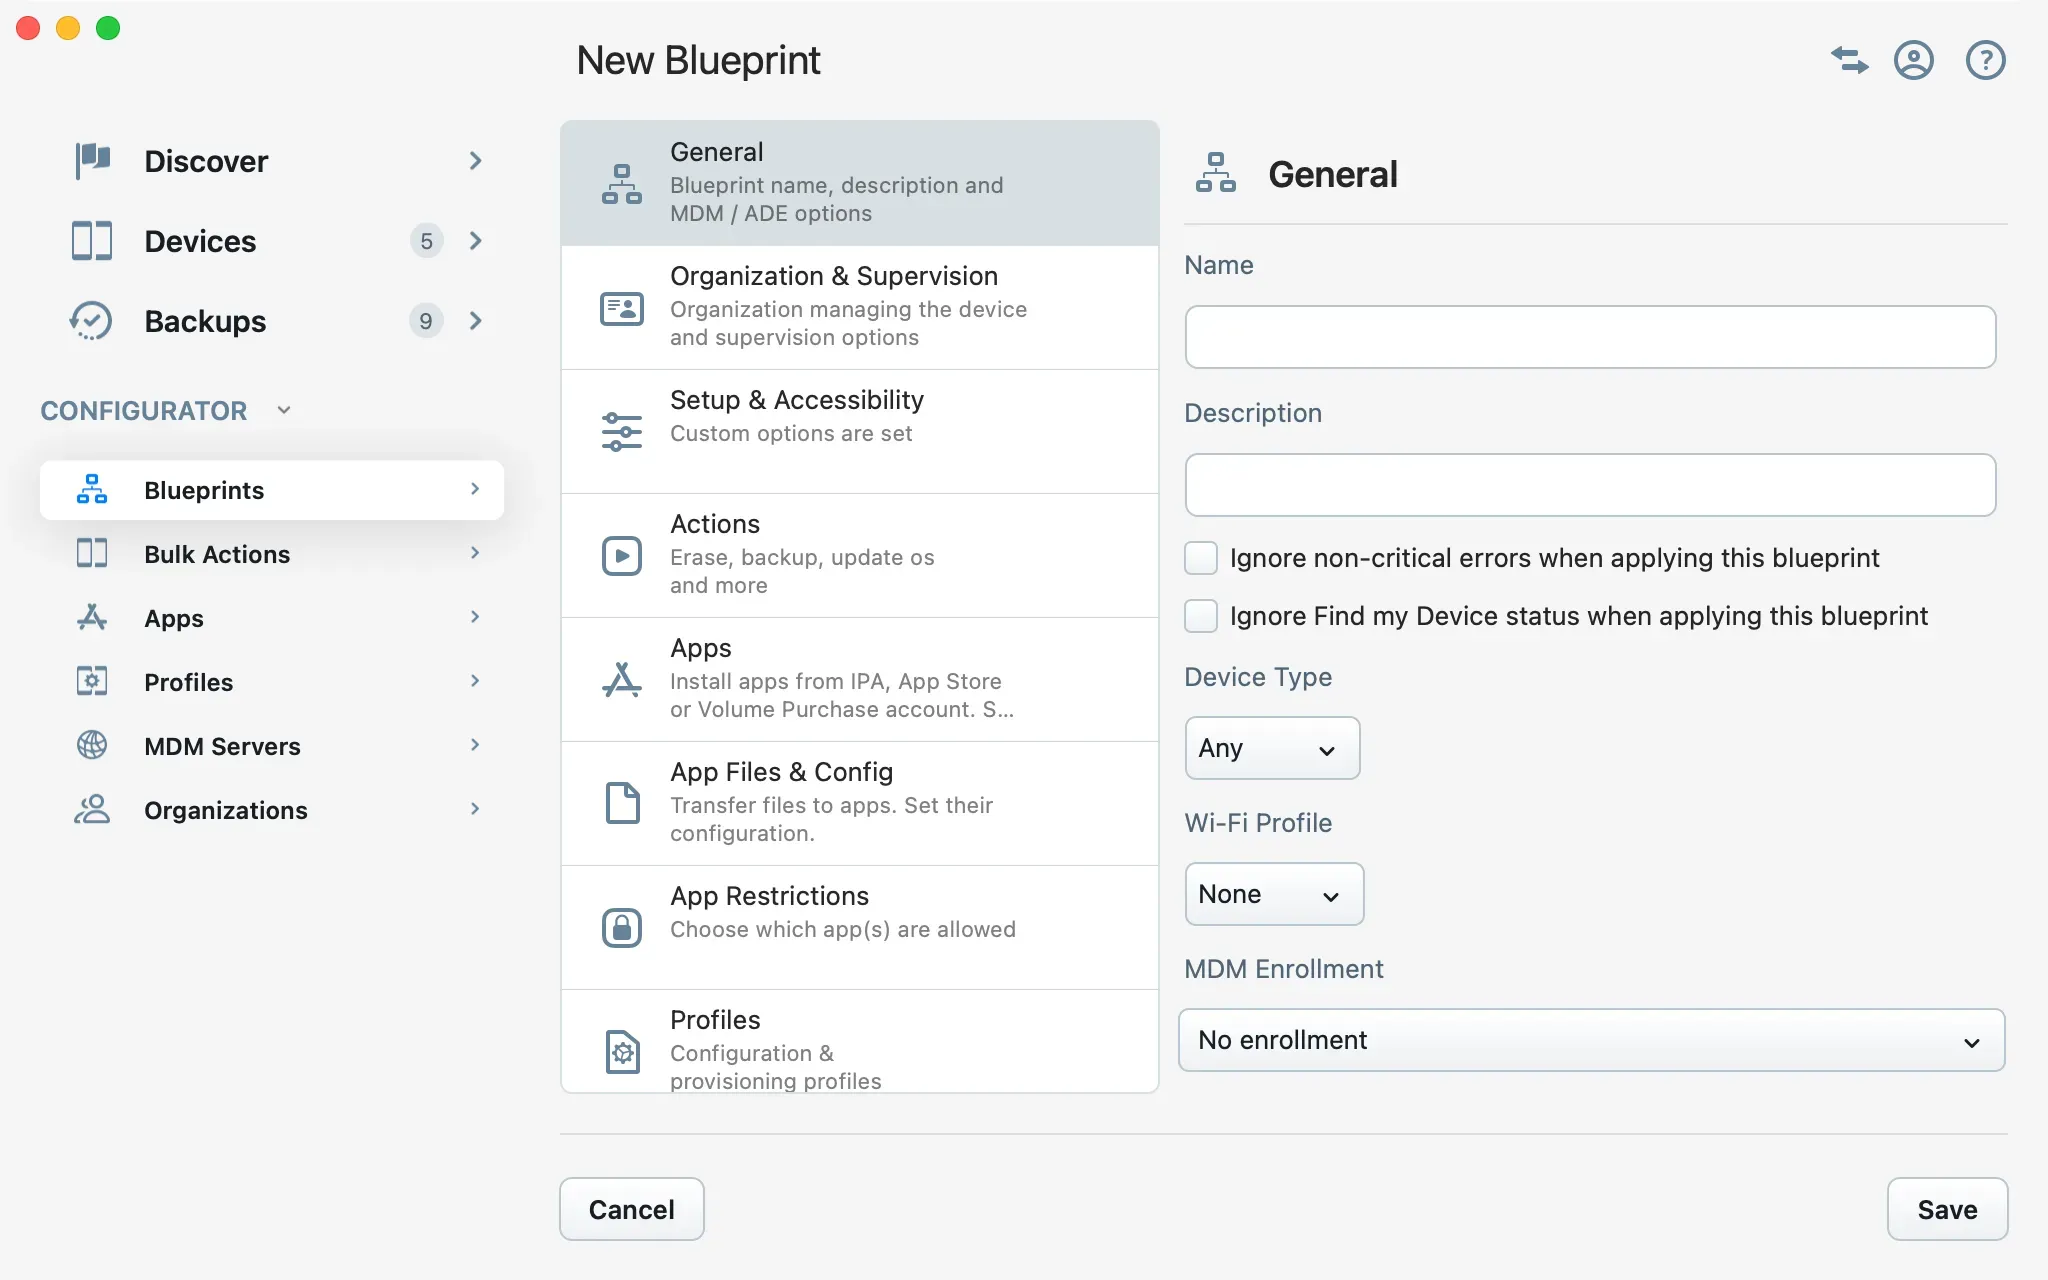
Name and Description
These fields are purely informative. Use them to quickly identify what a blueprint does.
Ignore non-critical errors when applying this blueprint
False by default. Enable this option and iMazing will keep applying a blueprint even after encountering non-critical errors. The following errors are considered critical and will always interrupt the deployment of a blueprint:
- Failure to back up or restore a backup
- Failure to supervise, to enroll in MDM, or to apply configuration from ADE (formerly DEP)
- Failure to install an app
Ignore Find My Device status when applying this blueprint
False by default. iMazing usually requires you to disable Find My iPhone/iPad in order to erase a device, restore its OS, or restore a backup to it. This protects against situations where the device ends up being activation-locked when it reboots after being erased or restored.
If you wish to bypass these checks and configure the blueprint to be executed regardless of Find my Device status, enable this option. Target devices may find themselves in an activation locked state after being erased or restored, at which point iMazing will wait until you enter the Apple ID and password to activate the device, and continue applying the blueprint.
Device Type
Default: Any. Use this drop-down to restrict deployment of the blueprint to a specific type of Apple mobile device. Attempting to deploy a blueprint on a device of the wrong type will result in an error.
Wi-Fi Profile
Installing a Wi-Fi profile is not only practical, it is also a requirement if you use iMazing Configurator for zero-touch MDM enrollment of your devices. Furthermore, if you are installing Volume Purchase apps via blueprints, iOS/iPadOS will need a network connection to verify license assignments when the app is launched. For this reason, a Wi-Fi profile is also required when setting up a device to launch an app in single-app mode (i.e. kiosk mode).
Depending on your network environment and on how many devices you are configuring, the devices may need more or less time to acquire a network connection after the Wi-Fi profile is installed. Use the Seconds to wait drop-down to increase or decrease the amount of time iMazing waits before resuming configuration of your devices.
Tip: when choosing a Wi-Fi profile in the General section of the blueprint editor, iMazing will display your profile library with only Wi-Fi profiles listed.
MDM and Automated Device Enrollment (DEP)
There are 4 options to choose from:

1. No enrollment: use this option if you're managing devices locally, or if your blueprint performs automations on already enrolled devices, or if you intend to enroll devices manually at a later stage.
2. Standard MDM enrollment: will erase target devices, and configure them just like Apple Configurator does if Manual configuration is selected when preparing a device. Enrollment with this method is appropriate for non-ADE devices.
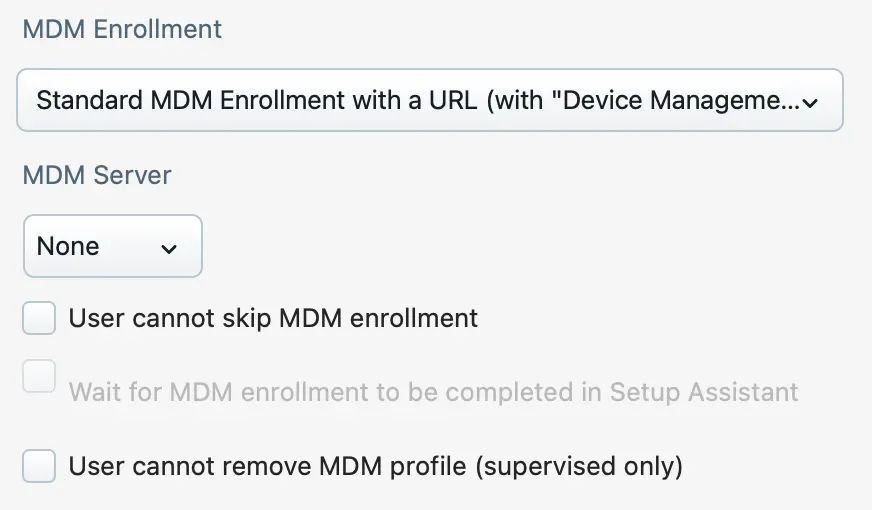
Requirements:
- The Skip Setup Assistant action must not be enabled.
Options:
- User cannot skip enrollment: enable this option and the enrollment setup assistant step will become mandatory.
- Wait for MDM enrollment: enable this option, and the user will have to wait after accepting enrollment until it is fully completed. Requires supervision.
- User cannot remove MDM profile: enable this option to prevent users from removing the MDM enrollment profile from the device. Requires supervision.
Manual MDM enrollment is performed by the device itself. It will download the enrollment profile from the MDM server, and prompt the user to accept enrollment in the Setup Assistant.
3. Zero-touch enrollment: will erase target devices, and install the MDM enrollment profile directly, without showing the MDM enrollment Setup Assistant step.
Requirements:
- A Wi-Fi profile must be configured in the blueprint (see above).
4. Apply configuration from "Automated Device Enrollment" (ADE/DEP): will erase target devices, and instruct them to retrieve and apply their configuration from ADE.
Requirements:
- A Wi-Fi profile must be configured in the blueprint (see above).
- Target devices must be registered in Apple Business Manager (ABM) or Apple School Manager (ASM).
Options:
- MDM enrollment credentials can be provided here if needed.
Important: For devices registered in ABM or ASM:, since iOS 13, all Automated Device Enrollments are mandatory and include supervision.
Organization & Supervision
An organization is required if the blueprint should supervise devices. If the target devices are already supervised, or if the blueprint does not contain any supervised only actions, you can skip this section entirely.
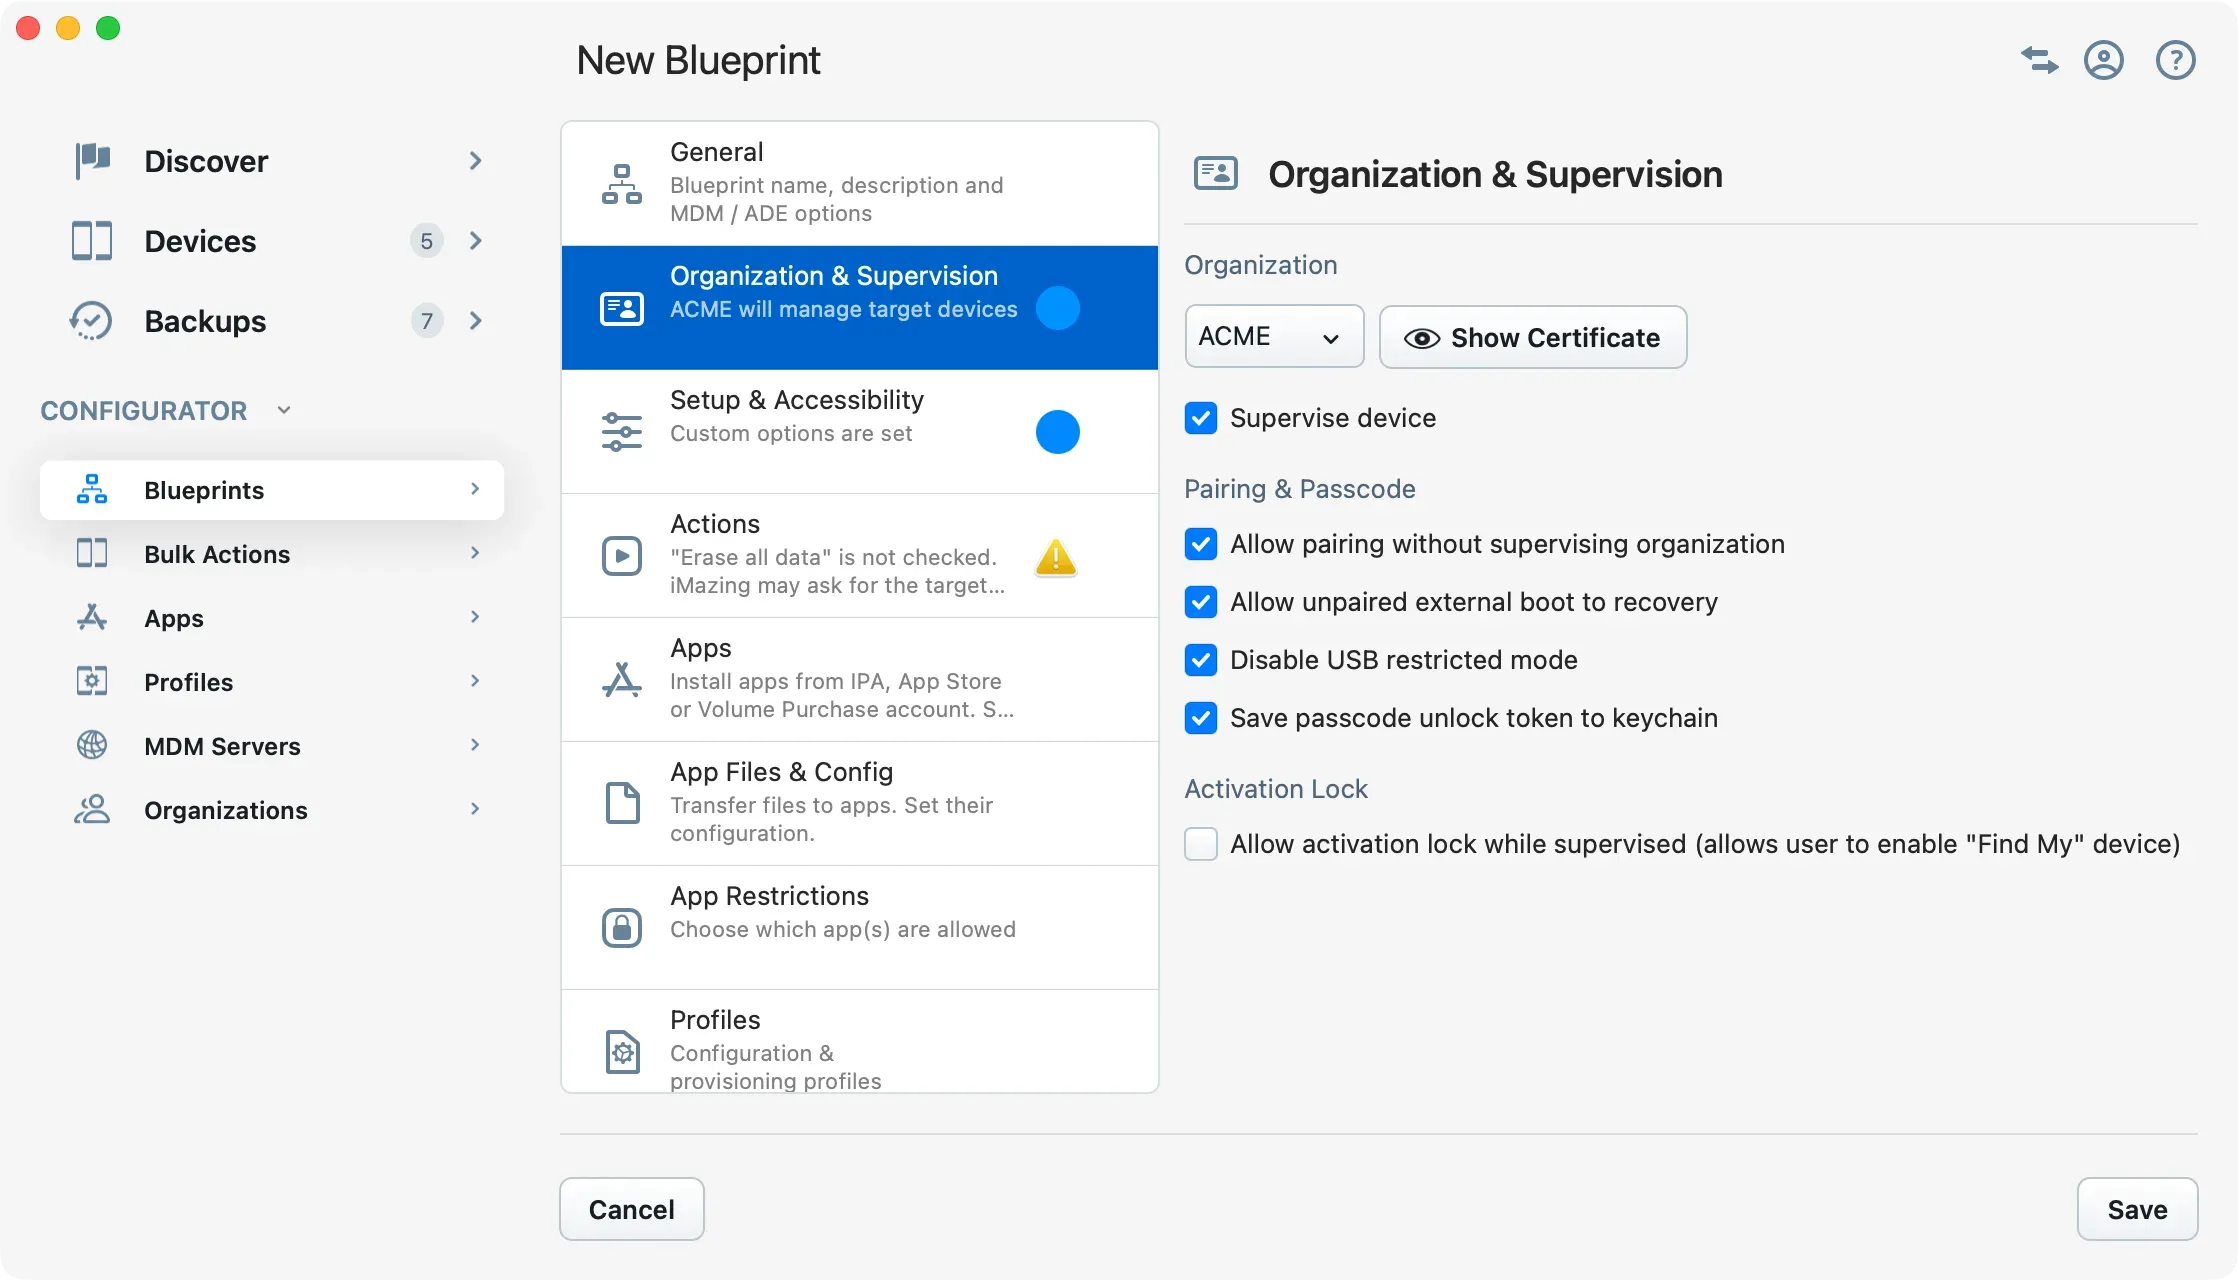
Use the drop-down and click 'Choose…' to display the Organizations Library, from where you can either choose an existing organization, create a new one, or import an existing one. The Organization Library is detailed here.
Once a valid organization has been selected, you can enable supervision and configure the following options:
Allow pairing without supervision identity
True by default. If false, pairing between the device and a computer will be secured by the supervision certificate, hence requiring that the supervising organization be created (or imported) in iMazing or in Apple Configurator. This setting is extremely important: it can be used to make sure that devices are secure by preventing their connection to unauthorized computers, but it can also lead to difficult situations. If the supervising identity is lost, it becomes impossible to connect locally to supervised devices, which may result in data being locked on the device permanently.
This all important setting can be named differently depending on the context. Here's how it appears in Apple Configurator:
Context | Setting Name | Key |
|---|---|---|
Prepare wizard | Allow devices to pair with other computers |
|
Profile Restrictions payload) | Allow pairing with non-configurator hosts |
|
In iMazing Configurator, we've decided to explicitly state what this setting effectively does: it does not allow or prevent pairing, it restricts pairing to authorized hosts only, via the supervision identity.
Notice that the setting is exposed in Apple Configurator's Prepare wizard, but also in the Restrictions payload of configuration profiles. In the event of a conflict, the most restrictive value is applied, false in this case.
Important: Note that setting allow pairing to false here is a permanent choice: the device will have to be erased and configured anew to change it. When applied via a Configuration Profile, the option can be disabled later by simply removing the profile.
Allow unpaired external boot to recovery
This function allows or disallows unpaired connected devices to switch into recovery mode when connected to a host computer, but not to switch it into DFU mode. This means that connected devices attempting to enter into Recovery mode will not succeed if the host computer does not have the supervising Organization configured when allowUnpairedExternalBootToRecovery is set to false (which is the default).
Disable USB restricted mode
True by default. USB restricted mode is a security feature introduced in iOS 12 which completely disables the USB port's data connection after the device is locked for more than one hour, or after rebooting. This setting is equivalent to the following preference of the iOS Settings app: Settings > General > Passcode > USB Accessories. It is applied via a configuration profile, and cannot be overridden by the user.
Save passcode unlock token to keychain
False by default. If true, a passcode unlock token will be saved to the computer's keychain during configuration. The unlock token can be used to clear the passcode, via a blueprint or directly from the Device Settings panel.
Important: Clear Passcode action is somewhat limited in scope, as it cannot be used on devices which have rebooted or which have been locked for more than 24 hours. In these cases, the device enters a state named BFU (Before First Unlock) which severely restricts possible actions. If faced with a locked device in BFU state for which you do not have the passcode, the only workaround is to restore it (Reinstall iOS action in iMazing, Erase data option checked).
Allow activation lock while Supervised
False by default. If true and Find My iPhone/iPad is enabled, the device will remain locked after being erased or restored, and iOS will require signing in to the Apple ID with which Find my iPhone/iPad was configured. While activation lock provides an effective deterrent against theft, disabling it on supervised devices is common.
Setup & Accessibility
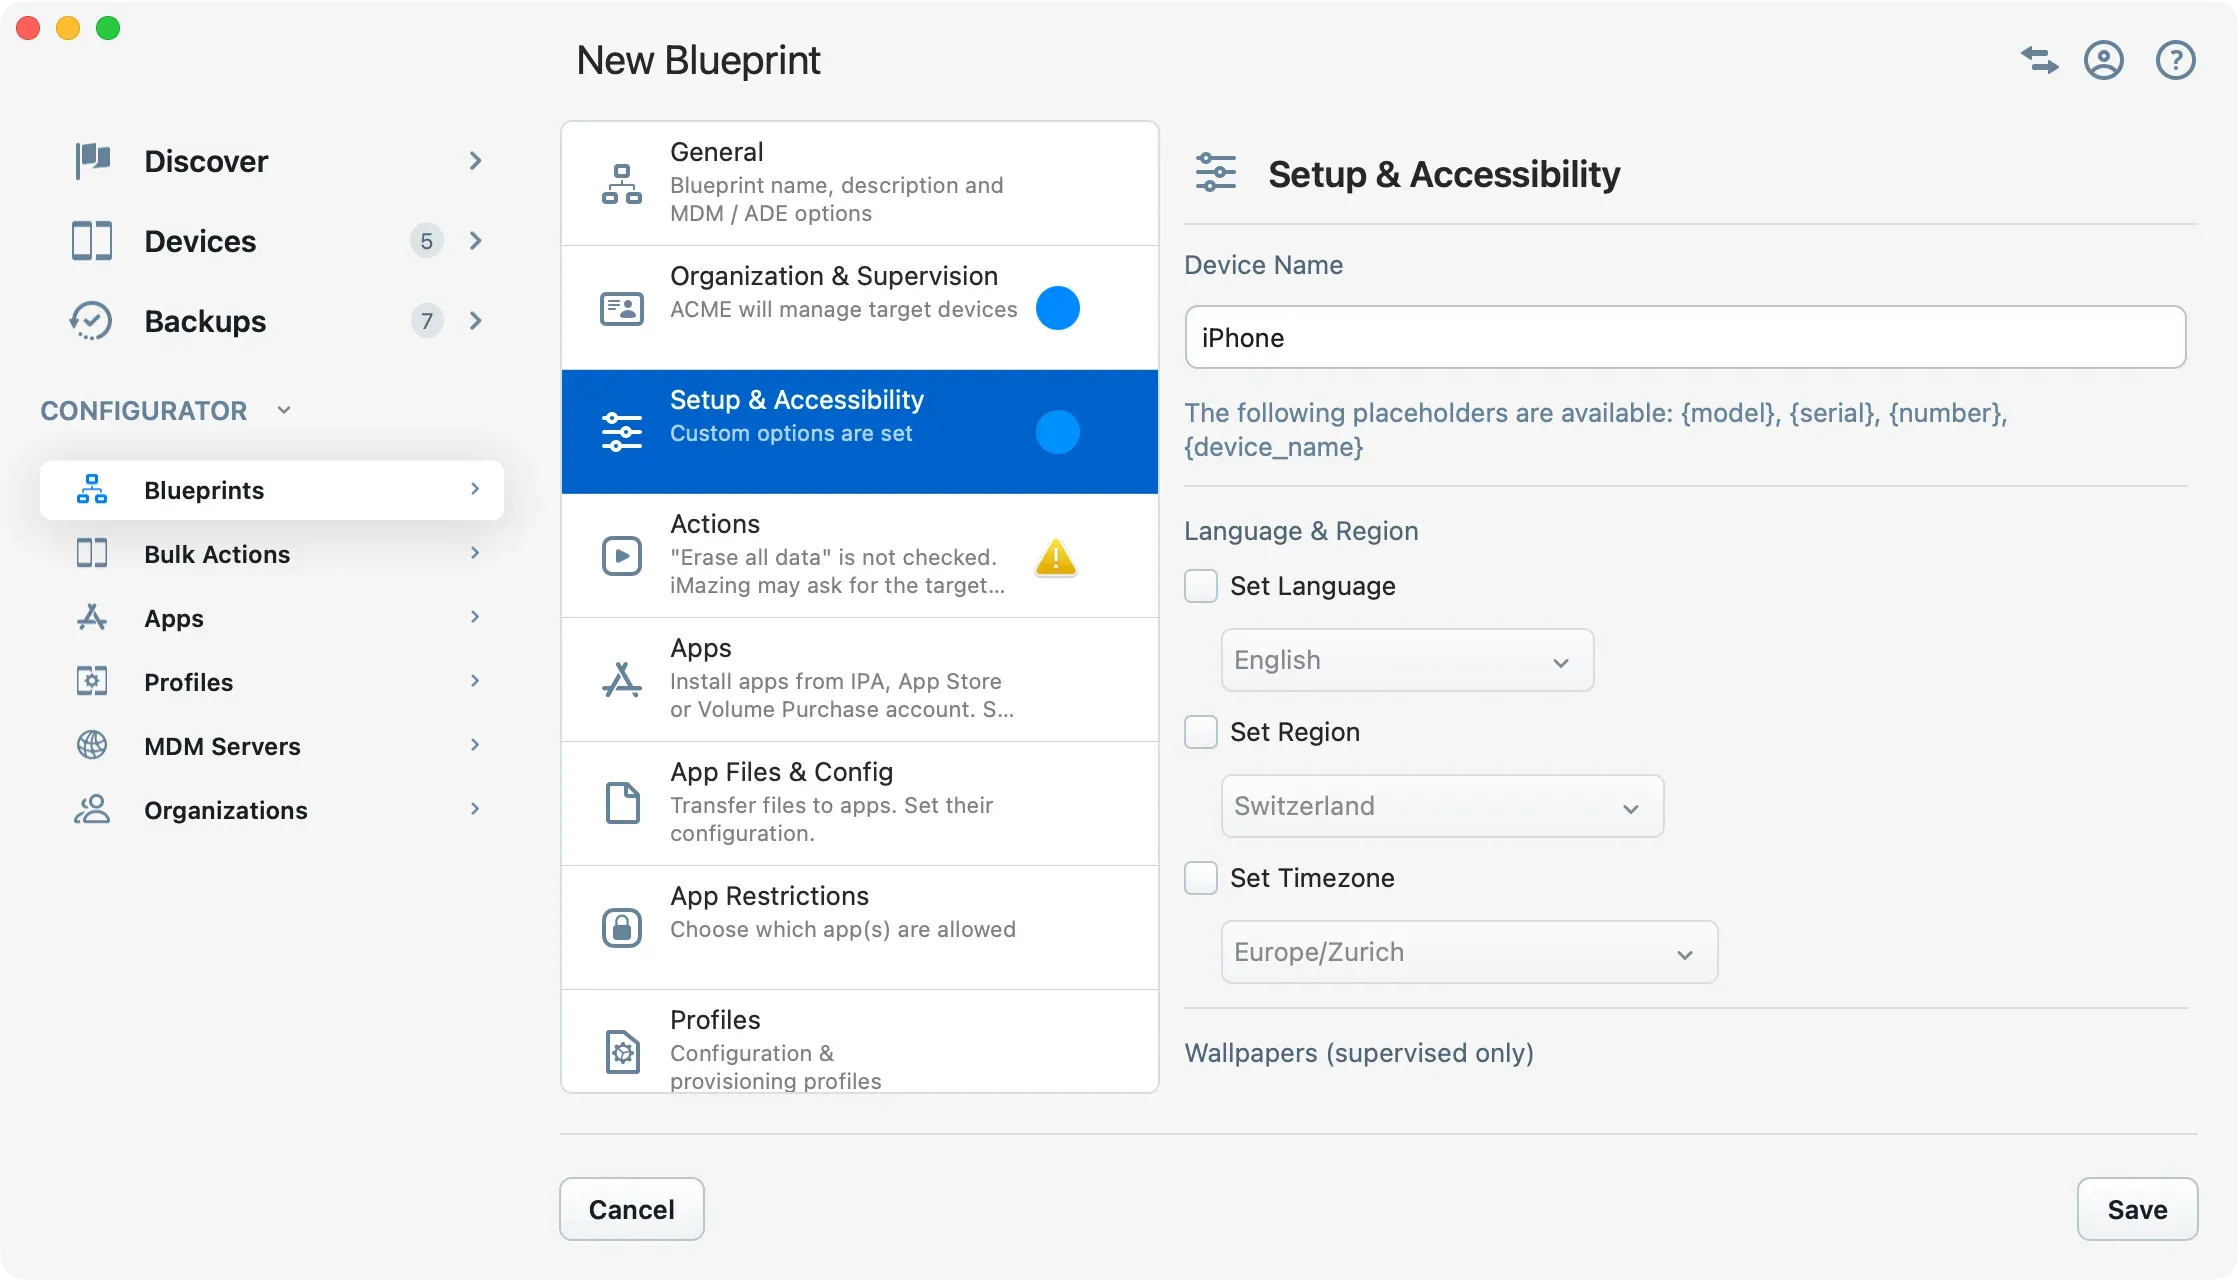
Device Name
Choose a naming scheme for devices you apply this blueprint to. Available placeholders are:
{model}– The device's model (iPhone 12, iPad Mini 2, etc…).{serial}– The device's serial number.{device_name}– The original device's name.{number}– When applying a blueprint to multiple devices, this reflects the order in which the devices were processed, starting at 1.
Language and Region
Leave the Set Language, Set Region and Set Timezone checkboxes unchecked if the device's current or default language and region setting should be preserved, or if you would like to let the user choose a language and region in the Setup Assistant.
Wallpapers (supervised only)
Pick images for the home screen and lock screen. Drag and drop is supported too.
Accessibility
All options here default to false:
- Zoomed interface: the entire UI is zoomed in
- Inverted colors: may help for visual impairments related to color perception, such as daltonism.
- VoiceOver: enables iOS' VoiceOver mode for the visually impaired.
- AssistiveTouch: an on-screen button that lets you control your iPhone, iPad, or Apple Watch by tapping instead of using physical buttons.
- Speak auto-corrections: when iOS' auto-correct feature kicks in to offer a suggestion, the suggestion will be read aloud by iOS.
- All audio forced to mono: useful mainly in contexts where headphones are used, to facilitate listening for the hearing impaired.
- Closed captions (where available): automatically enables closes captions where available.
Important: Single App Mode: if you are configuring a device for Single App Mode (Apps section), accessibility options are part of Single App Mode configuration and should be set in the Apps section, not here. In any case, Single App Mode accessibility options will override general accessibility settings.
iCloud
- Enable iCloud Backup: automatically enable iCloud backups.
Connectivity
Leave the Set connectivity options checkbox unchecked if the device's current or default roaming, hotspot and bluetooth settings should be preserved.
Available options:
- Data roaming: true by default. Uncheck to prevent roaming, including voice roaming.
- Personal hotspot: false by default. Check to enable hotspot.
- Bluetooth: true by default. Uncheck to disable bluetooth connectivity.
Setup Assistant Steps
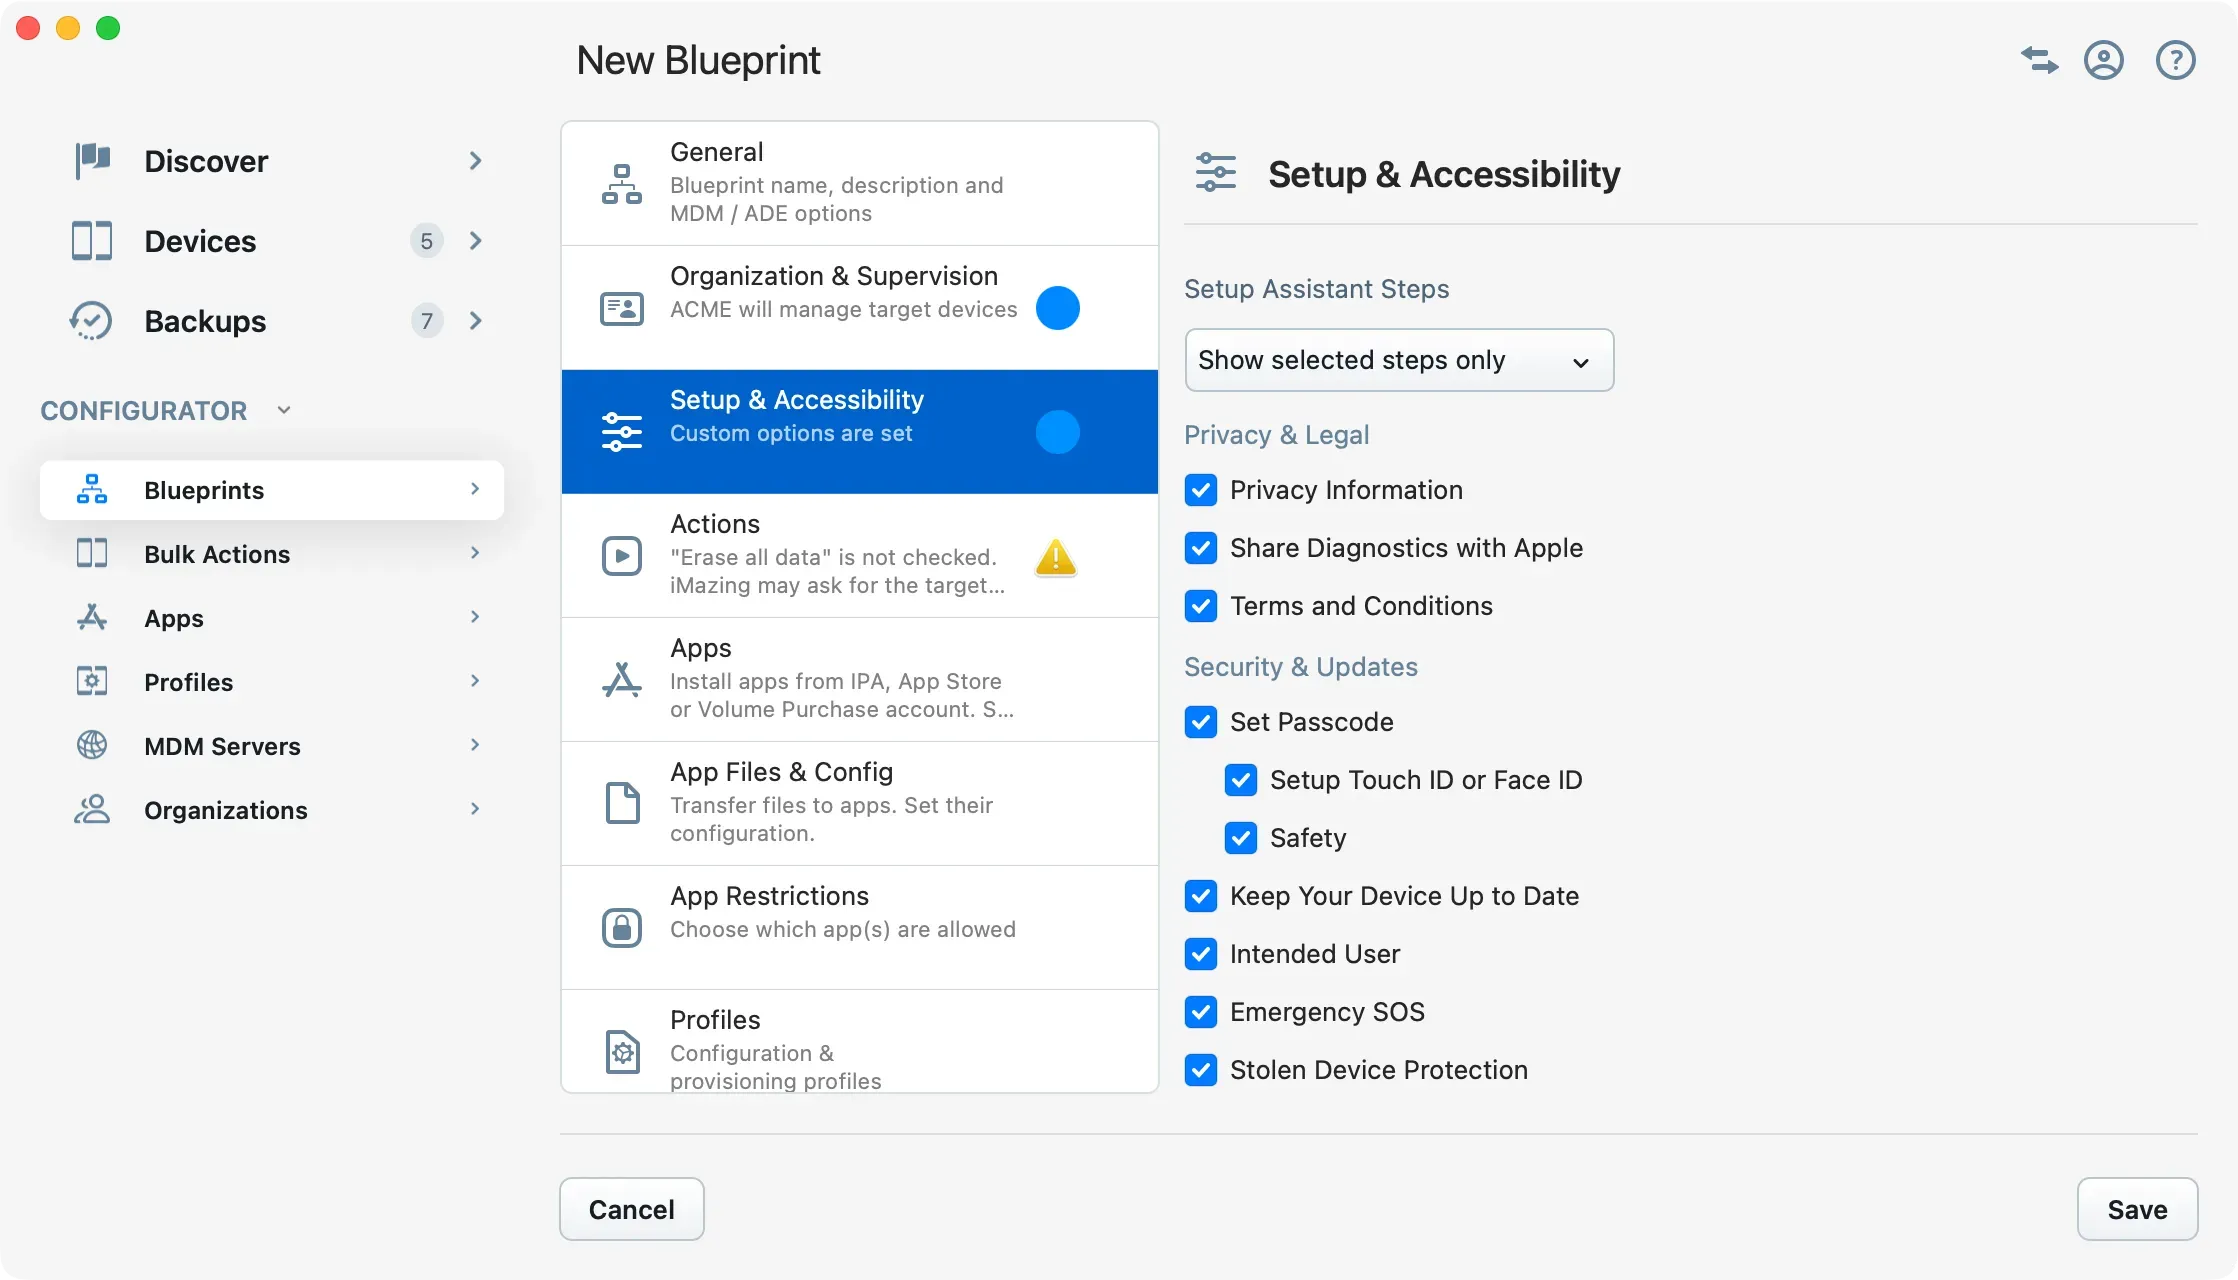
Use the drop down to choose among the following behaviours:
- Show all steps: this is the default. Note that not all steps listed will be shown, depending on the device type, model and iOS version.
- Don't show any of these steps: instructs iOS to skip as many steps as possible. Note that this does not guarantee that no step at all will be shown. For true zero-touch configuration, use the Exit Setup Assistant action described below.
- Show selected steps only: pick the steps you would like iOS to show to your users. Steps which aren't applicable to the device type, model or iOS version are simply ignored.
Actions
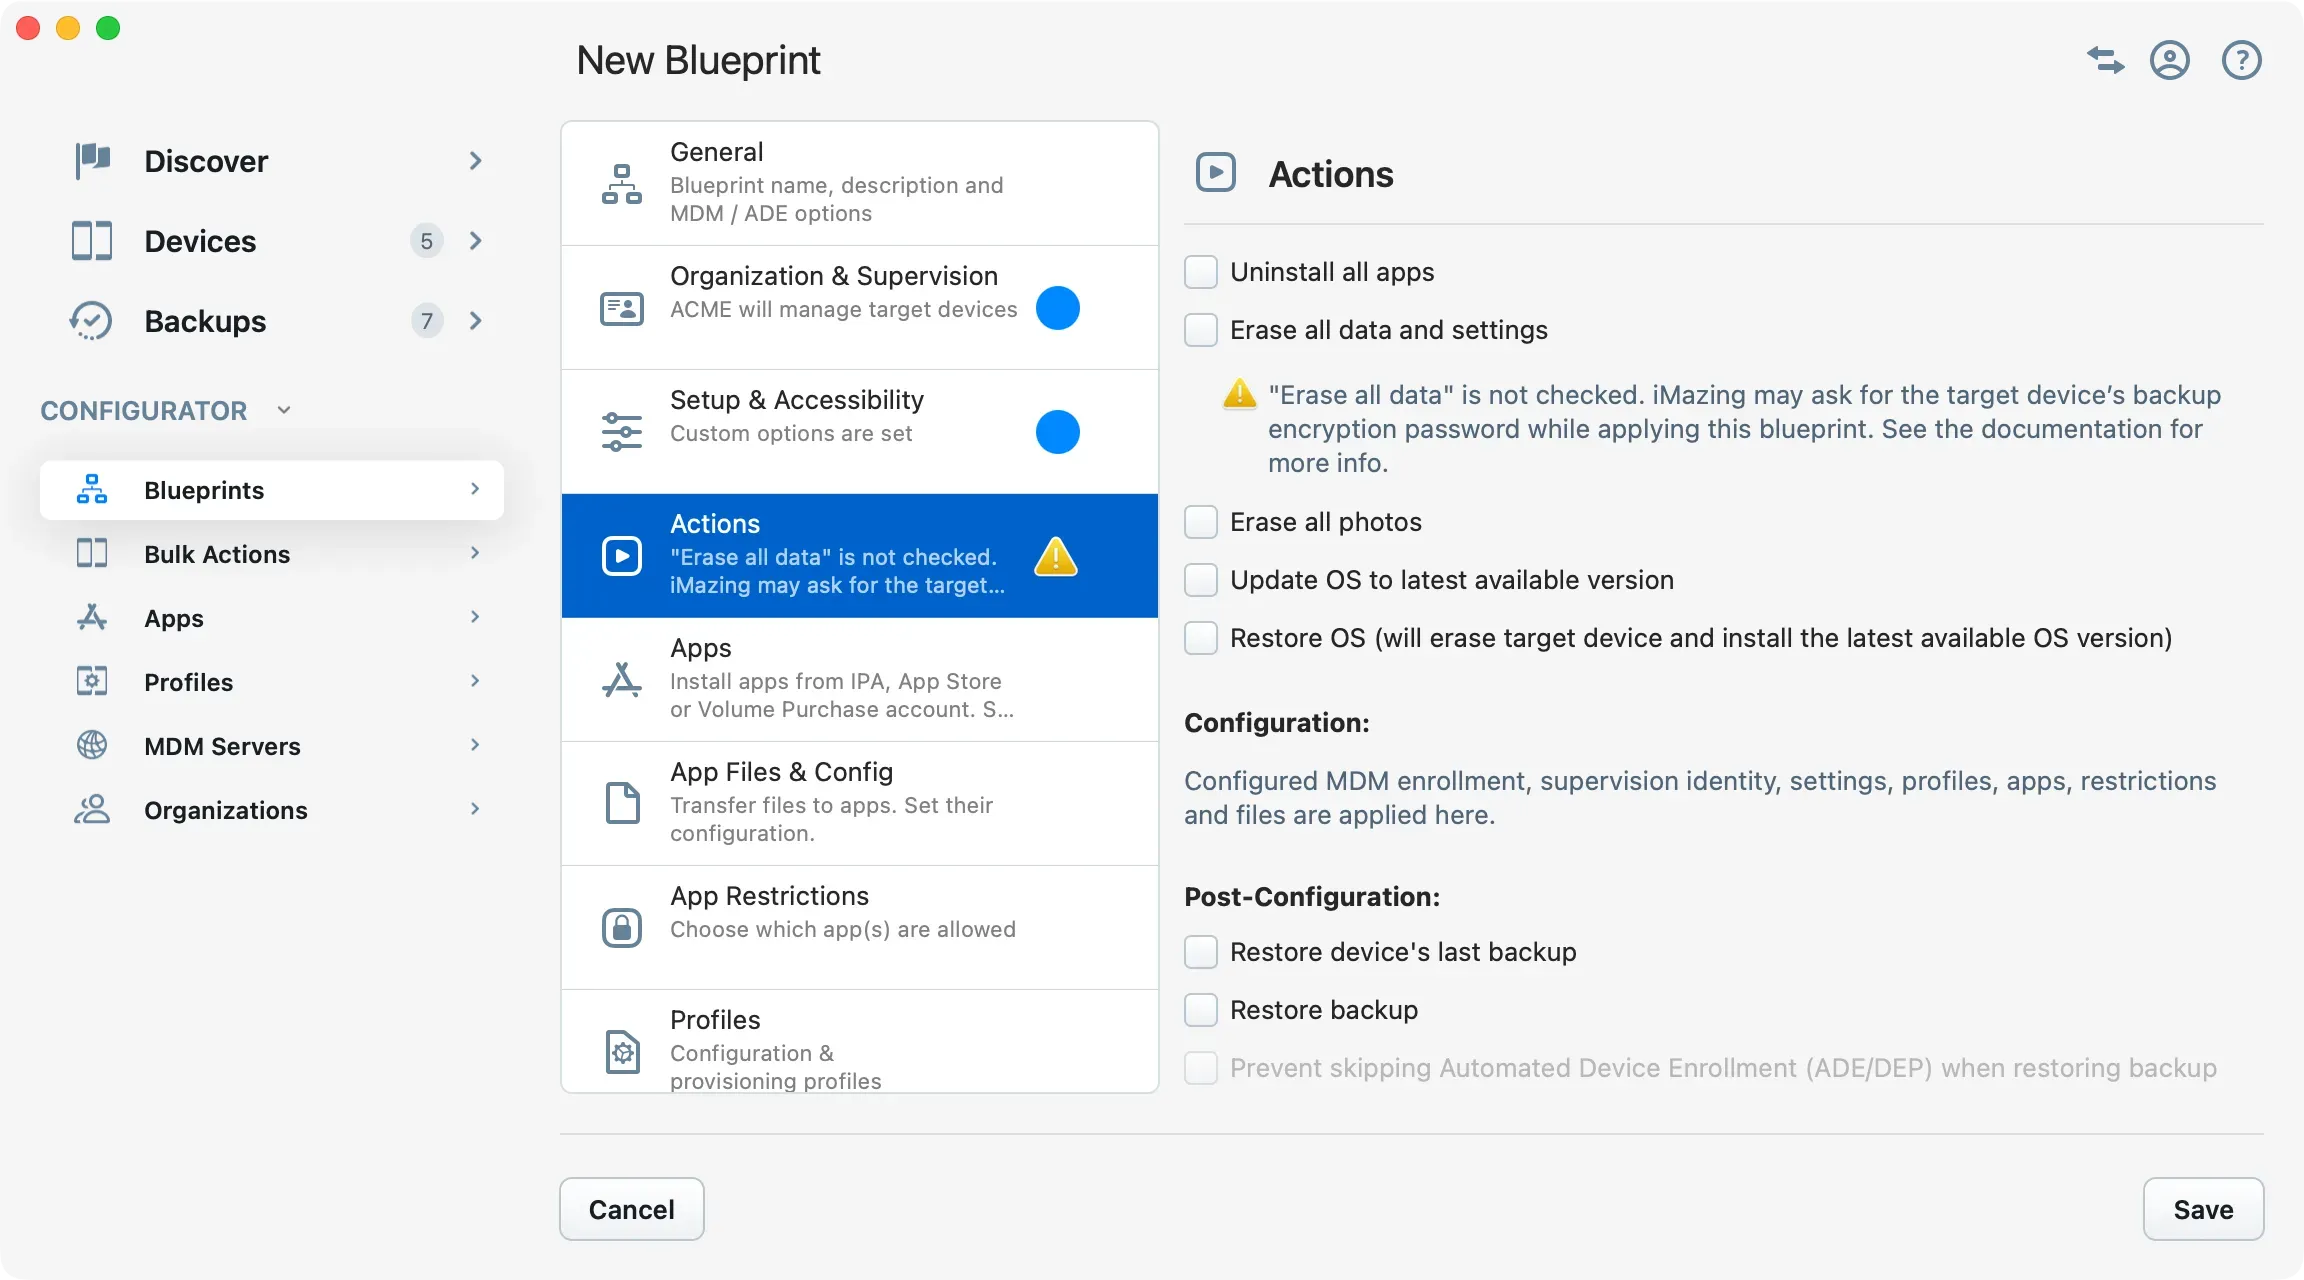
Actions add a whole new dimension to blueprints and enable rather complex and powerful automations. It is entirely possible to build a blueprint that consists entirely in a series of actions. You could for example configure a 'refurbish' blueprint that performs a battery health check, takes an encrypted backup with a given password, updates the OS, erases the device and waits for a full charge.
For clarity, actions are divided in 2 sections, pre-configuration and post-configuration, with configuration representing everything else that is configured in the blueprint.
Most actions here are self explanatory. The following deserve more detailed explanations:
Pre-configuration
- Clear passcode with unlock token (supervised only): this action requires that the passcode unlock tokens for the target devices have already been saved on the computer applying the blueprint. You can use the Save Passcode Unlock Token option in the Supervision section of the blueprint editor to automatically save passcode unlock tokens when configuring devices.
- Back up: check this action to first take a backup of the device before applying the blueprint. Default backup iMazing backup options will be applied: backup location, archiving options, etc.. You can also optionally set the backup encryption status and define an encryption password.
- Fail if activation lock is enabled (Find My is On): this action is useful in the context of refurbishing devices. Applying the blueprint will trigger an error if "Activation Lock" is on ("Find My" is enabled).
- Fail if battery health is poor: pick a threshold below which iMazing will fail with an Unhealthy Battery error. Battery health is computed as the ratio of effective max charge and design max charge.
- Clear Screen Time passcode (supervised only): this action clear the screen time passcode, it requires the device to be supervised by iMazing to be executed. This action will only work if the supervising organization is configured in iMazing Configurator.
- Remove all profiles: this action will uninstall all configuration and provisioning profiles. On supervised devices, profiles will only be removed if the supervising organization is configured in iMazing Configurator. This action can be leveraged to remove configuration of a device without erasing it, useful in BYOD contexts.
- Uninstall all apps: if Volume Purchased app assignments are managed by iMazing Configurator, uninstalling apps in this way will also unassign licenses where applicable.
- Erase all data settings: this action will completely wipe the device. You can decide if you want to preserve eSIM data and prevent proximity setup after the device restarts, to transfer data from one device to another by positioning them close from each other.
- Erase all photos: will remove all photos from the device.
- Update OS to latest available version: updates target devices with the latest available OS. Does not erase data. Skipped if device is up to date.
- Restore OS: reinstalls the OS of the target device with the latest available version, erasing all existing data.
Important: Update and Restore OS actions will download the required IPSWs from Apple's servers, and keep them cached in iMazing's Library as long as no new version is available. You can disable this caching behavior in iMazing's Preferences, Library tab.*
Post-configuration
- Restore device's last backup: restore's the target device's latest backup from the device's currently configured iMazing backup location. Skipped if no backup is found.
- Restore backup: restores a specific backup chosen from available backup locations. The backup is copied to iMazing's library and packaged within the blueprint if you export it.
- Prevent skipping Automated Device Enrollment (ADE/DEP) when restoring backup: Restoring the backup of a supervised device to itself can sometimes prevent the device from getting supervised by ADE, the user won't see the "Device Management" or "Remote Management" (for old OS versions) step in the iOS Setup Assistant. This issue can be avoided when this checkbox is checked, which is its default state.
- Remove configuration from backup when restoring a backup: This action will temporarily remove any configuration from the backup while restoring it to the device. This action is useful if you want to make sure no configuration previously set by ADE, MDM or iMazing Configurator will be restored to the device if present in the backup.
- Remove keychain data from backup when restoring backup: This action avoids a bug (loop on the ADE/DEP "Device Management" or "Remote Management" screen) when restoring a device previously managed by an MDM solution when it is registered to a new one in ABM or ASM.
- Enable Developer Mode: if you’re aiming to deploy or test development builds, you typically need the iOS device in developer mode.
- Mount Developer Image: Mounting the Developer Disk Image enables development tools like Xcode to recognize the device for debugging and app installation by providing version-matched OS symbols. iMazing does not include built-in development tools but uses this mounted image for advanced device interactions.
- Skip Setup Assistant: iMazing Configurator will attempt to exit the setup assistant whichever state it is in. A very important action for true zero-touch configuration.
- Set backup encryption password: iMazing Configurator will set the device backup encryption password after the device is configured.
- Back up: iMazing Configurator will back up the device after the configuration is applied.
- Launch app (supervised only): because this action can be configured to launch an app which is already installed on the device, you should also add the app to the list of apps to install in the Apps section of the blueprint if needed. Because iOS will need to verify the app's license when it is launched, it recommended to add a Wi-Fi profile to the blueprint. This action forces the Exit Setup Assistant action.
- Remove Wi-Fi profile: configuring iOS devices may require that they have internet access, to verify app licenses for example. Use this action to remove the configured Wi-Fi profile if it was intended for configuration only, and not for use by the recipient of the device.
- Remove supervision: use in combination with the Remove Profiles action to also remove configured settings.
- Wait for full battery charge: iMazing Configurator will simply wait until the battery is full before reporting a successful install of the blueprint.
- Shutdown device: iMazing will shutdown the device after all other actions have been executed.
- Unpair device when done: for user privacy reasons, it is important to remove the pairing link between devices you configure and your computer. This setting is important for non-supervised devices especially, as supervised devices can be paired anew without the passcode as long as they are not in BFU state. Unpairing also removes the device from iMazing's cache, reducing clutter.
Apps
If you are not familiar with how iMazing manages apps and signing in to an Apple ID, Business Manager or School Manager account, please read the Apps section of our iMazing Configurator Overview first.
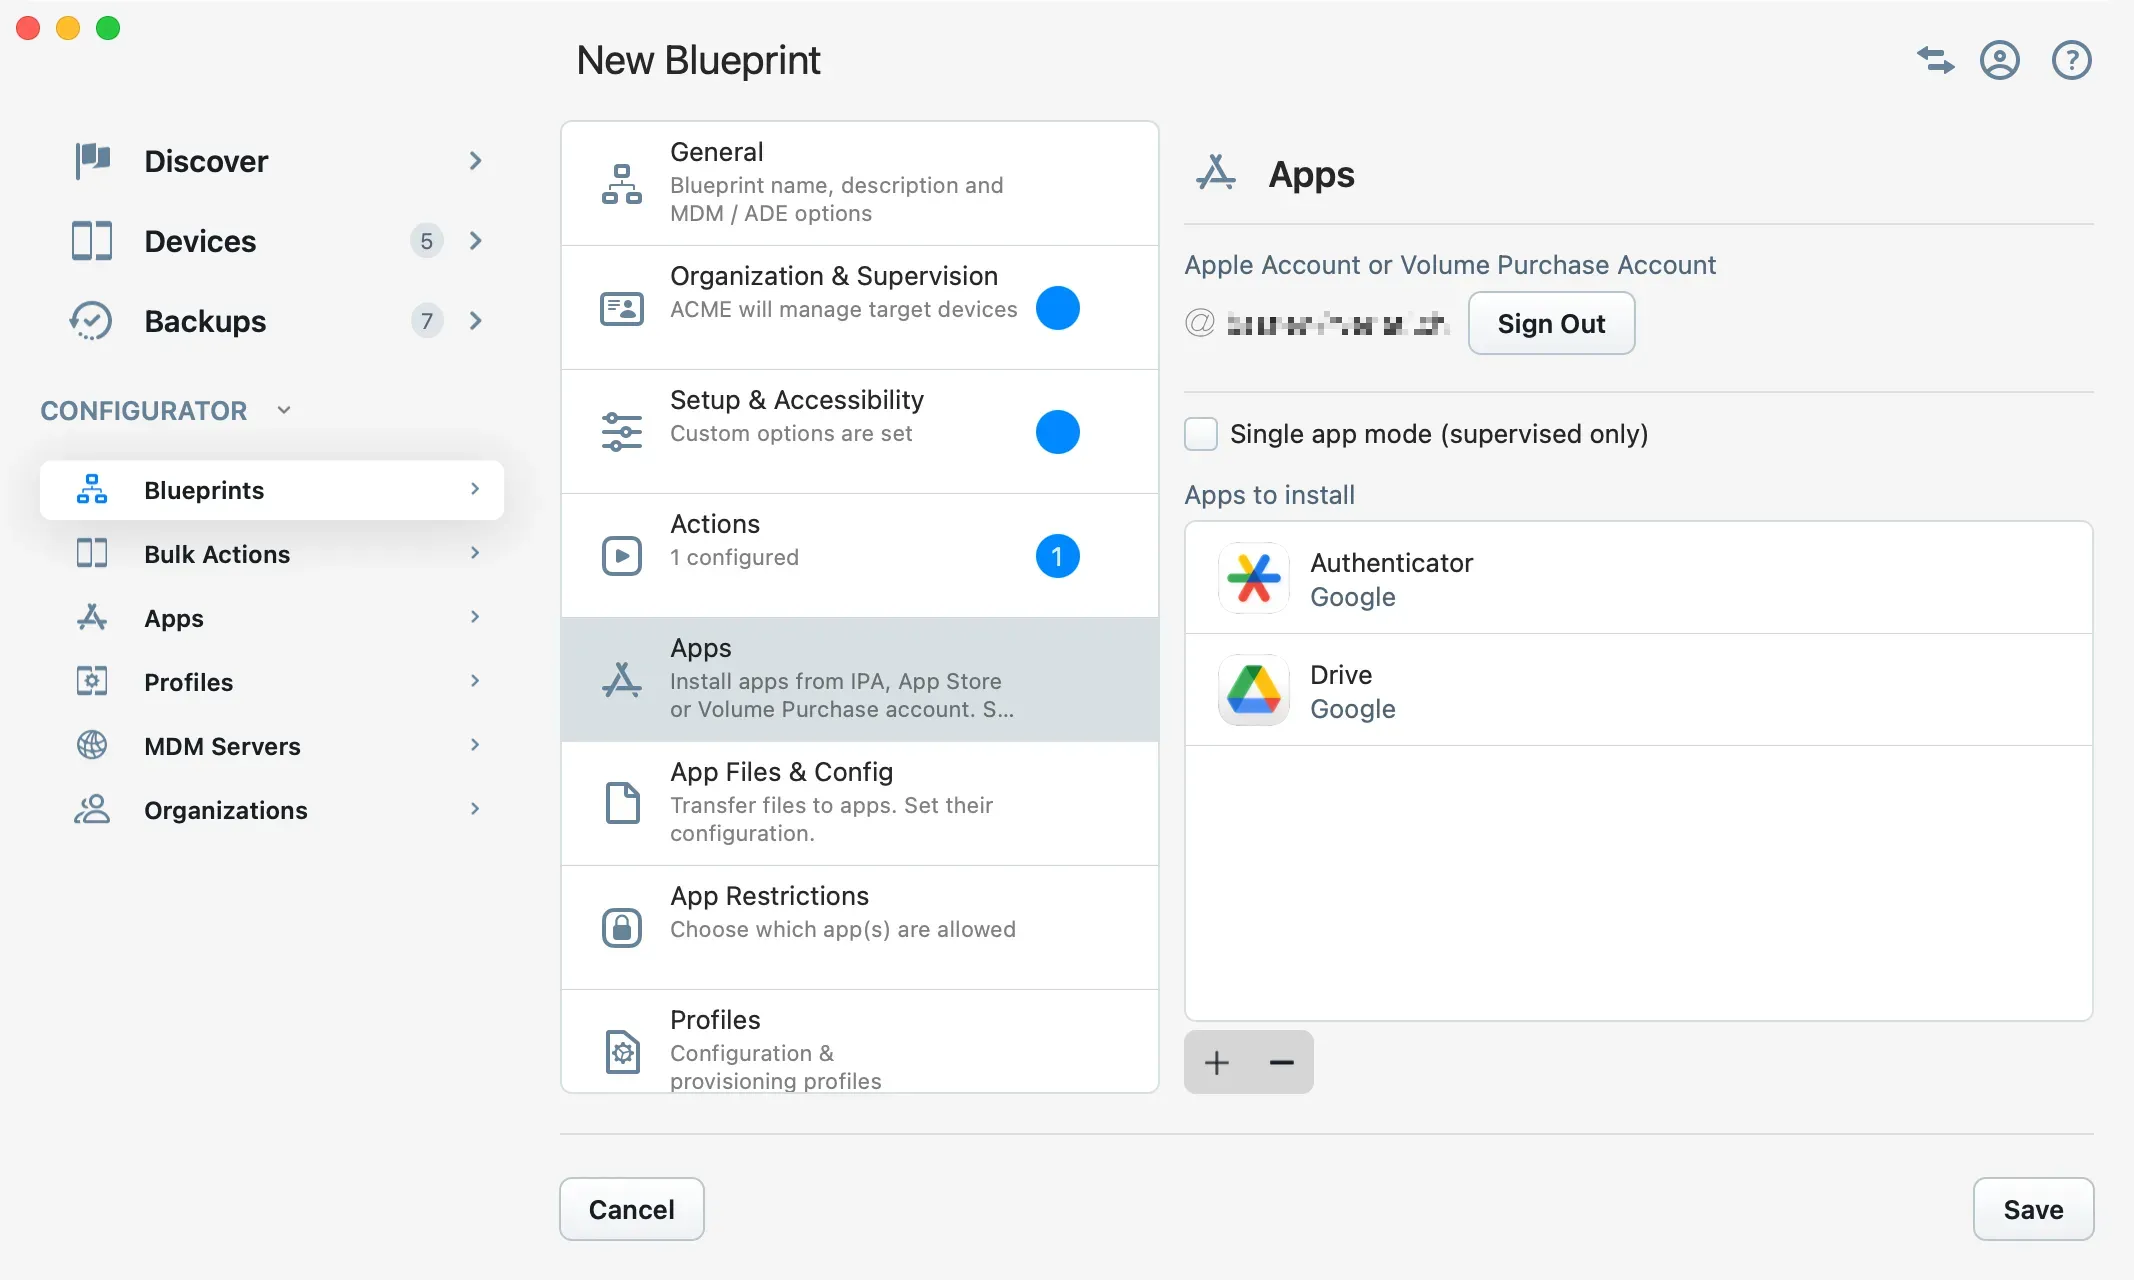
Signing In
You need to sign in to an Apple ID or a Volume Purchase account if you would like iMazing to download and install the latest available version of an app when applying the blueprint. Credentials will be stored securely in the macOS keychain and will not be otherwise exposed.
If you do not sign in, you can still use blueprints to install apps, but you will have to add .ipa files to the list of apps to install. In that case, it is advised to disable automatic license assignments in iMazing's Preferences, Library tab.
Important: when you export a blueprint, login credentials will be included in the password protected
.blueprintoutput. Upon import, they will be added to the importing computer's keychain. Because of this, you should only share blueprints which contain login credentials with authorized personnel.
Adding Apps from your Library
Click the '+' button and select Add Apps from Library to display the app selection sheet. If you log in to a Volume Purchase account, iMazing will display all apps available in your Volume Purchase account. If you log in to a standard Apple ID, iMazing will only display apps it already knows belong to the account. You can always add apps purchased with a standard Apple ID to iMazing's app library by clicking the Add from App Store button in iMazing Configurator's App Library view.
When you apply the blueprint, it will download the latest available version of the app if needed, and install it to target devices. The downloaded IPA remains in the library for later use.
Adding Custom Apps or IPAs
Click the '+' button and select Add Custom App to display an open panel and select an .ipa file. You can select an ad-hoc or Enterprise app, an IPA downloaded with iTunes, or an IPA exported from iMazing's library. Apps added to a blueprint in this way will be packaged within the .blueprint file outputted when you export a blueprint.
Tip: you can also drop
.ipafiles straight to the apps list.
Single App Mode (supervised only)
Also called Kiosk Mode, this mode locks the device in a single application and lets you disable hardware buttons for a truly safe and guided experience. It is used for POS apps, in museums, for custom inventory apps and more. With iMazing Configurator, not only can you put any 3rd party, system app or custom app in single app mode, you can also add files, photos, books and music to the app, including to Apple's Photos, Books and Music 1st party apps – see App Files & Config below for more information. We believe that these features can extend Single App Mode's usefulness to even more use cases, in particular for small and mid-sized businesses.
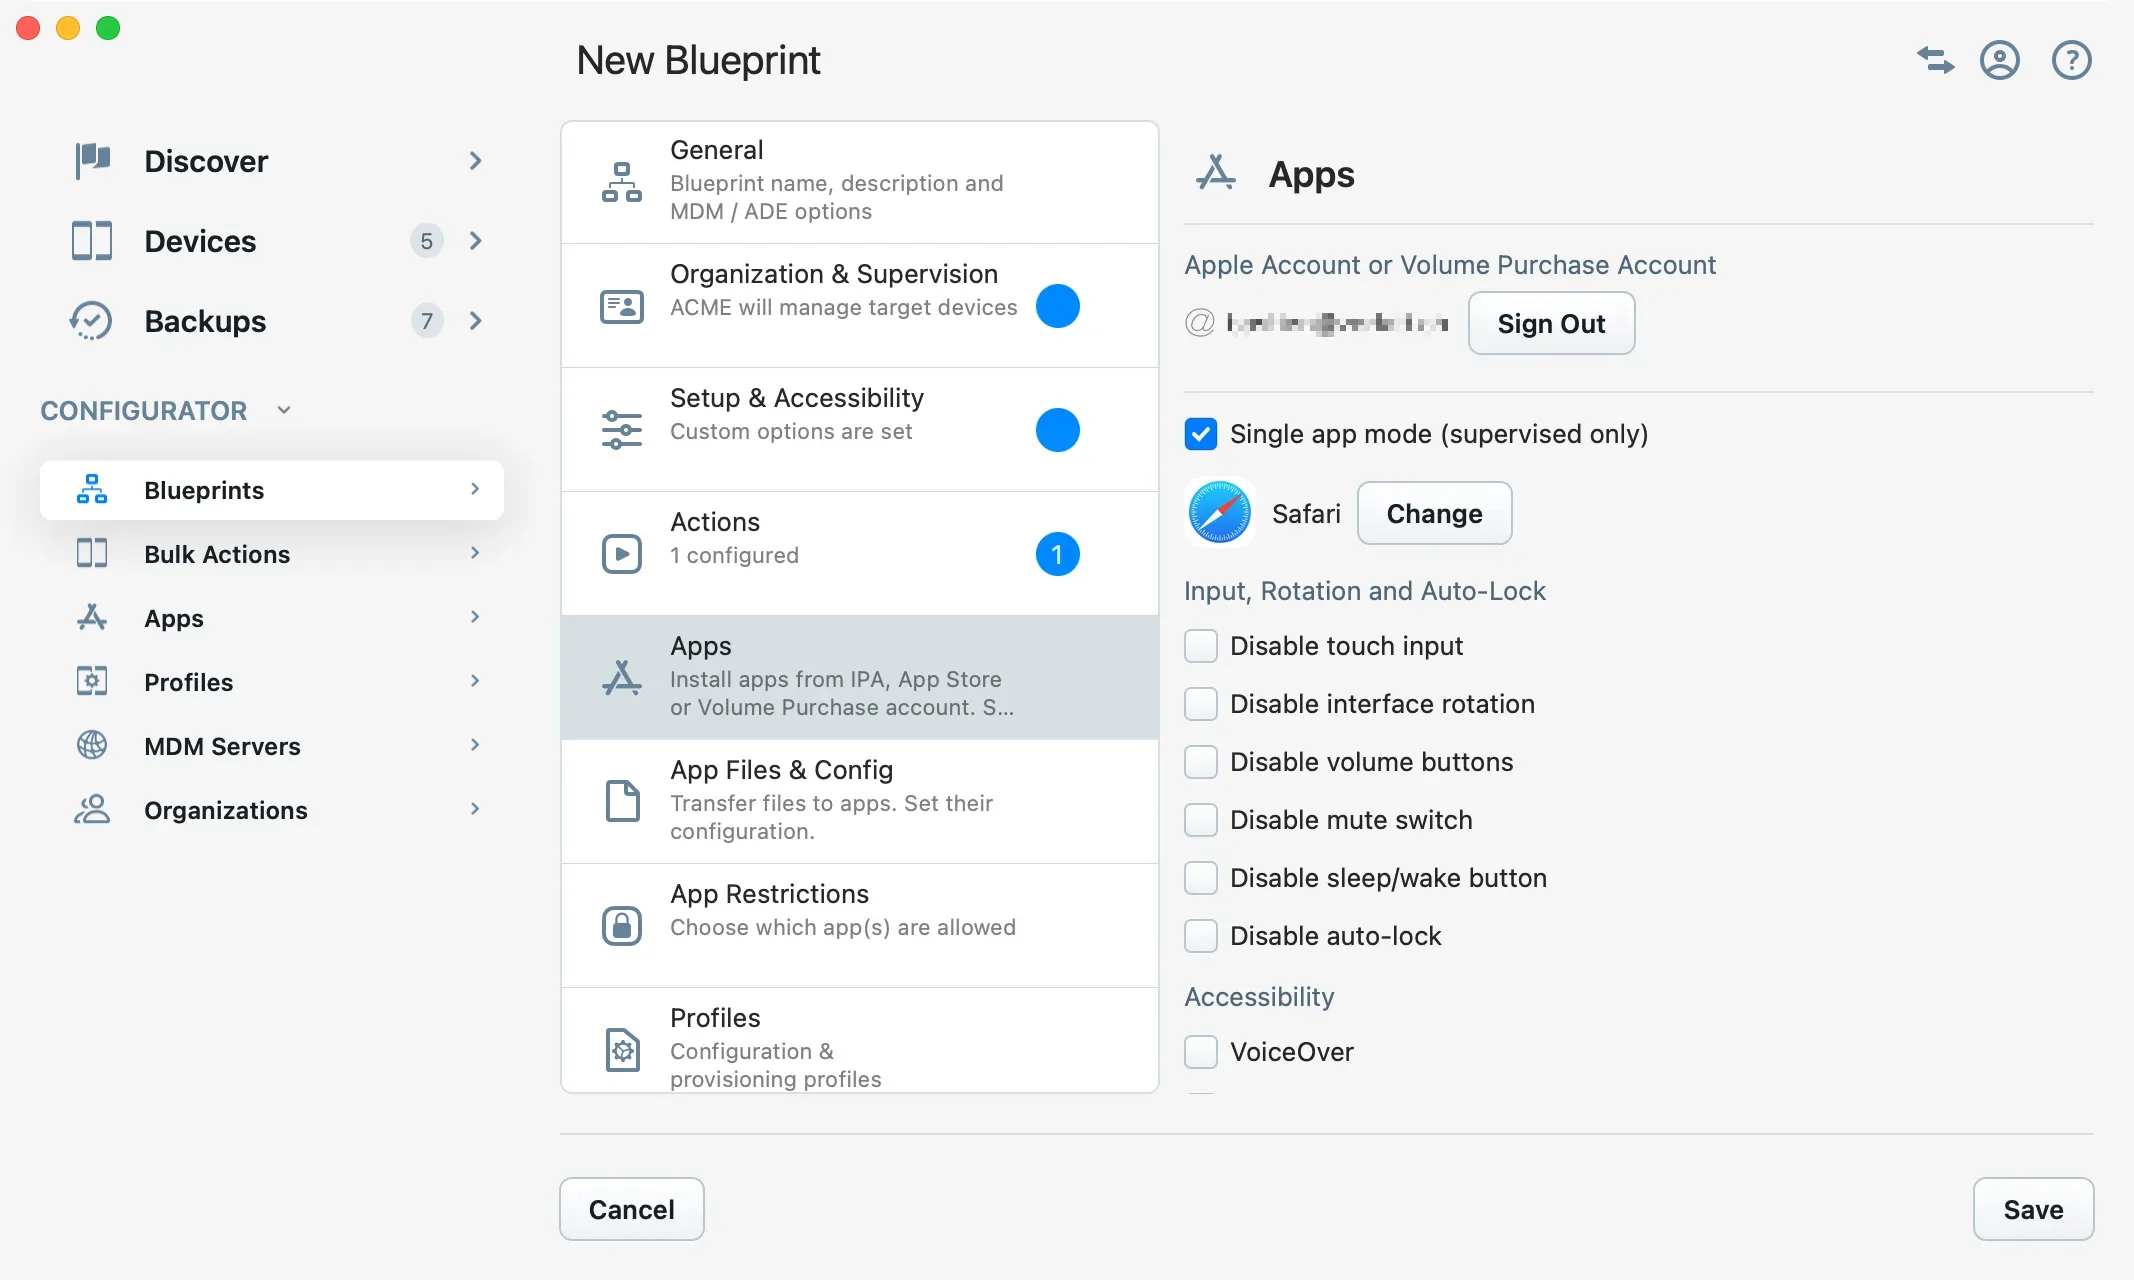
Click the Single App Mode check box and iMazing will display an app selection sheet. If you are not signed in, only system apps will be available. Once you've picked an app, you can configure input, rotation, auto-lock and accessibility options. Accessibility options configured here override existing settings. They are already documented above in Setup & Accessibility, with the addition of Accessibility Shortcut settings, which let you configure whether or not users can toggle specific accessibility features via the Accessibility Shortcut. If you're not familiar with the Accessibility Shortcut, here is Apple's documentation on the feature.
Tip 1: for true zero-touch configuration of Single App Mode, include a Wi-Fi profile and the Exit Setup Assistant action in your blueprint. That way, iOS will be able to validate the app's license and will successfully launch it after exiting the Setup Assistant.
Tip 2: you can use the Device Settings panel to make a device exit Single App Mode – read more here. Note that you can only do this if iMazing Configurator was used to enable Single App Mode in the first place.
Important: Custom apps in Single App Mode: sideloading Enterprise apps with iMazing Configurator or Apple Configurator is not appropriate for fully automated Single App Mode configuration. This is because the app needs to be manually trusted on the device before it can be launched (https://support.apple.com/en-us/HT204460). Ad-Hoc distribution is the simplest way to fully automate the launch of custom apps in Single App Mode. Alternatively, your custom Enterprise app can be released on the App Store but made available to specific organizations only (https://developer.apple.com/support/volume-purchase-and-custom-apps/).
App Files & Config
Here you'll configure one of the most unique features of iMazing Configurator: the ability to populate an app's container to gain control over an apps settings and files. This cannot be achieved with MDM alone, and is far more powerful than Apple Configurator's ability to add files to the Documents folder of file sharing enabled apps.
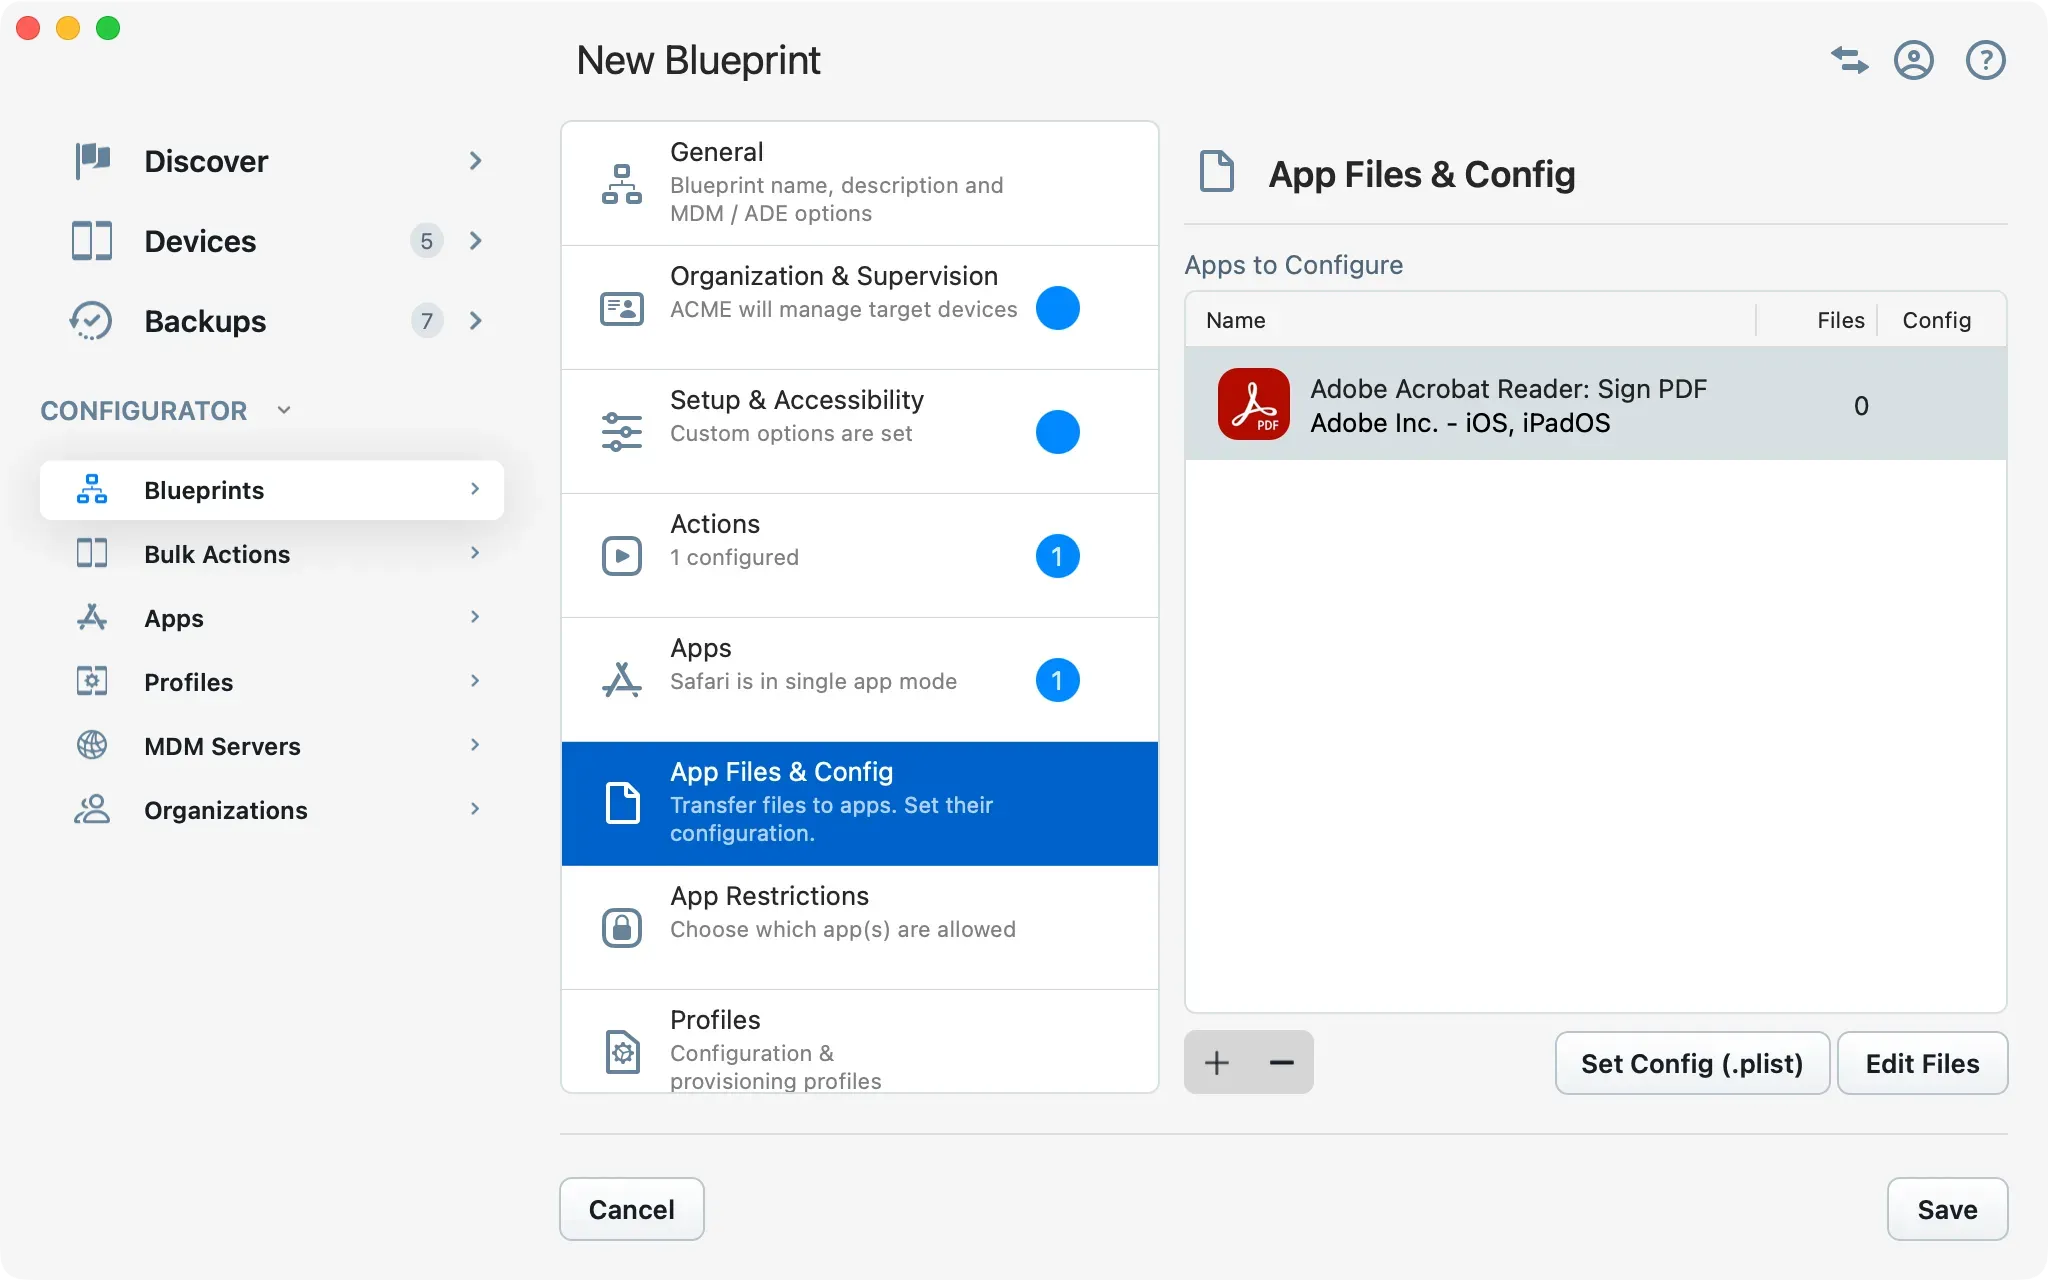
Click the '+' button to add an app to the list of apps to configure. Because the blueprint can be applied to an already configured devices, you'll be choosing apps straight from the app store, and not from your app library. Here's what it looks like after adding a popular PDF viewer app:
To add files to the app, double click the corresponding item in the list or select it and click Edit Files. iMazing will display a sheet listing files you've already added, if any:
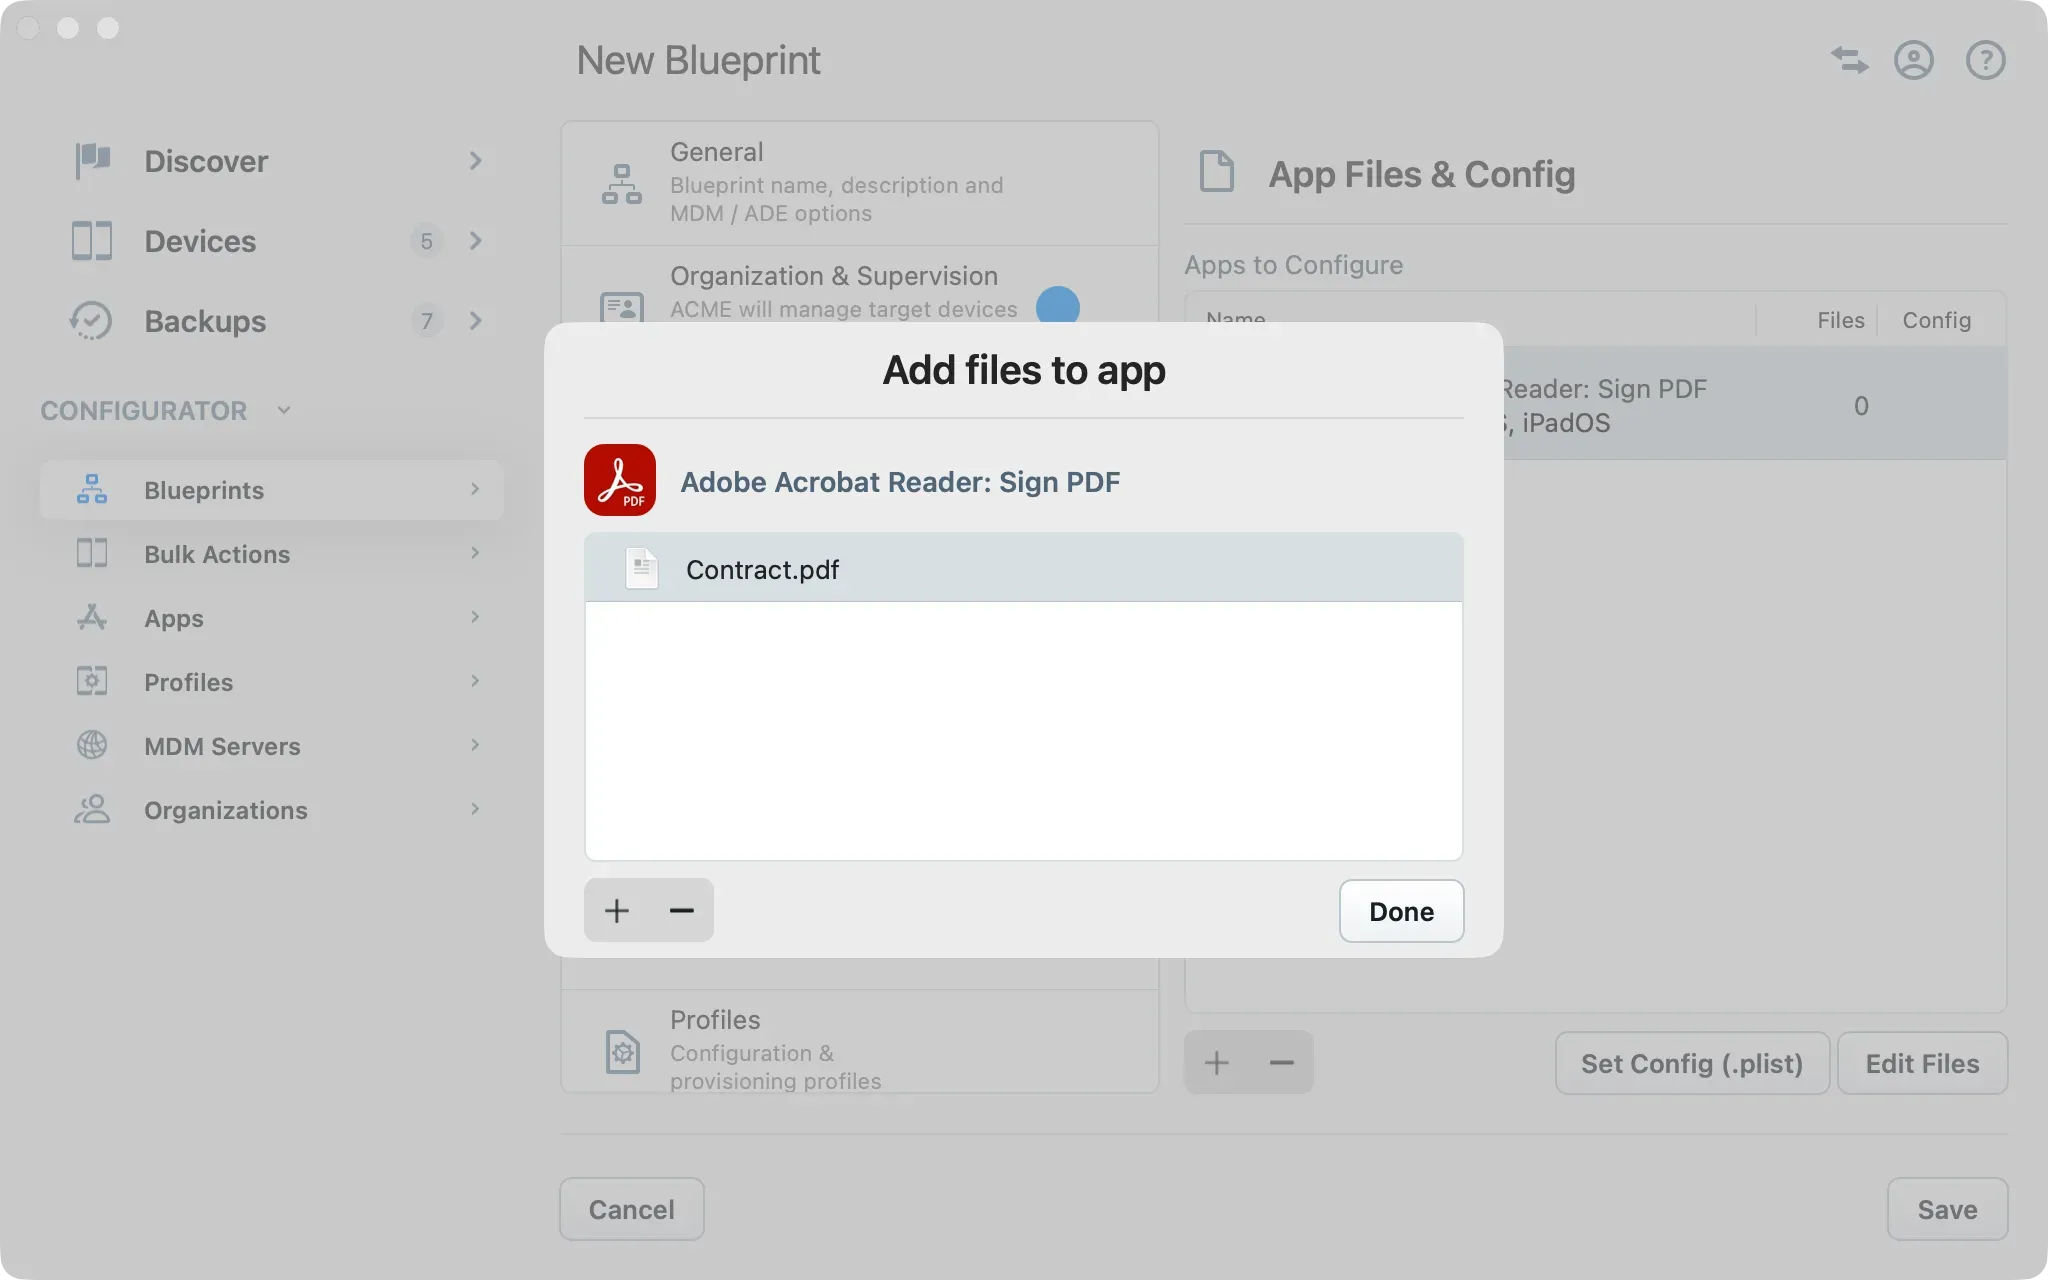
By default, this represents the Documents folder of the app. You can drag and drop files or folders there to add them. Note that even if the app does not support local file sharing, iMazing will still be able to transfer the files.
If you would like to transfer files to the Library folder as well as the Documents folder, simply place your files in folders named Documents and Library, and add these entire folders to the app. This will result in iMazing to consider that you know what you're doing, and populate the app's container accordingly.
Important: iMazing will overwrite and add files only, it will not remove existing files.
Restoring App Data (.imazingapp)
You can also drag and drop a .imazingappfile to the list of apps to configure. This will both add the app to the list, and instruct iMazing to restore the data packaged in the .imazingappfile. This is the only way to write data to an app's shared containers. Learn more about backing up app data to .imazingapphere: How to Export, Backup and Transfer iOS Apps’ Data and Settings
Adding Media and Documents to First Party Apps
The following first party apps and formats are supported:
- Contacts (VCard)
- Books (EPUB and PDF)
- Photos (JPEG, HEIC, PNG, TIFF)
- Music (MP3, WAV, AAC, FLAC)
- TV (MOV)
If you are adding content to any of those apps, iMazing will use the same channels as when pushing content via its Quick Transfer feature. Read the Quick Transfer documentation for more info.
Setting App Defaults
Finally, it is also possible to override the default settings of an app: select the app in the list, click Set Config and pick a property list file (.plist) which iMazing will use to override the app's default settings at Library/Preferences/{App bundle ID}.plist. This file stores the settings configured in the Defaults.plist file in Xcode – if you are configuring an in-house app, it may be interesting to work in tandem with your developers to expose the appropriate settings there.
App Restrictions
This section exposes as a convenience in blueprints the apps whitelist or blacklist setting of the Restrictions payload in a configuration profile. Configuring app restrictions here instead of in a configuration profile carries the additional benefit of optionally uninstalling restricted apps, where iOS' default behavior is simply to hide them.
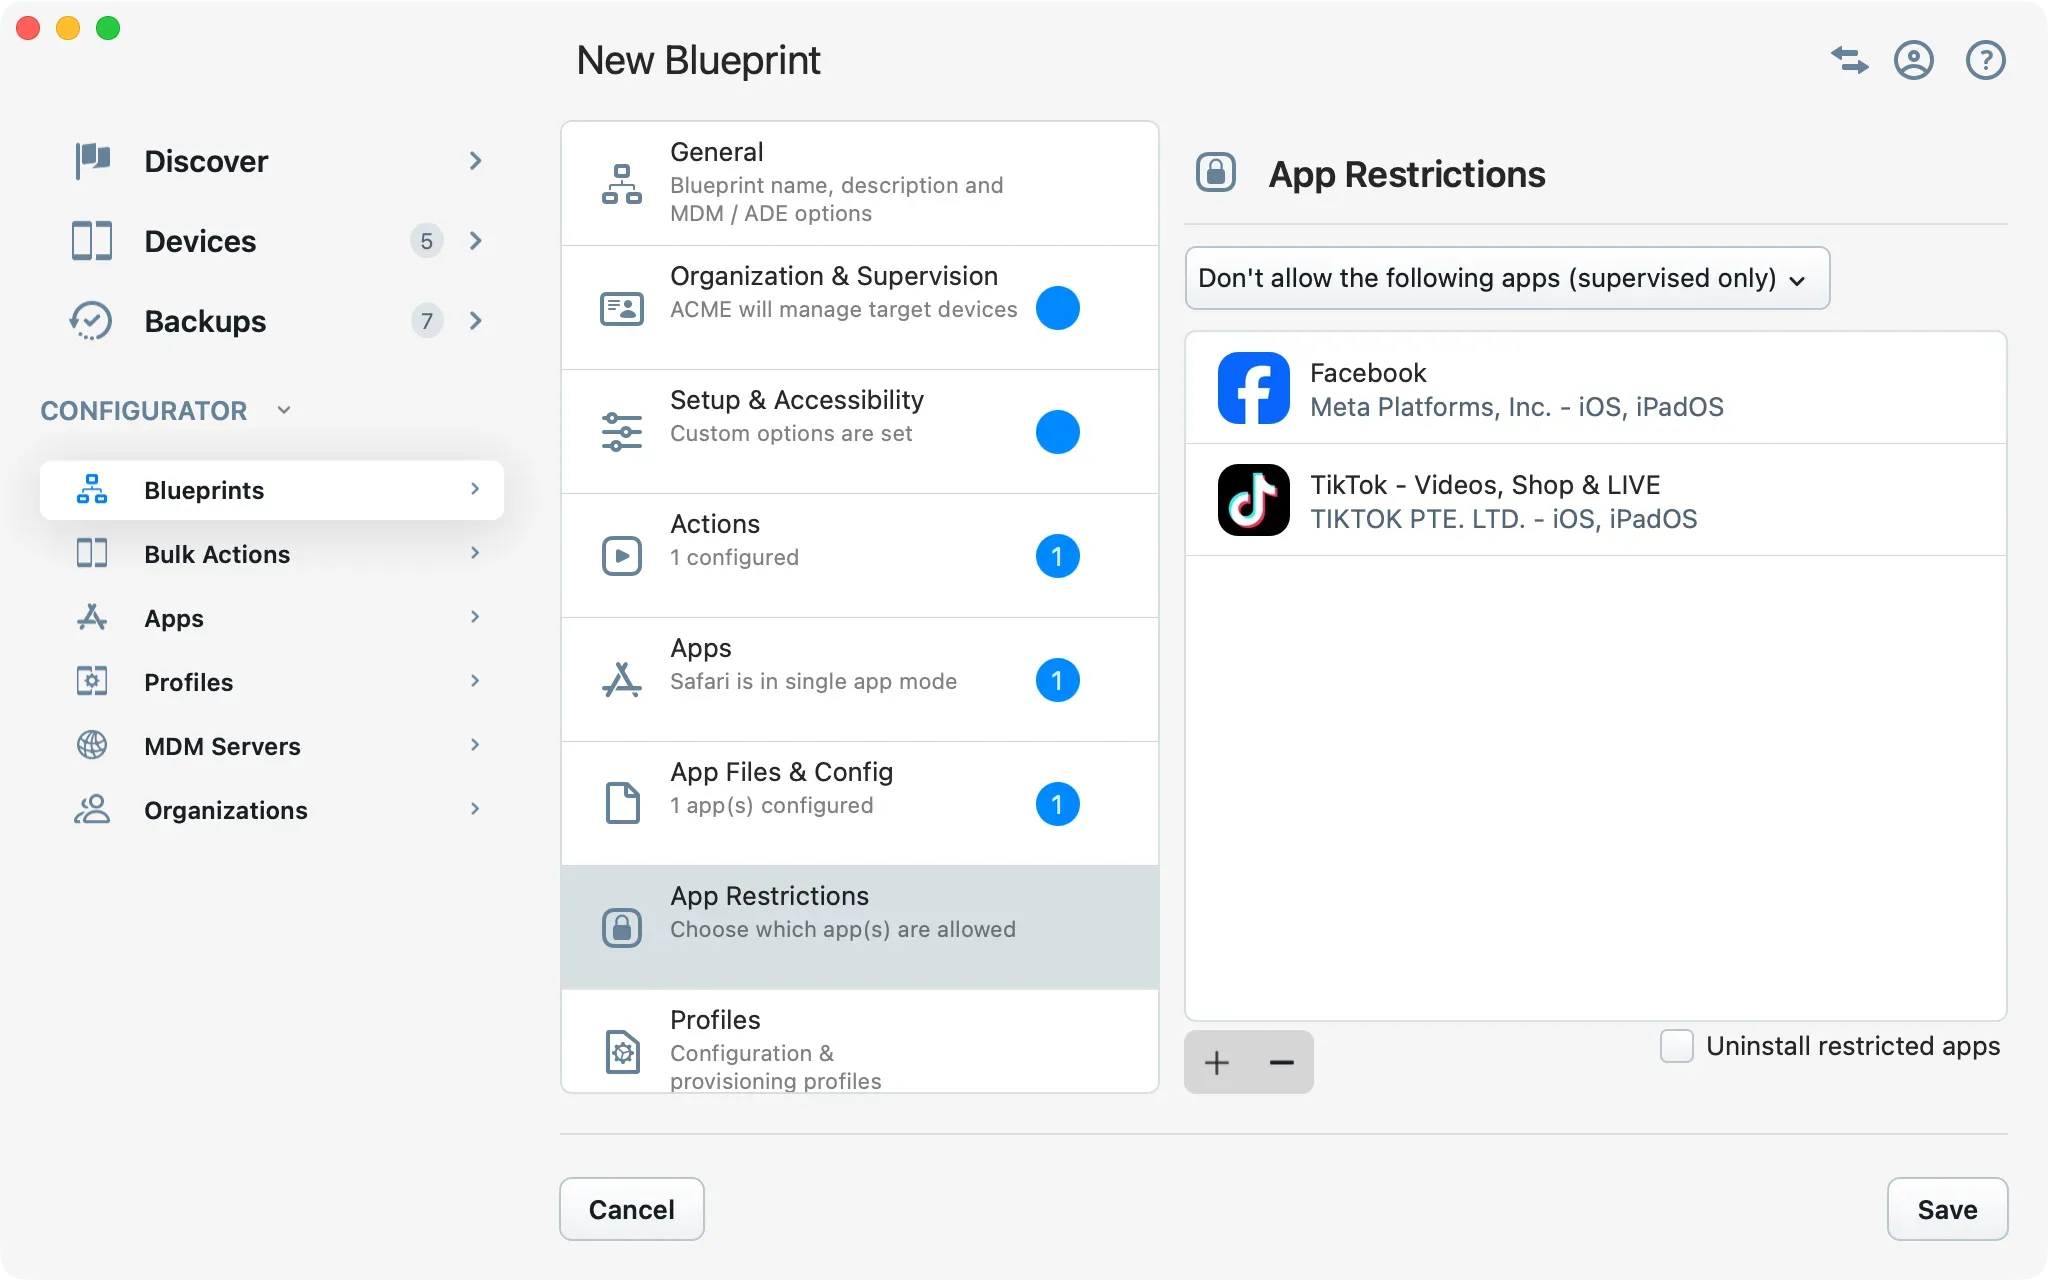
The first thing to do here is to choose between whitelist and blacklist behavior using the dropdown control. Then, click the '+' button to add an app to the list of apps to restrict, or to exclusively authorize. iMazing will present an app search sheet from which you can add custom bundle IDs or search the App Store for any existing public app.
Finally, check the Uninstall restricted apps checkbox if you'd like iMazing to uninstall unauthorized apps which have already been installed, including first party apps which iOS downloads by default on newly setup devices (Notes, Music, Calendar, Clock, Calculator, Compass, Watch, Voice Memos…). Uninstalling (and thereby preventing the download of) first party restricted apps lets you minimize the amount of automatically downloaded content on a configured device, increasing deployment speed and efficiency if said apps aren't needed.
Profiles
Profiles here refer to both configuration profiles (.mobileconfig) and provisioning profiles (.mobileprovision). Click the '+' button and iMazing Configurator will display your profile library in a sheet, letting you select profiles to add to the blueprint.
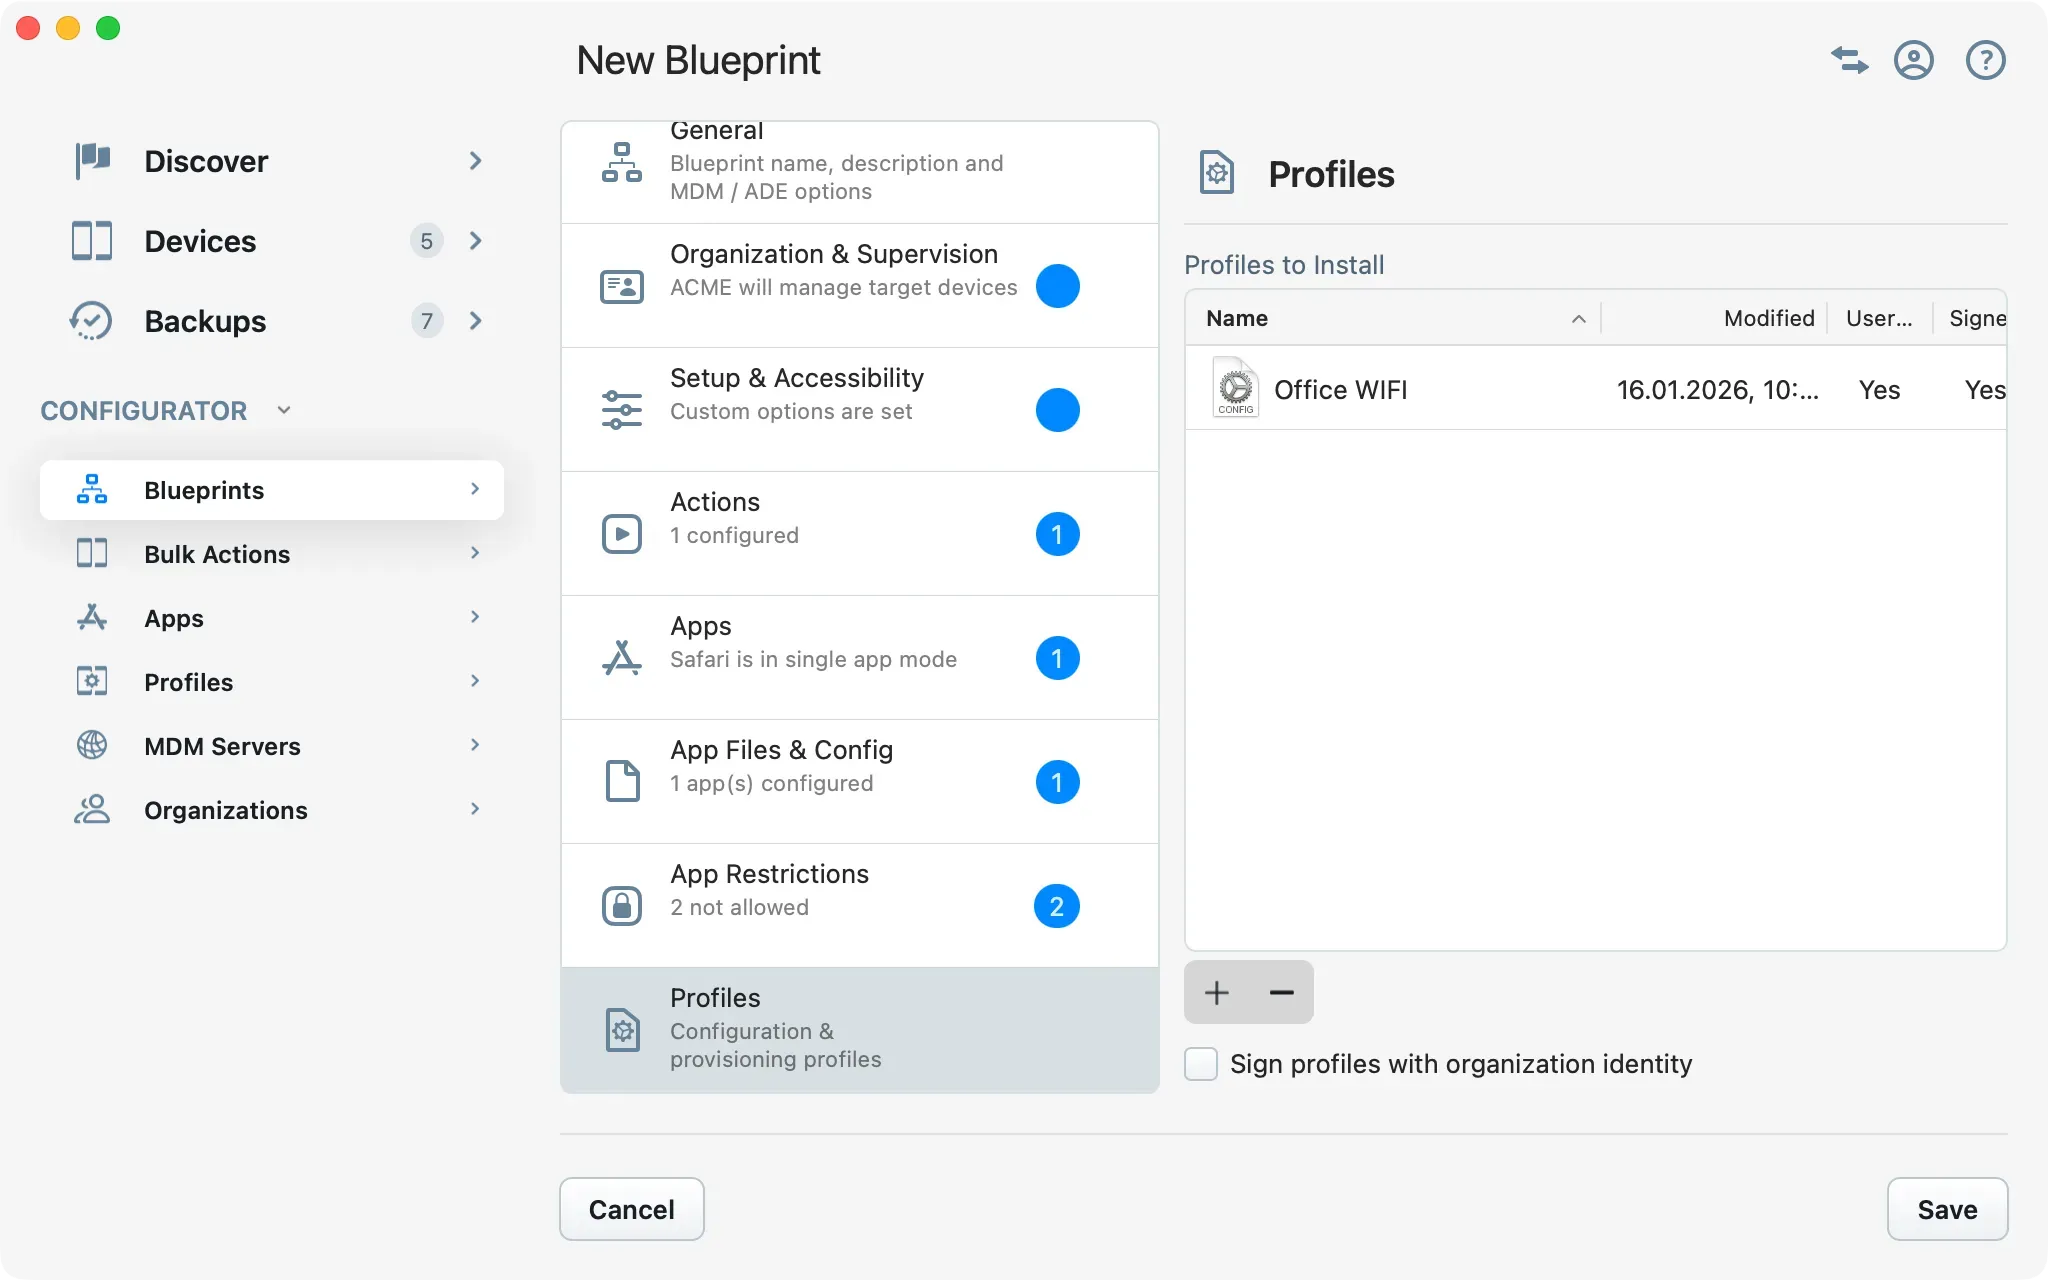
If your profile library is empty, you can import a profile or create a new configuration profile right there from the profile library sheet. Creating a new profile will launch iMazing Profile Editor, our free utility to create and edit configuration profile. Because iMazing Profile Editor is packaged with iMazing, there is no extra step to download or install it.
Learn more about iMazing Configurator's profile library
Getting Started with iMazing Profile Editor
Last, you can opt to sign configuration profiles with the blueprint's organization identity.
Tip: as a convenience, iMazing Configurator's blueprints expose a few settings which could also be applied via configuration profiles: Wi-Fi Profile, Single App Mode and App Restrictions. Make sure that you do not configure the same settings both in a profile and in other sections of the blueprint.
Tip 2: if you're not already familiar with configuration profiles, do create one in iMazing Profile Editor and take a look at all the available options: passcode and backup security, url whitelists and blacklists, WebClips, VPN and proxy configuration… Configuration profiles expose a ton of useful settings and restrictions, and are an indispensable tool for automating the configuration of Apple devices.
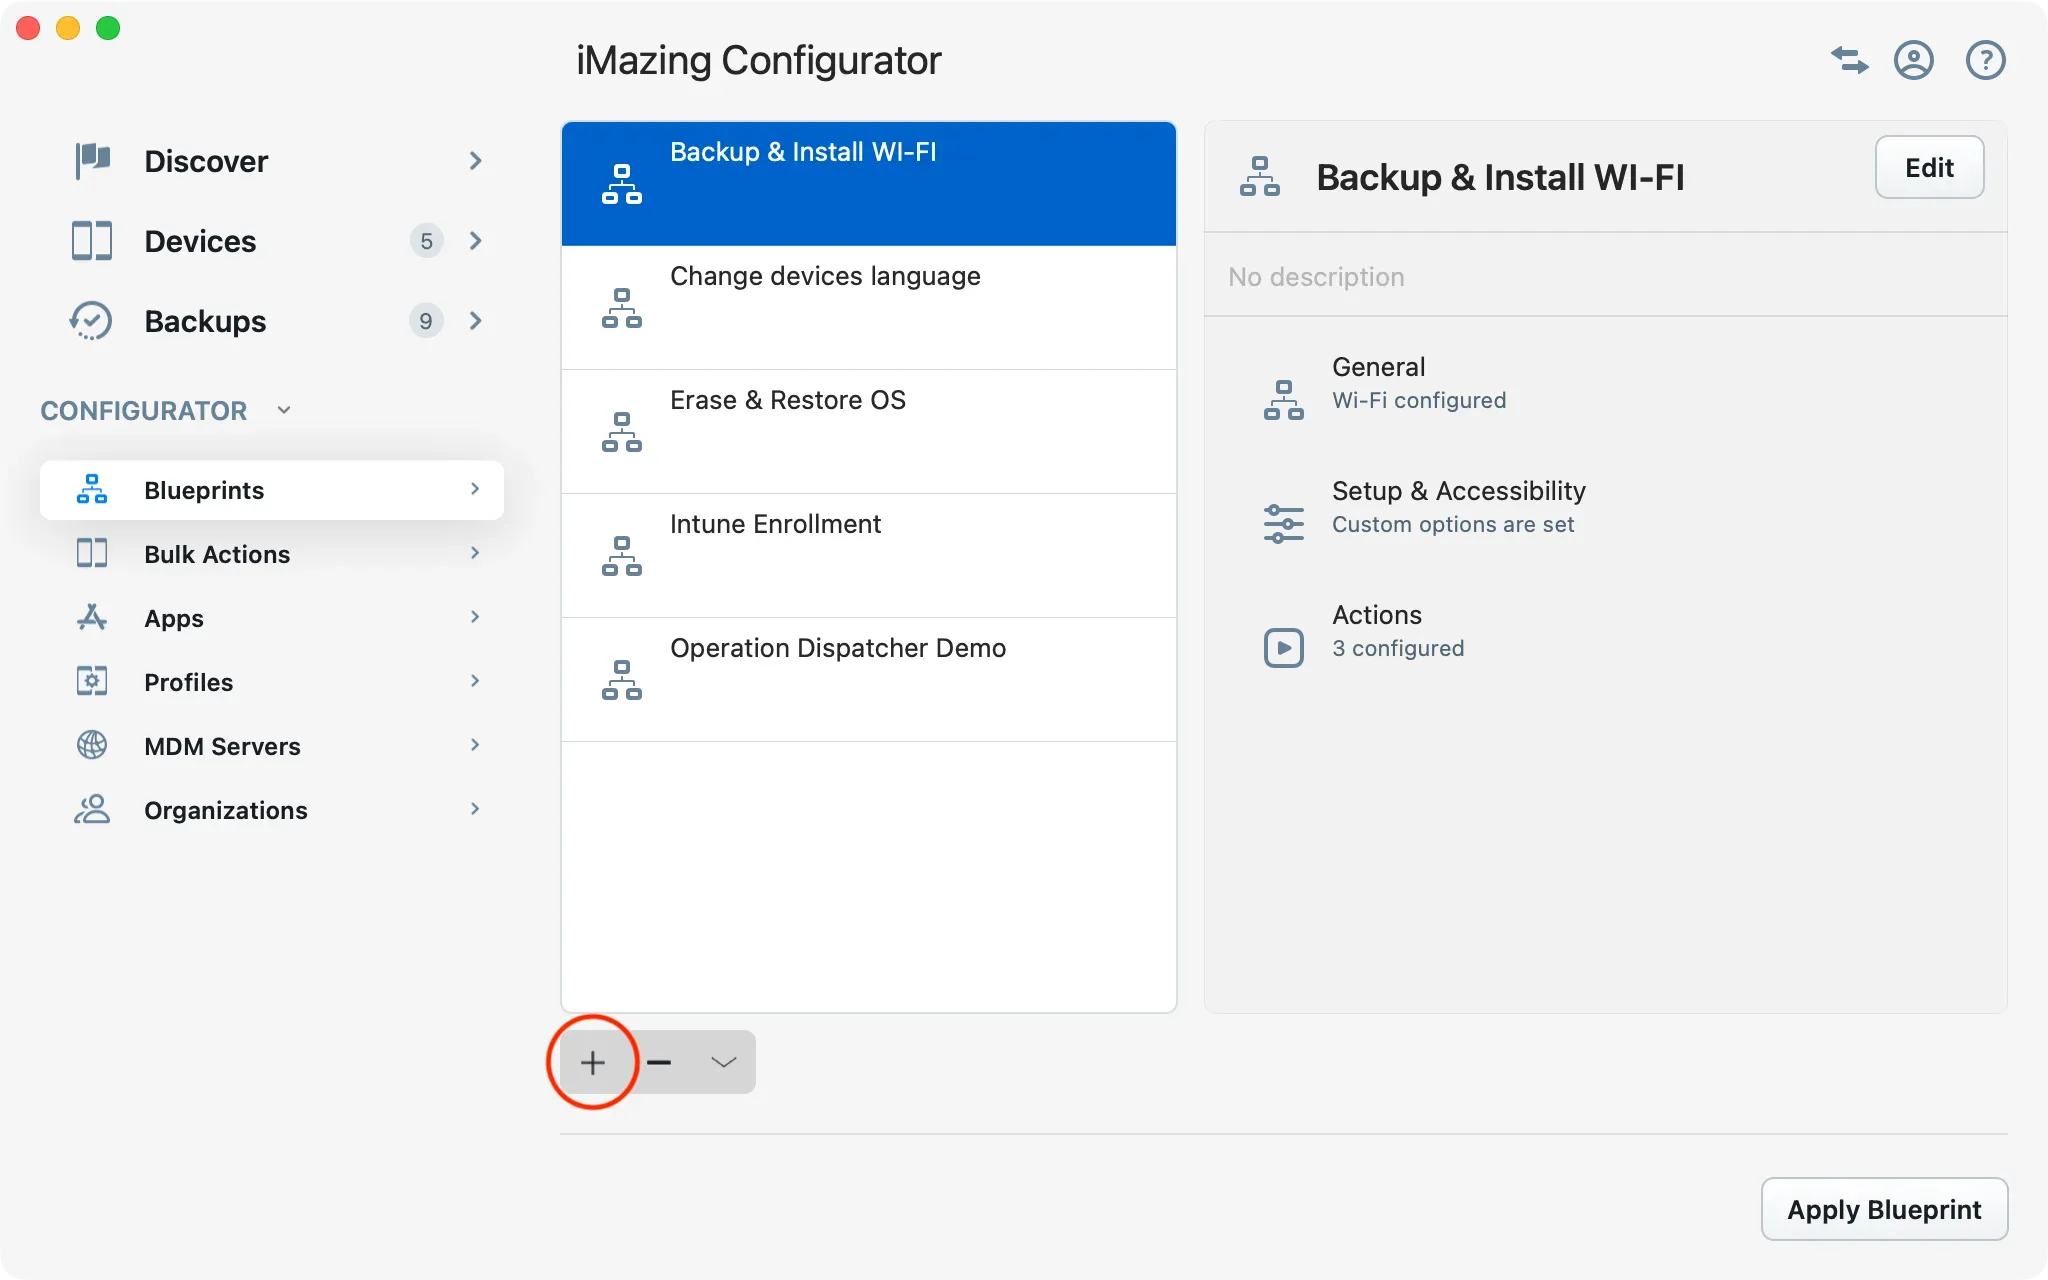
The Blueprint Library
Creating Blueprints
Click the + button to create a fresh blueprint and open the Blueprint Editor view. The blueprint will not be saved to your library until you click the Save button in the Blueprint Editor.
Exporting and Importing Blueprints
When you export a blueprint, iMazing prompts you for a password and packages all the required assets in an AES-256 encrypted archive. Packaged assets include:
- Settings and app configurations
- Backup to restore
- Wallpapers
- Custom Apps
- App files
- Configuration and provisioning profiles
- Supervising organization
- Apple ID or Volume Purchase account login credentials
- Configured backup passwords
These last 3 items are obviously sensitive. When the admin you share a blueprint with imports it in iMazing Configurator, these items will be imported in his keychain. In consequence, it is vital that you only share blueprints with admins who are authorized to access those secrets.
Tip: When you export a blueprint which applies supervision, iMazing will display a dialog asking whether or not the organization identity should be included. This enables sharing blueprints safely, without exposing organization certificates. When importing a blueprint which has been stripped of its supervision identity, iMazing will prompt you to select an organization.
Deleting Blueprints
Deleting a blueprint will not remove any associated items from your keychain (backup passwords, supervising organization, login credentials).
Applying Blueprints
Select a blueprint in the list and click Apply Blueprint, and iMazing will present you with the Operation Dispatcher View:
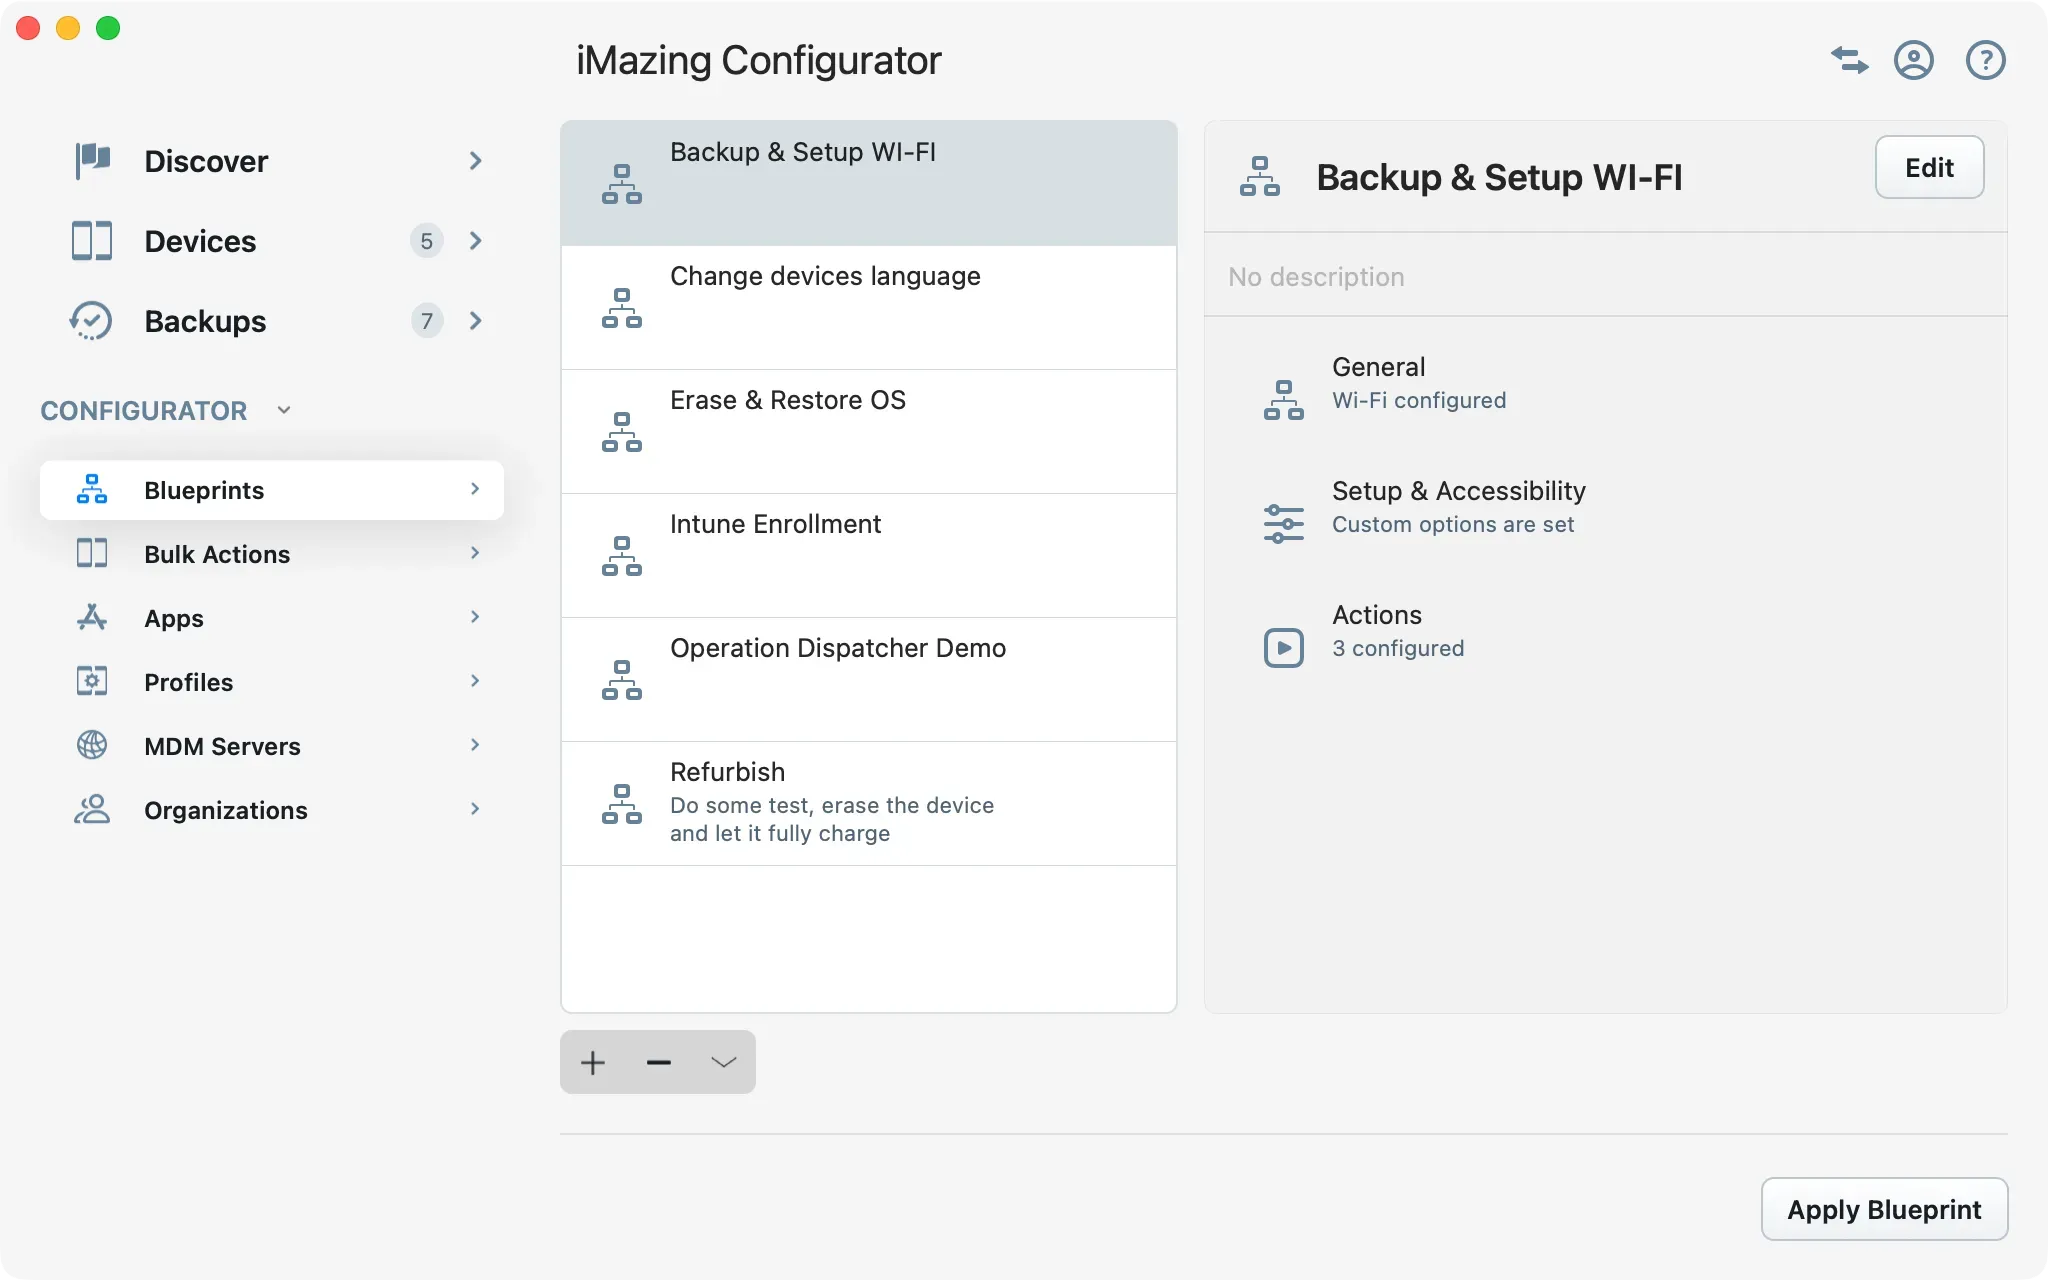
In the screenshot above, we are about to apply a blueprint named Backup & Setup Wi-Fi to all available devices. After selecting at least one device, click the Launch button at the bottom right of the window to start. There will be a confirmation dialog only if the blueprint erases the target devices, otherwise iMazing will run configuration operations immediately.
Wi-Fi vs USB: Not all blueprints can be applied via Wi-Fi. iMazing will automatically filter out Wi-Fi connected devices if the blueprint's configuration requires a USB connection to be applied.
Alternate workflow: blueprints can also be applied via the Apply Blueprint action available in iMazing's Tools Section.
For a more in depth look, please read the following guide: iMazing Configurator: Operation Dispatcher View