iMazing Profile Editor: Working with Custom Manifests
Updated on Mar 25, 2026
Reading time ~8 minutes
The configuration preferences available in iMazing Profile Editor can be customized to fit the various needs of system admins.
Thanks to the app’s robust manifest customization system, changes can be as simple as editing the default value of a single preference key, or as advanced as swapping out the entire preferences body and replacing it with a completely custom one.
Before you begin
There are a number of ways to customize manifests, depending on the desired level of customization. However, they all depend on familiarity with PFMs, or preference manifest files [acronym shuffled at the source].
PFMs are property list files that contain the information about preferences available for configuration. Each manifest file describes one configuration domain (for example, com.apple.wifi.managed) and its preference keys, along with their types, descriptions, formats, conditions, or other meta information necessary for a valid configuration.
iMazing Profile Editor relies on manifests from the community-led ProfileManifests project. These manifests are based on Apple’s documentation and have been augmented over the years through contributions from Mac Admins community members.
Tip: if you customize the manifests in a way that may benefit other admins in the community (for example, when adding missing keys or updating outdated information), we encourage you to submit your changes to the repository. Find out how iMazing Profile Editor makes this easy later in this article.
Simple customization
The simplest way to customize configuration preferences is to override individual manifest files using local files from your drive. If you’d like to make a small modification to an existing preference key, or even to add a completely new key when one is missing, this is the workflow for you.
- Obtain the original manifest that you would like to customize. For example, if you’d like to change a preference in the Web Clips domain, you could download
com.apple.webClip.managed.plistfrom https://github.com/ProfileManifests/ProfileManifests/tree/master/Manifests - Place the file in an empty folder somewhere convenient on your drive, and start editing the PFM.
- In iMazing Profile Editor, open the preferences window and under the Manifests tab, choose this folder as a Local folder for custom and override preference manifests:
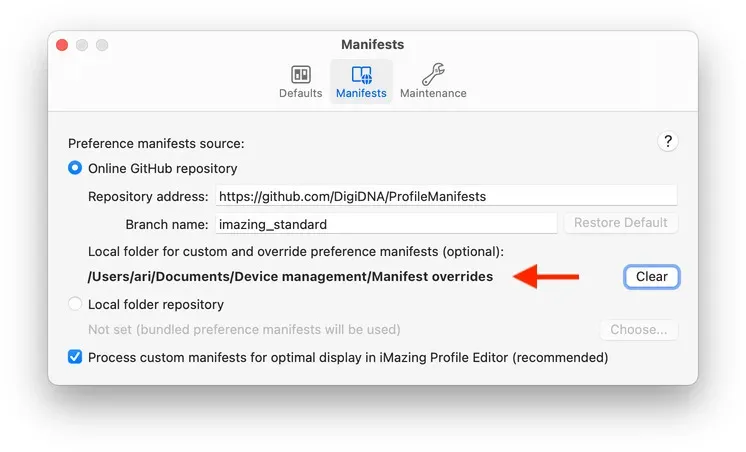
- Close the preferences window to apply the new settings, and reload your profiles when prompted. Any changes that you made in the local manifest file will override the original.
Tip: You can continue working on your custom manifest with iMazing Profile Editor open. When you save your changes and switch the focus back to IPE, you'll notice a Manifest Updates indicator in the top toolbar – click it to review changes and reload your profile with up-to-date manifest overrides.
Adding new preference domains: custom manifests that introduce a new configuration domain will appear as additional sections under the Available User Domains group.
Advanced customization
For certain workflows it may be useful to go beyond overriding individual manifests, and to replace the default manifests source entirely. iMazing Profile Editor lets you change to another online manifest repository, or even use a local folder as its manifest source.
Online manifest repository
By default, the app polls our GitHub fork of ProfileManifests for the most recent manifests. We use a fork so that we can roll our contributions out quickly to users before they get merged and also in order to add manifests not currently supported by other editors (e.g. VPN). We do, however, continuously sync our fork back up with the ProfileManifests community upstream.
To switch to another repository, open the app preferences and select the Manifests tab. When Online GitHub repository is selected, you can enter custom repository address and branch.
We imagine that users who choose this option would normally use a fork of ProfileManifests, however repositories not based on ProfileManifests are supported too, so long as they have a similar structure. Namely, a Manifests folder should sit at the root and contain an index file enumerating the manifests by category. One General settings manifest must also be present and have its pfm_domain key set to Configuration.
Once the information for the alternative online repository is entered, close the preferences window to apply the new settings, and reload your profiles when prompted.
Local manifest repository
Using a local folder as a manifest repository gives you total control over the manifests and frees you from the need to update the index file or make commits.
A local repository can be a simple folder containing a number of manifests, or can be a complete local Git clone of ProfileManifests. The minimum requirement for a valid local manifest folder is to contain one manifest file for the General settings domain with its pfm_domain key set to Configuration or to an empty string.
To set a local manifest repository, open the app preferences and select the Manifests tab. When Local folder repository is selected, you can choose a folder from your drive to serve as one.
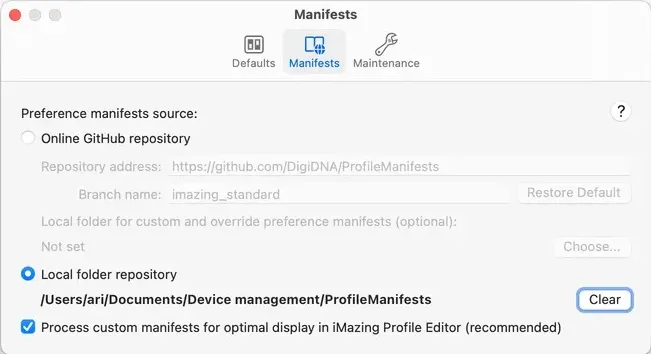
Similarly to the previous repository options, when you finish setting your repository up, close the preferences window to apply the new settings and reload your profiles when prompted.
Tip: Setting a local manifest repository but leaving the folder path empty will make the app load its bundled manifests, effectively disabling automatic manifest updates.
Contribute to ProfileManifests
System admins often ask us how they can change or update preference manifests and how they could then contribute their modifications back to the community. Beginning with version 1.5, iMazing Profile Editor makes this task a real breeze.
Advanced users can choose to clone ProfileManifests to a folder and use that as a local repository as explained earlier. They would then follow the usual change-commit-push cycle.
However, if you are not familiar or not comfortable with Git, the manifest override workflow detailed below is a hassle-free way to get started with submitting changes.
Before you begin make sure that you have a GitHub account, since one is necessary for communicating your changes back to the community repository.
Making changes
Jump right into making changes to the manifest by following these steps:
- Download the relevant manifest from ProfileManifests.
- Place the manifest in an empty folder.
- In the Manifests tab of the iMazing Profile Editor preferences, choose your folder as Local folder for custom and override preference manifests.
- Close the preferences window and reload the profiles if prompted.
Note: in ProfileManifests, some preference domains are split across multiple manifest files. When working on
com.apple.applicationaccess,com.apple.MCX, andcom.apple.notificationsettings, make sure that you download all files whose names begin with the relevant domain string, even if you only plan to make changes to one of them.
Now you can use any text editor to modify the manifest. While making changes, keep a draft profile open in the app, with a payload of the domain you are working on configured. When changes are detected, iMazing Profile Editor will notify you via the Manifest Updates indicator in the toolbar. Clicking on the indicator offers the option to reload the draft profile so that changes can become immediately visible.
Submitting changes
Once you are happy with the changes that you made, you can submit them to the GitHub repository using these steps:
- In your text editor, update the
pfm_last_modifiedkey of the manifest. If you added new preference keys to the manifest, bump up thepfm_versionkey as well. - On GitHub, fork ProfileManifests to your account (if you haven't yet done so). This fork is where you will be adding your proposed changes, and you may delete it once they get accepted.
- Create a new branch by clicking on the name of the current branch,
masterand typing in a name of the new one, followed by a click on Create branch:… . This will automatically switch you to the new branch. - Navigate to the manifest file and click the pencil icon to edit it.
- Copy and paste the entire file from your text editor into the GitHub editor, overwriting any code that was already there.
- Write a short commit message describing the changes to the file, and click Commit changes.
- Click Code at the top left to go back to the repository.
- Click Compare & pull request to create the request to merge your changes.
- Write a short message describing the changes that you are proposing. This could be similar to the commit message.
- Click Create pull request, and you're done.
Getting help
The techniques presented in this article are a bit more advanced than casual use of iMazing Profile Editor, and it is quite understandable if you have follow-up questions or need some assistance in setting up the correct preferences for your needs.
Our support team is happy to take your questions over at our support request form. We are also actively engaging with users on our Mac Admins Slack channel, #imazing_profile_editor. For specific preference manifest and ProfileManifests related questions, we recommend the #profilemanifests channel, where some of the community members who author ProfileManifests hang out.