Use iMazing for iOS digital forensic analysis and e-Discovery
Updated on May 19, 2026
Reading time ~23 minutes
iMazing gives investigators and legal teams direct access to iOS device data for forensic analysis and e-Discovery, from a computer running macOS or Windows, without requiring iCloud access or jailbreaking the device. It relies on iOS backups and other services running on the device, which requires knowing the device passcode. Other extraction methods offered by companies such as Celebrite or Elcomsoft rely on direct file system access via security exploits and jailbreaks. These techniques are often unavailable for the latest iOS versions or Apple device models and are widely viewed as problematic from a user-privacy standpoint, as they can weaken device security or circumvent user consent.
This guide covers the main workflows, from extracting communications and other data to exporting system diagnostics, logs or raw data.
Depending on your situation, iMazing supports three starting points:
Connected device: Select your device from the Devices section on the Home Screen.
Existing backup: Select it from the Backups section on the Home Screen.
External backup (e.g., recovered from a hard drive): In the Backups section, click + and choose Add Backup Folder or Add Backup Disk to import it.
Here’s a list of available features, depending on whether you can connect and pair the device with iMazing or are working from an existing iOS backup in iMazing:
iOS backups are essential for exporting data from iOS devices without using zero-day exploits or jailbreaking techniques. To create a backup, the device must first be paired with the computer by entering the device passcode. To start the backup, you’ll need to enter the device passcode again on iOS 16.1 and later, where Apple introduced this requirement as a security measure to protect user privacy.
iMazing leverages the same iOS backup protocol used by Finder on macOS, or iTunes and Apple Devices on Windows. iMazing doesn’t control the backup process; instead, the BackupAgent running on iOS prepares the backup, encrypts it, and streams it to iMazing while providing instructions on how to store it. This method makes iOS backups suitable for legal extraction or forensic analysis, since it ensures the backup data can’t be tampered with before it’s streamed to the computer.
Backup encryption is recommended when exporting data because, if it’s not enabled, Safari, Health, and Keychain data are excluded. It’s also important to enable backup encryption to preserve user privacy by securing the backup data stored on the computer with strong AES-256 encryption.
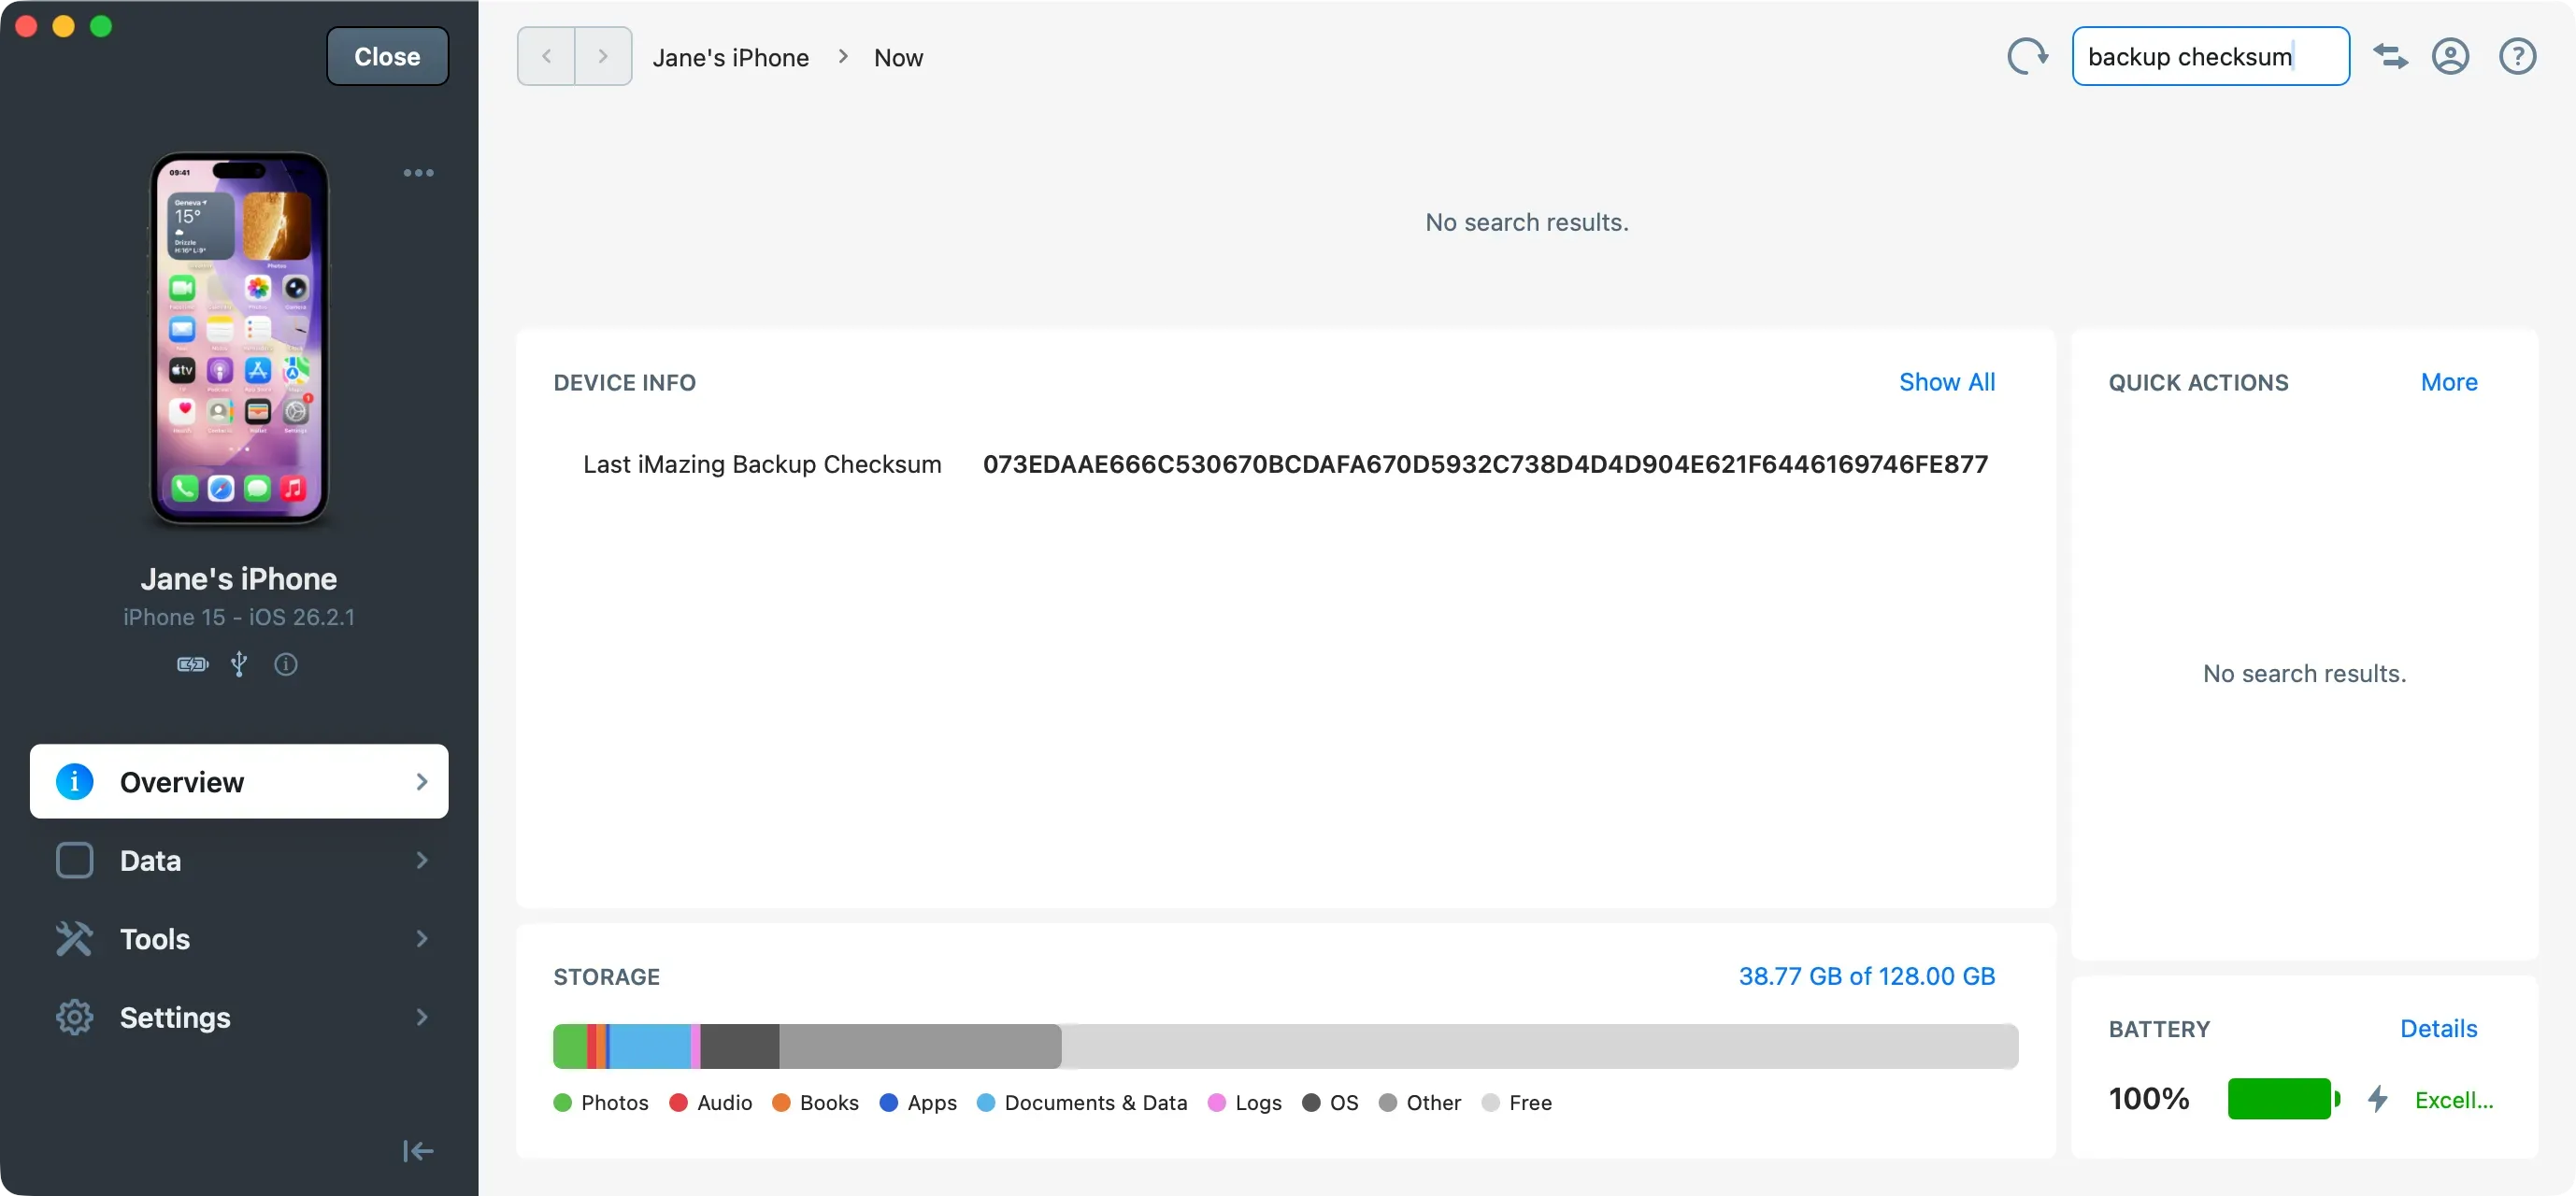
When backup encryption is enabled, iMazing provides a “backup manifest hash” that lets you verify the backup hasn’t been tampered with or modified since it was streamed to iMazing. The iMazing Backup Checksum is only valid when backup encryption is enabled because it produces a cryptographic hash of Manifest.db, which references all backup files and their encryption keys. You can verify integrity by checking whether the SHA-256 hash of the Manifest.db file (stored at the root of the backup) matches the SHA-256 hash displayed in iMazingBackupChecksum.txt (also stored at the root of the backup). If a file in the backup has been altered, its digest or encryption key won’t match the corresponding entry in Manifest.db. We therefore consider the Manifest.db hash strong proof of backup integrity.
Example of iMazingBackupChecksum.txt file:
----------------------------------------------------------------------------------
iMazing Backup Checksum:
- File: Manifest.db
- SHA-256: 34252FD2B06E40C7DE4E6C4E39CD1BFA68D93609E10E2B8F9D35D65771083809

----------------------------------------------------------------------------------
Important Info:
1. This checksum can be considered cryptographically valid
   for ensuring the integrity of all backup files, but only if
   this backup is encrypted and its encryption password is
   unknown to any potential attacker.
2. To verify this checksum, drag & drop the file available in this backup folder:
   Manifest.db on https://emn178.github.io/online-tools/sha256_checksum.html
   (the file is not uploaded)
----------------------------------------------------------------------------------
Tip: You can also find the latest iMazing Backup Checksum in the Device Info section on the Summary tab. Search for Last iMazing Backup Snapshot.
The iMazing Backup Checksum (SHA-256) hash is displayed at the bottom of the footer of exported messages when signing PDFs. It links a specific export to a specific backup’s integrity, helping prove chain of custody for legal purposes.
Partial Backups
From the device’s Data section, when you access a dataset that must be loaded from a backup, iMazing will prompt you to choose either Data Access Only or Full Backup. Data Access Only backs up only the data required to access the datasets available in the Data section. The resulting partial backup uses significantly less space on the computer used for extraction. However, for forensic purposes, we recommend performing a full backup to ensure all evidence is preserved.
Unlike Finder on macOS, or iTunes and Apple Devices on Windows, iMazing lets you choose where to store iOS backups, helping you save space on your computer’s main hard drive.
iMazing offers a unique feature that lets you keep multiple backup snapshots while preserving storage space in the backup location by leveraging hard links, a feature similar to Time Machine backups on macOS.
An iOS backup contains almost everything stored on a device, except cached content downloaded from iCloud or other cloud services (which can be re-downloaded at any time), logs, and app packages. It also contains third-party app data when the developer hasn’t opted out of backups. Third-party apps such as Telegram, Signal, or banking apps typically exclude their data from being backed up.
Folders and file entries in an iOS backup are organized into categories called domains.
Here are the main domains typically included in an iOS backup:
Apps (virtual folder): Contains all app domains (AppDomain). Each AppDomain is the sandboxed container of a specific app.
App Plugins (virtual folder): Each AppDomainPlugin is the sandboxed container of a specific app plugin.
App Groups (virtual folder): Each AppGroupDomain is the shared sandboxed container for apps from the same developer. For instance, WhatsApp and Facebook can share common containers since they are both developed by Meta. For an illustration of this, read our blog article: No, end-to-end encryption does not prevent Facebook from accessing WhatsApp chats.
System Containers (virtual folder): Each SysContainerDomain contains files related to system services.
System Shared Containers (virtual folder): Each SysSharedContainerDomain contains files shared by system services. The most important one is SysSharedContainerDomain-systemgroup.com.apple.configurationprofiles, which contains user and system configuration information related to device supervision and MDM enrollment.
Files (On My iPhone) (virtual folder): A shortcut to AppDomainGroup-group.com.apple.FileProvider.LocalStorage, which contains all files visible in the Apple Files app under "On My iPhone."
CameraRollDomain: Contains all photos and videos stored on your iPhone, including the Photos library.
HomeDomain: Contains all user data not specific to a sandboxed app, such as configured accounts, contacts, messages, TCC, and more.
HomeKitDomain: Contains all data related to HomeKit (Apple Home app).
InstallDomain: Contains system apps installation state.
KeyboardDomain: Contains settings related to keyboard and keyboard dictionaries.
KeychainDomain: Contains the encrypted backup of your iOS Keychain. Passwords and other secure items cannot be retrieved because they are encrypted.
ManagedPreferencesDomain: Contains managed preferences—currently only web content filters, as far as we know.
MediaDomain: Contains attachments from the Apple Messages app, such as files and photos.
MobileDeviceDomain: Contains provisioning profiles for enterprise apps.
NetworkDomain: Contains diagnostic data related to the network (not much as of today).
ProtectedDomain: Contains TrustStore.sqlite3, the system-level certificate trust database. It tells the OS which certificates to trust, distrust, or treat with special constraints.
RootDomain: Contains preferences of various system daemons.
SystemPreferencesDomain: Contains various other data and preferences, especially related to network, Wi-Fi, thermal status, and more.
TonesDomain: Contains custom ringtones.
WirelessDomain: Contains databases related to cellular and data usage and other radio preferences.
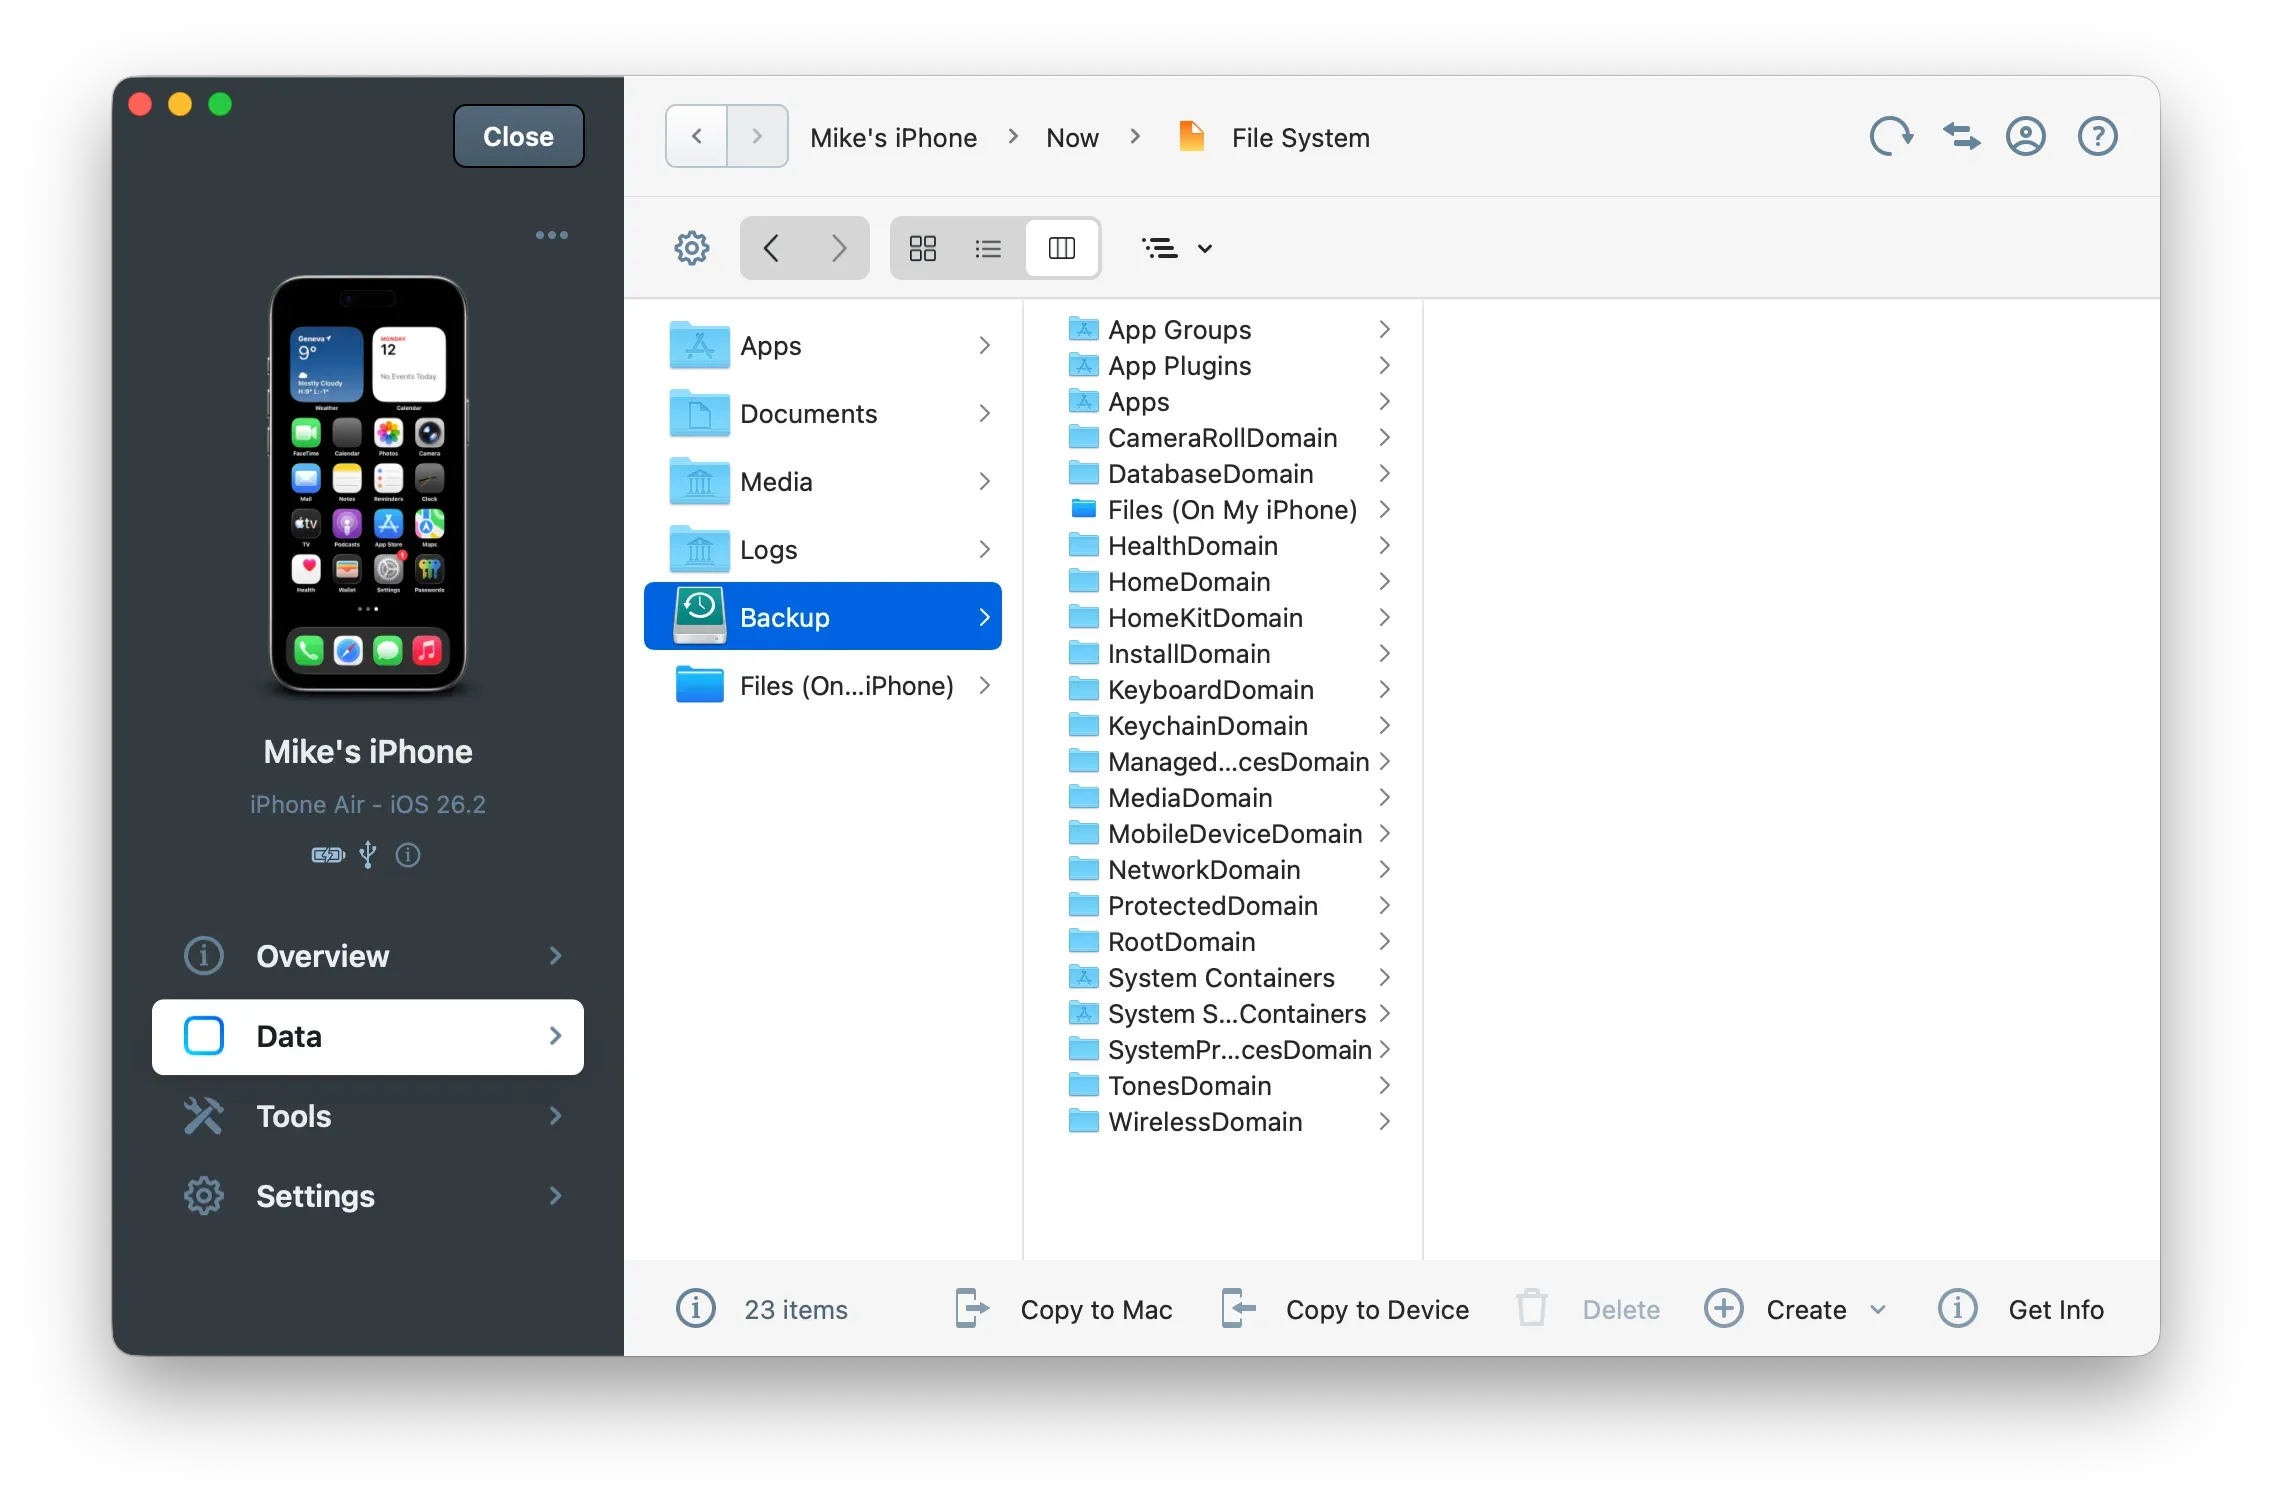
The File System section in iMazing provides a file browser that lets you browse app storage sandboxed containers, the Media partition containing photos, music and other medias — the Logs partition, and the full backup file structure.
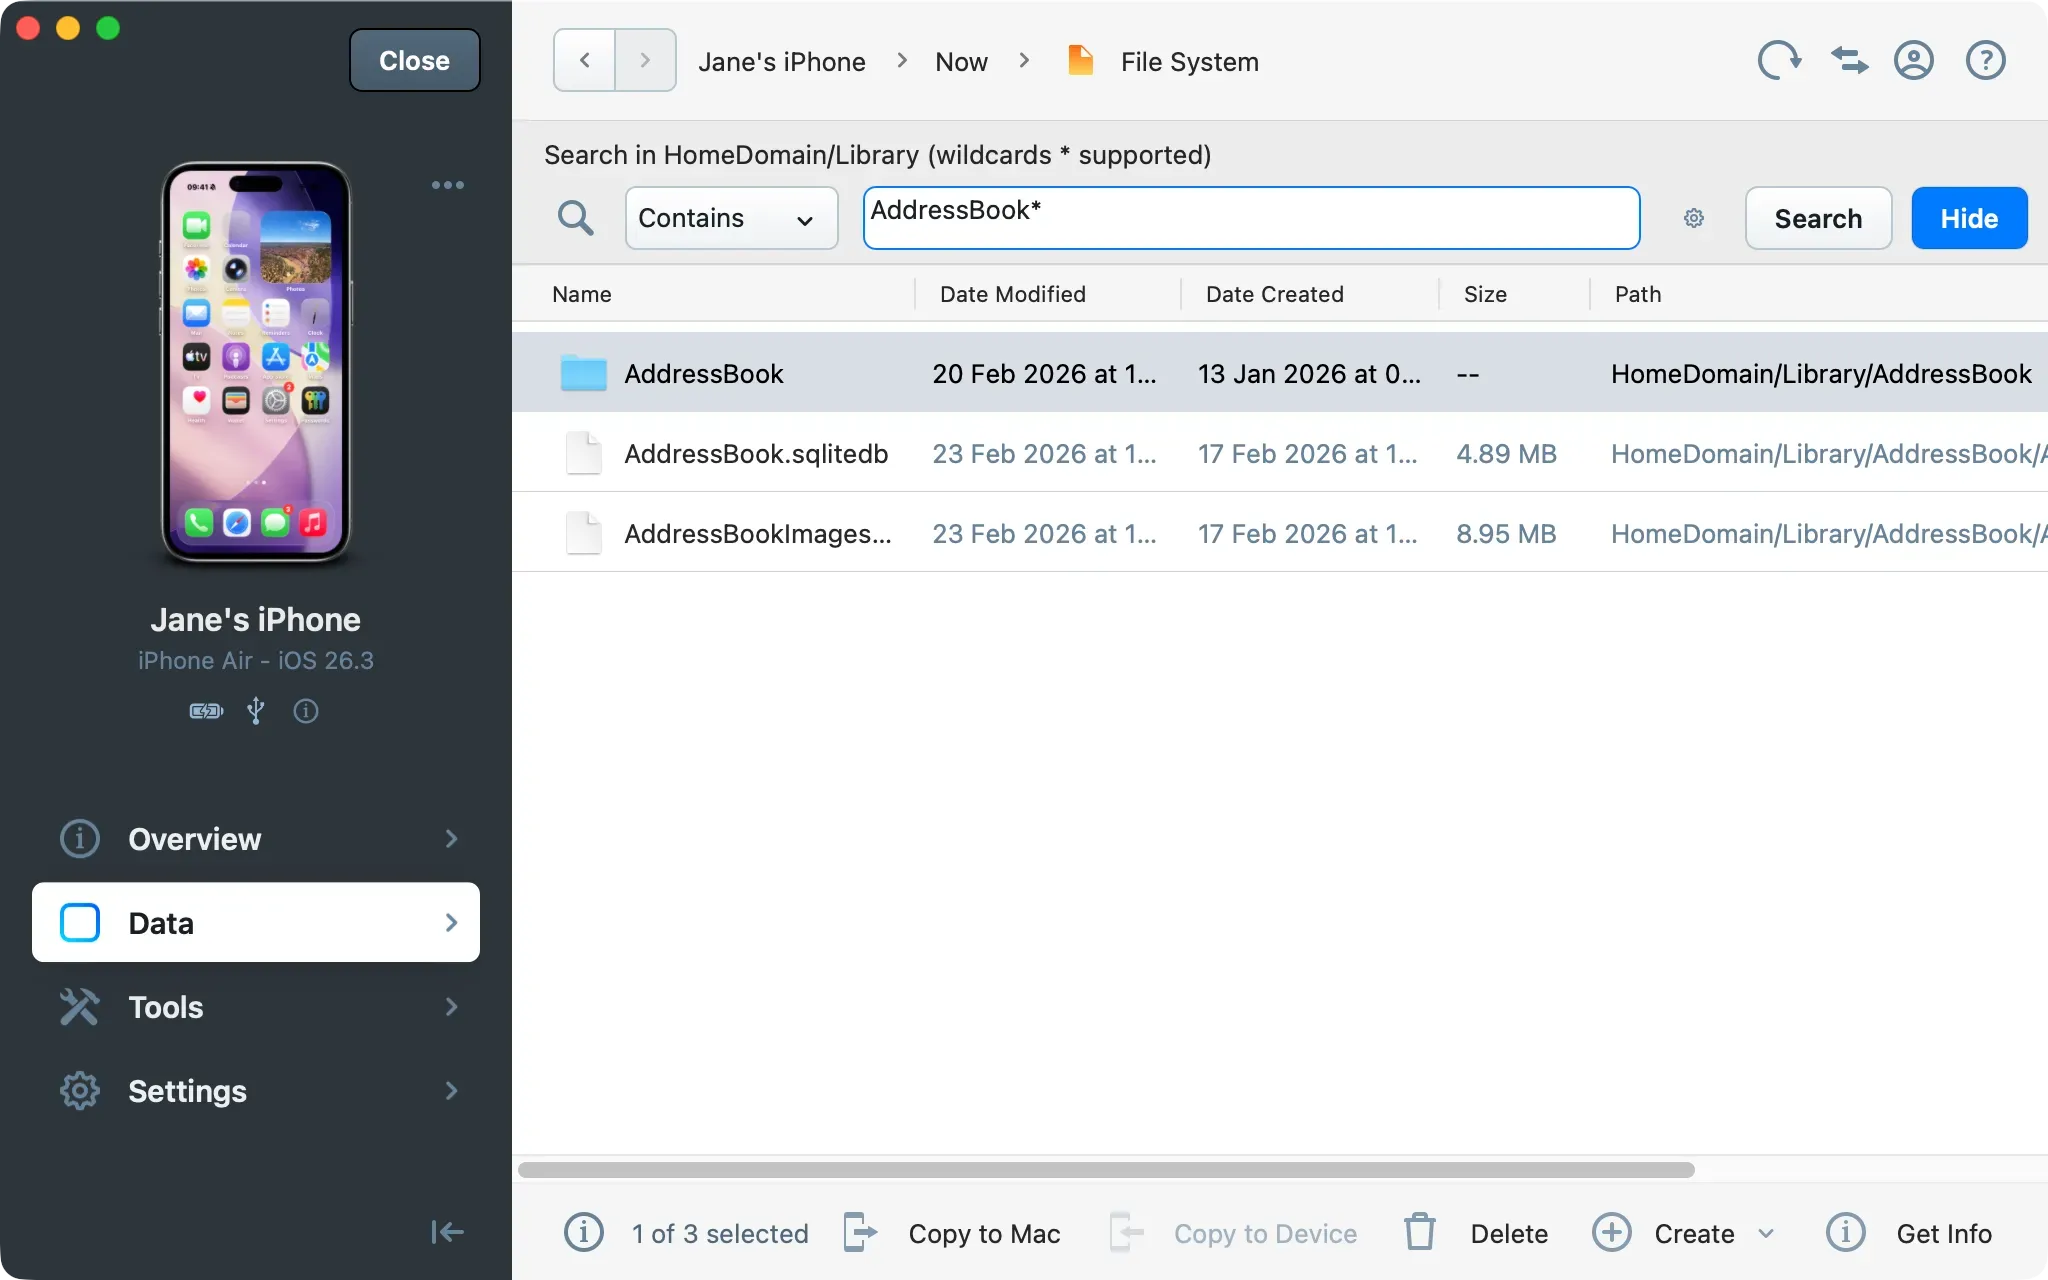
The File System section also supports targeted searches for specific files and folders, including wildcard patterns across both connected devices and backups.
This is useful for locating specific artifacts (a document, a database, a configuration file) without performing a full data export.
Click File System in the Data section.
Select a folder.
Use the Search field at the top to search by filename or pattern. Wildcards are supported (e.g., *.sqlite, com.apple.*).
Navigate to a result and use Copy to Mac/PC in the bottom toolbar to export specific files.
Tip: The Backup folder appears when a backup exists for a device and contains the full iOS backup domain structure. Use it to locate database files for apps that aren’t exposed through iMazing’s dedicated export interfaces. For more details about the backup structure (domains), see Export Raw Files below.
Export specific data with iMazing
iMazing lets you browse and extract a broad range of data types from a device backup and export them in formats suited for legal review, e-Discovery workflows, and forensic analysis.
Note: Extracting data requires iMazing to access a backup of the device. If no backup exists, iMazing will offer to run one before proceeding.
Export all data
Export All Data is a guided wizard that exports multiple datasets in a single operation. It is the recommended approach for broad data collection.
Select your device from the Devices section on the Home Screen, or select a backup from the Backups section.
Click Tools in the sidebar.
Under General, click Export All Data.
Select the datasets to include in the export.
Configure filters as needed: by contact, email address, phone number, filename, keywords, or date range.
Choose a destination folder on your macOS or Windows computer and start the export.
The subsections below describe targeted exports for individual data types. Use them when you need granular control over a specific dataset or export format.
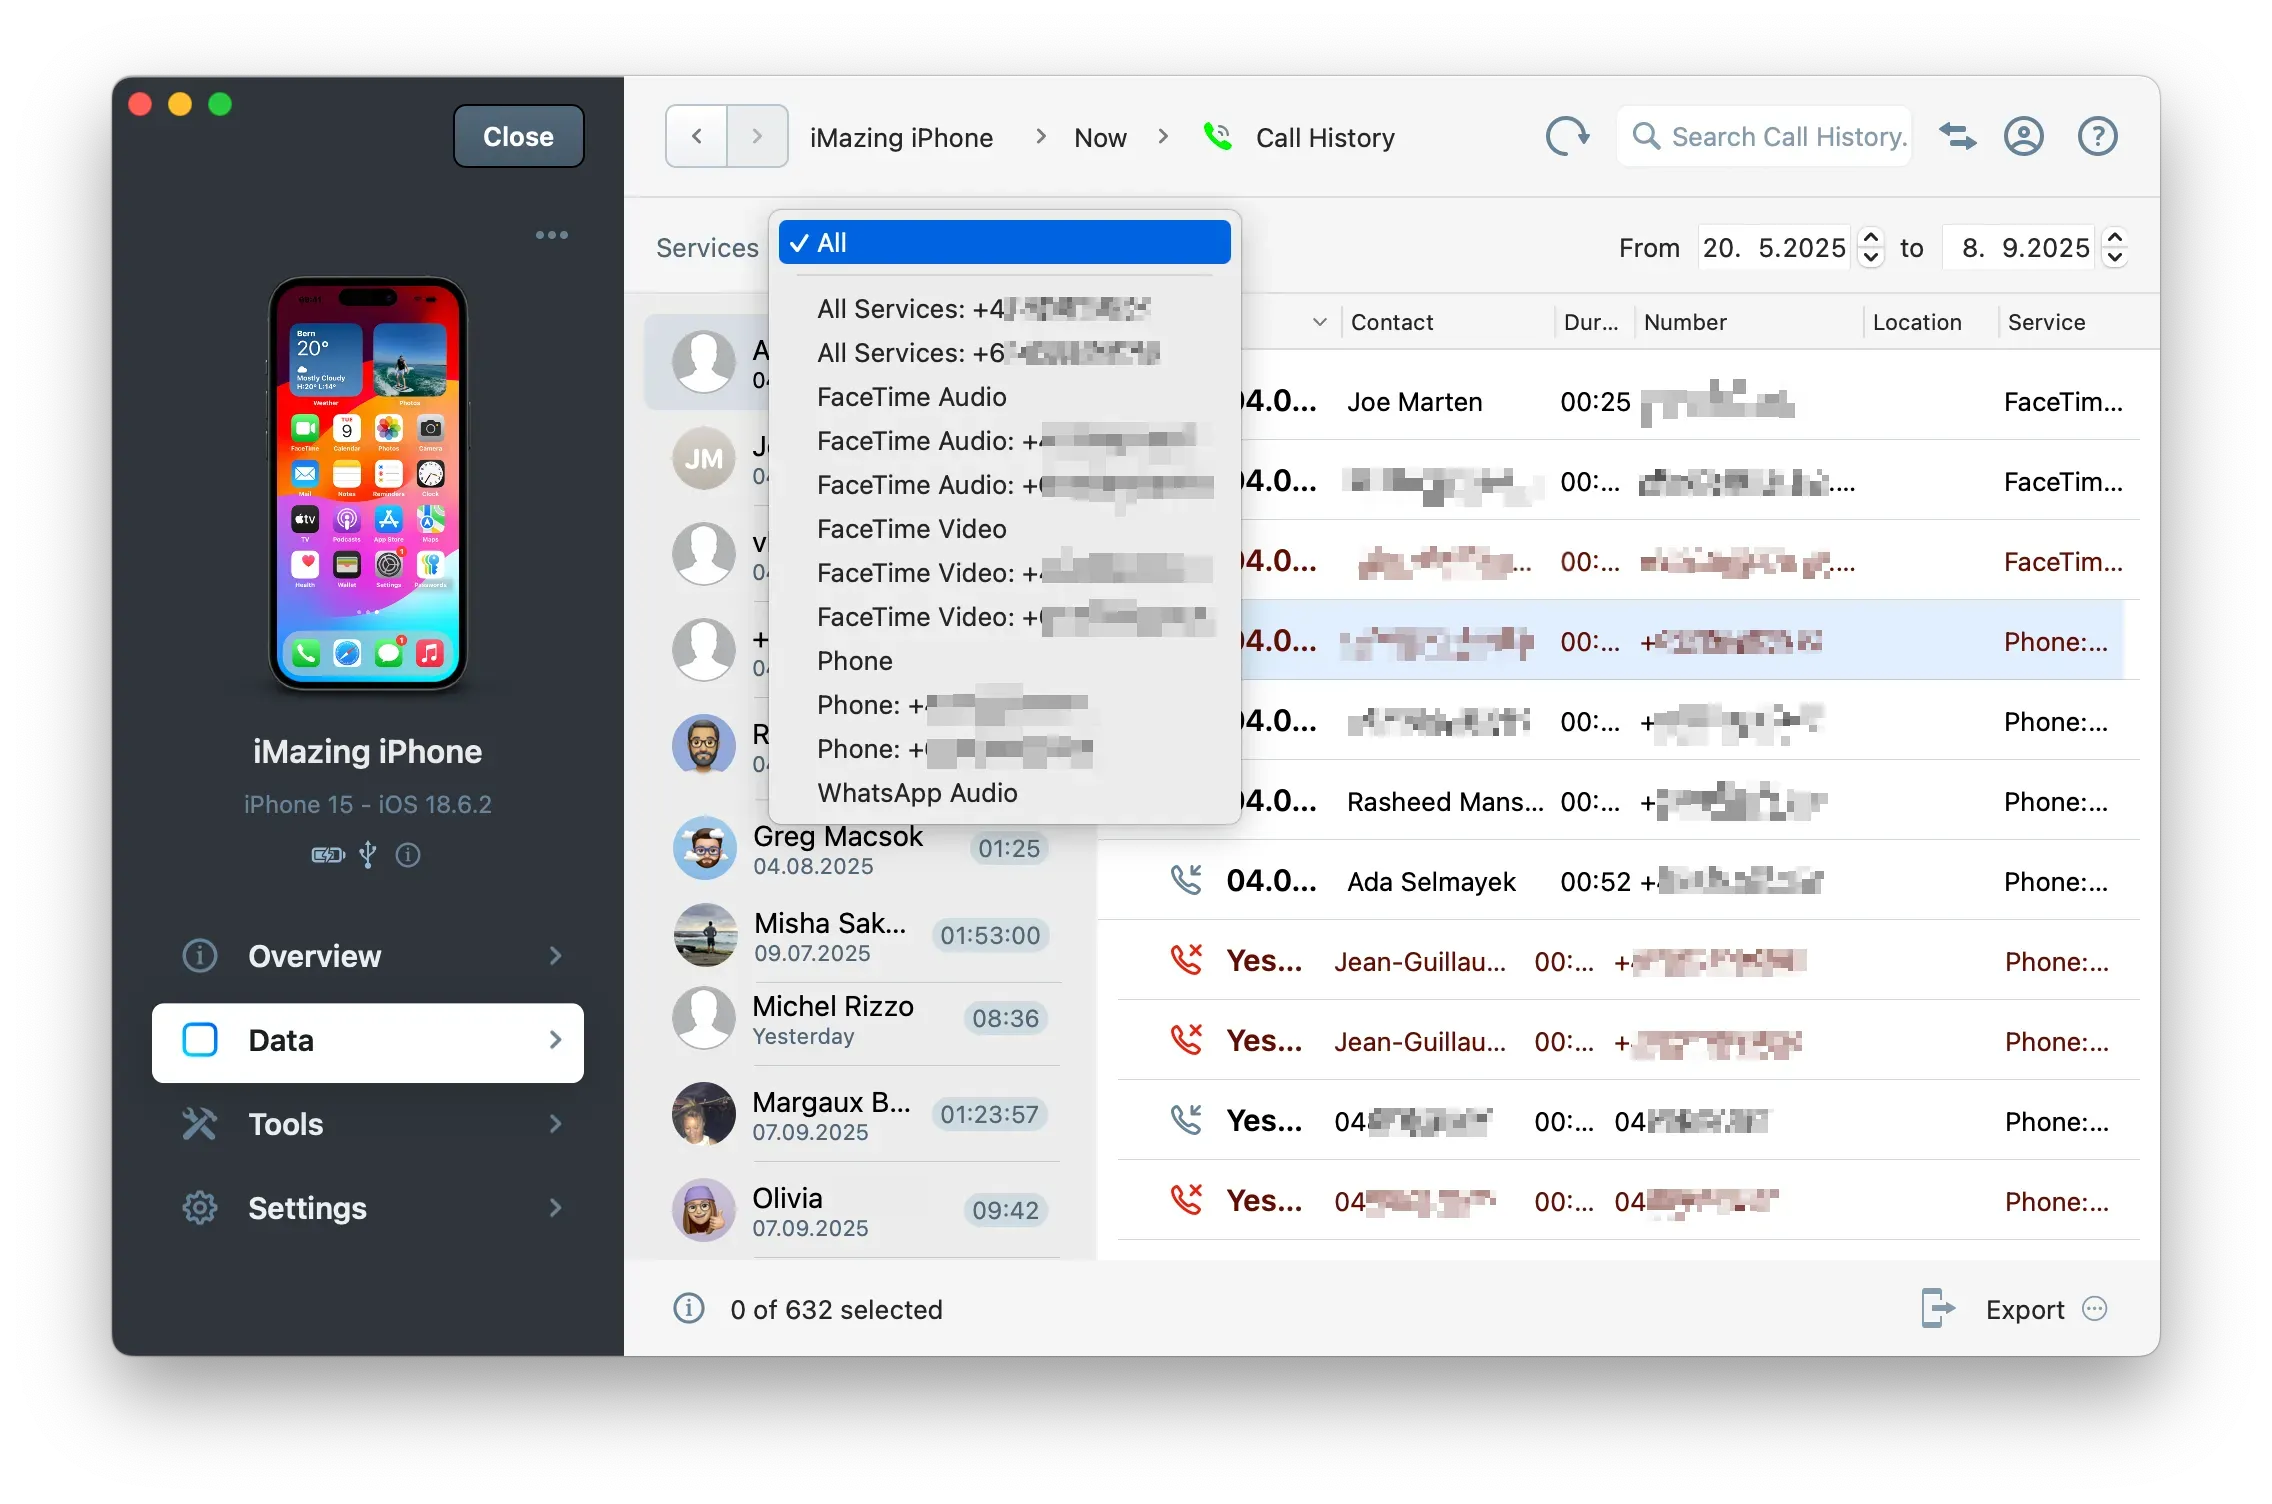
Export messages (SMS and RCS) and iMessages
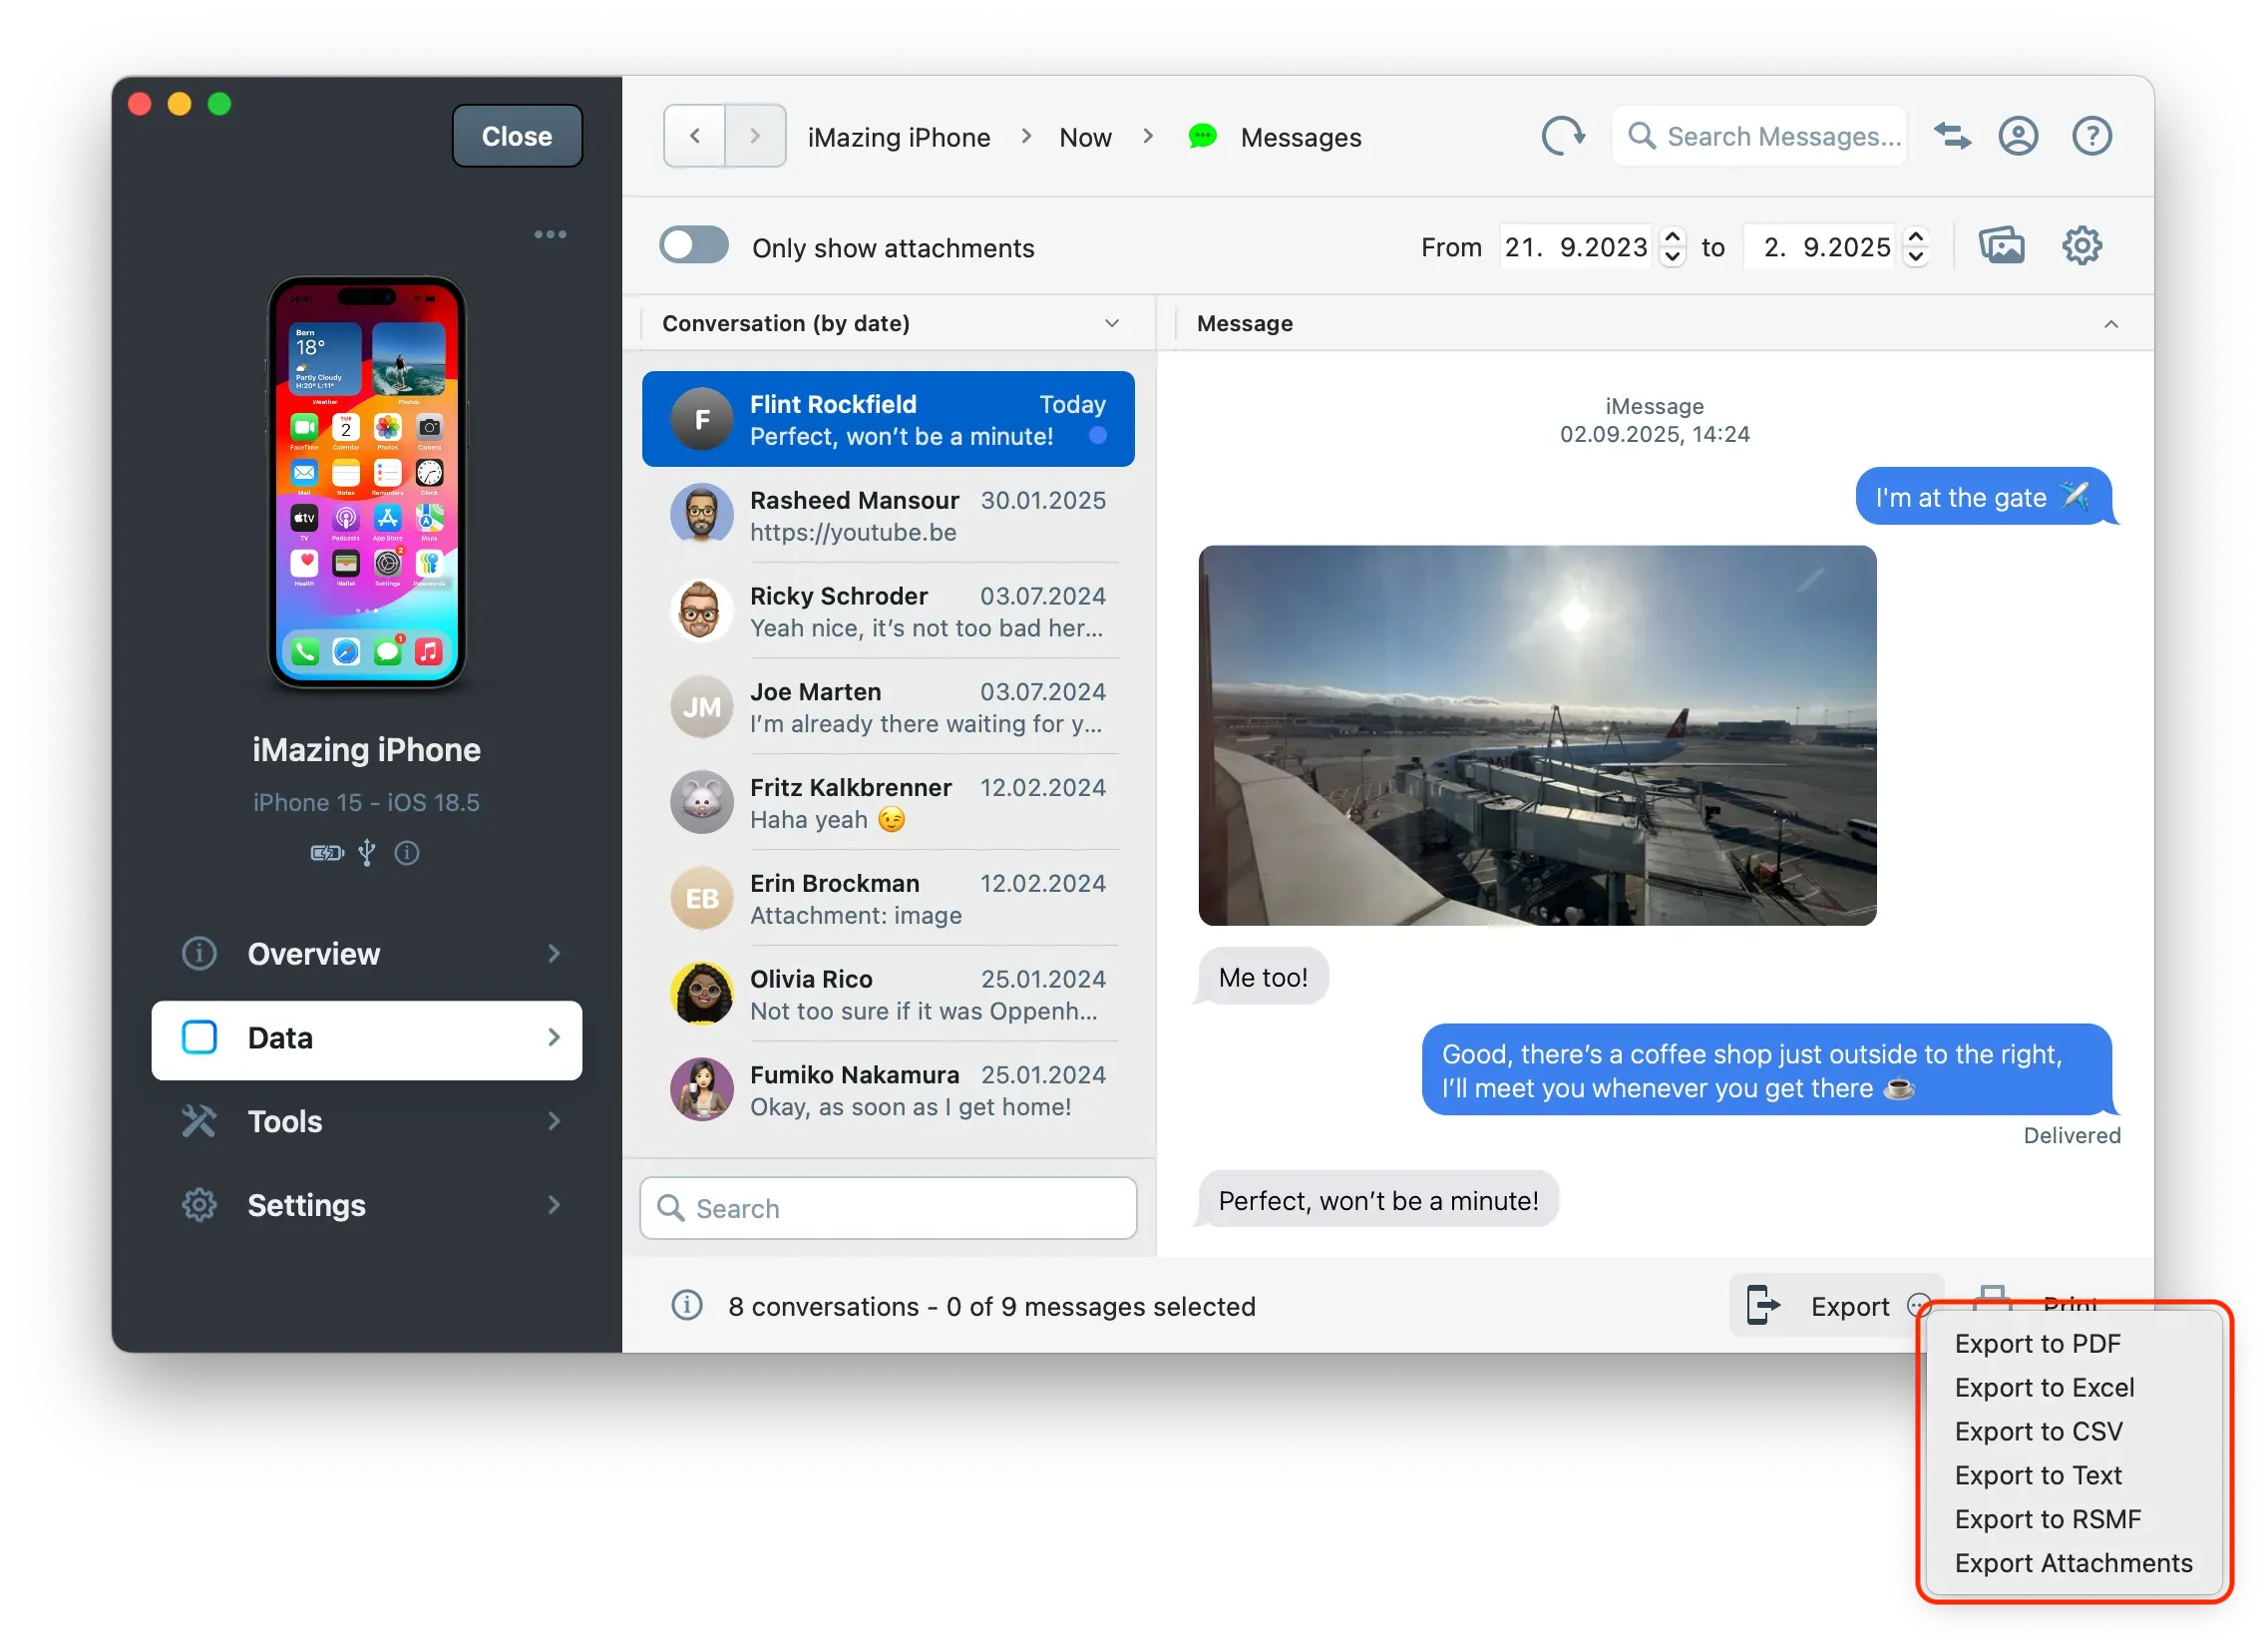
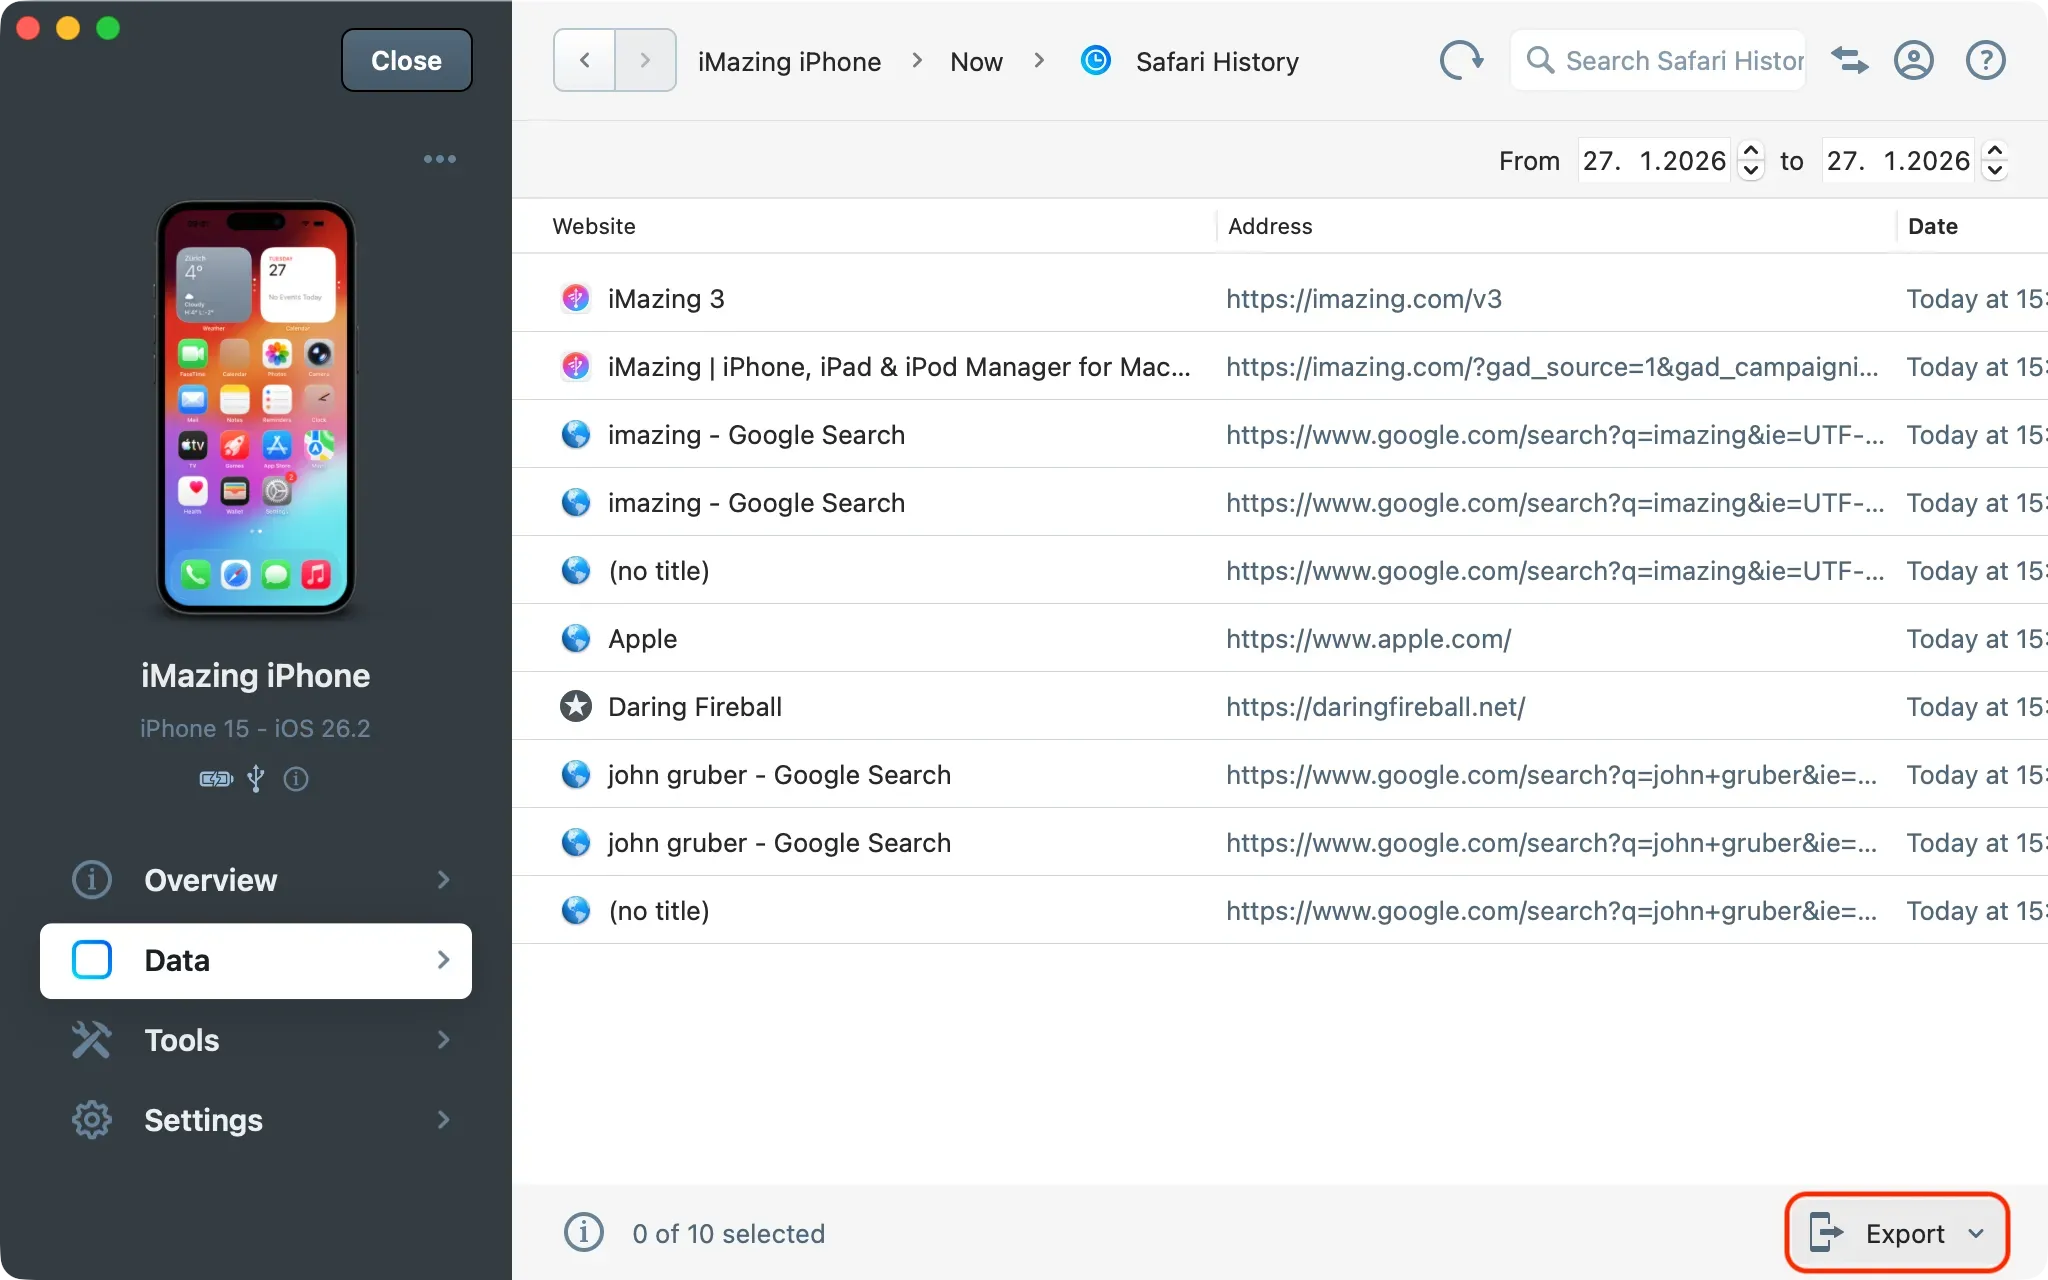
Click Messages in the Data section.
Select the conversations to export. Use Cmd (macOS) or Ctrl (Windows) to select multiple conversations.
Choose the metadata you want to include.
Click Export in the bottom toolbar and choose an export format: PDF, Excel, CSV, RSMF
Review export options, and optionally sign the PDF with a digital identity.
Choose a destination folder.
For forensic and legal use, export as PDF (supports a digital signature for chain-of-custody documentation) or RSMF (compatible with e-Discovery platforms such as RelativityOne).
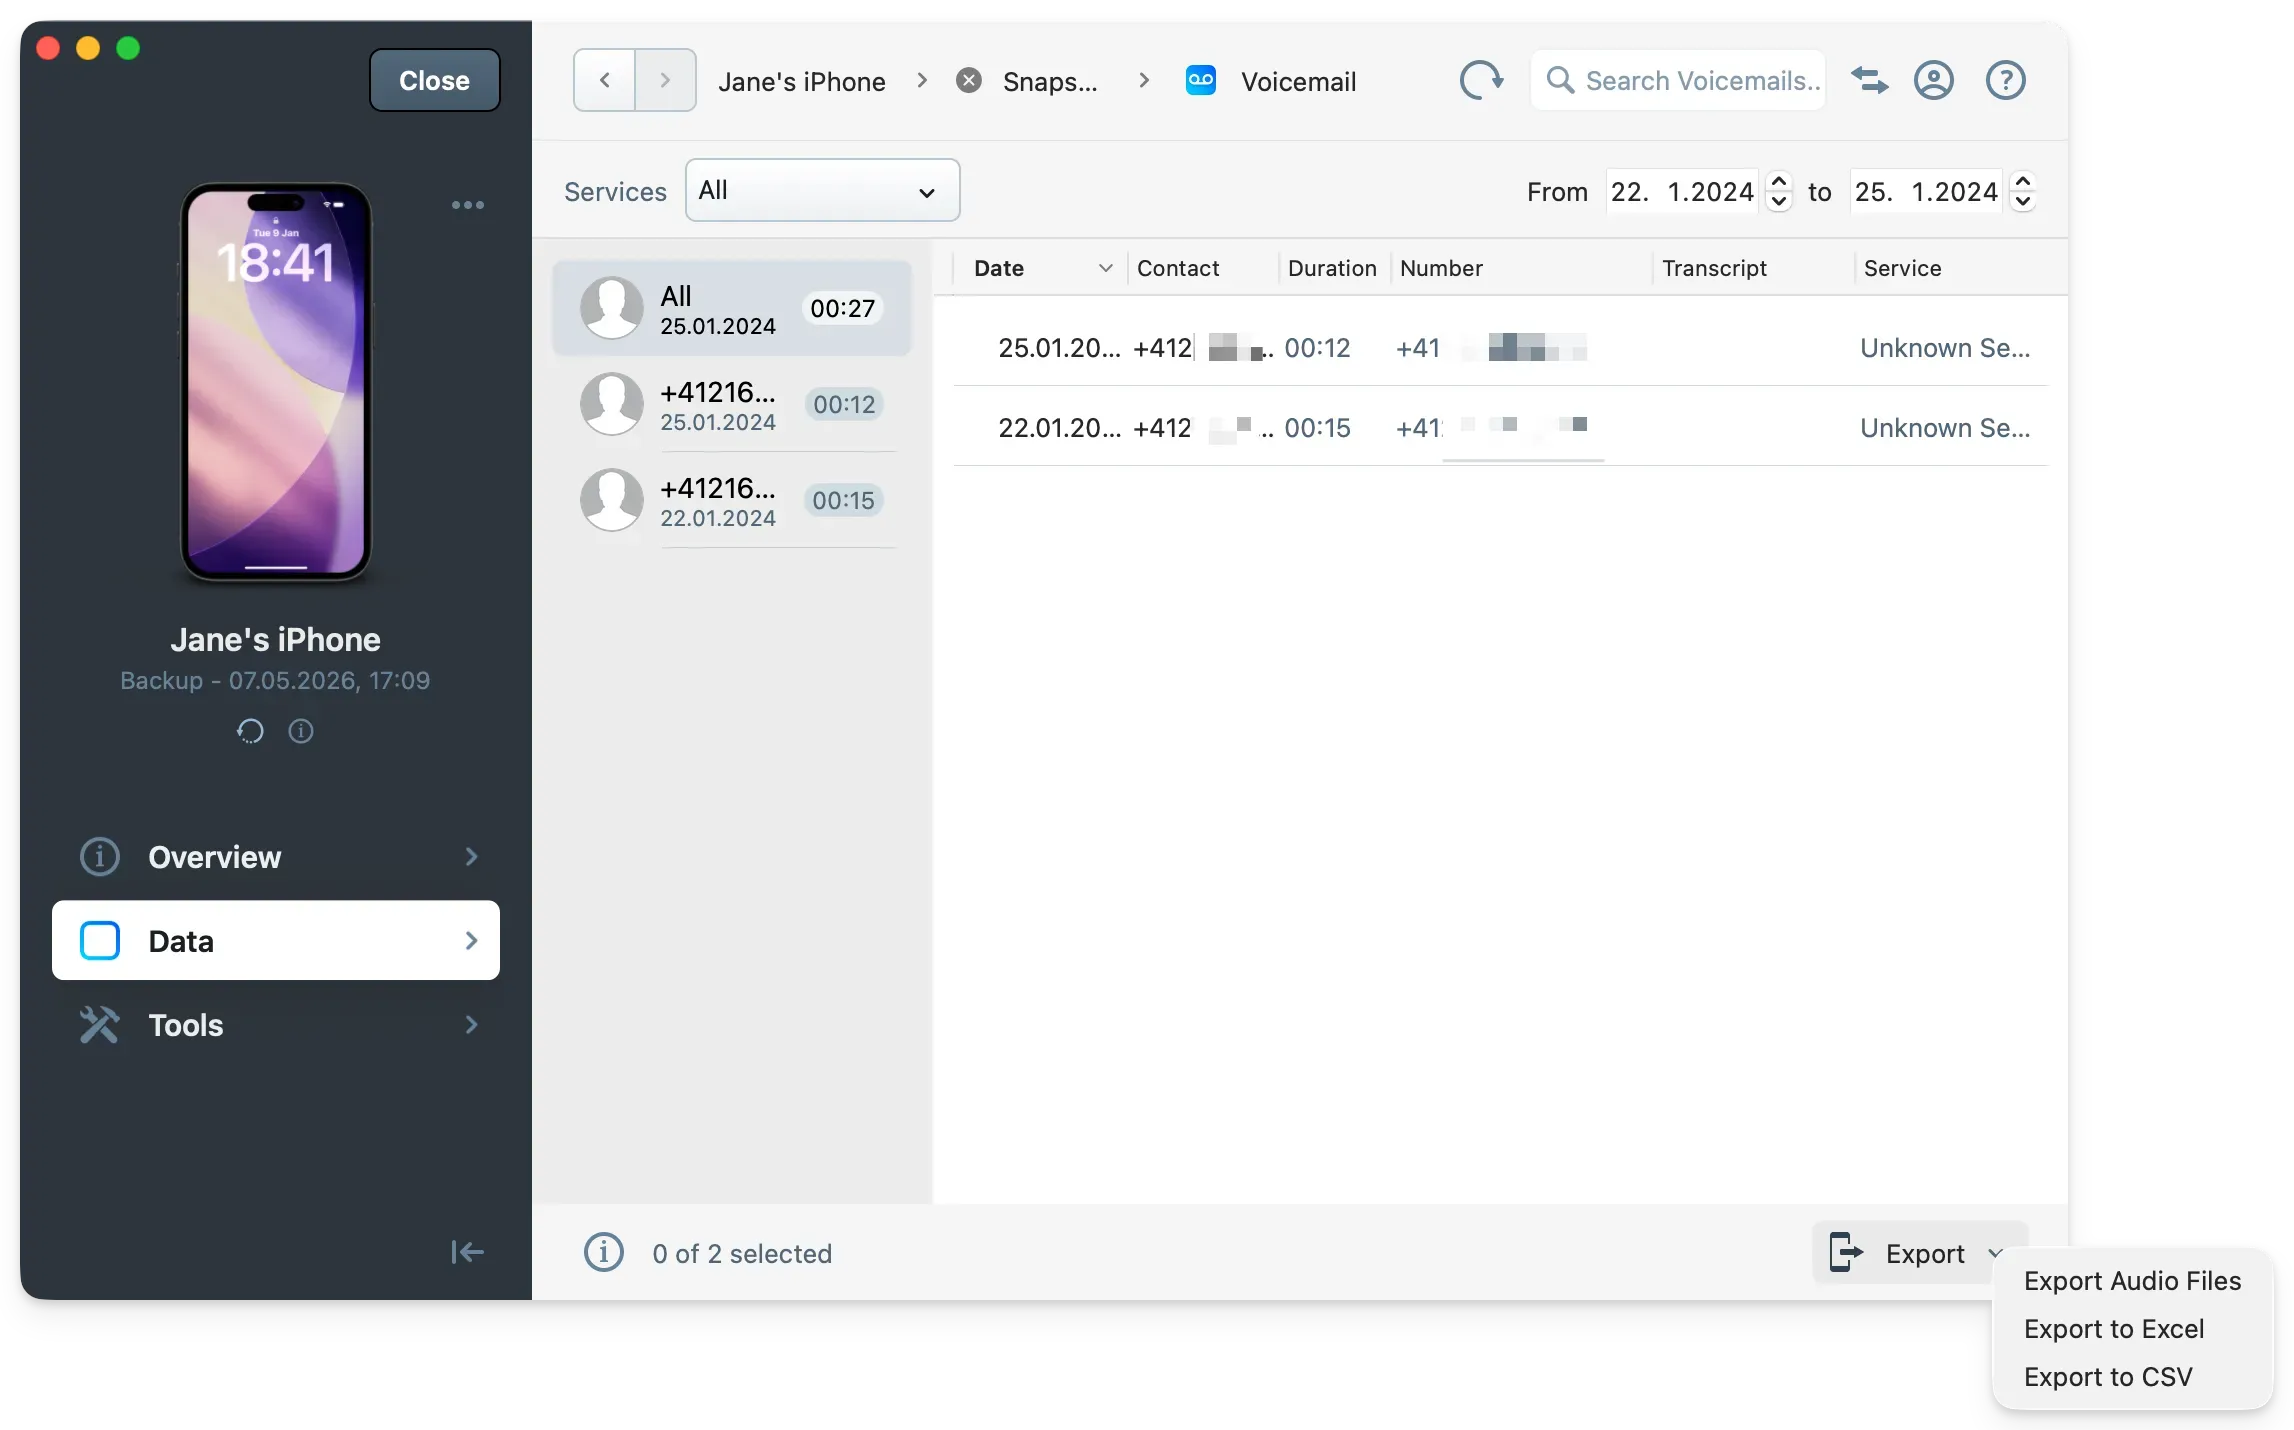
iMazing can export visual voicemail recordings as audio files. This requires visual voicemail to be enabled by the device's carrier.
Click Voicemail & Call History in the Data section.
Click the Voicemail tab.
Select the voicemail recordings to export.
Click Export in the bottom toolbar and choose a destination folder.
Voicemails are exported as .m4a on macOS and .amr on Windows.
Note: Voicemail recordings are stored in device backups. If the current device backup does not contain them, load a historical backup snapshot from the Backups section on the Home Screen. Older recordings may be present in earlier snapshots.
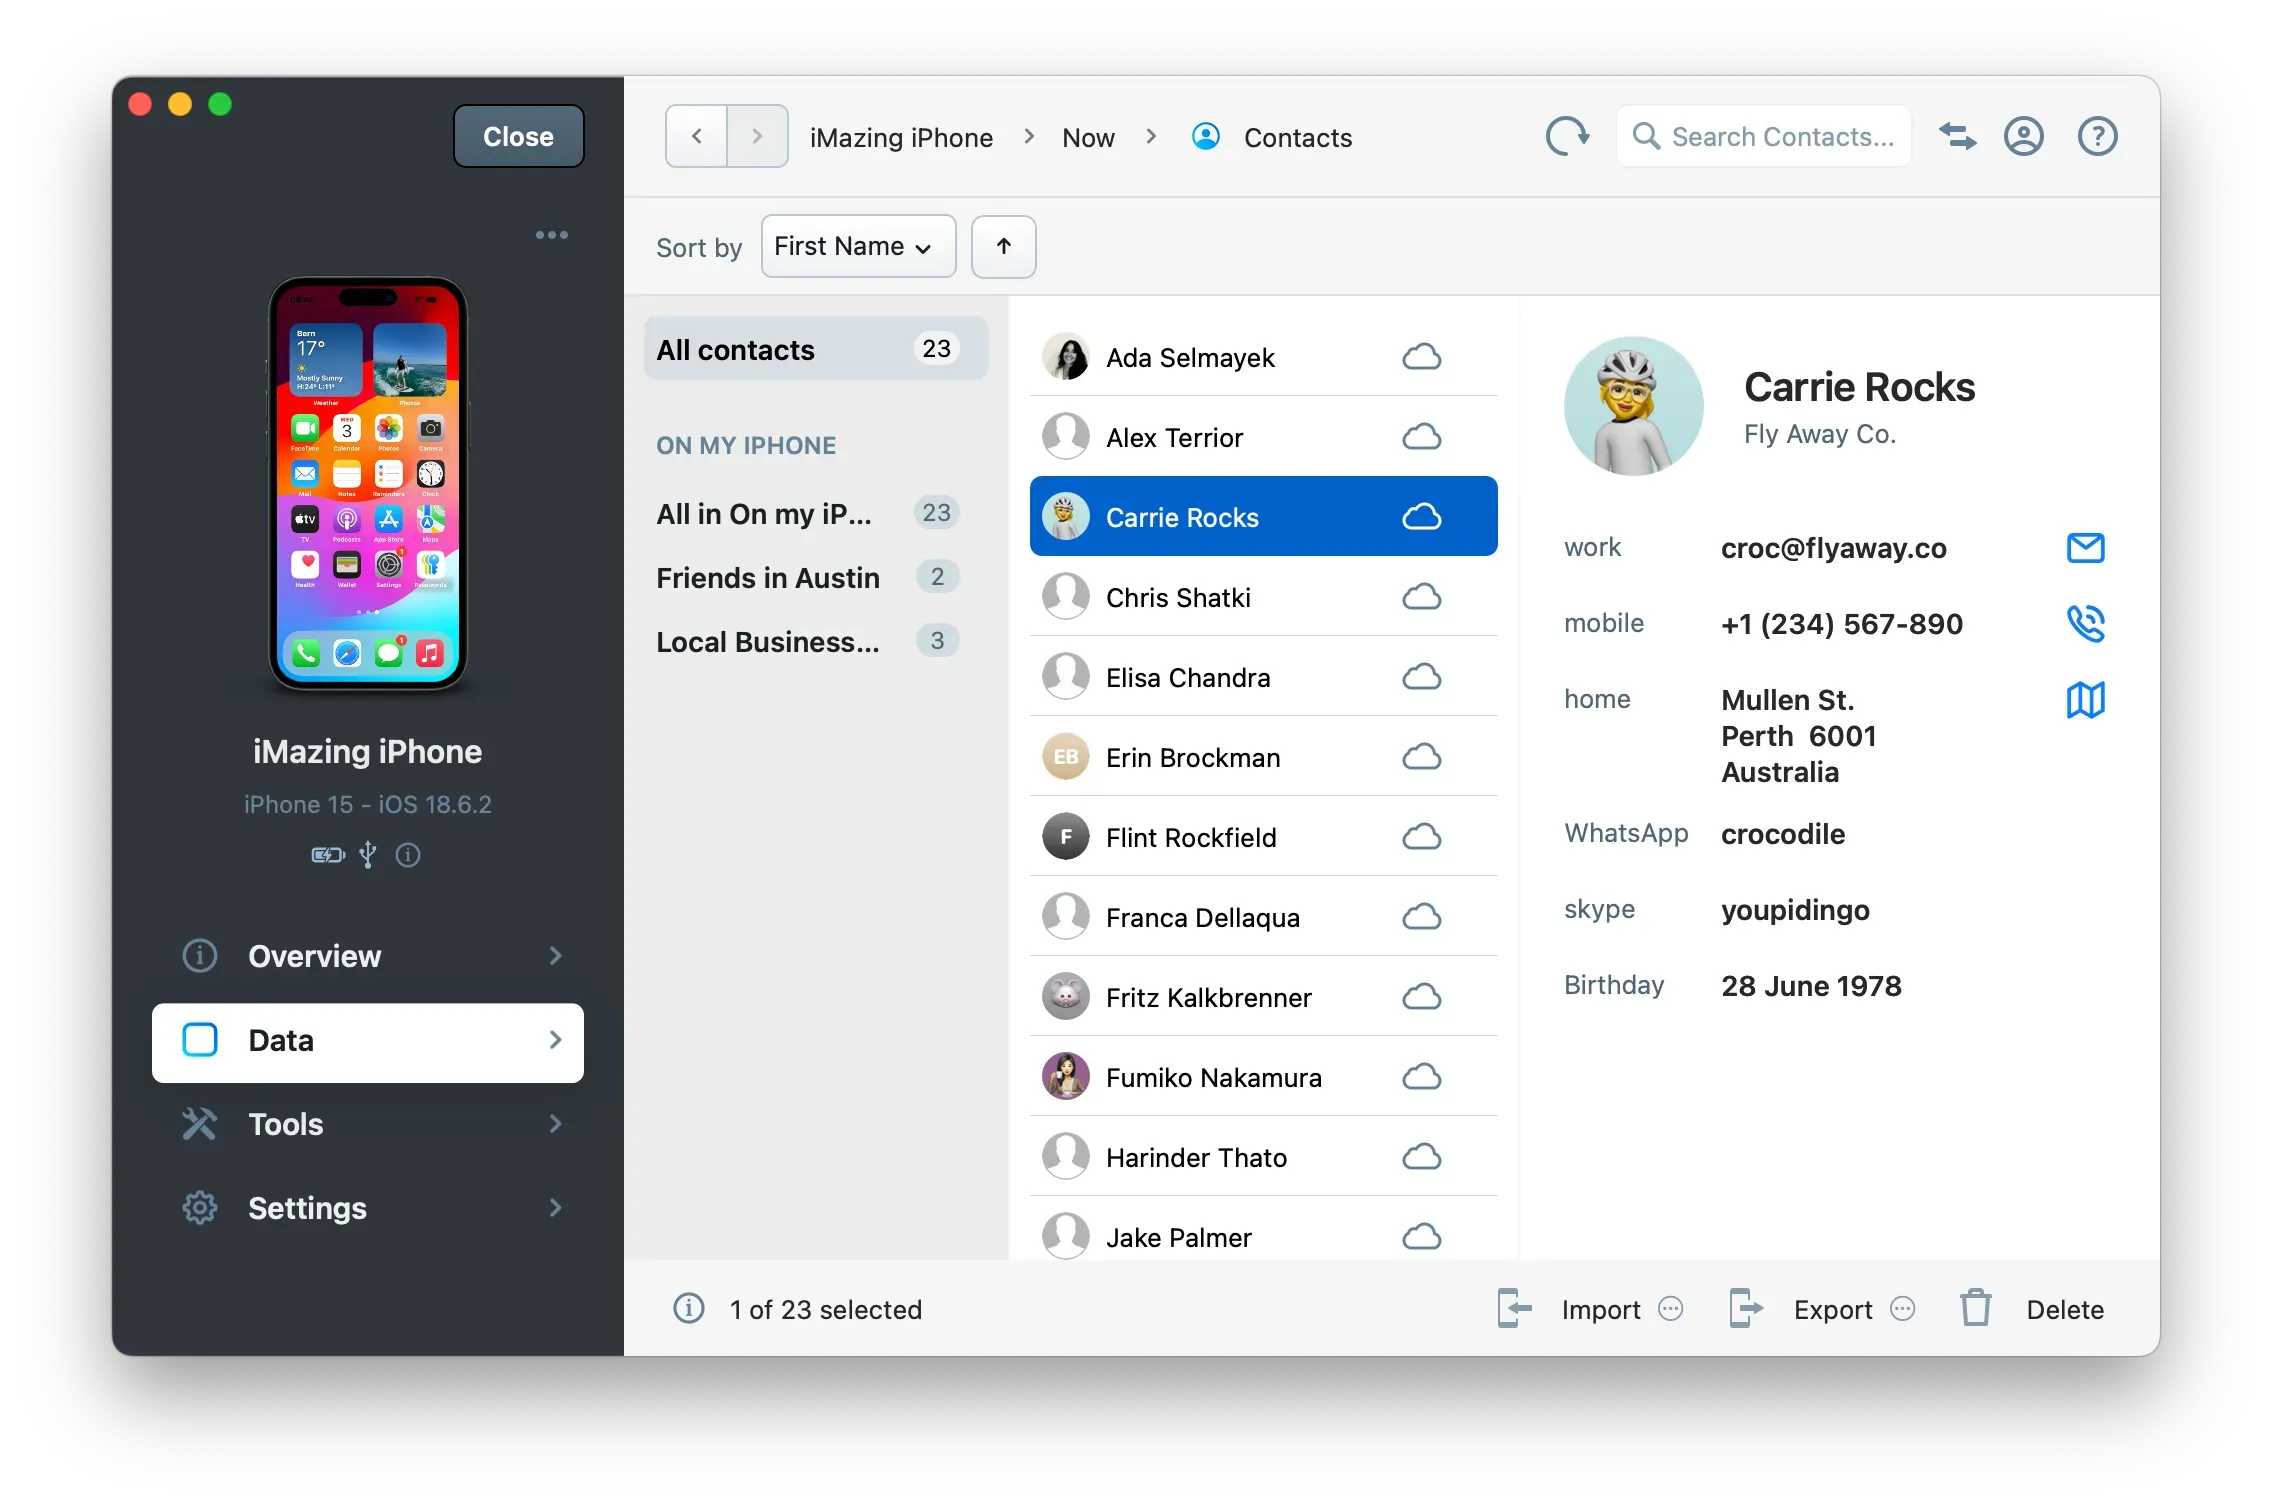
Export contacts
Click Contacts in the Data section.
Select the contacts to export, or select all with Cmd+A (macOS) or Ctrl+A (Windows).
Click Export in the bottom toolbar.
Choose a format: Excel, CSV, or vCard.
Choose a destination folder on your macOS or Windows computer.
Click Export in the bottom toolbar and choose a destination folder.
Notes are exported as .txt files.
Note: Recently deleted notes may be accessible in the Recently Deleted folder within the Notes section, depending on whether they have been purged from the backup.
Browse and select the photos and videos to export.
Click Export in the bottom toolbar and choose a destination folder.
iMazing exports original files, including EXIF metadata and, where applicable, pre-edit versions of photos that have been modified in the Photos app.
Note: Recently deleted photos and videos may appear in the Recently Deleted album within the Photos section. Their availability depends on whether the device backup captured them before automatic deletion.
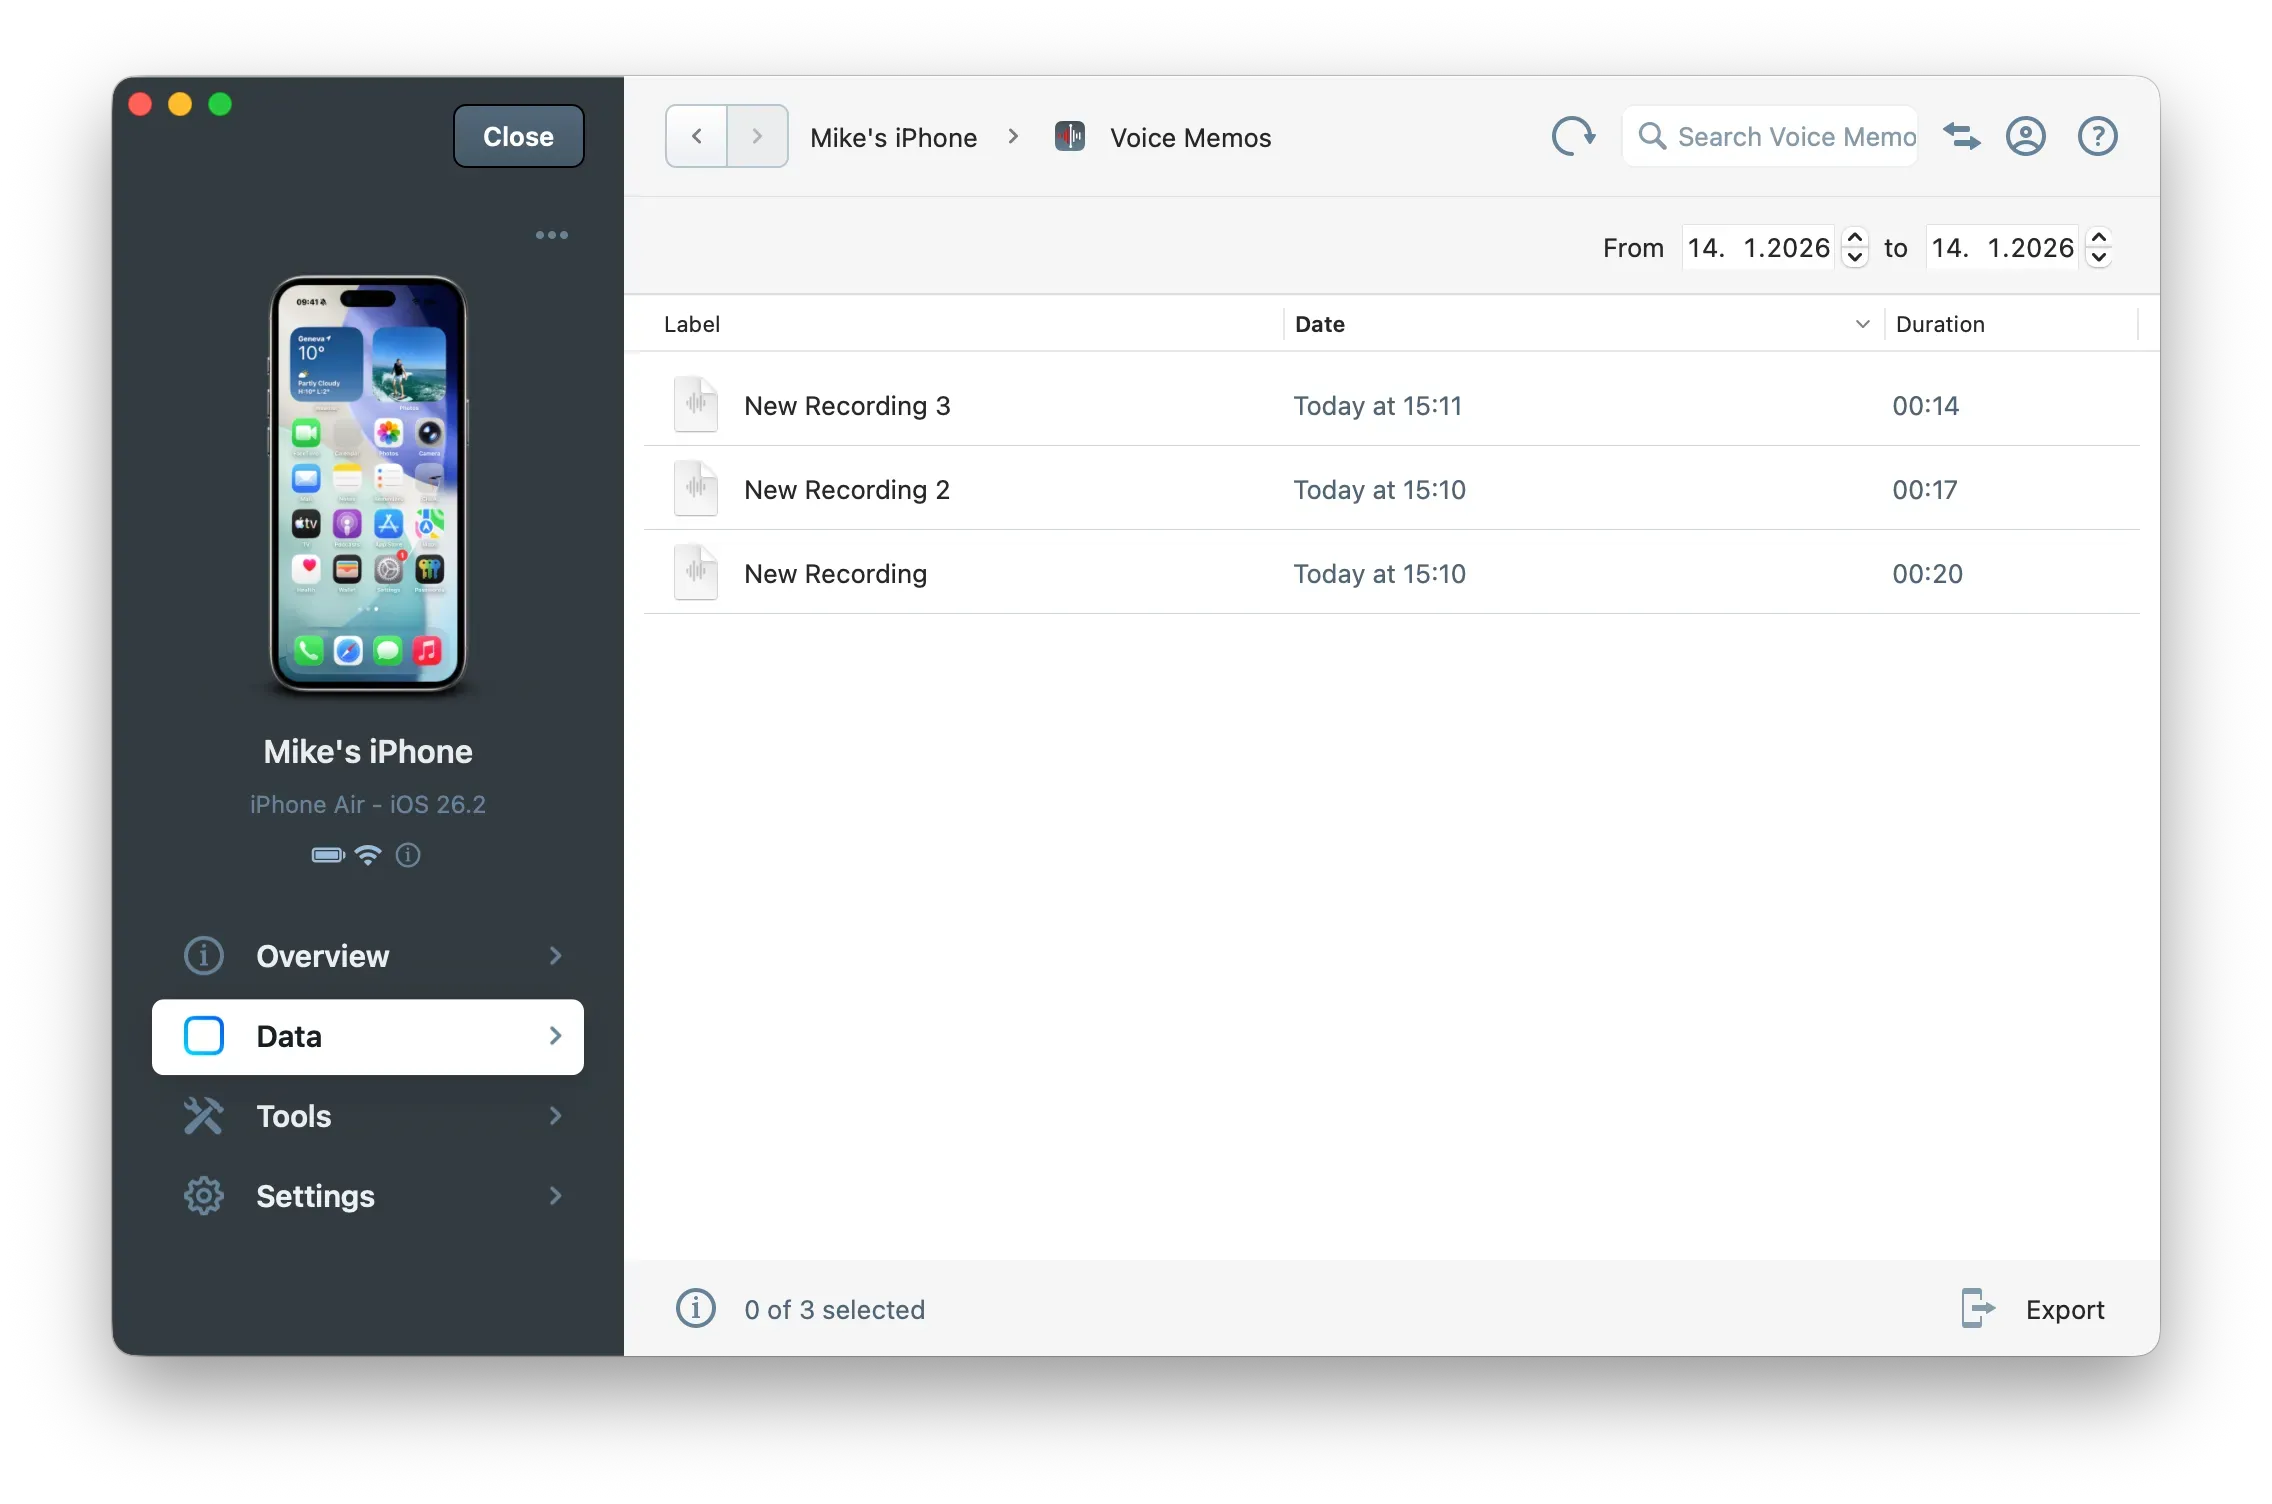
Click Export in the bottom toolbar and choose a destination folder.
Voice memos are exported as M4A files.
Export app data
iMazing provides access to local data stored by third-party apps: SQLite databases, property list files, and other app documents. This extends forensic reach beyond the built-in data types described above.
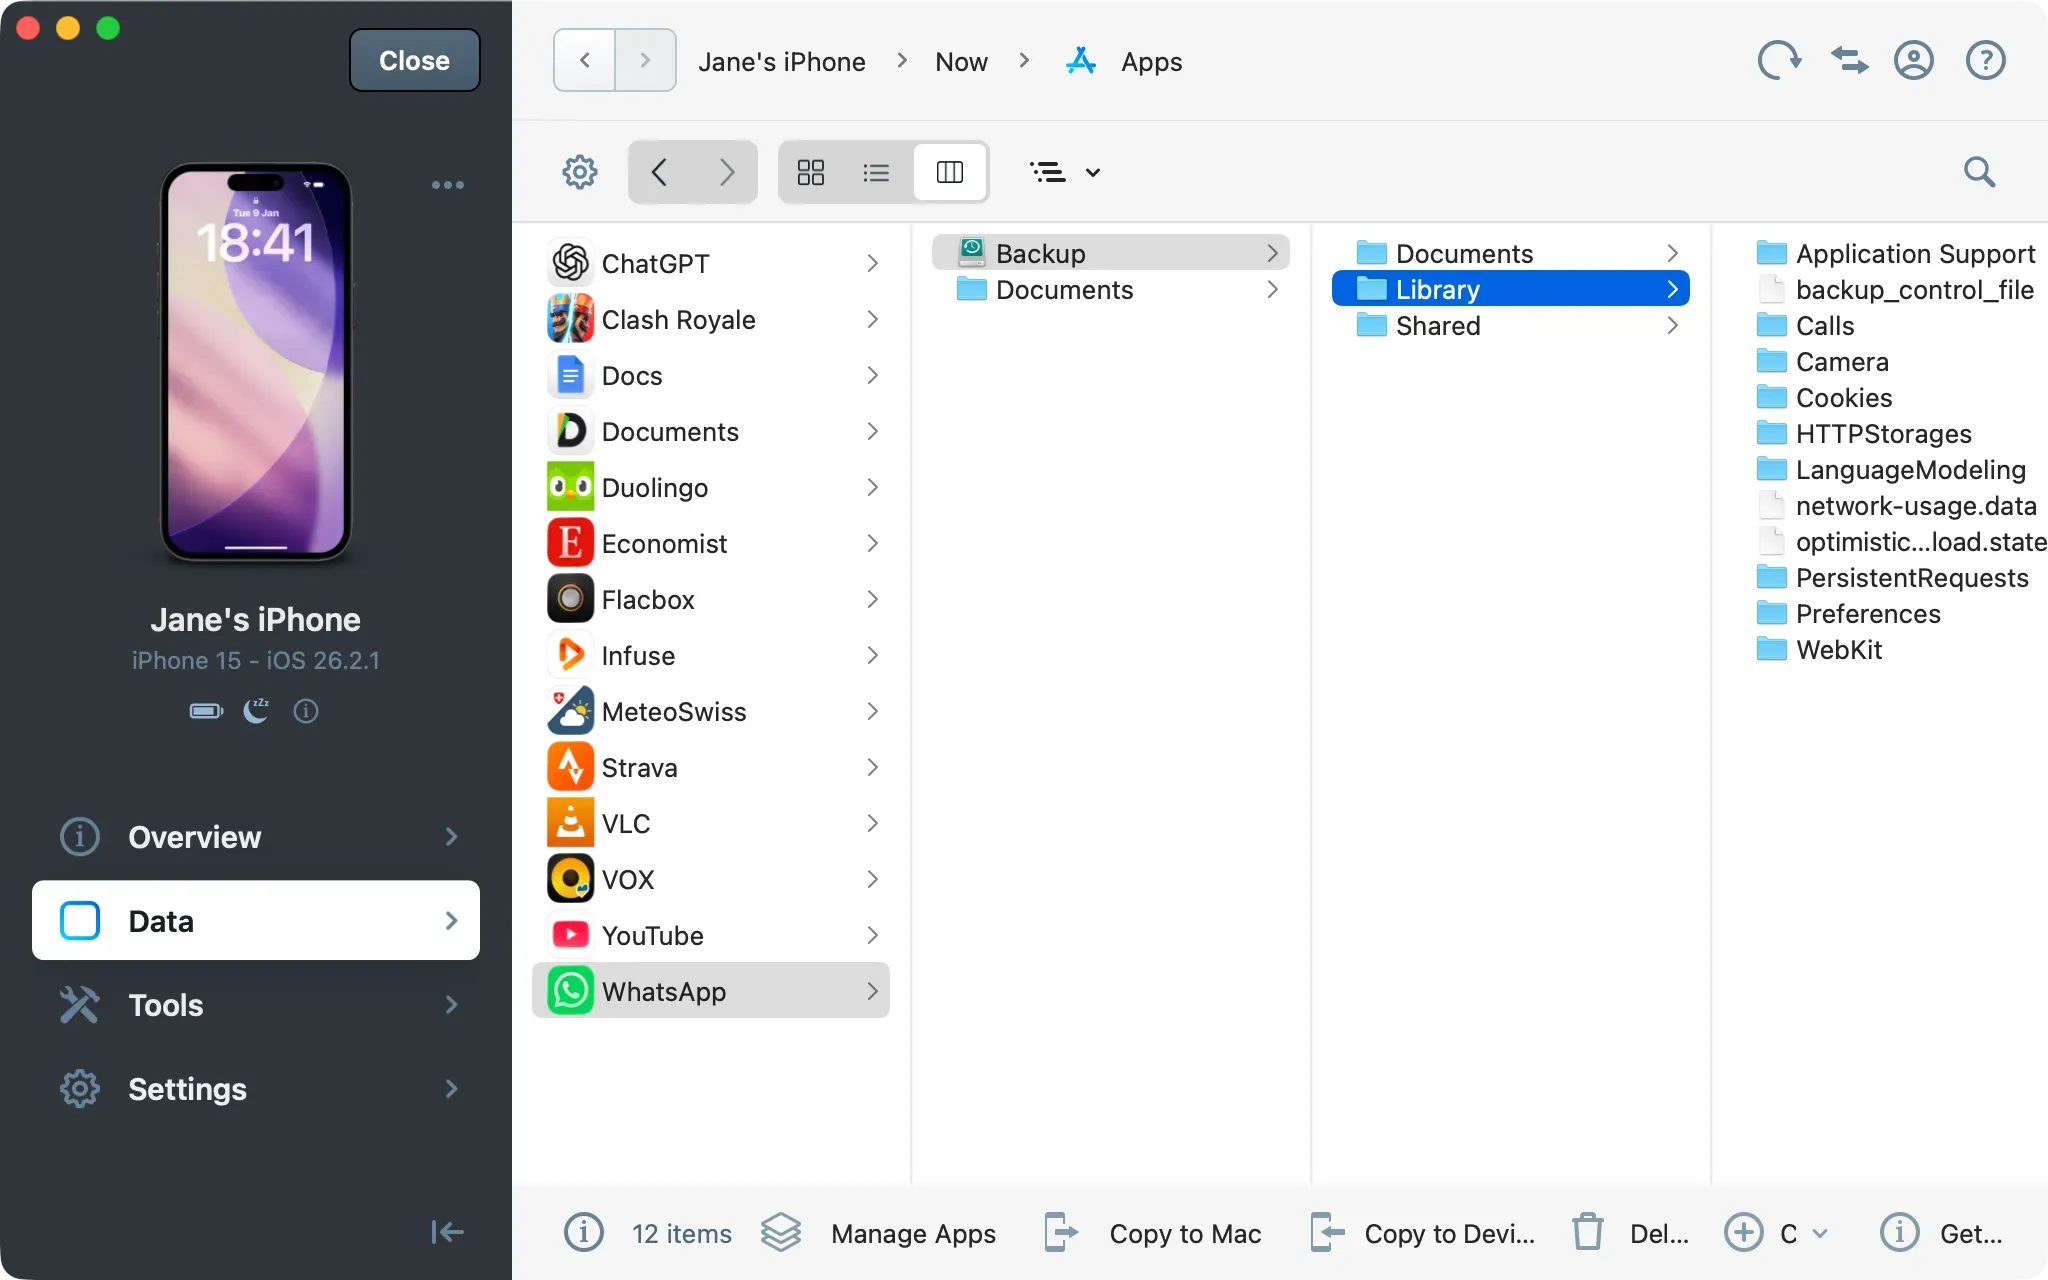
Click Apps in the Data section.
Select the app whose data you want to examine.
Browse the app's file structure. Relevant databases are typically found in the app's Documents or private storage folders.
Select files to export and click Copy to Mac/PC in the bottom toolbar.
Apps with forensic relevance include, for instance, WhatsApp, Threema, Viber, and other messaging or communication apps that store data locally on the device. However, Telegram and Signal notably exclude their data from iOS backups.
Note: Apps that enable file sharing expose a Documents folder directly in the Apps section. When a backup exists, iMazing also displays a Backup folder for each app, which contains the app's Documents, Library, and Shared directories. This gives access to data from apps that do not enable file sharing.
Export device information
Exporting device information creates a text document recording the device's identity and state at the time of the investigation. This is typically one of the first steps in a forensic workflow to establish a baseline record.
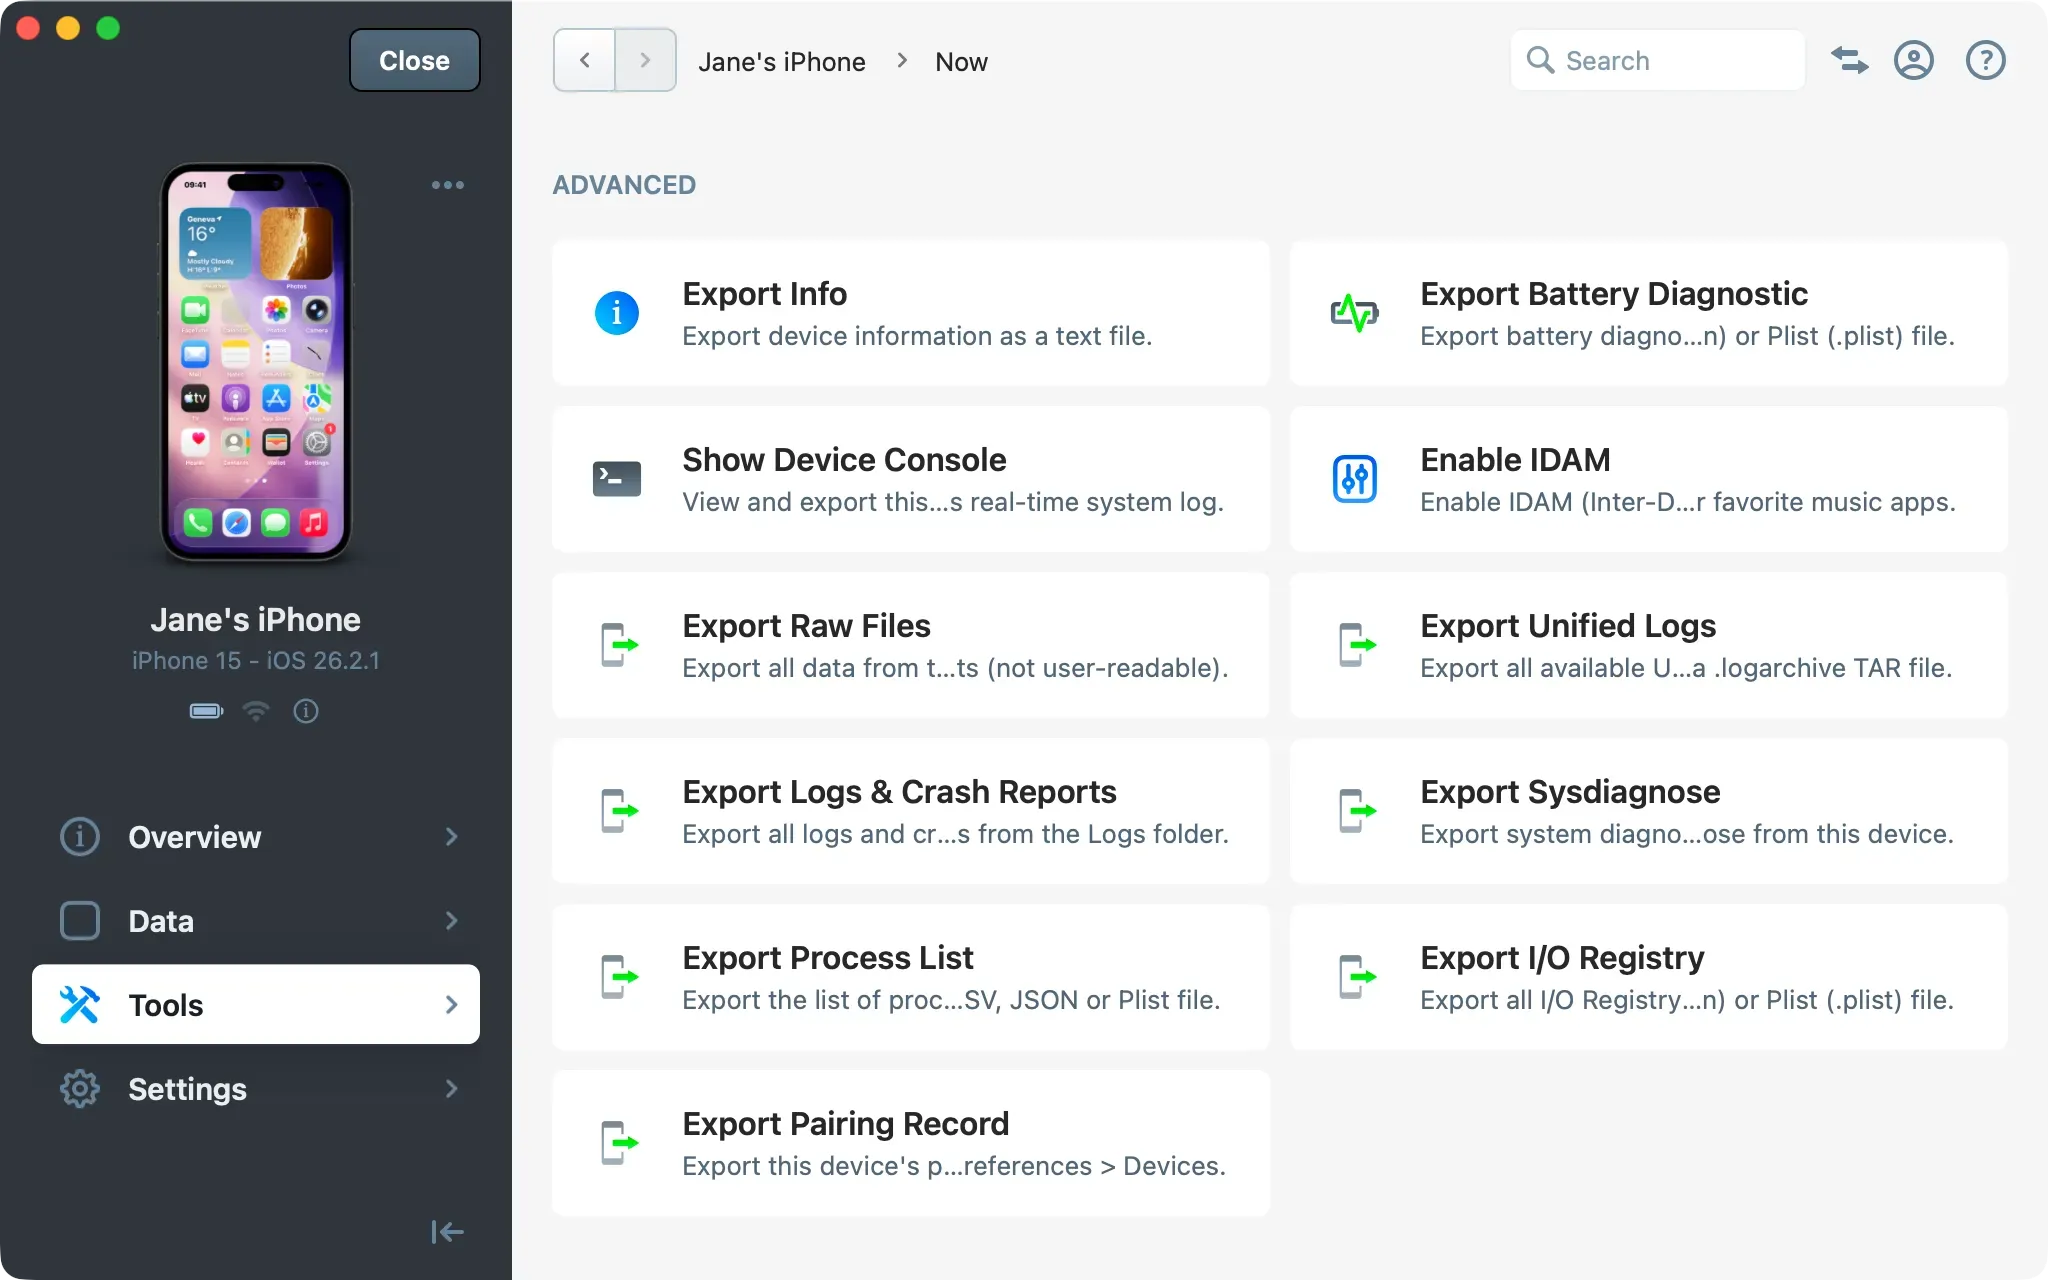
Click Tools in the sidebar.
Under Advanced, click Export Info.
Choose a destination folder on your macOS or Windows computer.
The exported .txt file includes the device model, serial number, UDID, iOS version, installed configuration profiles, and more.
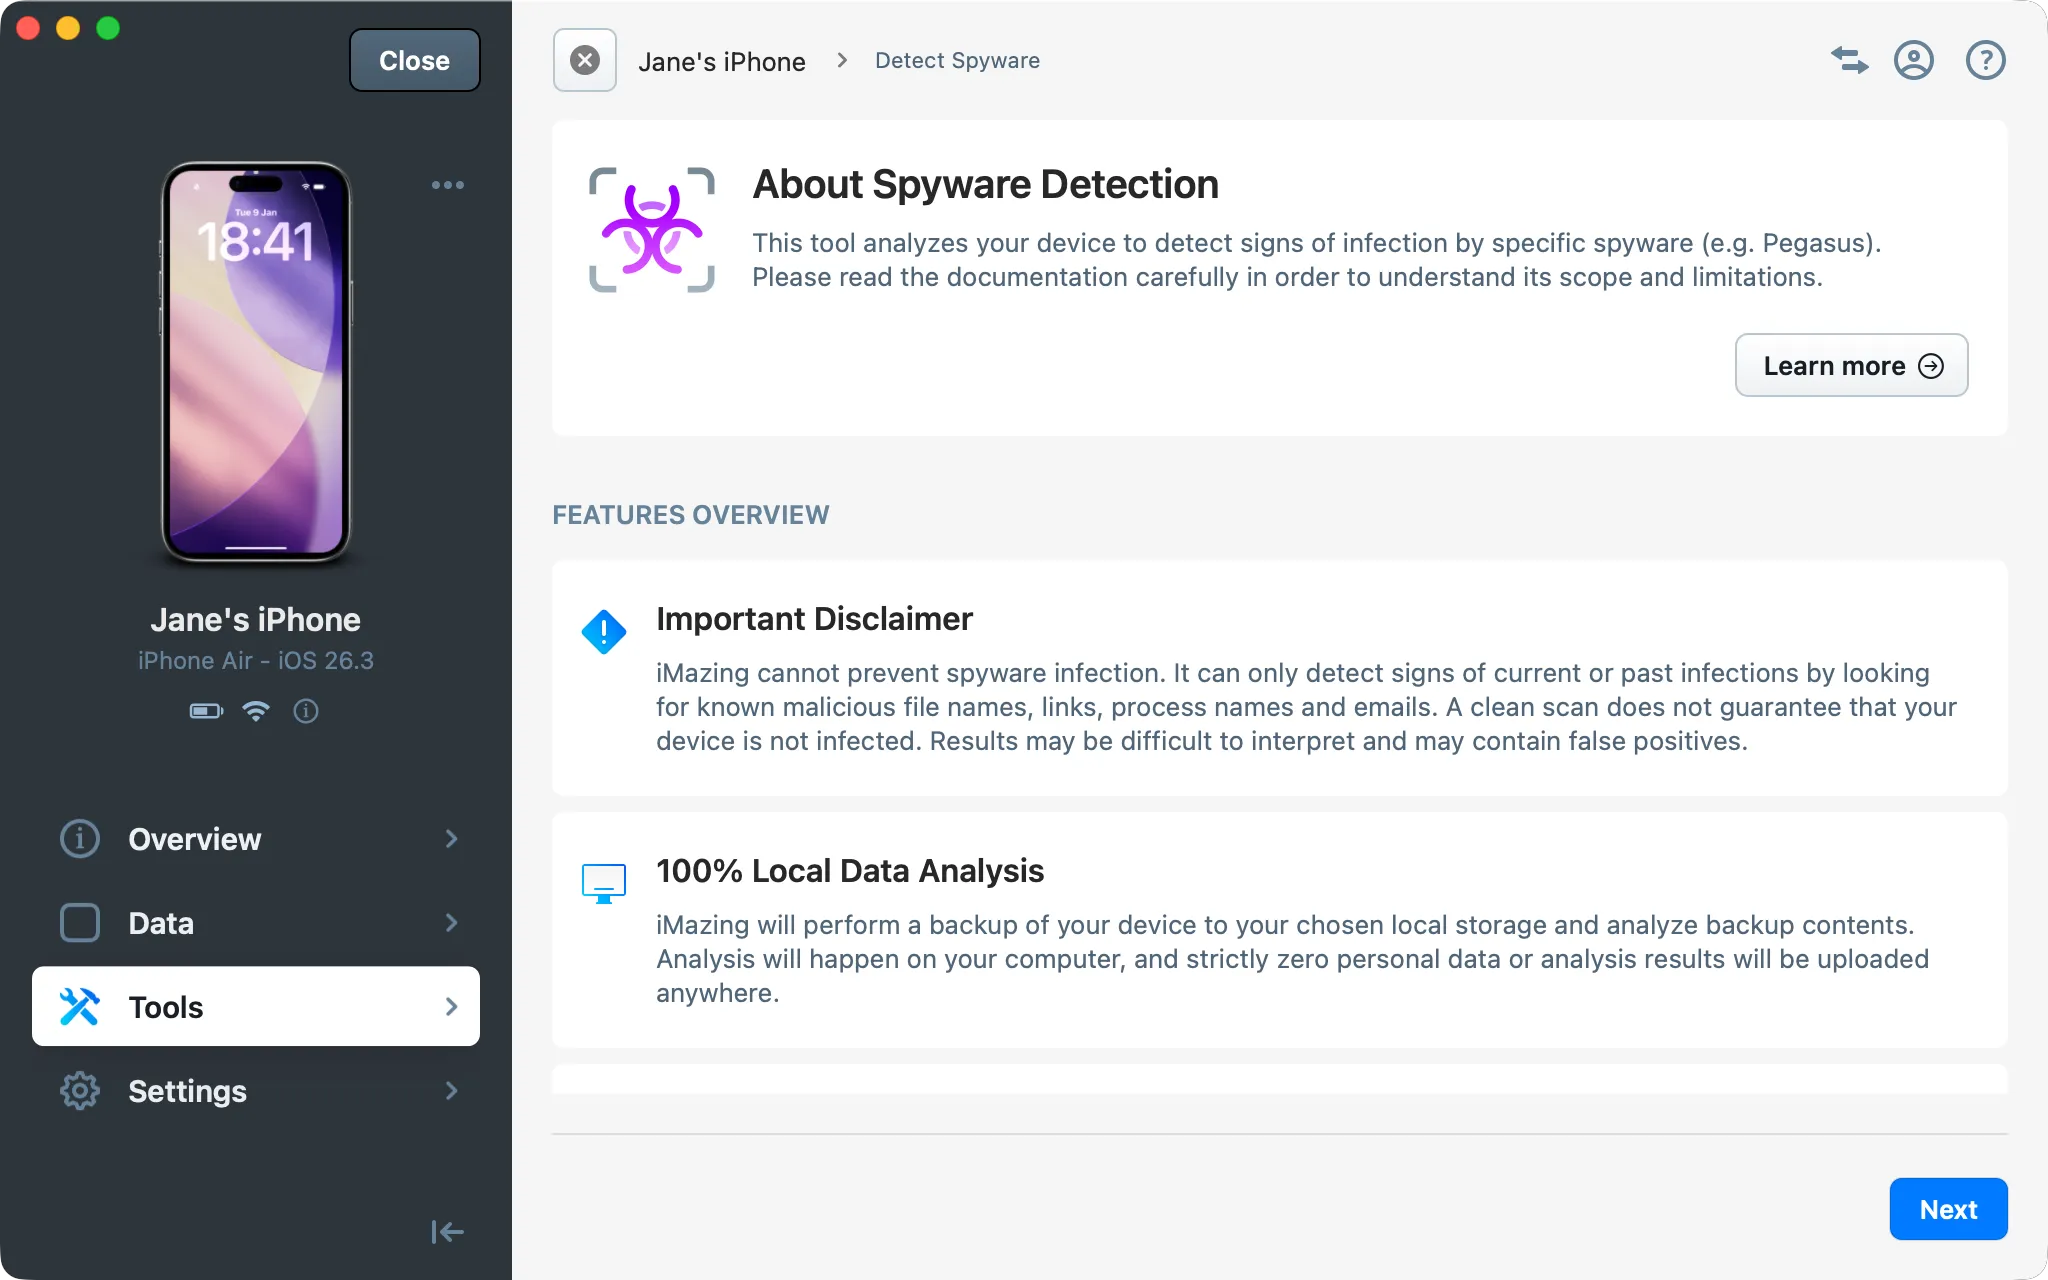
Detect spyware
iMazing integrates a tool based on MVT (Mobile Verification Toolkit) developed by Amnesty International Security Lab to analyze a device or its backup for known indicators of compromise published by the community and used in MVT, including commercial spyware such as Pegasus and many others.
Click Tools in the sidebar.
Under General, click Detect Spyware.
Follow the on-screen steps to configure and run the analysis.
iMazing generates a report summarizing the findings and flagging any suspicious indicators.
Important: To work properly, iMazing Spyware Analyzer requires an internet connection because it needs to resolve HTTP redirects for URLs found in various analyzed datasets. Without an active internet connection, the analysis would be ineffective.
Note: Spyware detection can be run on a connected device or on an existing backup. For the most thorough results, run it on a fresh encrypted backup to ensure Safari history and other data are included in the analysis.
Tip: For a full walkthrough of the detection workflow and guidance on interpreting results, see the dedicated Detect spyware guide.
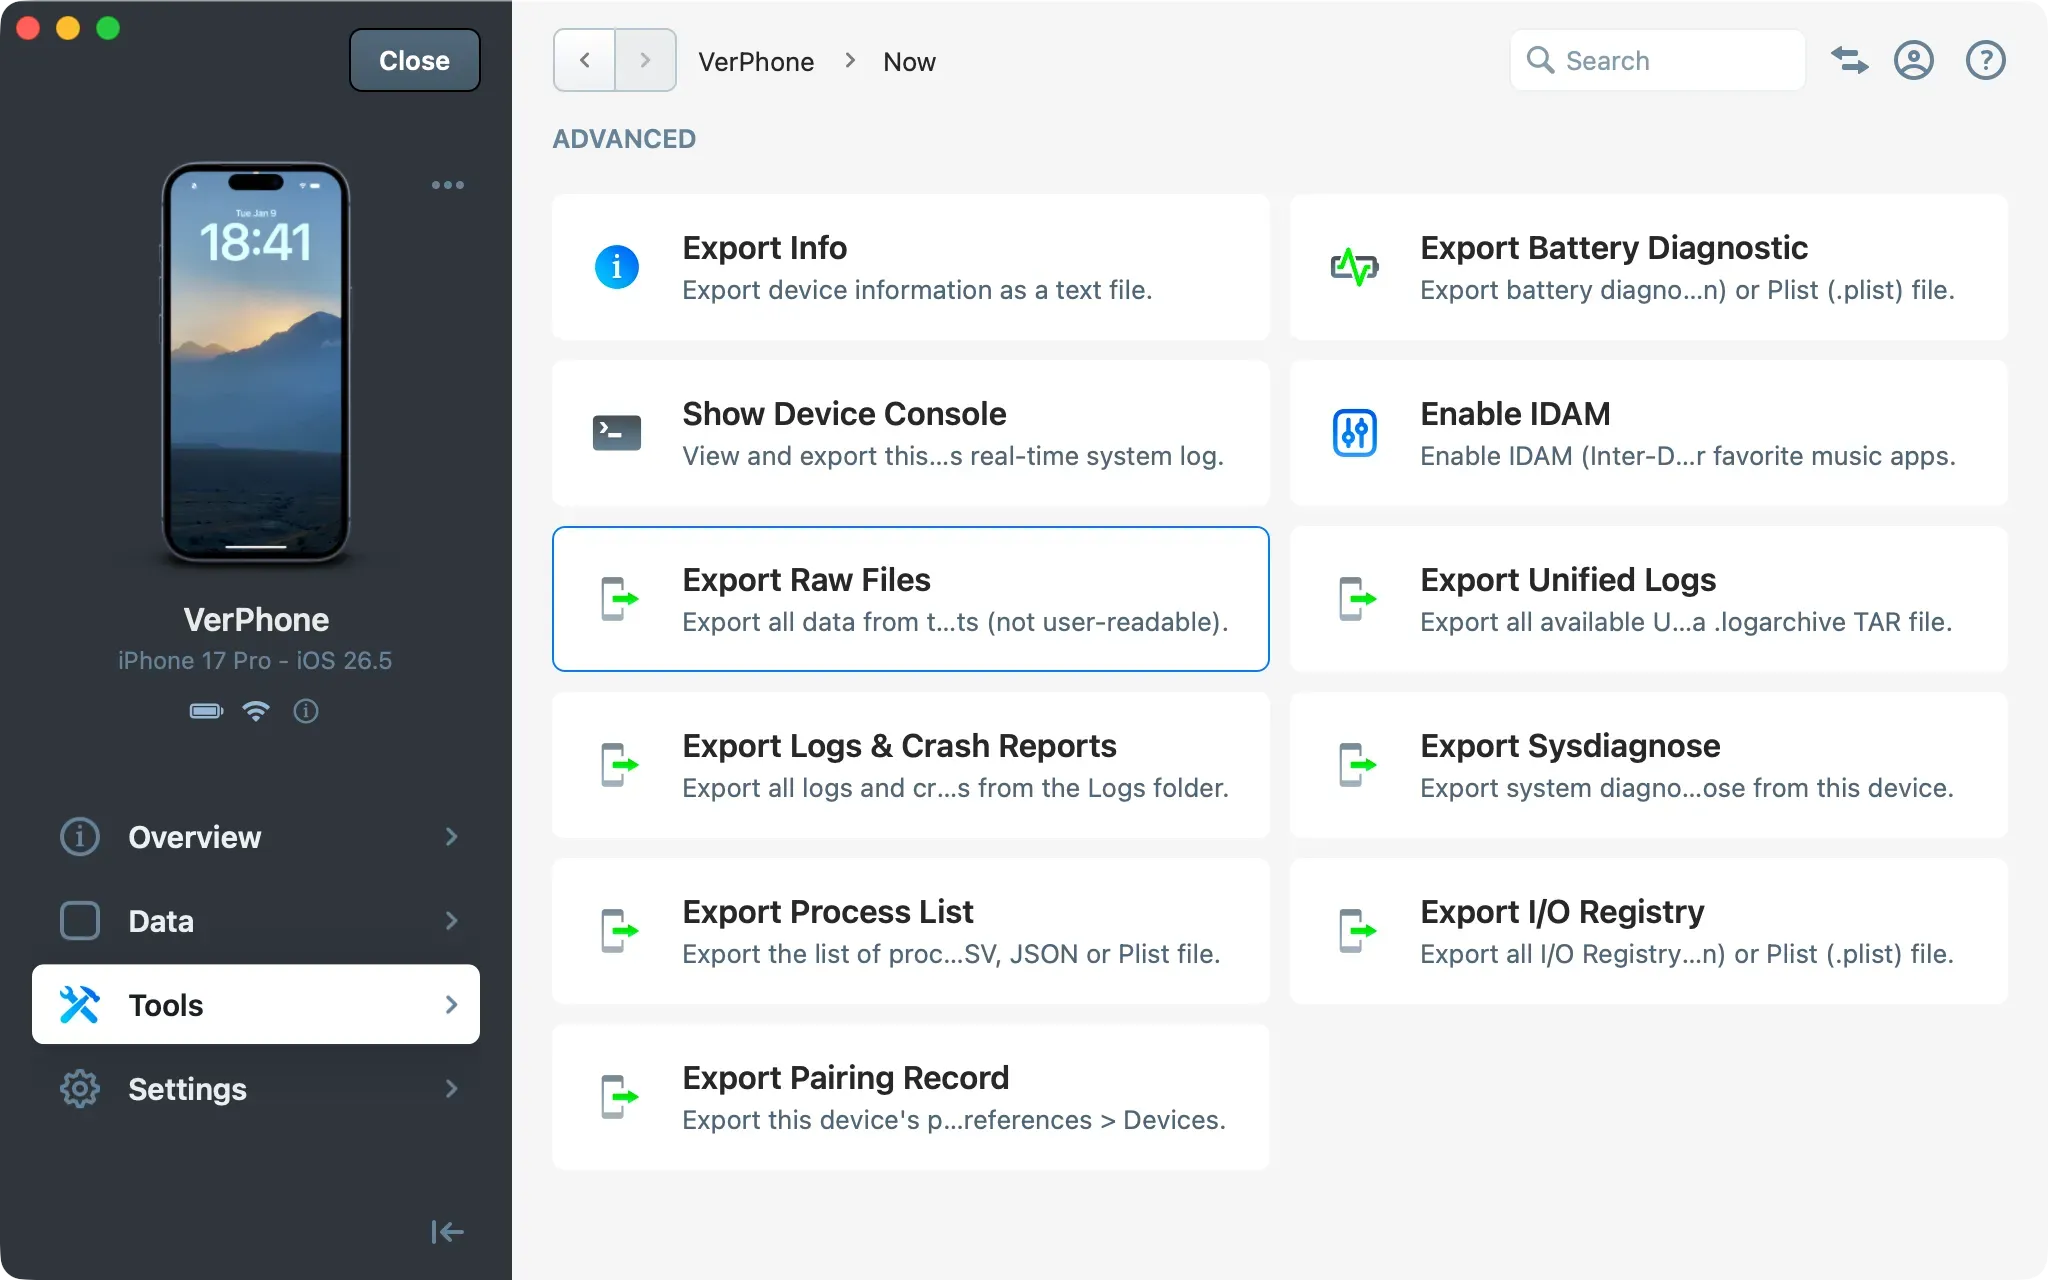
The “Export Raw Files” tool gives access to the underlying file structure of a device backup. The output can be examined directly or ingested into third-party forensic tools. It contains all files and folders exactly as they are stored on the device, without requiring a jailbreak to access the file system. In this backup, you will find raw SQLite, Plist, and other files, as well as media and any app sandboxes that are backed up.
Click Tools in the sidebar.
Under Advanced, click Export Raw Files.
Choose a destination folder on your macOS or Windows computer.
Important: Enable backup encryption before running this export to ensure Safari, Health, and Keychain data are included. See the Backup encryption guide.
Note: The raw backup files contain data beyond what iMazing exposes through dedicated export interfaces. Refer to the above iOS backup domains for a complete breakdown of what is stored in each backup domain.
Export system logs and diagnostics
The tools in this section provide access to system-level data useful for timeline reconstruction and behavioral analysis.
Important: All exports in this section require a connected and unlocked device. They are not available from a backup.
Export Unified Logs
Unified Logs contain timestamped, system-level activity logs recorded by iOS. They are valuable for reconstructing event timelines and identifying anomalous behavior.
Click Tools in the sidebar.
Under Advanced, click Export Unified Logs.
Select a time range in the dialog.
Click Export and choose a destination folder on your macOS or Windows computer.
Use the macOS Console app to view the exported .logarchive file.
Important: Depending on the type of Unified Log entry, iOS keeps up to 30 days of logs. However, the most useful log entries for forensics usually go back only about 10 days. This is why it’s important to export Unified Logs as soon as the device is available and put it in Airplane mode to reduce the number of new logs written. To learn more on this topic, read Elcomsoft’s article: Extracting and Analyzing Apple sysdiagnose Logs
Tip:iOS Unified Logs is a free tool by iOS forensics expert Lionel Notari that can parse exported UnifiedLog log archives. It generates a filtered database and a forensic report that help verify data integrity.
Read his blog to learn how to use Unified Logs in forensic analysis to uncover different types of evidence.
Also note that iMazing can export Unified Logs from Apple Watch, which can be useful for finding evidence in some cases.
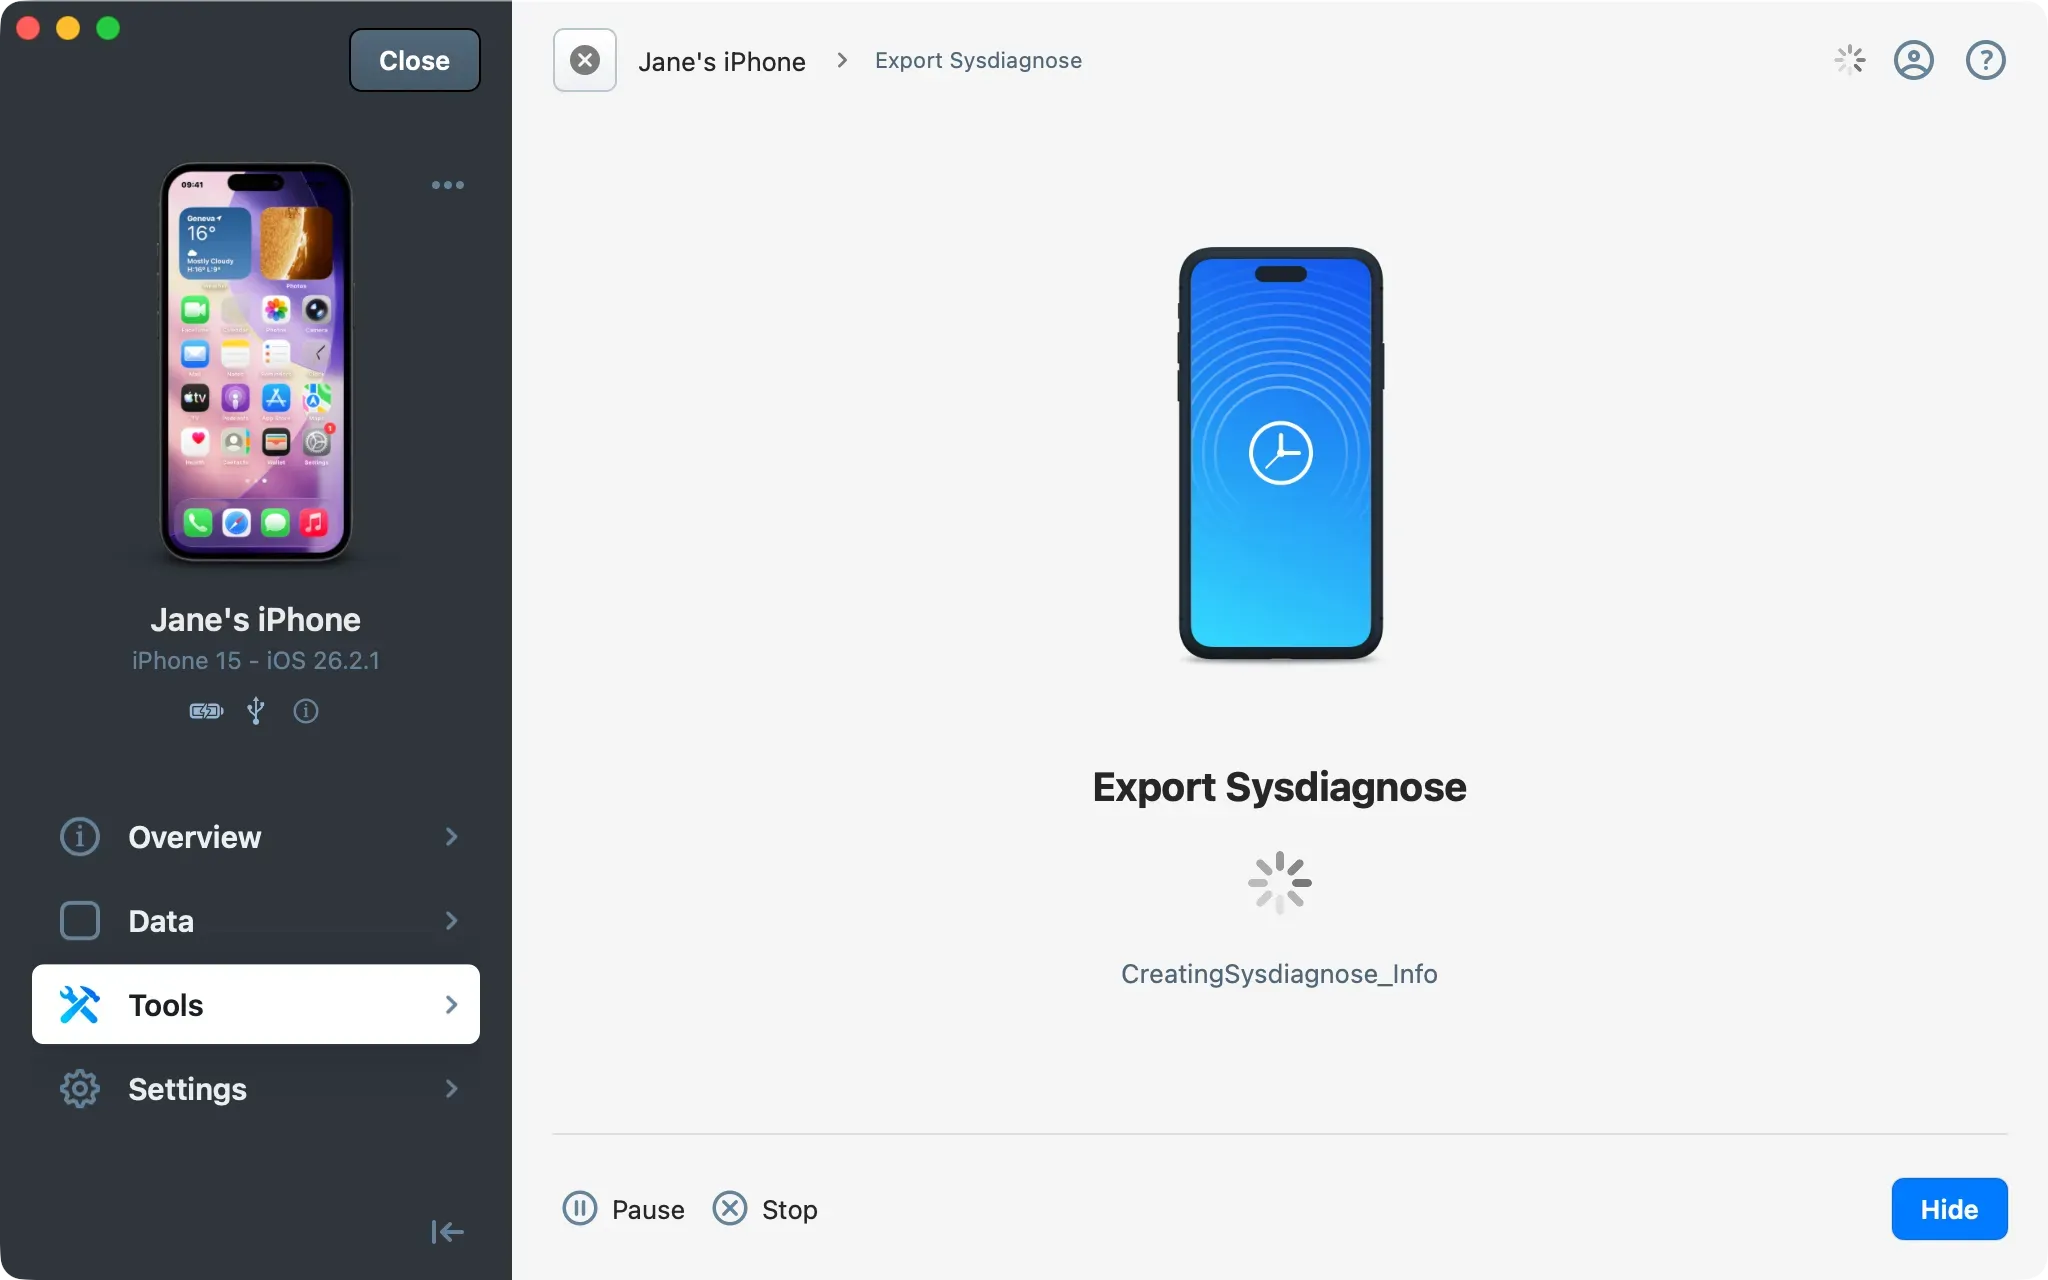
Export Sysdiagnose
Sysdiagnose is a comprehensive diagnostic package generated by iOS. It includes system logs, crash reports, network activity summaries, and a snapshot of system state.
Click Tools in the sidebar.
Under Advanced, click Export Sysdiagnose.
Follow the instructions in the right panel to trigger sysdiagnose manually. On your iOS device, press and hold Volume Up, Volume Down, and Power simultaneously for about 1.25 seconds. When sysdiagnose starts, the device briefly vibrates (except on iPads).
Wait for the package to generate on the device, then confirm the transfer.
Choose a destination folder on your macOS or Windows computer.
Caution: On some iOS devices, holding this combination much longer can start a countdown to activate the SOS emergency call feature. If the SOS icon changes to a countdown timer, release the buttons. you’ve already held them long enough to start sysdiagnose.
If Developer Mode is enabled on the device, you won’t need to trigger the Sysdiagnose manually.
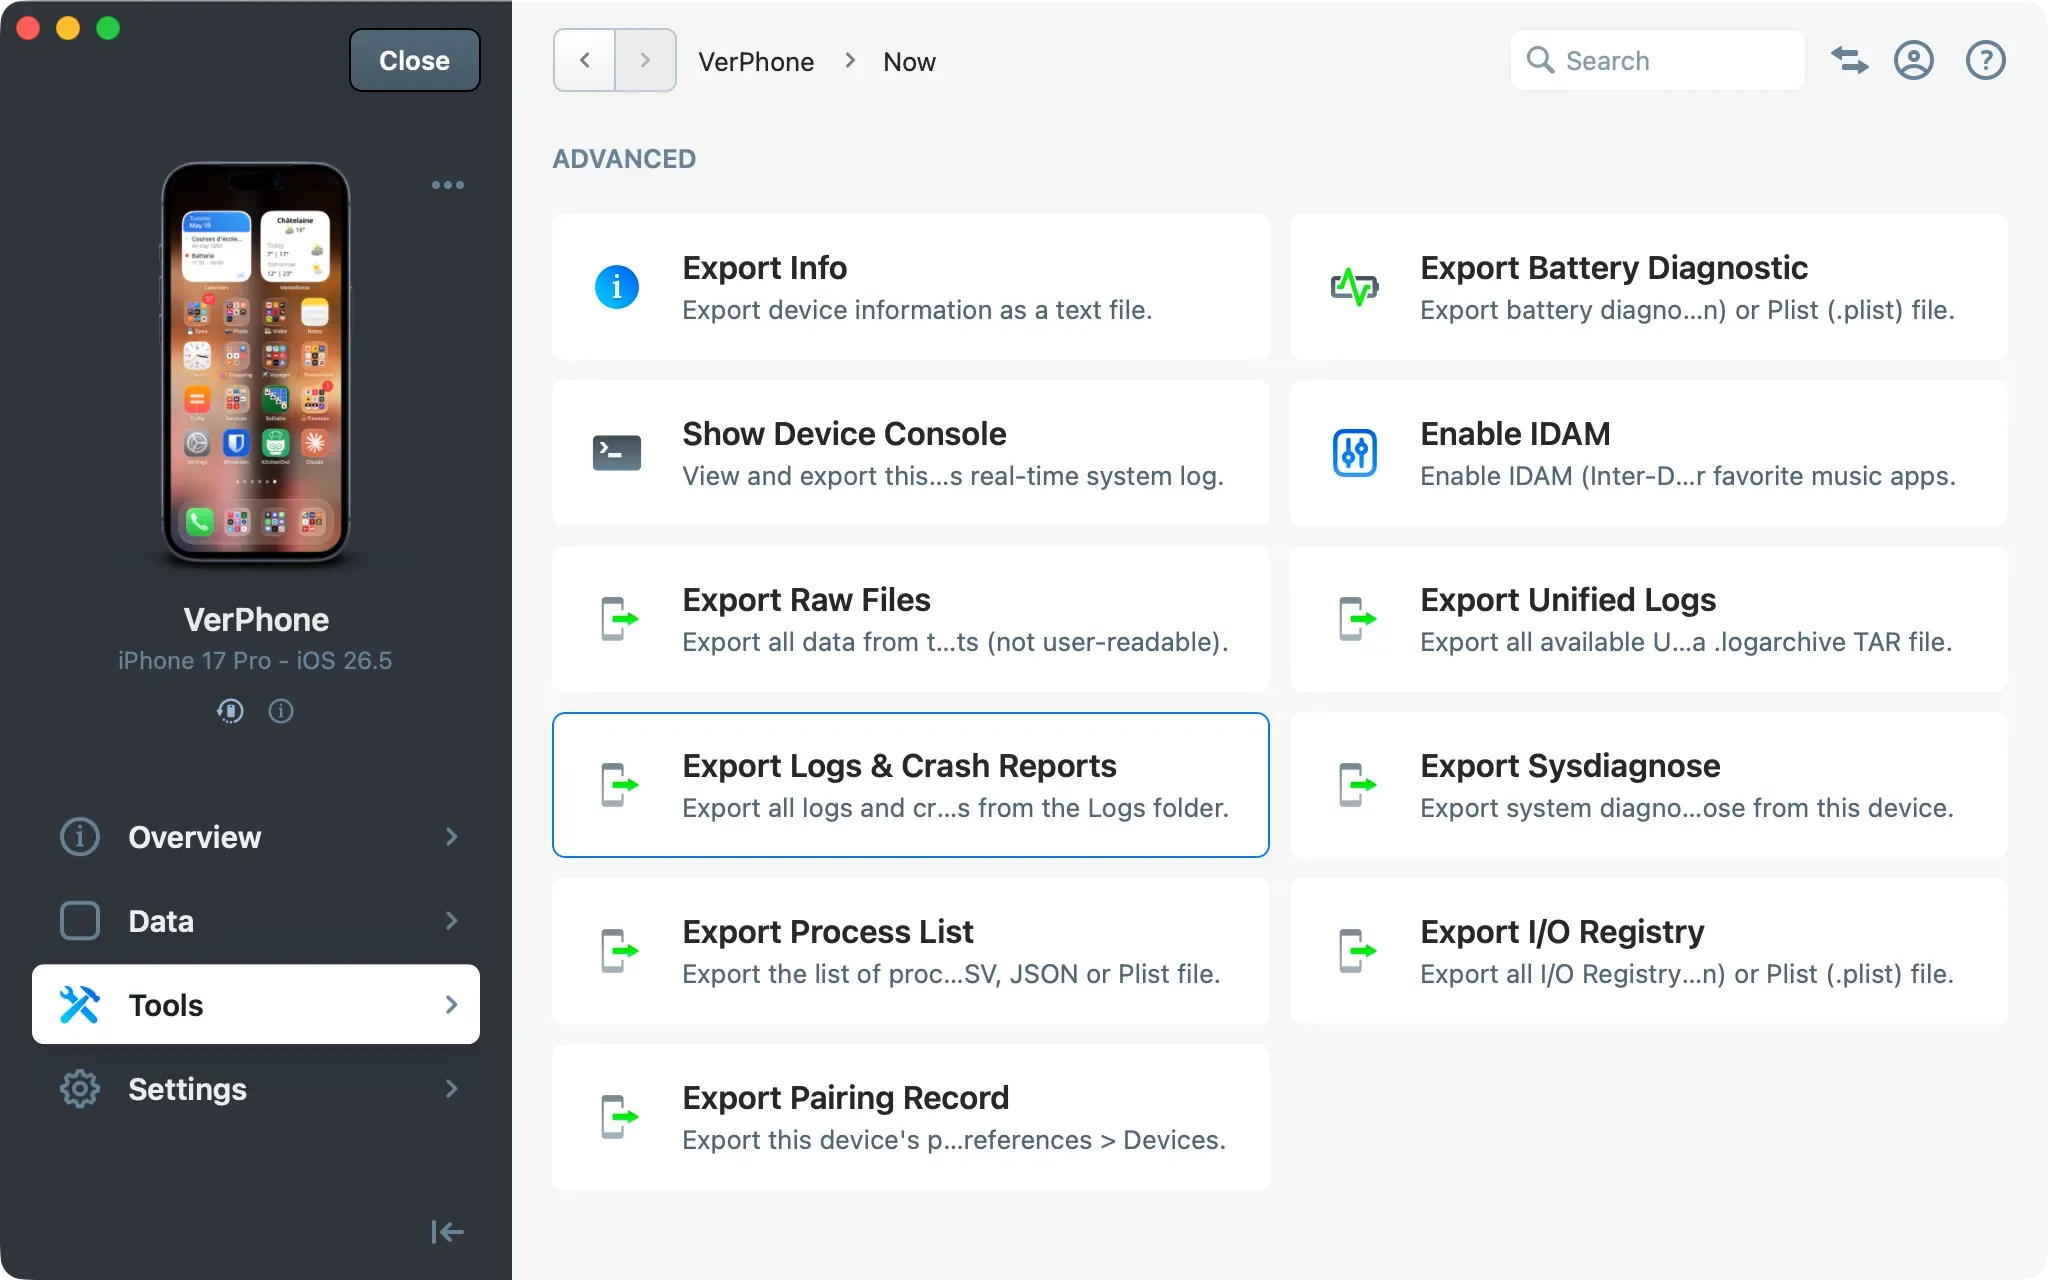
Export Logs & Crash reports
Logs and crash reports are files generated by system processes in the device log partition, and include system diagnostic logs, system crash reports, and third-party app crash reports.
Click Tools in the sidebar.
Under Advanced, click Export Logs & Crash Reports.
Choose a destination folder on your macOS or Windows computer.
In iMazing’s File System section, you can browse the Logs partition and export specific files.
Export Process List
The process list is a point-in-time snapshot of all processes running on the device at the moment of export.
Click Tools in the sidebar.
Under Advanced, click Export Process List.
Choose a format: CSV, JSON, or Plist.
Choose a destination folder on your macOS or Windows computer.
Export I/O Registry
The I/O Registry provides a detailed view of the device's hardware components and connected peripherals at the time of export.
Click Tools in the sidebar.
Under Advanced, click Export I/O Registry.
Choose a format: JSON or Plist.
Choose a destination folder on your macOS or Windows computer.
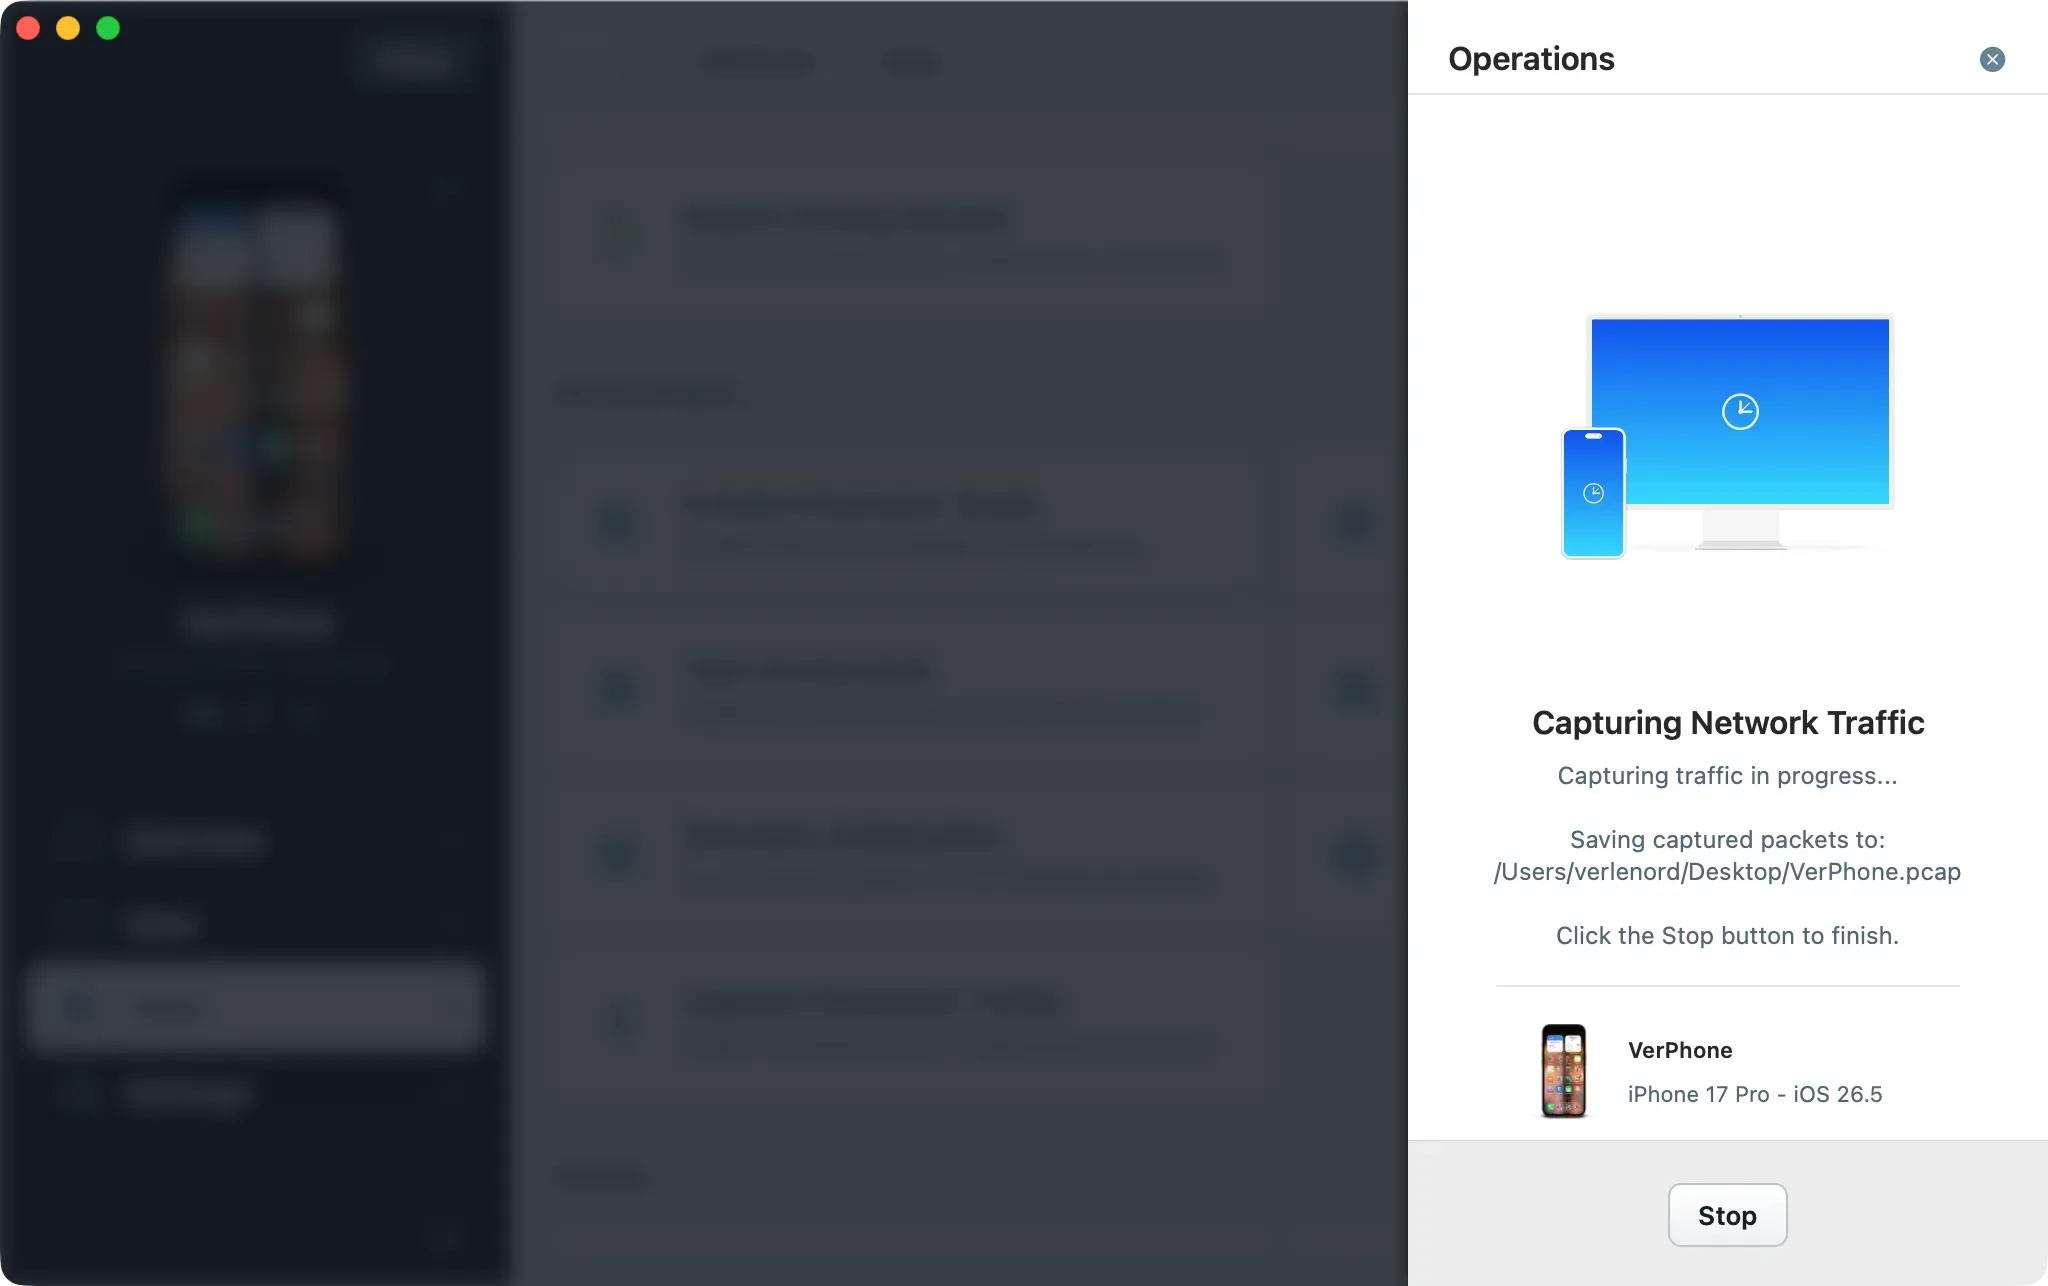
Capture Network and Bluetooth traffic
iMazing can capture network and Bluetooth packets from a connected device and save them as .pcap files for analysis in tools such as Wireshark.
To capture network traffic:
Connect your device to your computer via USB (this action doesn’t work over Wi-Fi)
Click Tools in the sidebar.
Under Development, click Capture Network Traffic.
Select the destination filename and location for the .pcap file.
Packet capture has started.
Stop the capture when you’re done.
Open the file in Wireshark or another network packet analyzer that supports the PCAP format.
To capture Bluetooth traffic:
Click Tools in the sidebar.
Under Development, click Capture Bluetooth Traffic.
Select the destination filename and location for the .pcap file.
Packet capture has started.
Stop the capture when you’re done.
Open the file in Wireshark or another network packet analyzer that supports the PCAP format.
Note: Network capture can help detect specific network activity, including the IP addresses the device connects to and the protocols involved. This can be useful for identifying abnormal behavior, such as spyware connecting to a command-and-control server.
Export pairing records
When iMazing pairs with a device, it generates a pairing record containing cryptographic keys that link a specific computer to the device and grant access. You can export this pairing record, then import the .plist on another computer via iMazing Preferences → Devices → Import Pairing Record to avoid pairing the device again on that computer.
To export the pairing record:
Connect the device and select it from the Devices section on the Home Screen.
Click Tools in the sidebar.
Under Advanced, click Export Pairing Record.
Enter the device passcode.
Choose a destination folder on your macOS or Windows computer.
Note: To protect user privacy, the device must be connected, and you must enter their passcode to export the pairing record.
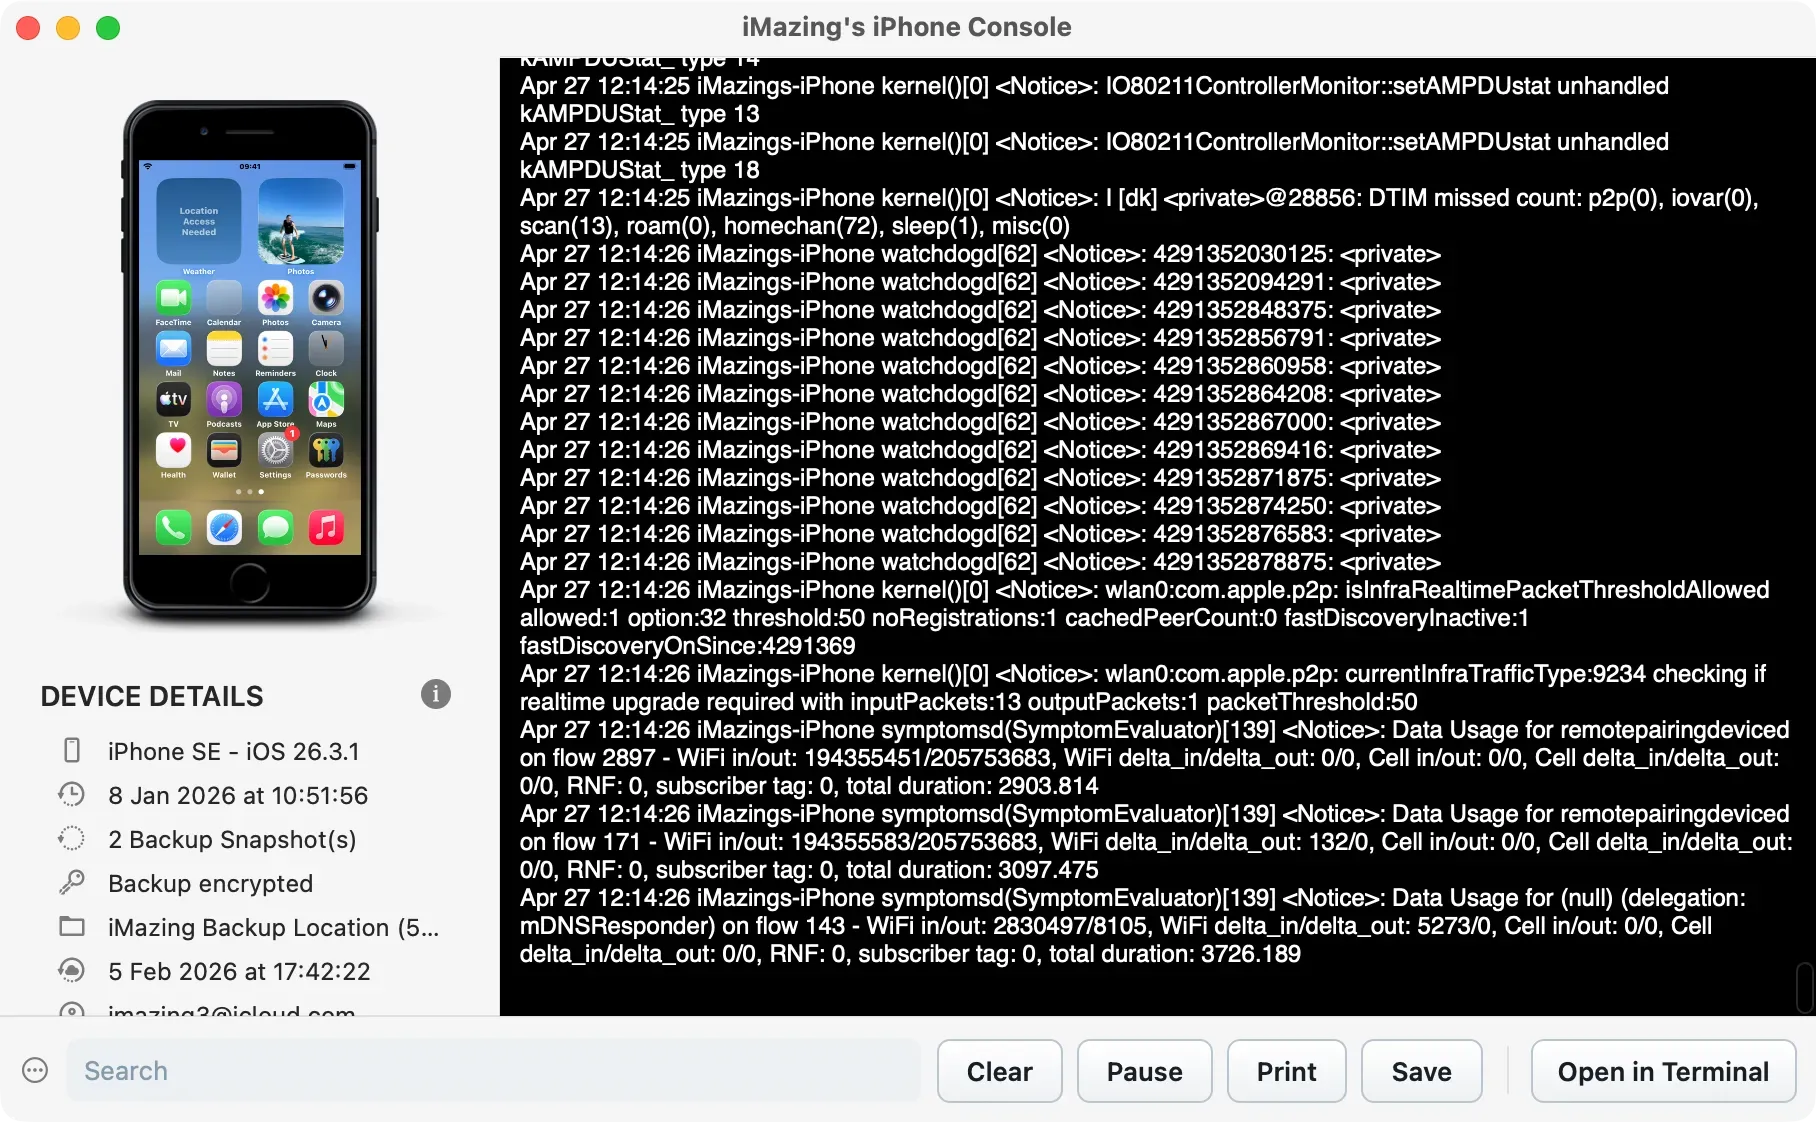
Monitor the device console
The device console streams real-time system logs from a connected iOS device. It is useful for observing device behavior during an active session or capturing log activity triggered by specific user actions.
Important: The device console requires a connected device. To access earlier system logs, export Unified Logs as explained in section 7.1.
Click Tools in the sidebar.
Under Advanced, click Show Device Console.
The console opens in a dedicated window and streams log entries in real time. From this window, you can:
Use the Search field to filter entries by keyword, process name, or log level.
Click Pause to freeze the stream and examine a specific moment without losing the preceding log history.
Click Export to save the current log output as a .txt file on your macOS or Windows computer.
Open the stream in the macOS Terminal app or Windows Command Prompt.
Use iMazing CLI for automating tasks
All data extraction features and iMazing tools are available through iMazing’s command-line interface (iMazing CLI). If you need to run a sequence of tasks, or want to use scripts to streamline or automate data extraction (or other operations), consider using iMazing from the command line. iMazing CLI gives you precise control over each operation and includes features that are sometimes unavailable in the iMazing GUI.
Third-party tools and resources for forensic analysis
Here is a list of useful tools and resources that can be used in conjunction with iMazing to analyze backups and extracted Unified Logs:
iLEAPP stands for iOS Logs, Events, And Plists Parser. It is an open-source digital forensics / incident response tool used to parse artifacts from iOS and iPadOS devices and backups.
iOS Unified Logs is a free tool by iOS forensics expert Lionel Notari that can parse exported UnifiedLog log archives. It generates a filtered database and a forensic report that help verify data integrity.
What to keep in mind
iMazing performs logical extraction based on device backups and direct device access. It does not require a jailbreak or perform physical extraction.
All data processed by iMazing stays on your macOS or Windows computer. Nothing is ever uploaded to any server.
Enable backup encryption before running backups to unlock access to Safari data and Health data, and to ensure the backup hasn’t been tampered with after the operation thanks to the iMazing Backup Checksum. Learn more about backup encryption: Backup Encryption in iMazing
Operations in sections 3 through 6 are available from a connected device or an existing backup. Operations in sections 7 through 9 require a connected and unlocked device.
For forensic data extractions, we advise putting the device in Airplane mode as soon as it is unlocked and running to preserve as much evidence as possible and prevent apps and services from connecting to online servers that may alter the device’s content.
For batch or automated acquisition workflows, consider iMazing CLI, iMazing’s command-line companion for macOS and Windows.