An iOS/iPadOS backup is a snapshot of your iPhone, iPad, or iPod touch at the moment it was saved. It allows you to restore your device's data if it’s lost, replaced, or reset.
iMazing stores backups locally on your computer, external storage, or network drive (NAS)—never in the cloud. For more details, please refer to: iMazing Security & Privacy.
Local backups are essential to iMazing's functionality because Apple restricts direct access to device data. To work around this limitation, iMazing first backs up the device, then extracts the needed data from this backup. Learn more about this below.
Backing up an Apple device involves more than simply copying files. Apple's iOS backup format uses a "flattened" structure where each file receives a unique identifier or "hash" as its filename. These files are stored in a single backup folder, organized into 256 two-letter subfolders. Without user-friendly names or extensions, it's impossible to identify files by name or type. Additionally, when Backup Encryption is enabled, these files are encrypted. Learn more about the BackupAgent: How Apple's iOS BackupAgent Creates and Transfers Encrypted Backups to Your Computer.
This is where iMazing proves invaluable. It creates a virtual reconstruction of your backup, enabling you to easily view data and extract files to your computer.
What data is included in an iOS/iPadOS Backup?
An iOS/iPadOS backup contains various datasets, settings, and app data listed below.
Datasets
Accounts, settings, other
Important:
Without backup encryption enabled, these items aren't backed up for security reasons: passwords and keychain data, health data, Safari history, and call history.
Some apps exclude their data from backups by adding the attribute NSURLIsExcludedFromBackupKey to their files. Apps like Signal and banking applications typically require reconfiguration after a backup restoration.
Music and Photos transferred or synced via Finder, iTunes, the Music app, or iMazing aren't included in backups because they're already considered stored in your computer's library (and thus already backed up).
Some cached iCloud data that iOS or iPadOS can re-download later may be excluded from backups.
iMazing leverages Apple's own backup protocol. It does not control the backup process itself, nor does it decide which files to backup. An iOS/iPadOS service called the BackupAgent runs on the device and manages all operations, including encrypting files transferred to iMazing.
However, iMazing enhances standard iOS/iPadOS backups with these key features:
Apple's iOS/iPadOS backup process maintains only one backup per device. Every time you back up your device, your last backup is overwritten. If you accidentally delete a file or photo on your device and back it up afterwards, the accidentally deleted file is gone forever.
iMazing creates snapshots of your backups automatically, a unique solution that is similar to Apple's macOS Time Machine feature, but for your iOS or iPadOS devices.
How does it work?
iMazing creates a "shallow" copy of your current backups. This means the next time you back up your device, it won't overwrite your previous backup. You'll still have access to it and can view files as they were before. Only the files that have changed take up additional disk space.
To optimize storage usage, iMazing leverages hard links on file systems supporting it. This allow using only a fraction of the space that would be required to save every snapshot since similar files are not duplicated.
Important: Both macOS Finder and Windows File Explorer cannot properly detect hardlinks. The size of items in the iMazing.Versions folder (where all snapshots are saved) reported by these file managers doesn't accurately reflect the actual disk space used. In most cases, they will show approximately double the actual size because hardlinks in the iMazing.Versions folder are simply references to files that already exist in the main device backup folders.
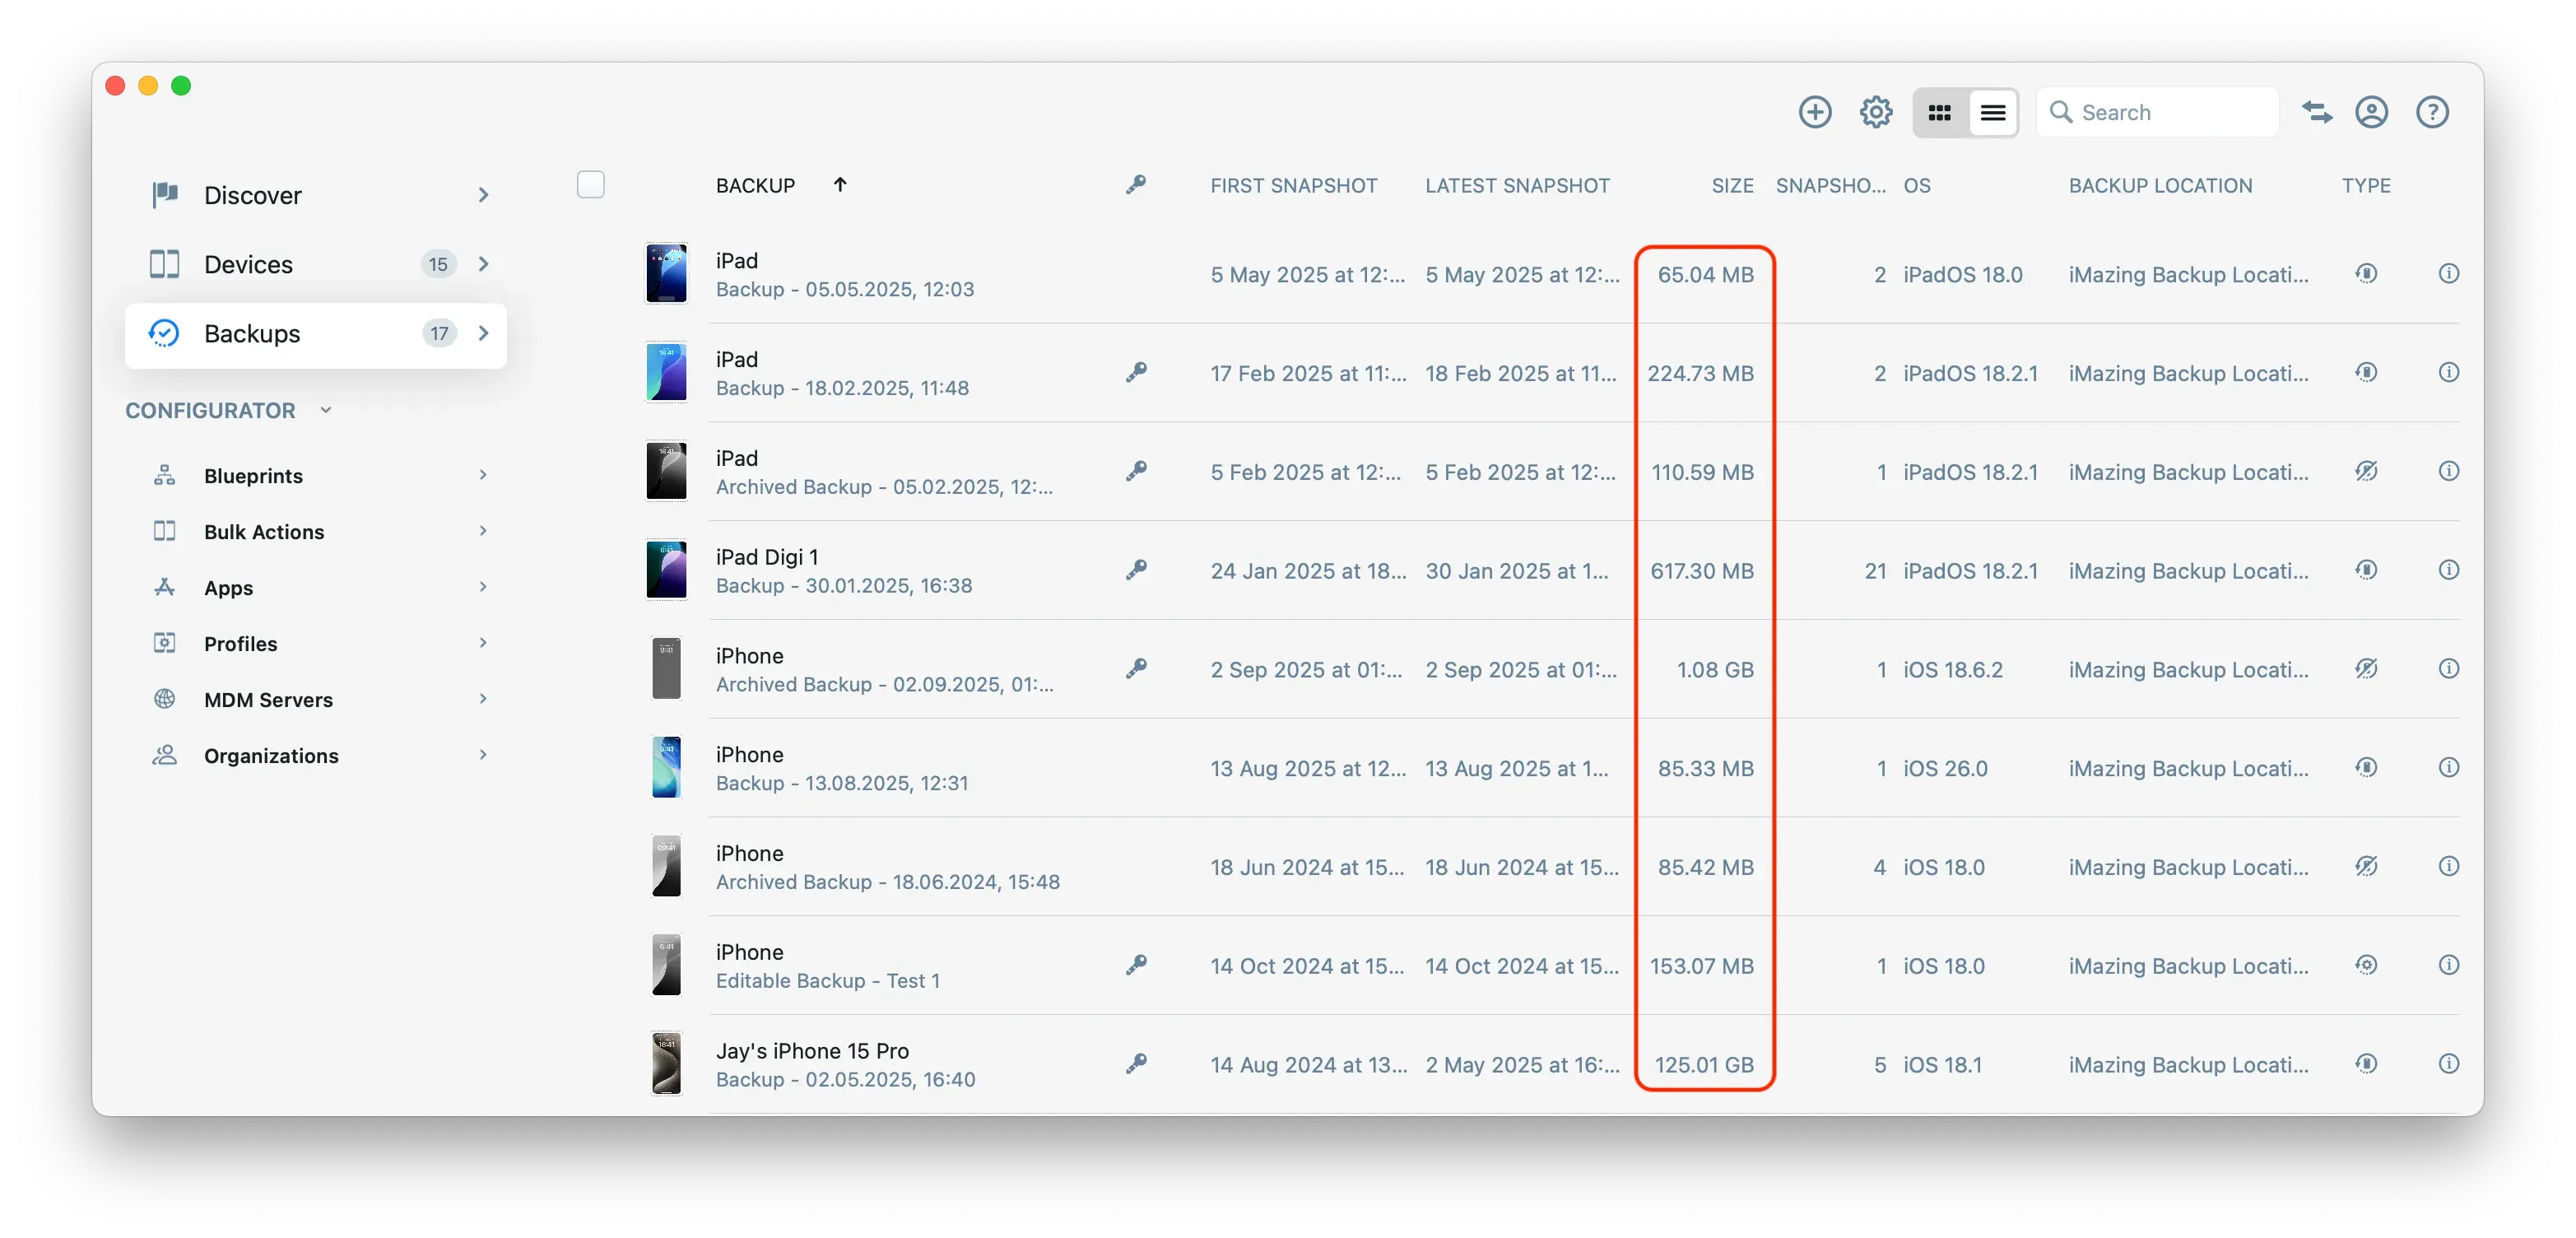
Tip: For an accurate measurement of a backup's total size, including all snapshots, use the Backups section in iMazing, which correctly reports storage usage.
Important: Never manually transfer, copy, or move files in the backup location since iMazing keeps multiple snapshots of a device. All actions must be performed through iMazing to maintain snapshot chain integrity and prevent backup corruption.
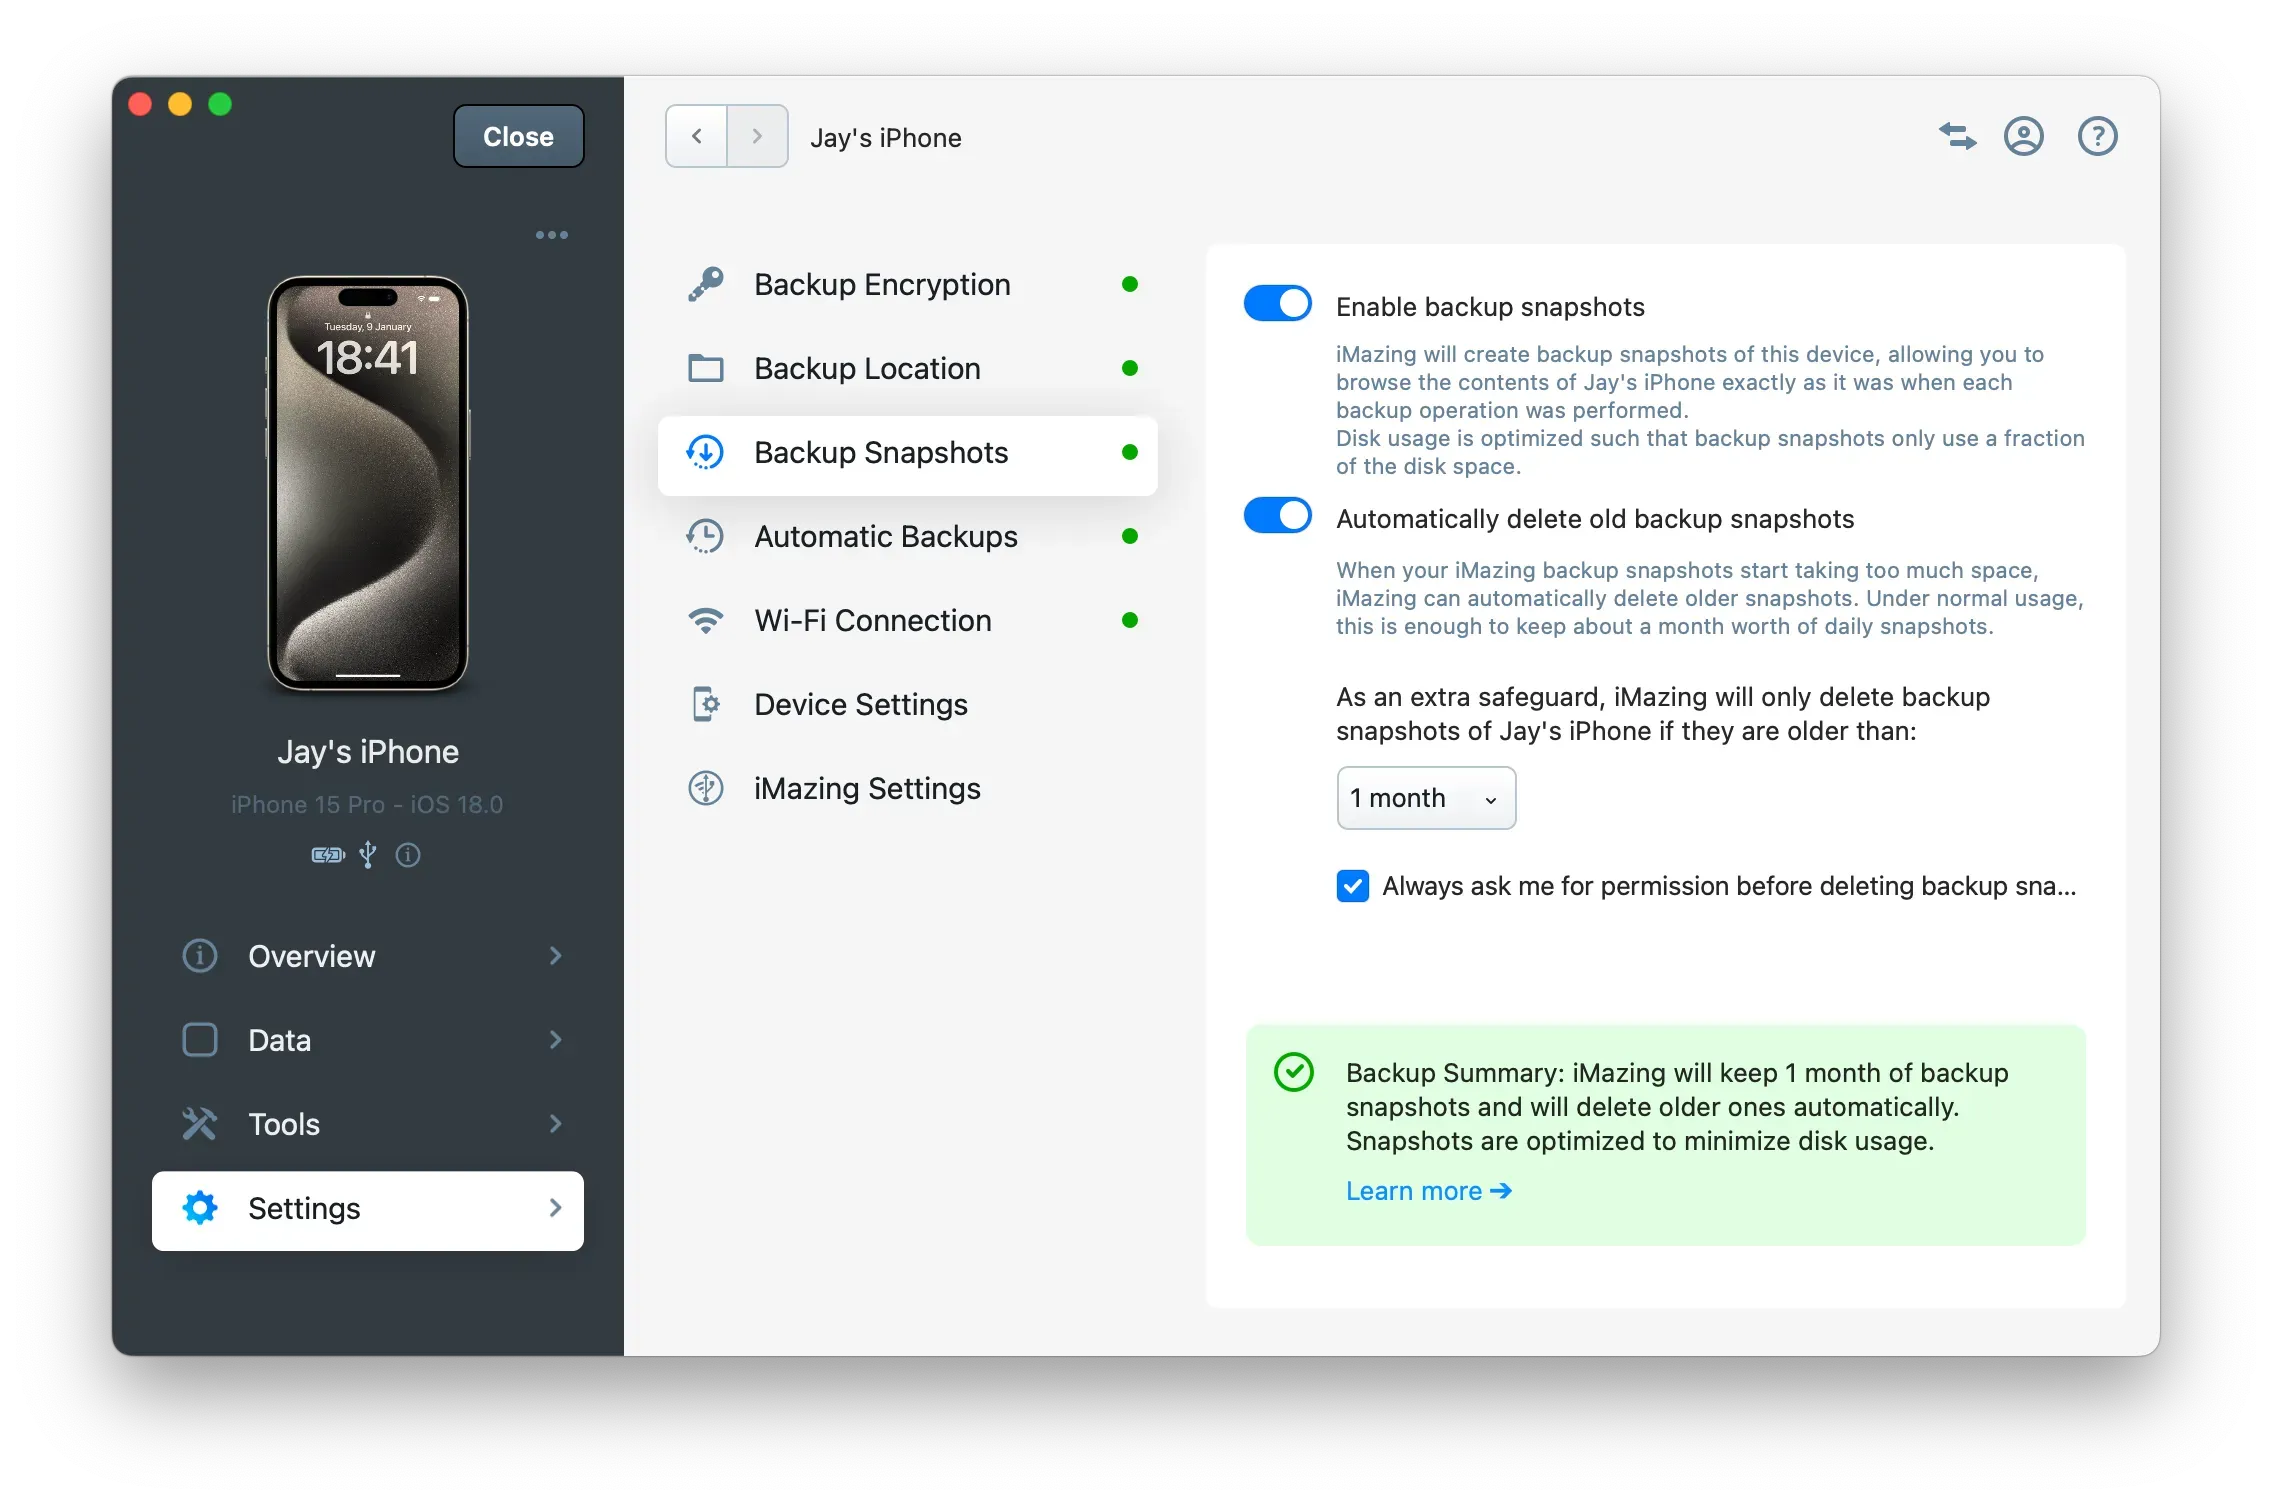
In your Device Settings, you'll find a section called Backup Snapshots. This section allows you to enable or disable snapshot creation and lets you control how iMazing manages backup snapshot deletion, including the retention period and whether your confirmation is required when deleting older snapshots automatically.
Precise numbers will depend on the frequency of your backups and how much new data you generate in between. Generally speaking, you should be able to keep dozens of backups for only marginally more space than a single backup.
iMazing provides several actions that allow you to view and export data from snapshots, lock them for preservation, add custom labels for easier identification, or delete individual or multiple backup snapshots to free up space.
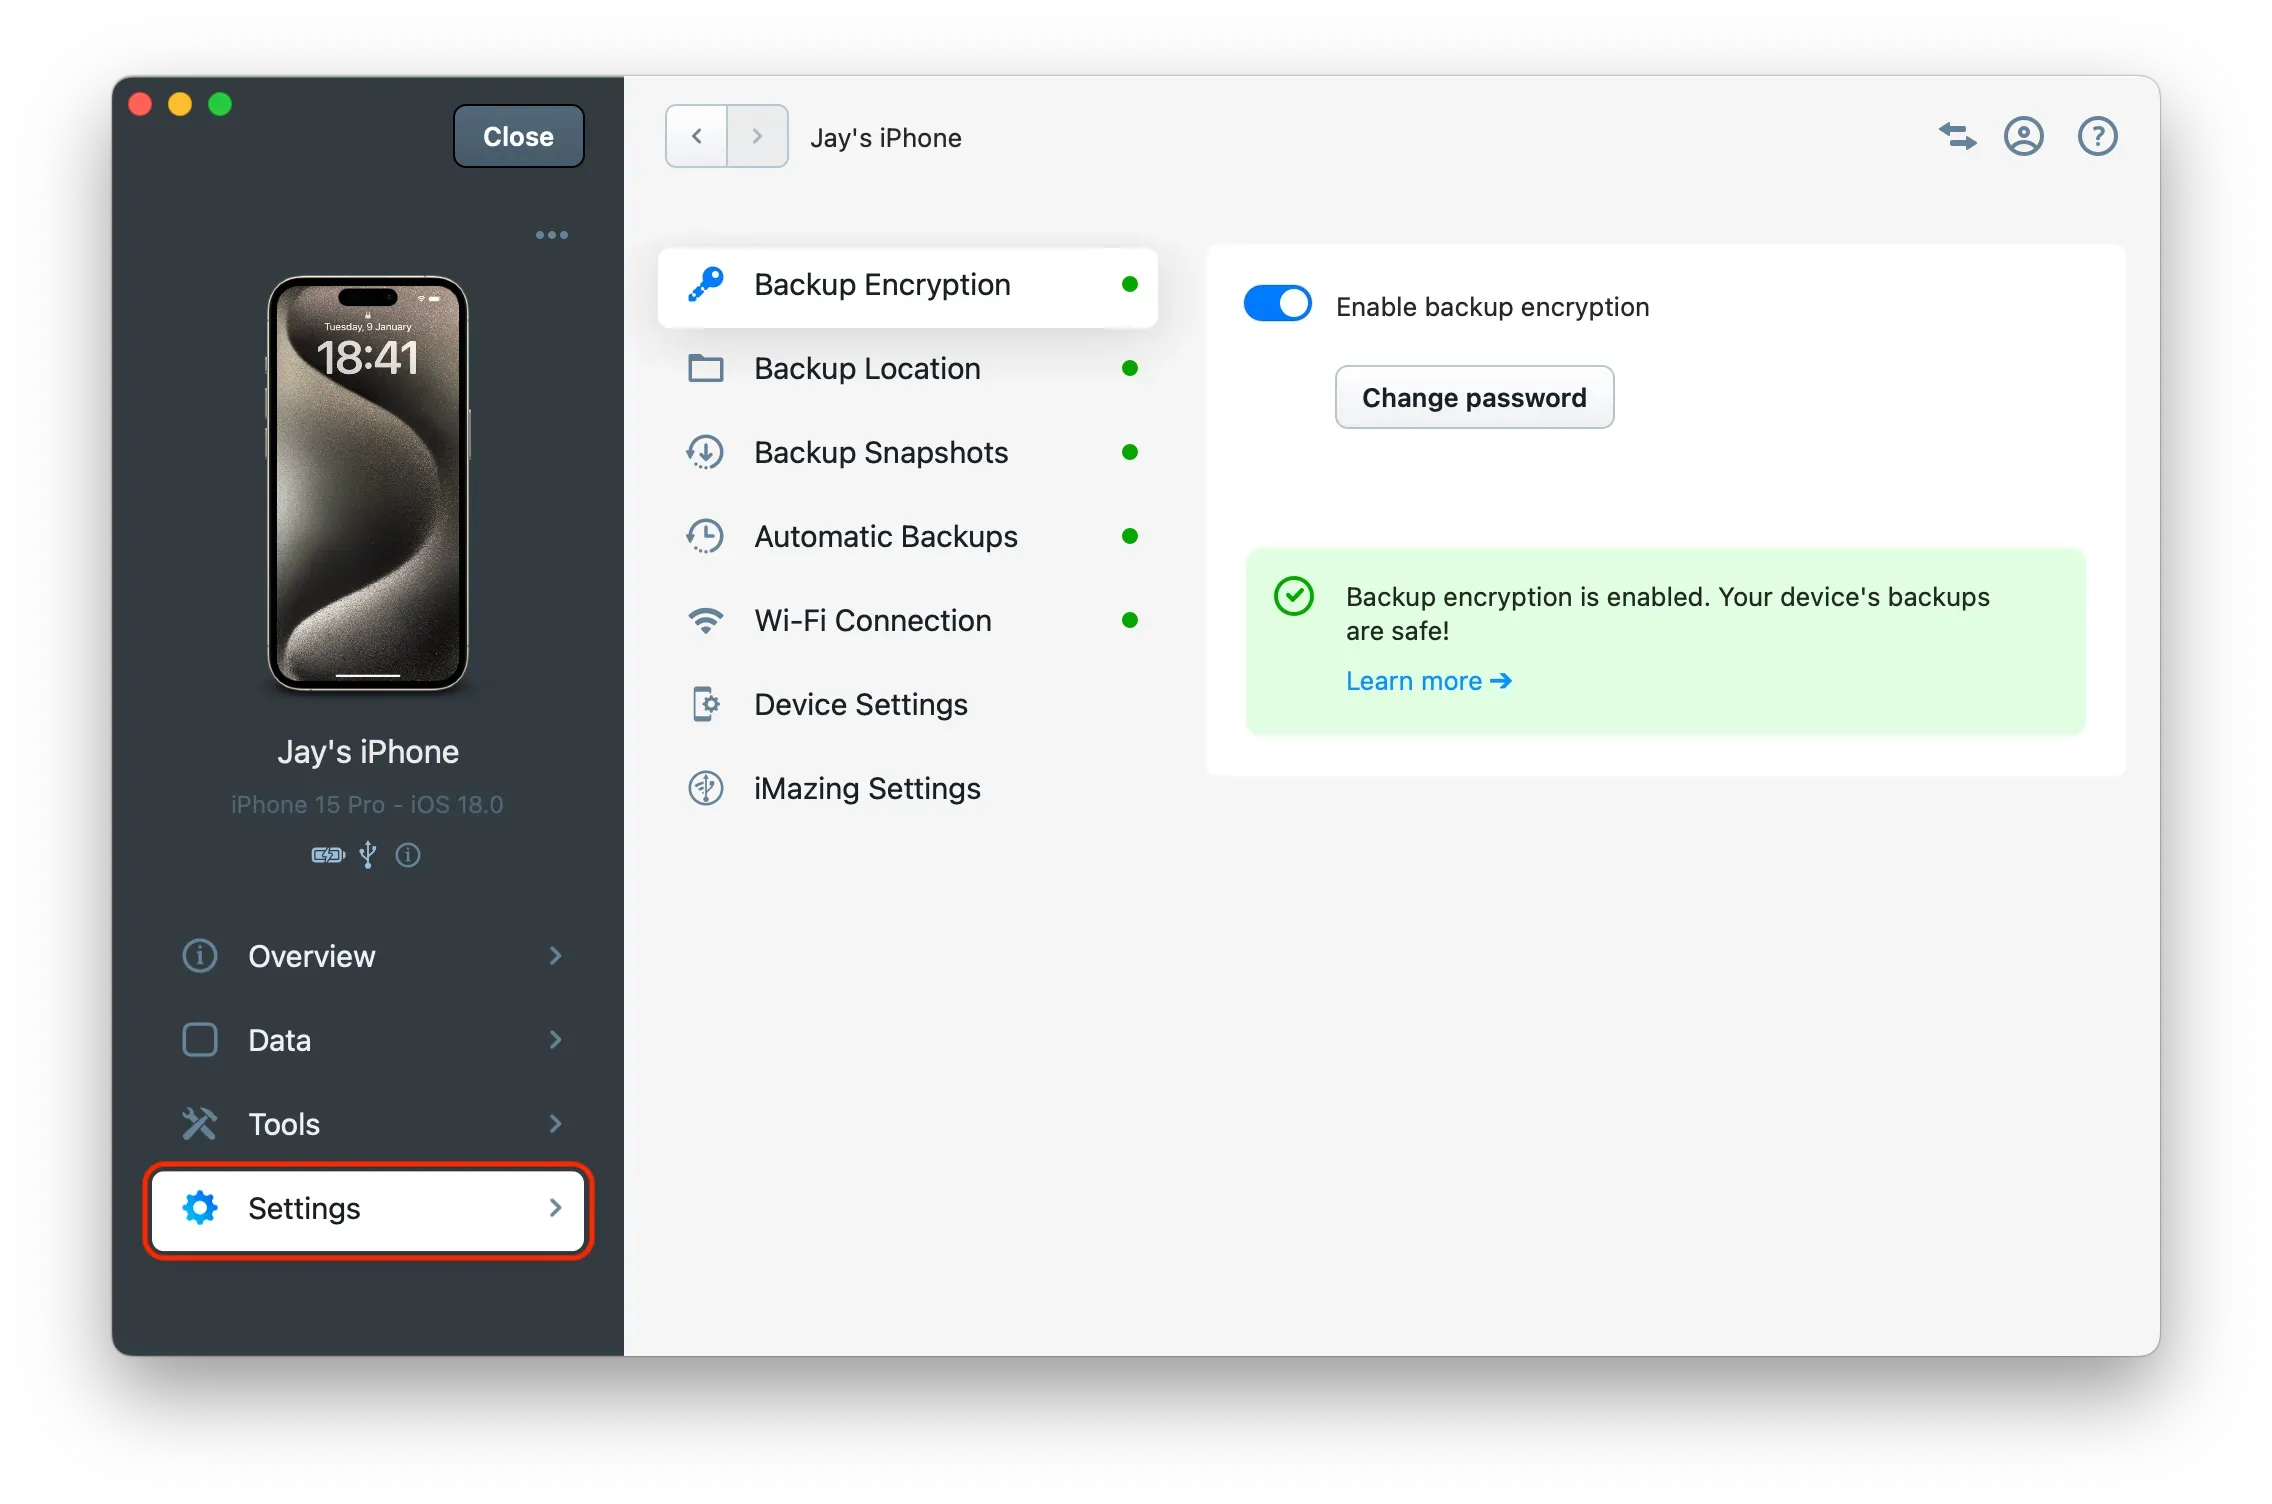
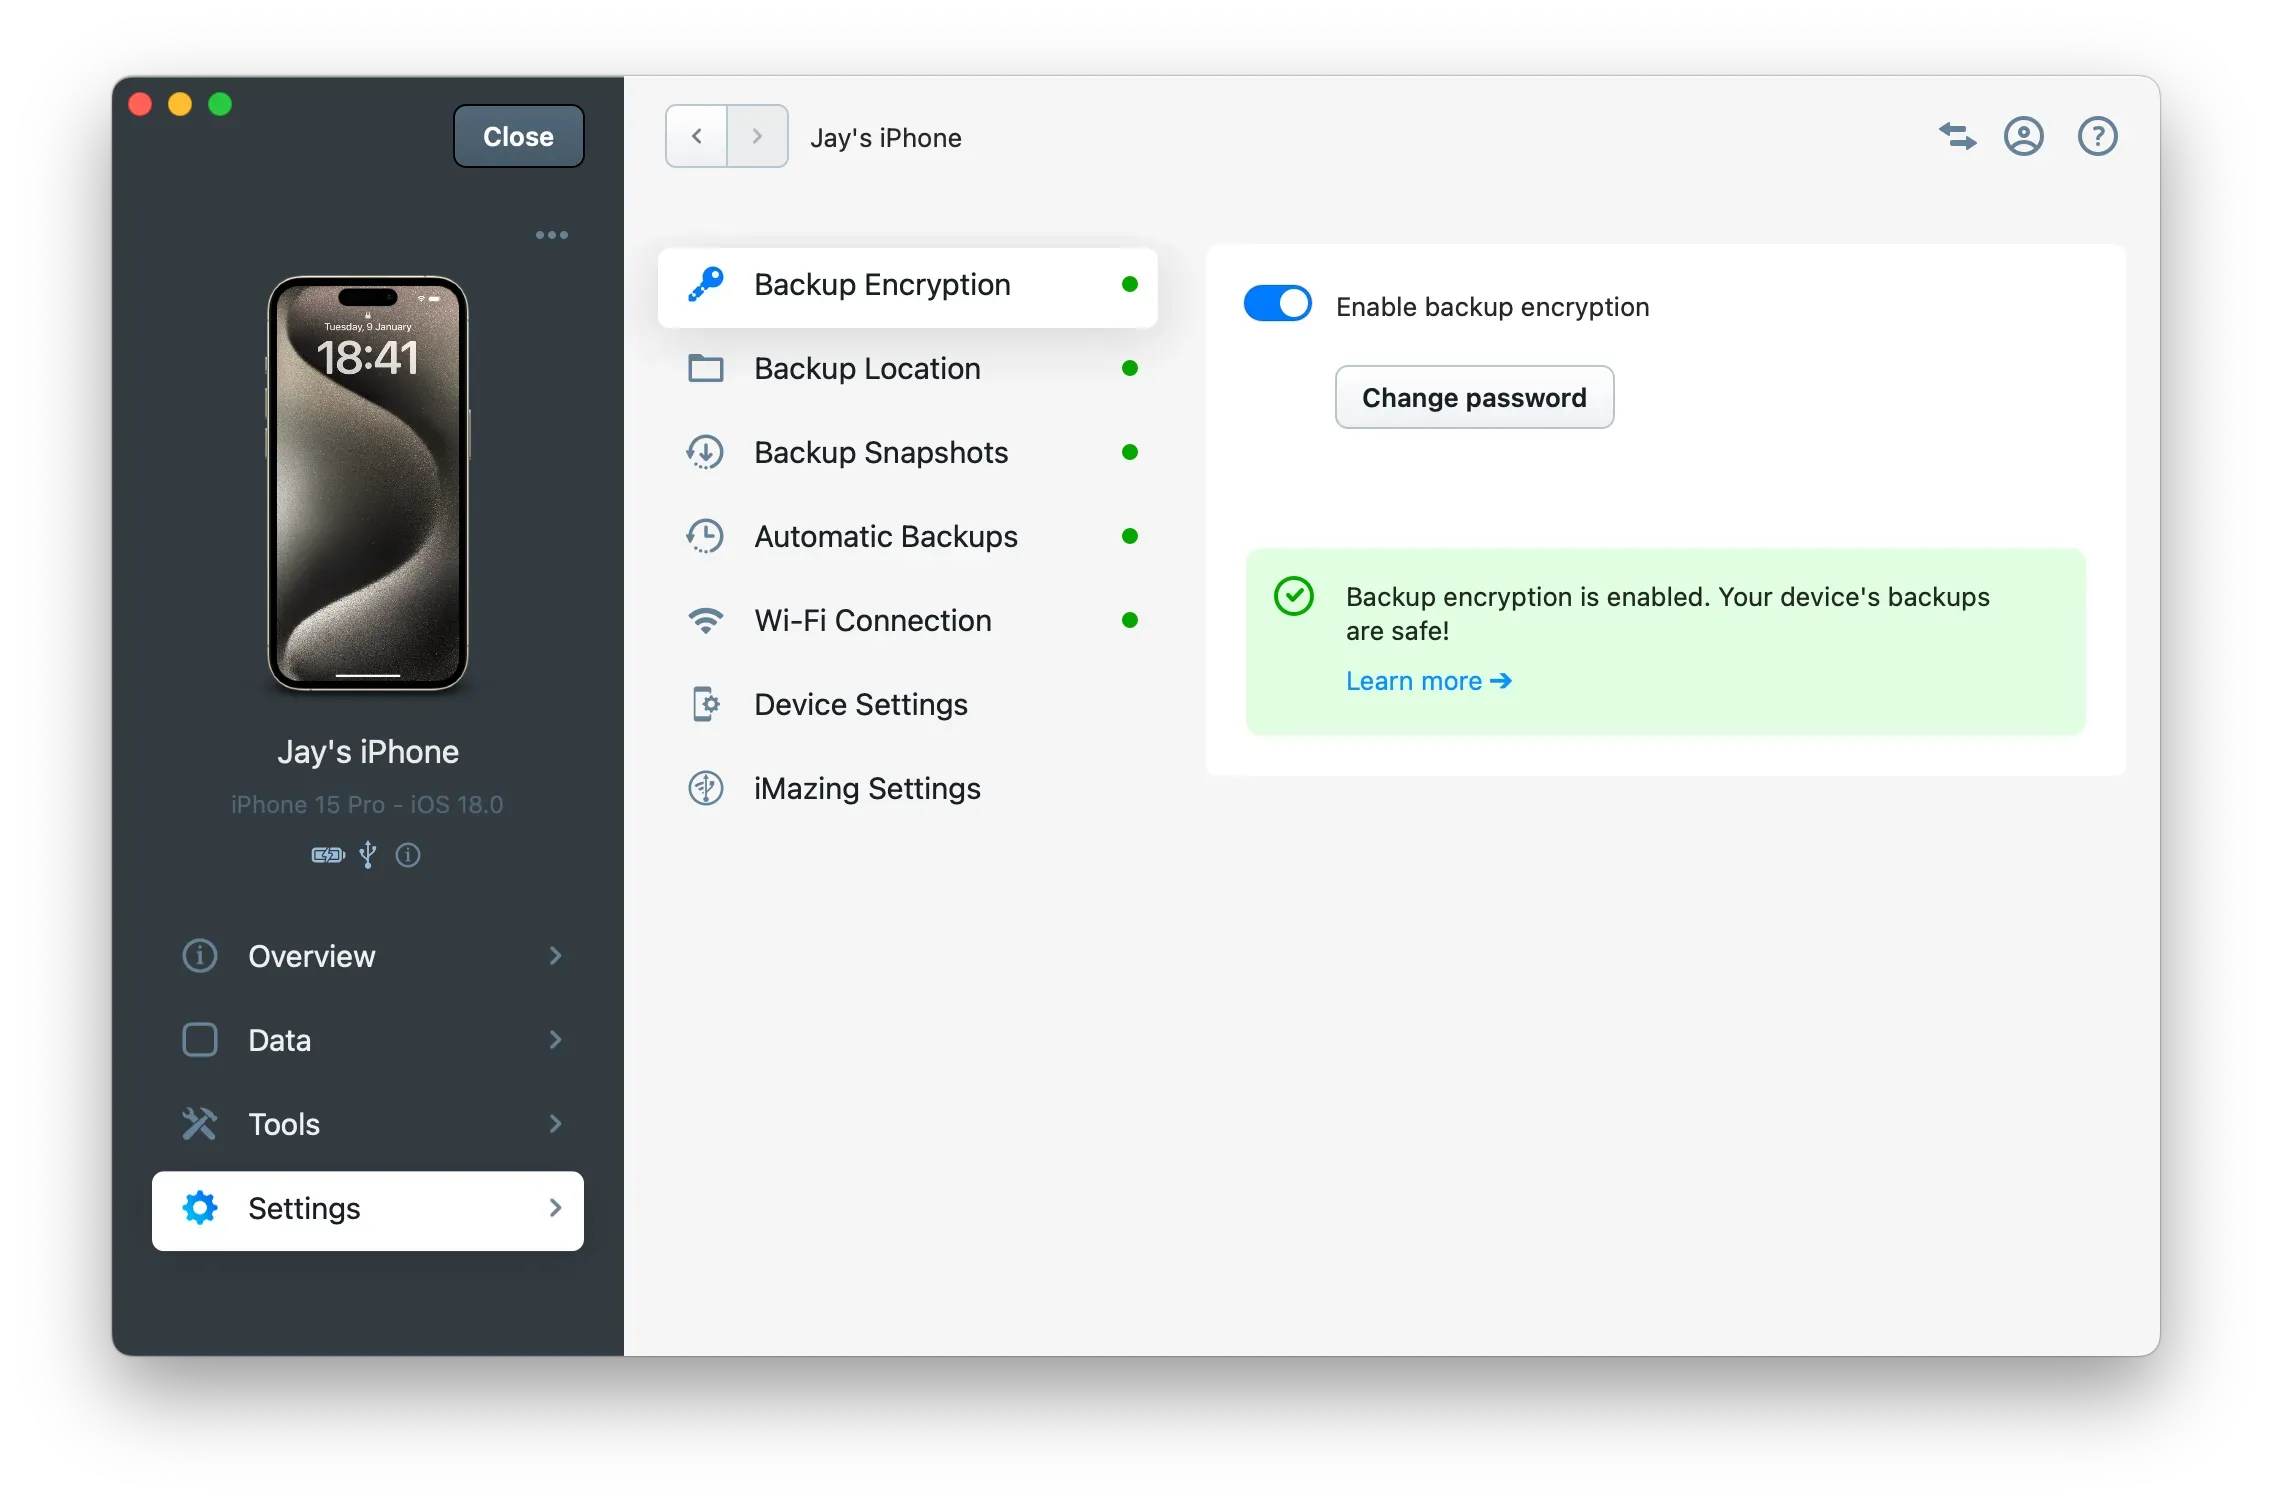
To configure backup options, you need to select a device in iMazing and go to the Device Settings section.
There, you'll find all settings related to managing backups for your chosen device:
Backup Encryption: We recommend always enabling backup encryption to ensure your data is stored securely. This also allows including datasets otherwise excluded by Apple from the backup: passwords and keychain data, health data, Safari history, and call history.
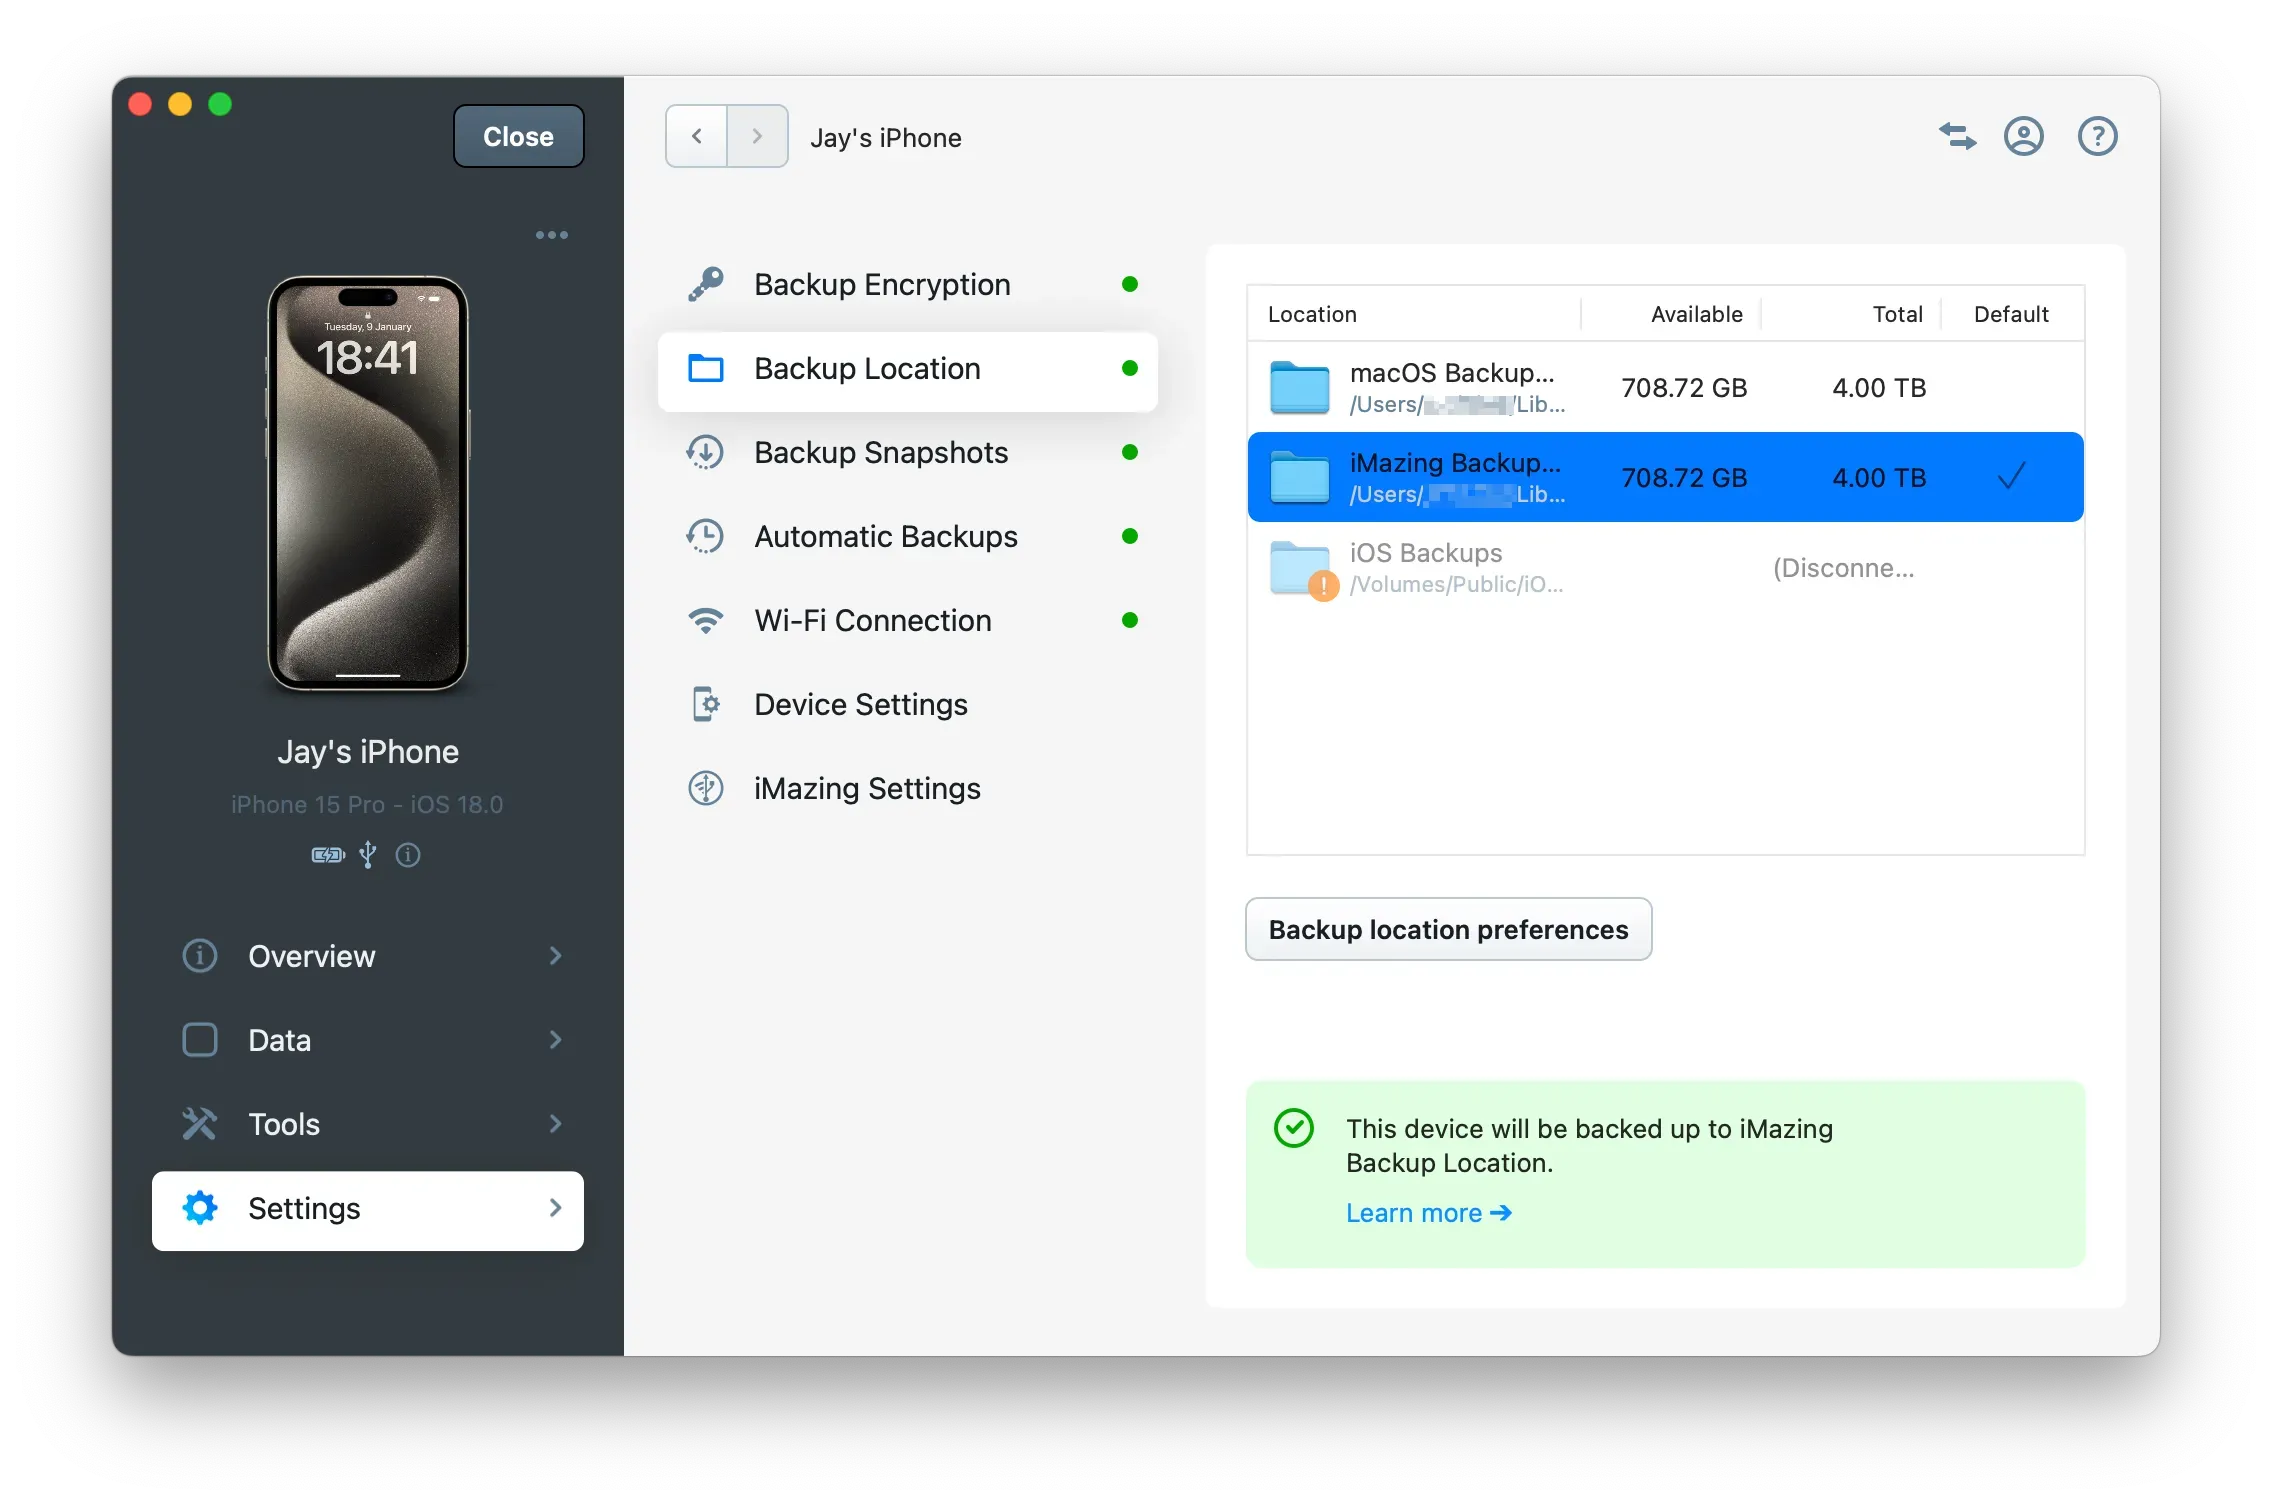
Backup Location: Choose a backup location with sufficient space to store your backup. A warning icon appears if the available space is inadequate. We recommend using local or external hard drives rather than NAS systems, as backups will take longer on NAS devices, especially if their file systems don't support hard links for the snapshot system.
Backup Snapshots: These are enabled by default. You'll find various options to define how iMazing should manage the retention of old backup snapshots.
Automatic Backups: You can set up automatic backups that will be executed by the iMazing companion app, iMazing Mini, when your devices are accessible over your local Wi-Fi network.
In your Device Settings, you'll find a section called Backup Encryption. Here you can enable or disable backup encryption by setting an encryption password.
We recommend always enabling encryption to protect your data stored in your Backup Location. Encryption also includes data that Apple otherwise excludes from backups: passwords and keychain data, health data, Safari history, and call history.
Important
The backup encryption password is configured on the device. If you lose your encryption password, you won't be able to access previous backups or create new ones. Keep this password safe and select the Remember Password checkbox. Your password will be securely stored in your macOS Keychain or Windows Credentials.
Backup locations are specified per device. It means you can for instance back up your iPhone locally on your hard drive in the iMazing Backup Location, but decide to back up your iPad in a different location such as an external drive or network drive (NAS).
You can change each of your device's backup location from the Device Settings section.
Important
Select a backup location with adequate space for your backup. A warning icon will appear if space is insufficient. For optimal performance, we recommend using local or external hard drives instead of NAS systems. Backups on NAS devices take longer, particularly when their file systems don't support the hard links needed for the snapshot system.
When adding a disk as a backup location, iMazing will create an iMazing.Backups folder at the root of your disk to prevent permission issues.
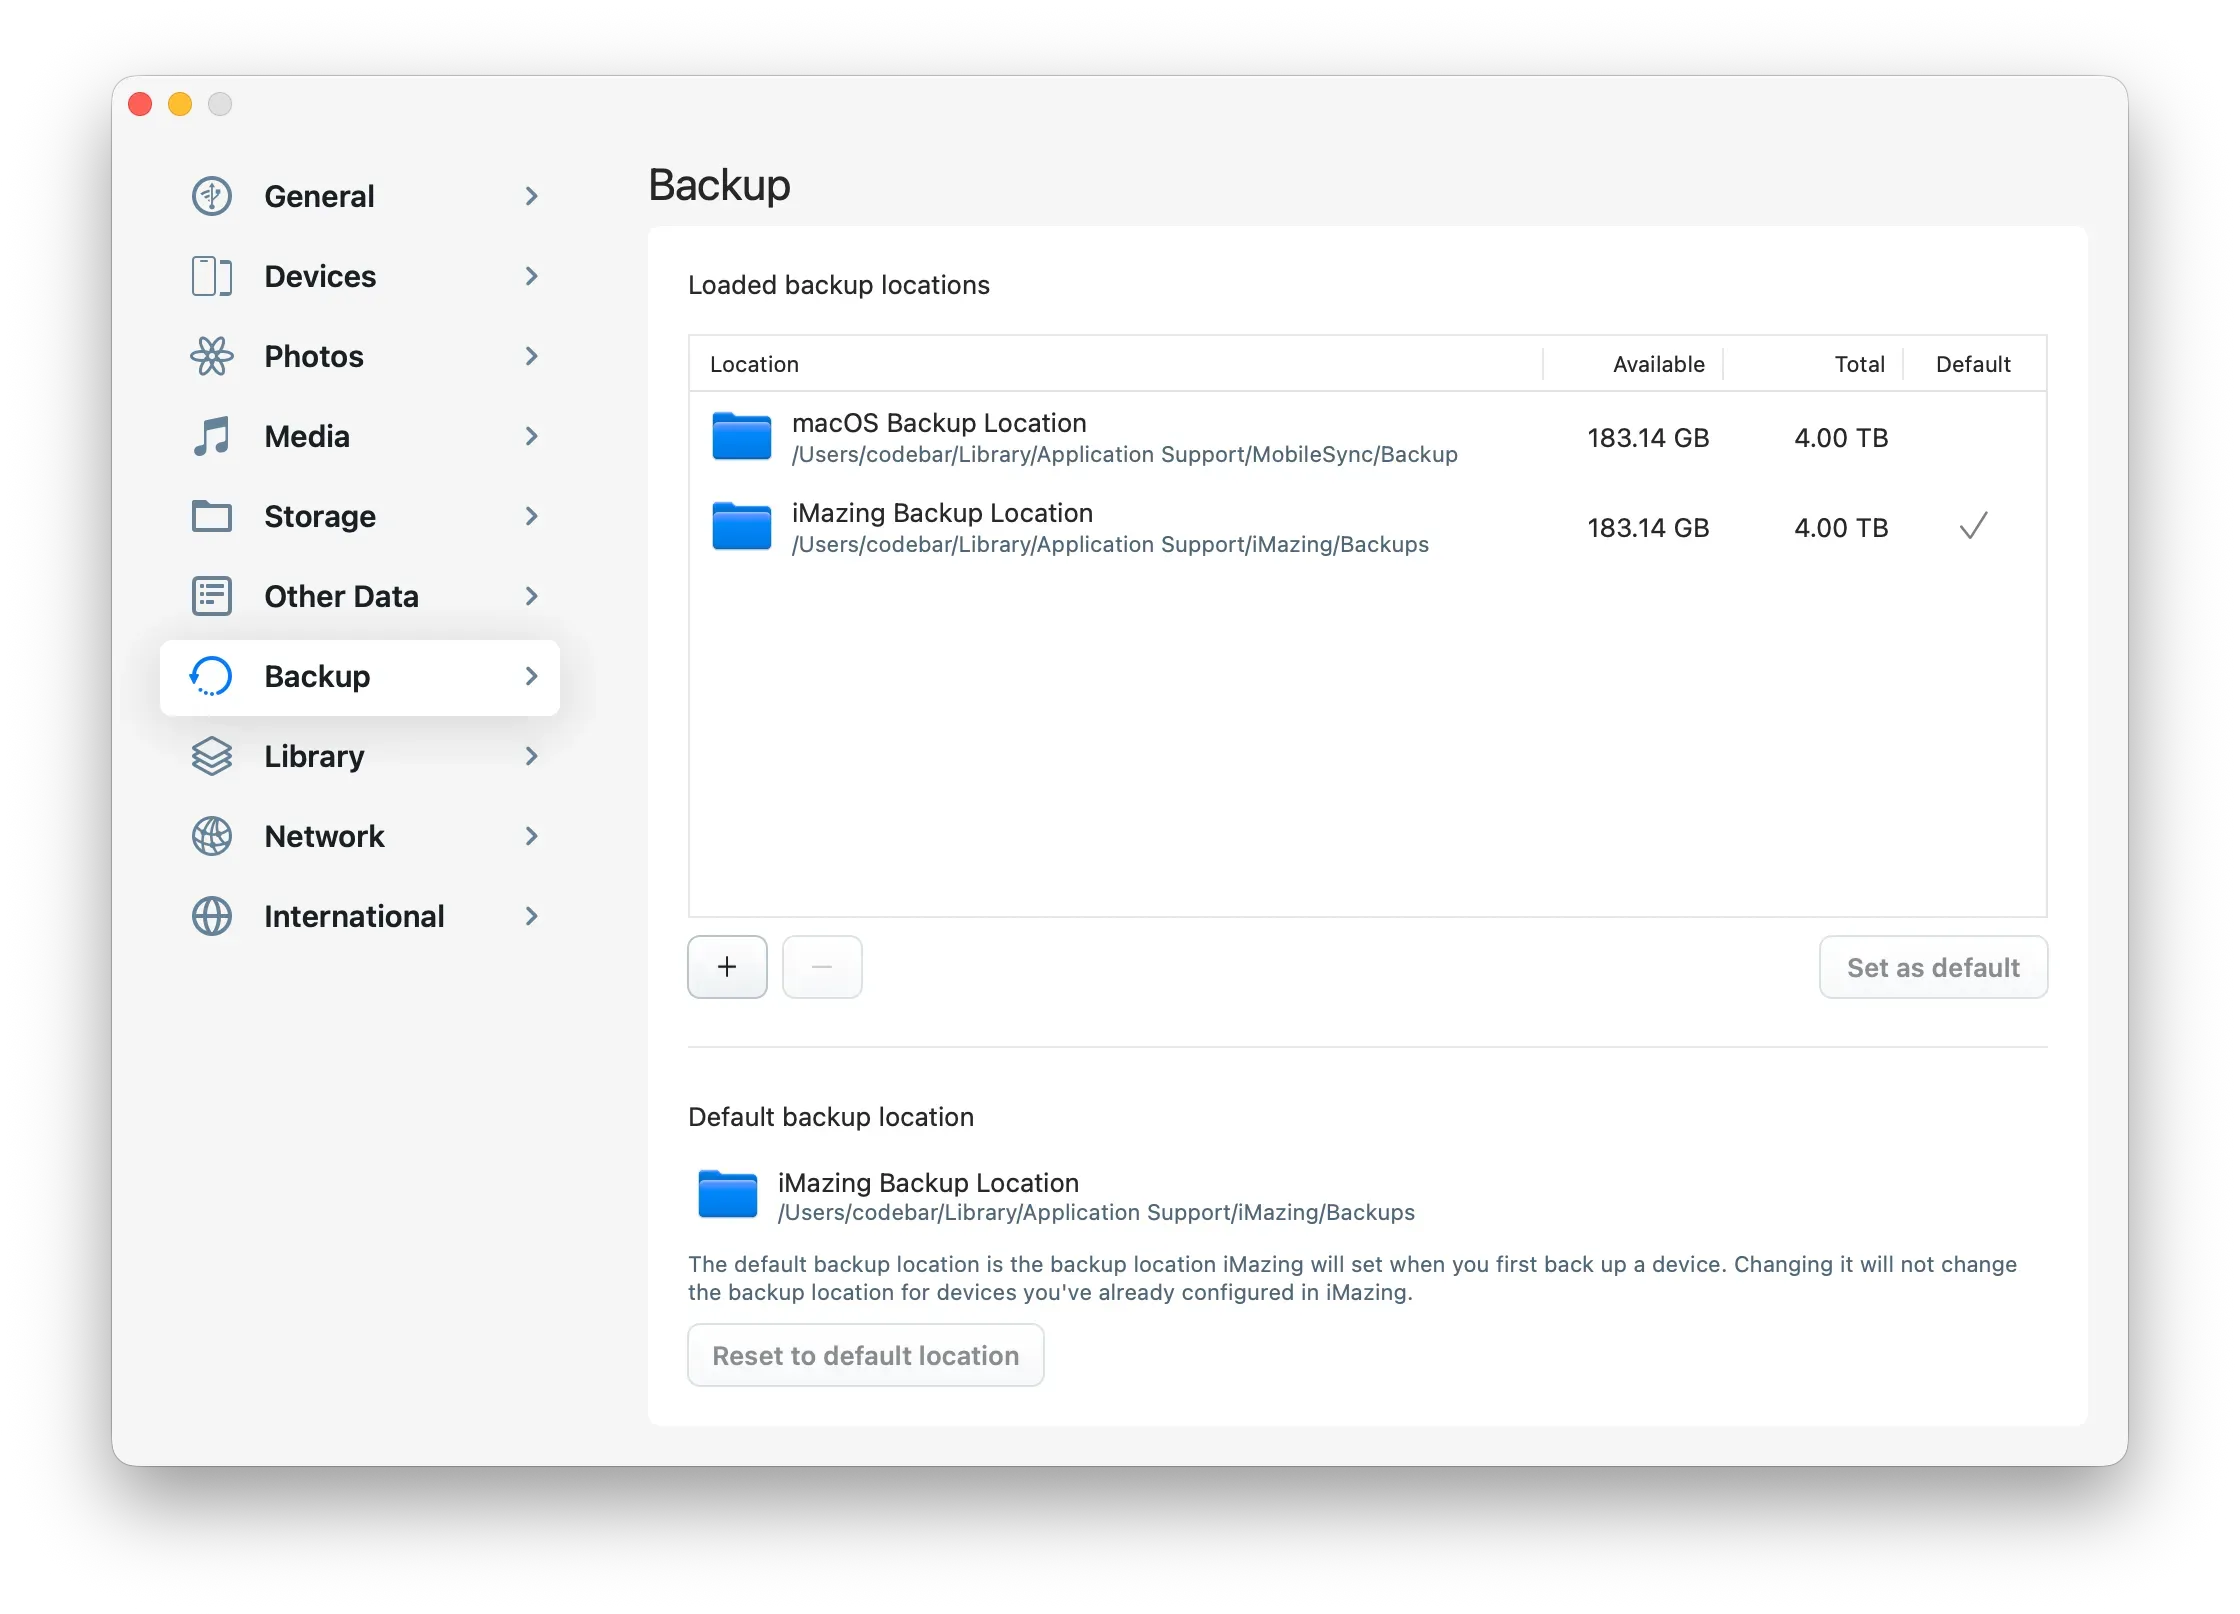
Manage all your backup locations through the Backup section of the iMazing Preferences window.
This section also allows you add or remove backup locations and to select iMazing's default backup location where all newly connected devices will automatically be backed up.
You can also access the backup locations management directly from the Backup Location options of any of your devices by clicking the "Backup location preferences" button.
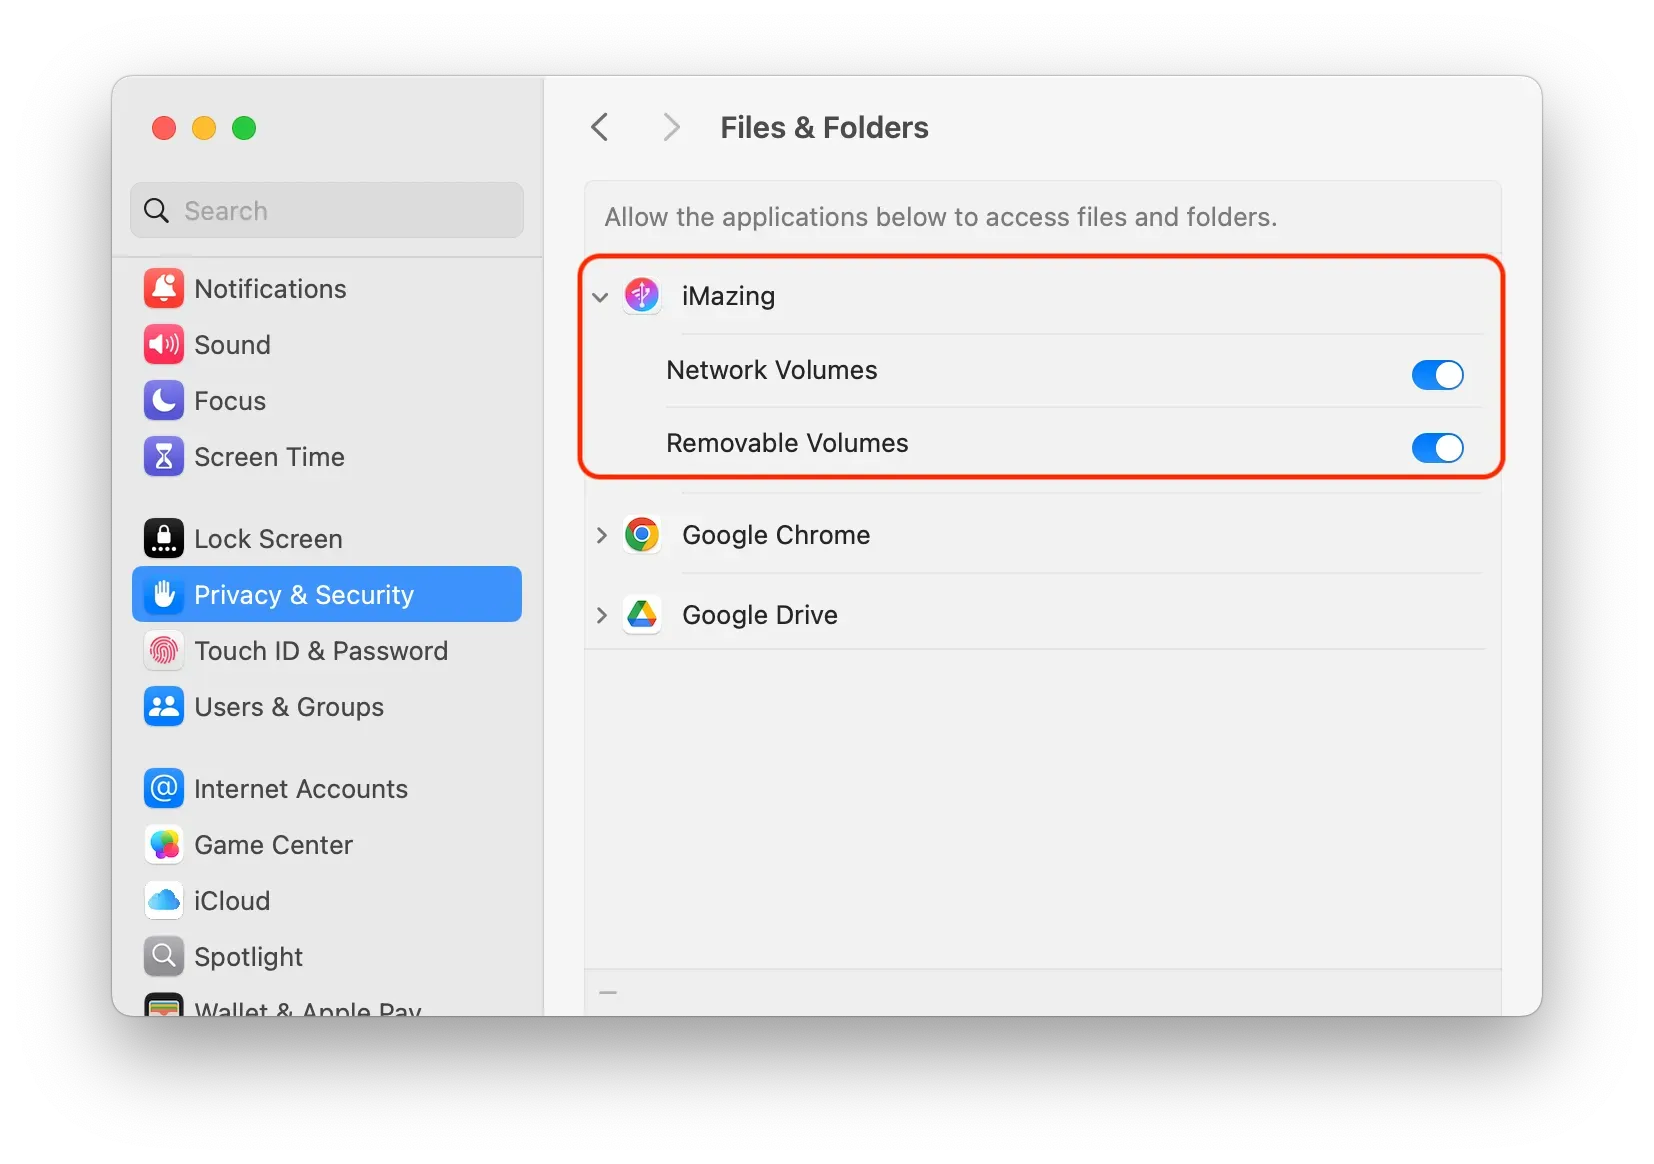
Enable iMazing to access external drives or network drives (NAS) in macOS Settings for backup locations
Before using an external drive or NAS as backup location in iMazing on macOS, you need to provide permissions to iMazing in your macOS "System Setting" in Privacy & Security > Files & Folders and allow iMazing to access Network Volumes and Removable Volumes.
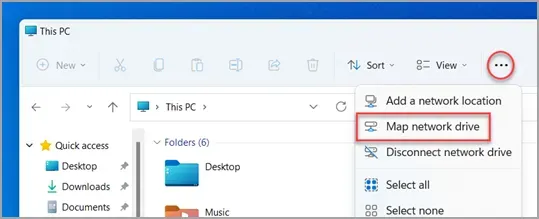
Enable iMazing to access network drives (NAS) in Windows for backup locations
Before using a network drive (NAS) as a backup location in iMazing on Windows, you need to map it to a drive letter.
Follow these steps to map a network drive in Windows File Explorer:
Open File Explorer from the taskbar, Start menu, or by pressing Windows logo key + E.
Select "This PC" from the left pane. Then, on the File Explorer ribbon, select More > Map network drive.
Note: If you don't see Map network drive on the More menu, you can right-click the This PC node in the folder pane and you'll see the command there.
In the Drive list, select any available drive letter.
In the Folder box, enter the path of the folder or computer, or click Browse to locate it. Select "Reconnect at sign-in" if you want to connect automatically when you log in.
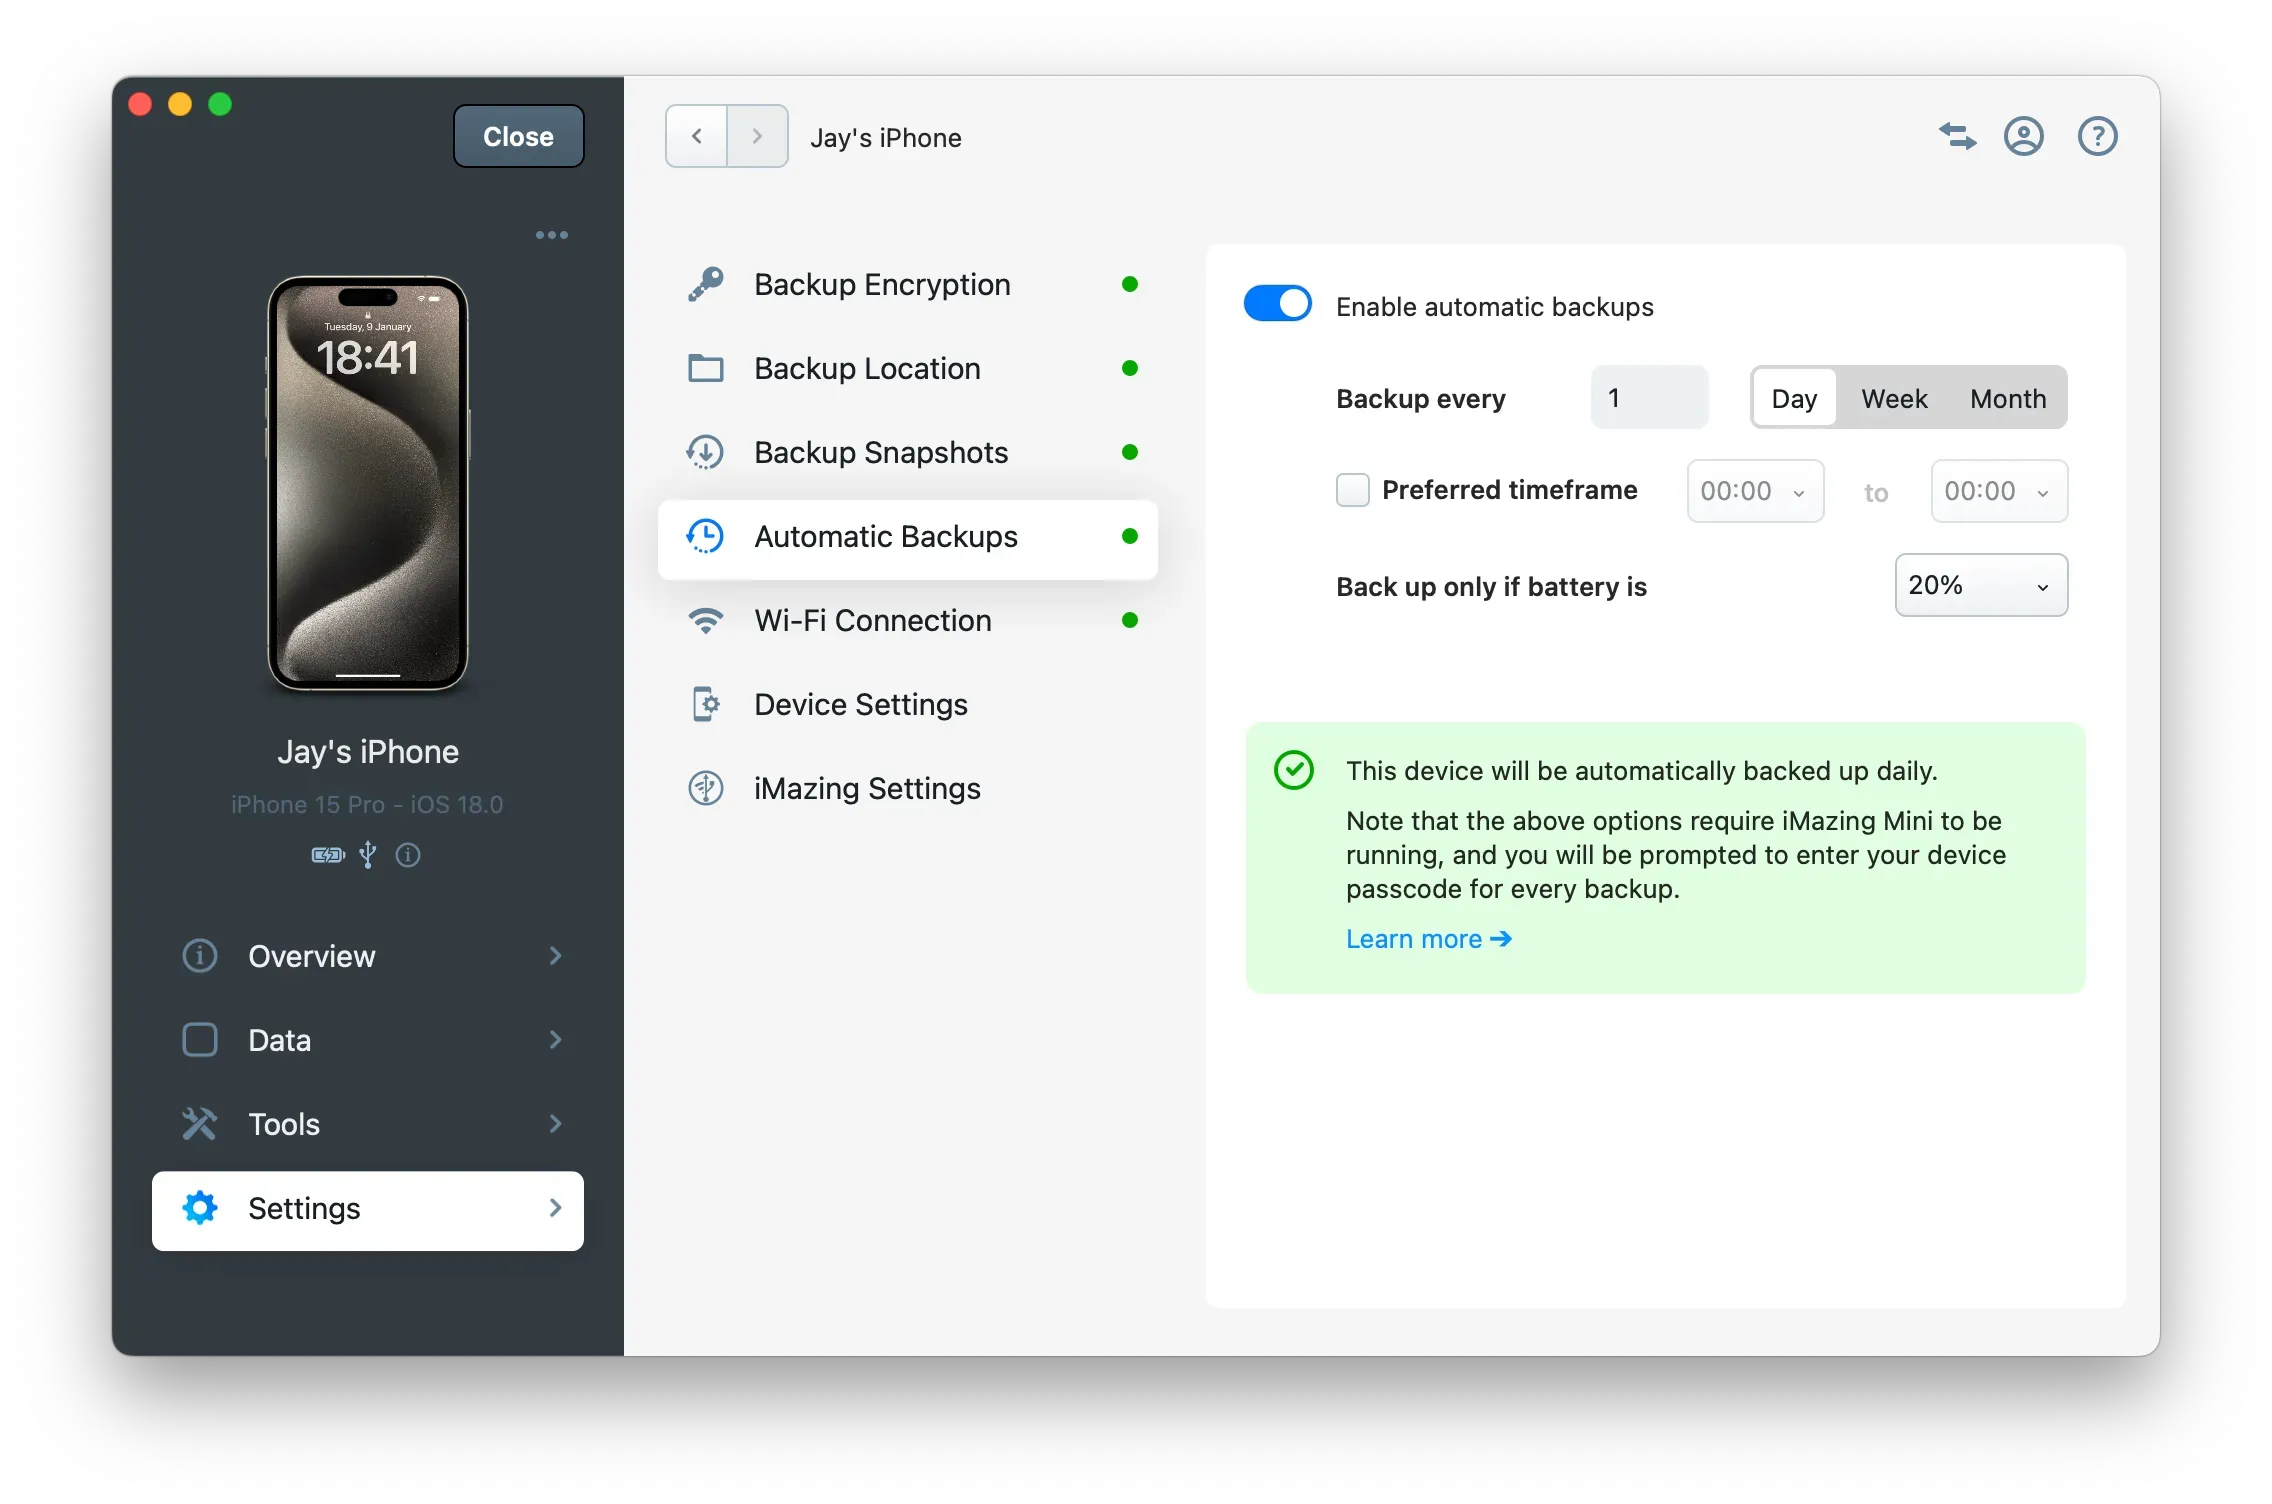
In your Device Settings, you'll find a section called Automatic Backups. This section allows you to enable or disable automatic backups for your device and offers various options to define the frequency and preferred time frame.
When enabled, the iMazing Mini companion app will launch automatically when your computer starts and will back up your device at your chosen frequency in the background. iMazing Mini performs the backup when your device is available over the local Wi-Fi network or when you connect your device to your computer via USB. For example, if you've set up a daily backup, iMazing Mini will perform the backup when your device is detected, provided the previous backup was made more than approximately a day ago.
Important: Since iOS 16.1, Apple has implemented an additional security measure requiring you to enter your device passcode to authorize backups. iMazing Mini will display a dialog prompting you to get ready to enter your passcode. You simply need to take your device, unlock it with Face ID or Touch ID, and enter your passcode.
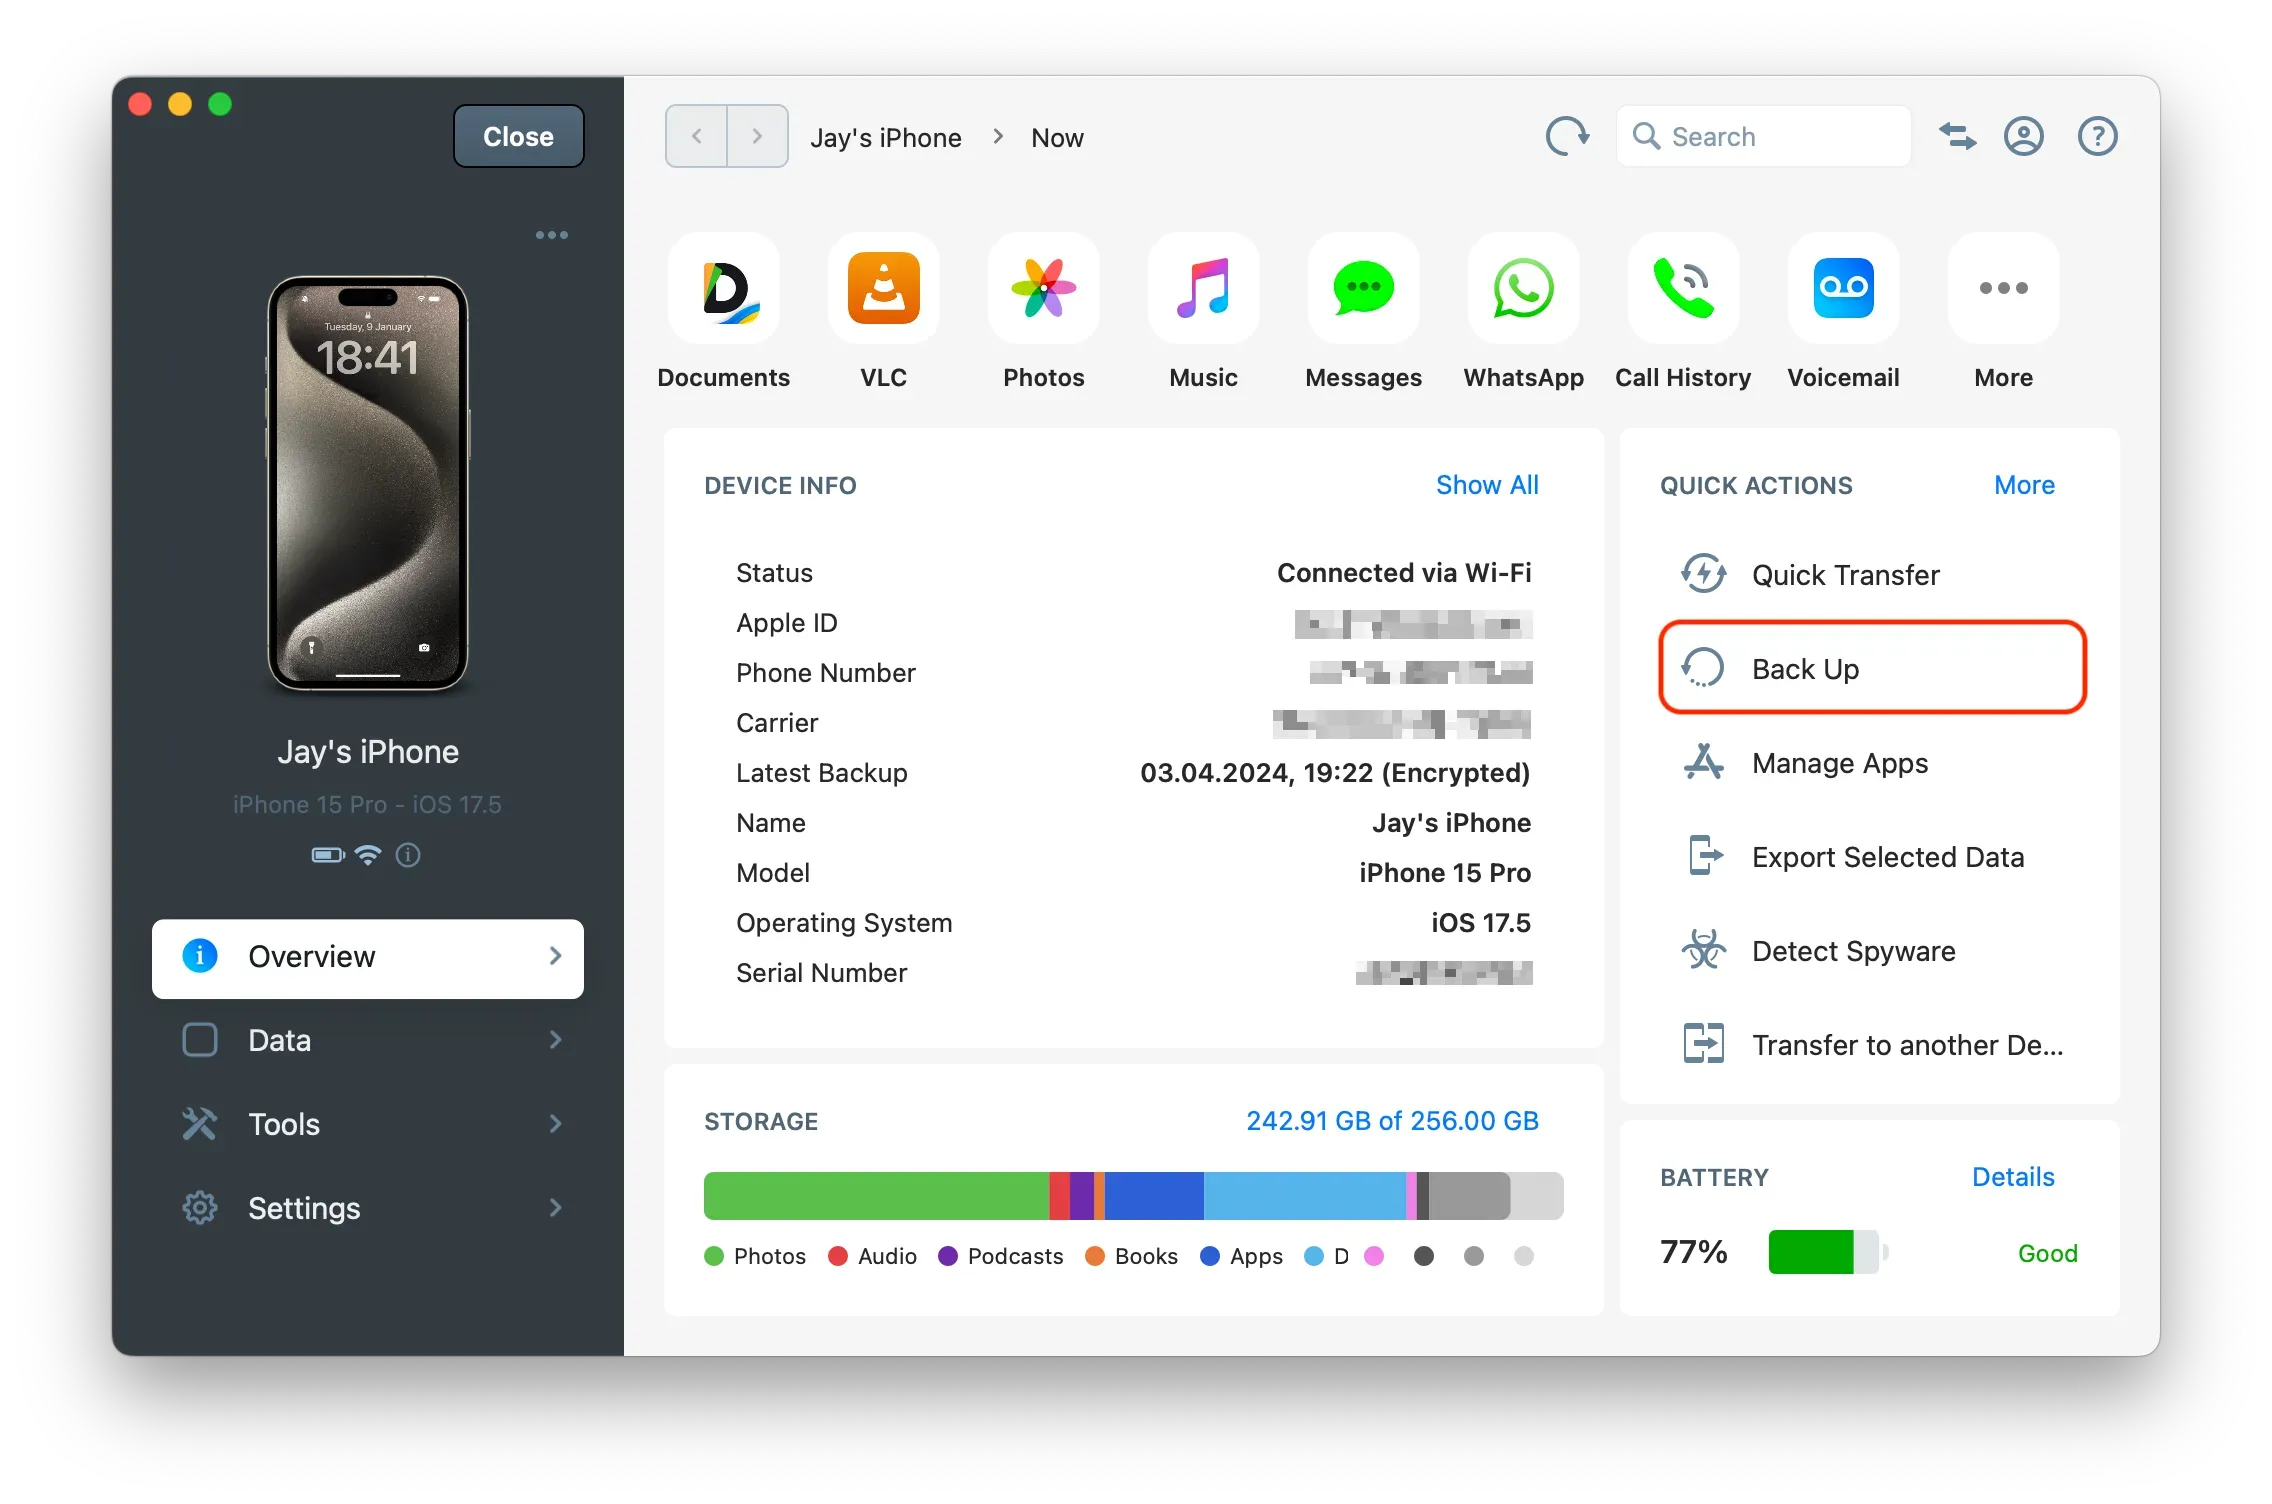
Some datasets can be accessed directly from your device, while others require a backup. To access and display all your data, iMazing must create either a full backup of your device or a partial one solely for data access.
To load a dataset, go to the iMazing Device Data section and click the dataset icon of your choice.
If the dataset can be accessed without a backup, iMazing will load the data directly. This applies to datasets like photos and music.
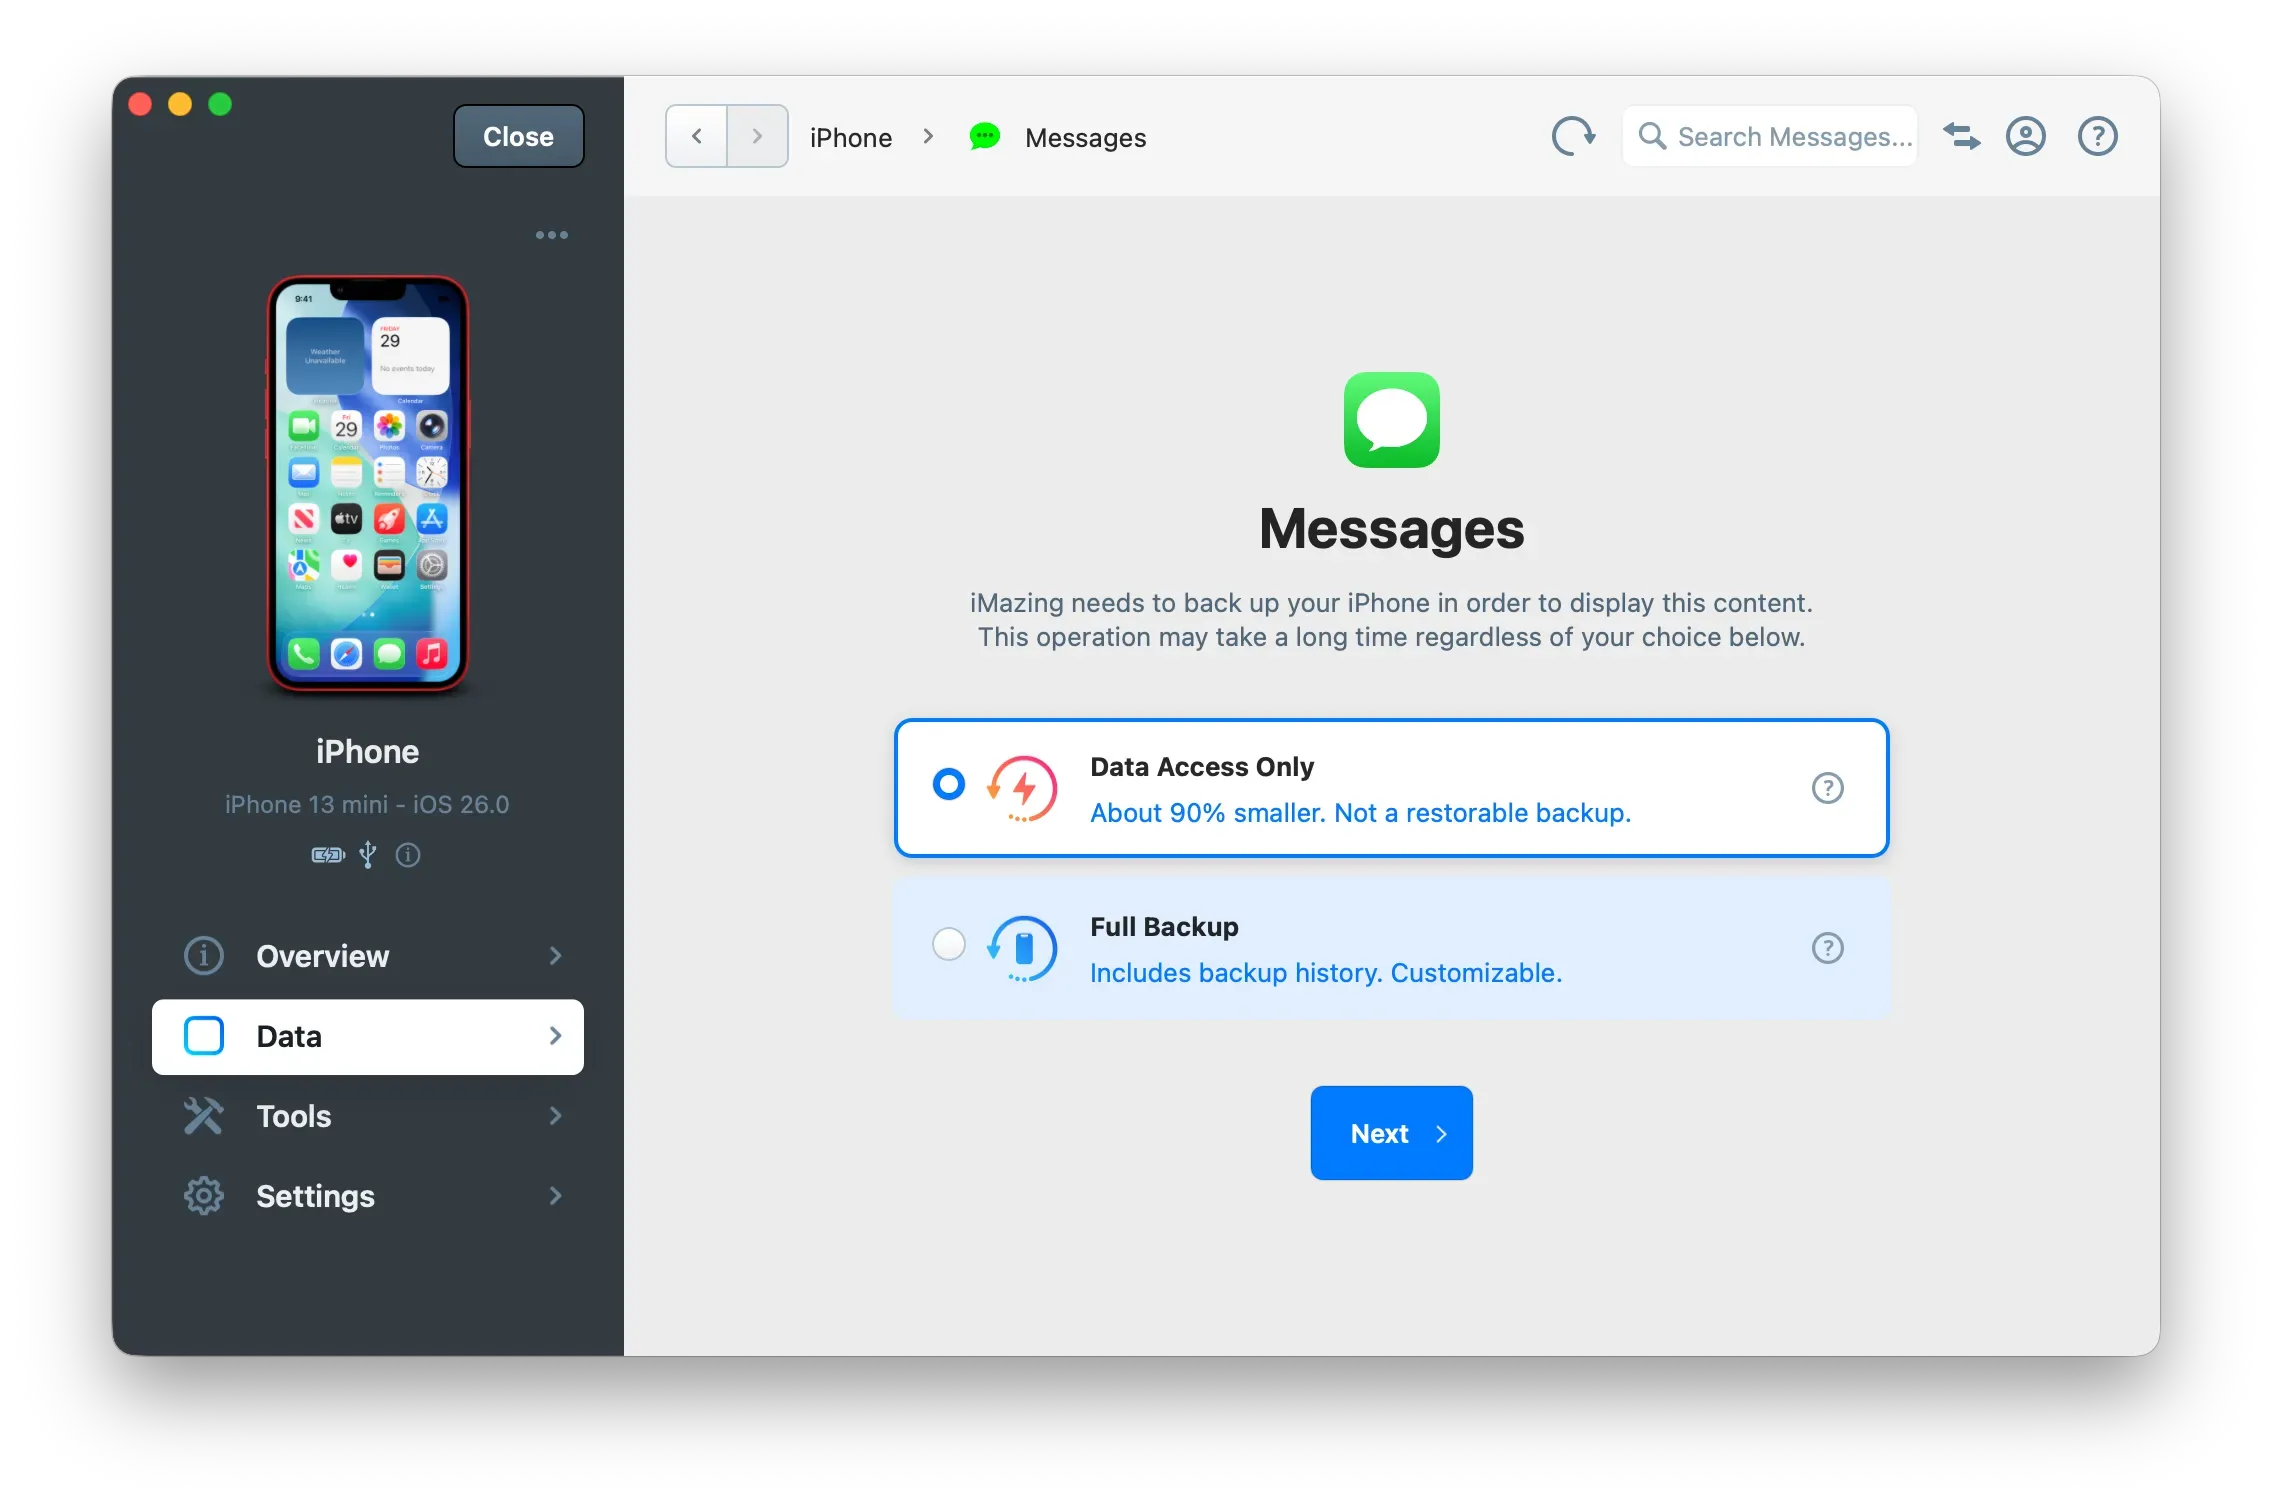
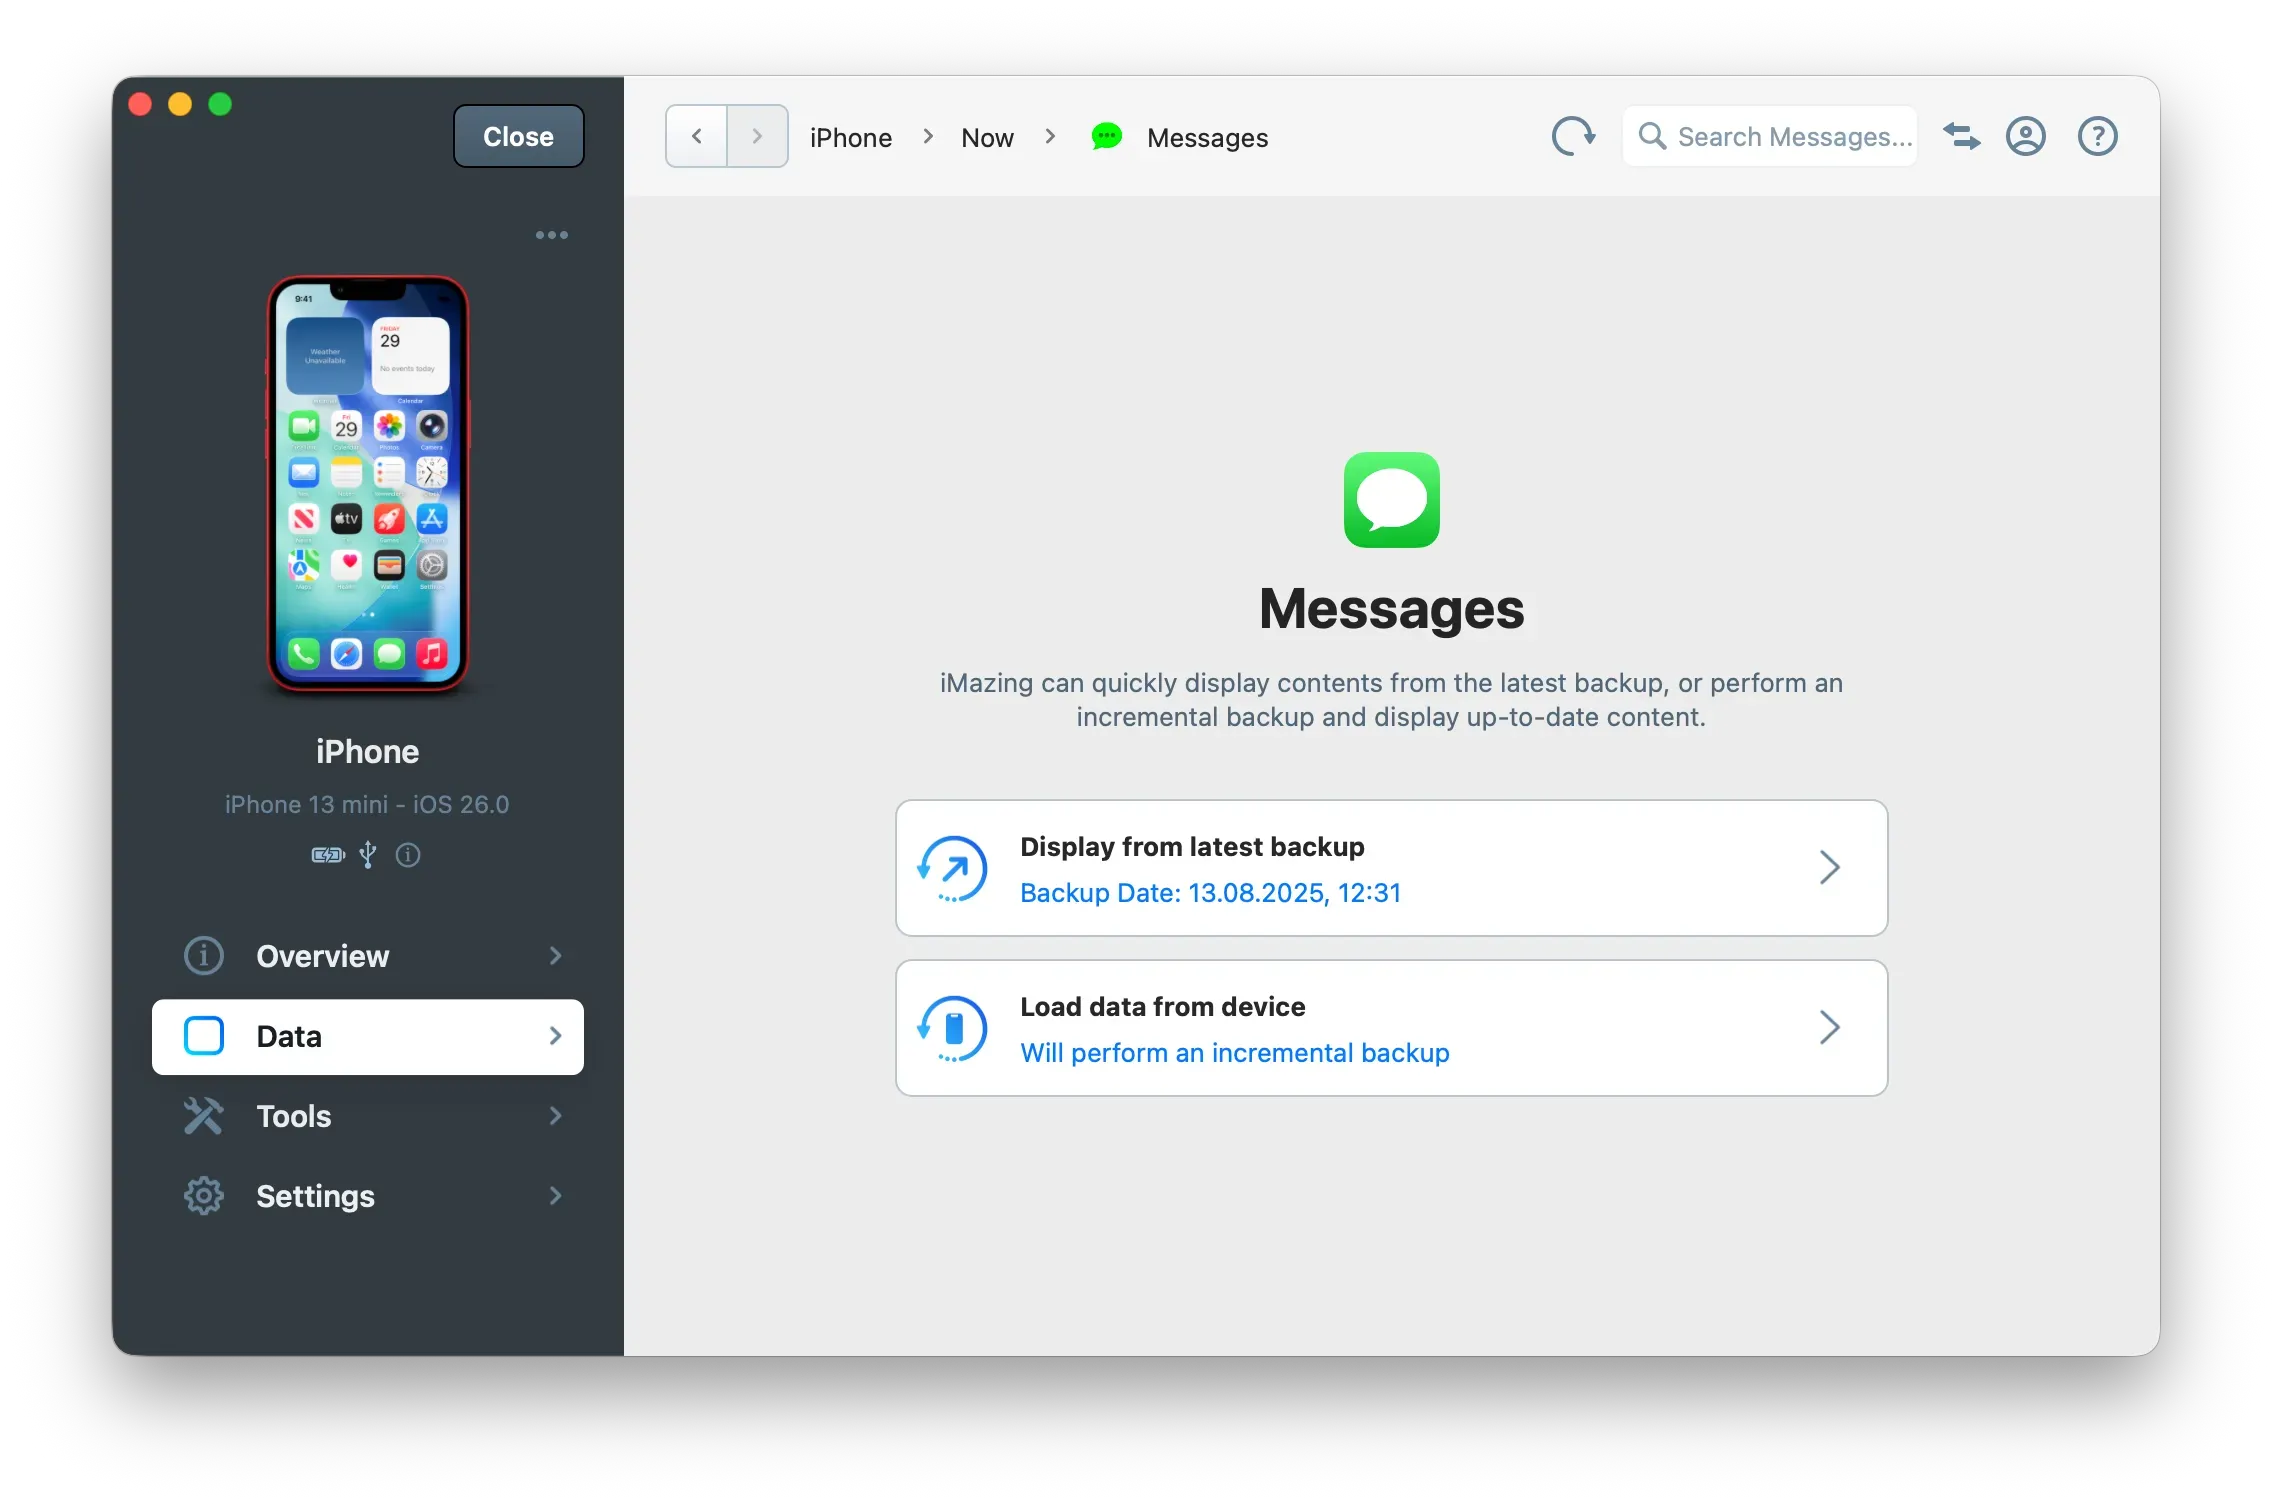
If a backup is needed to access the data, iMazing will display the following screen and let you choose between accessing your data or creating a full backup. A Full Backup requires more storage on your computer or selected Backup Location, while Data Access Only creates a smaller partial backup on your main computer hard drive.
If an existing backup is available for your device, iMazing offers options to load data from this backup or from your device by performing an incremental backup:
Which datasets can be accessed directly and which require a backup?
Here is the exhaustive list of datasets that either require or don't require a backup to be accessed:
requires a backup
can be accessed without a backup
How to access data from a previous backup snapshot?
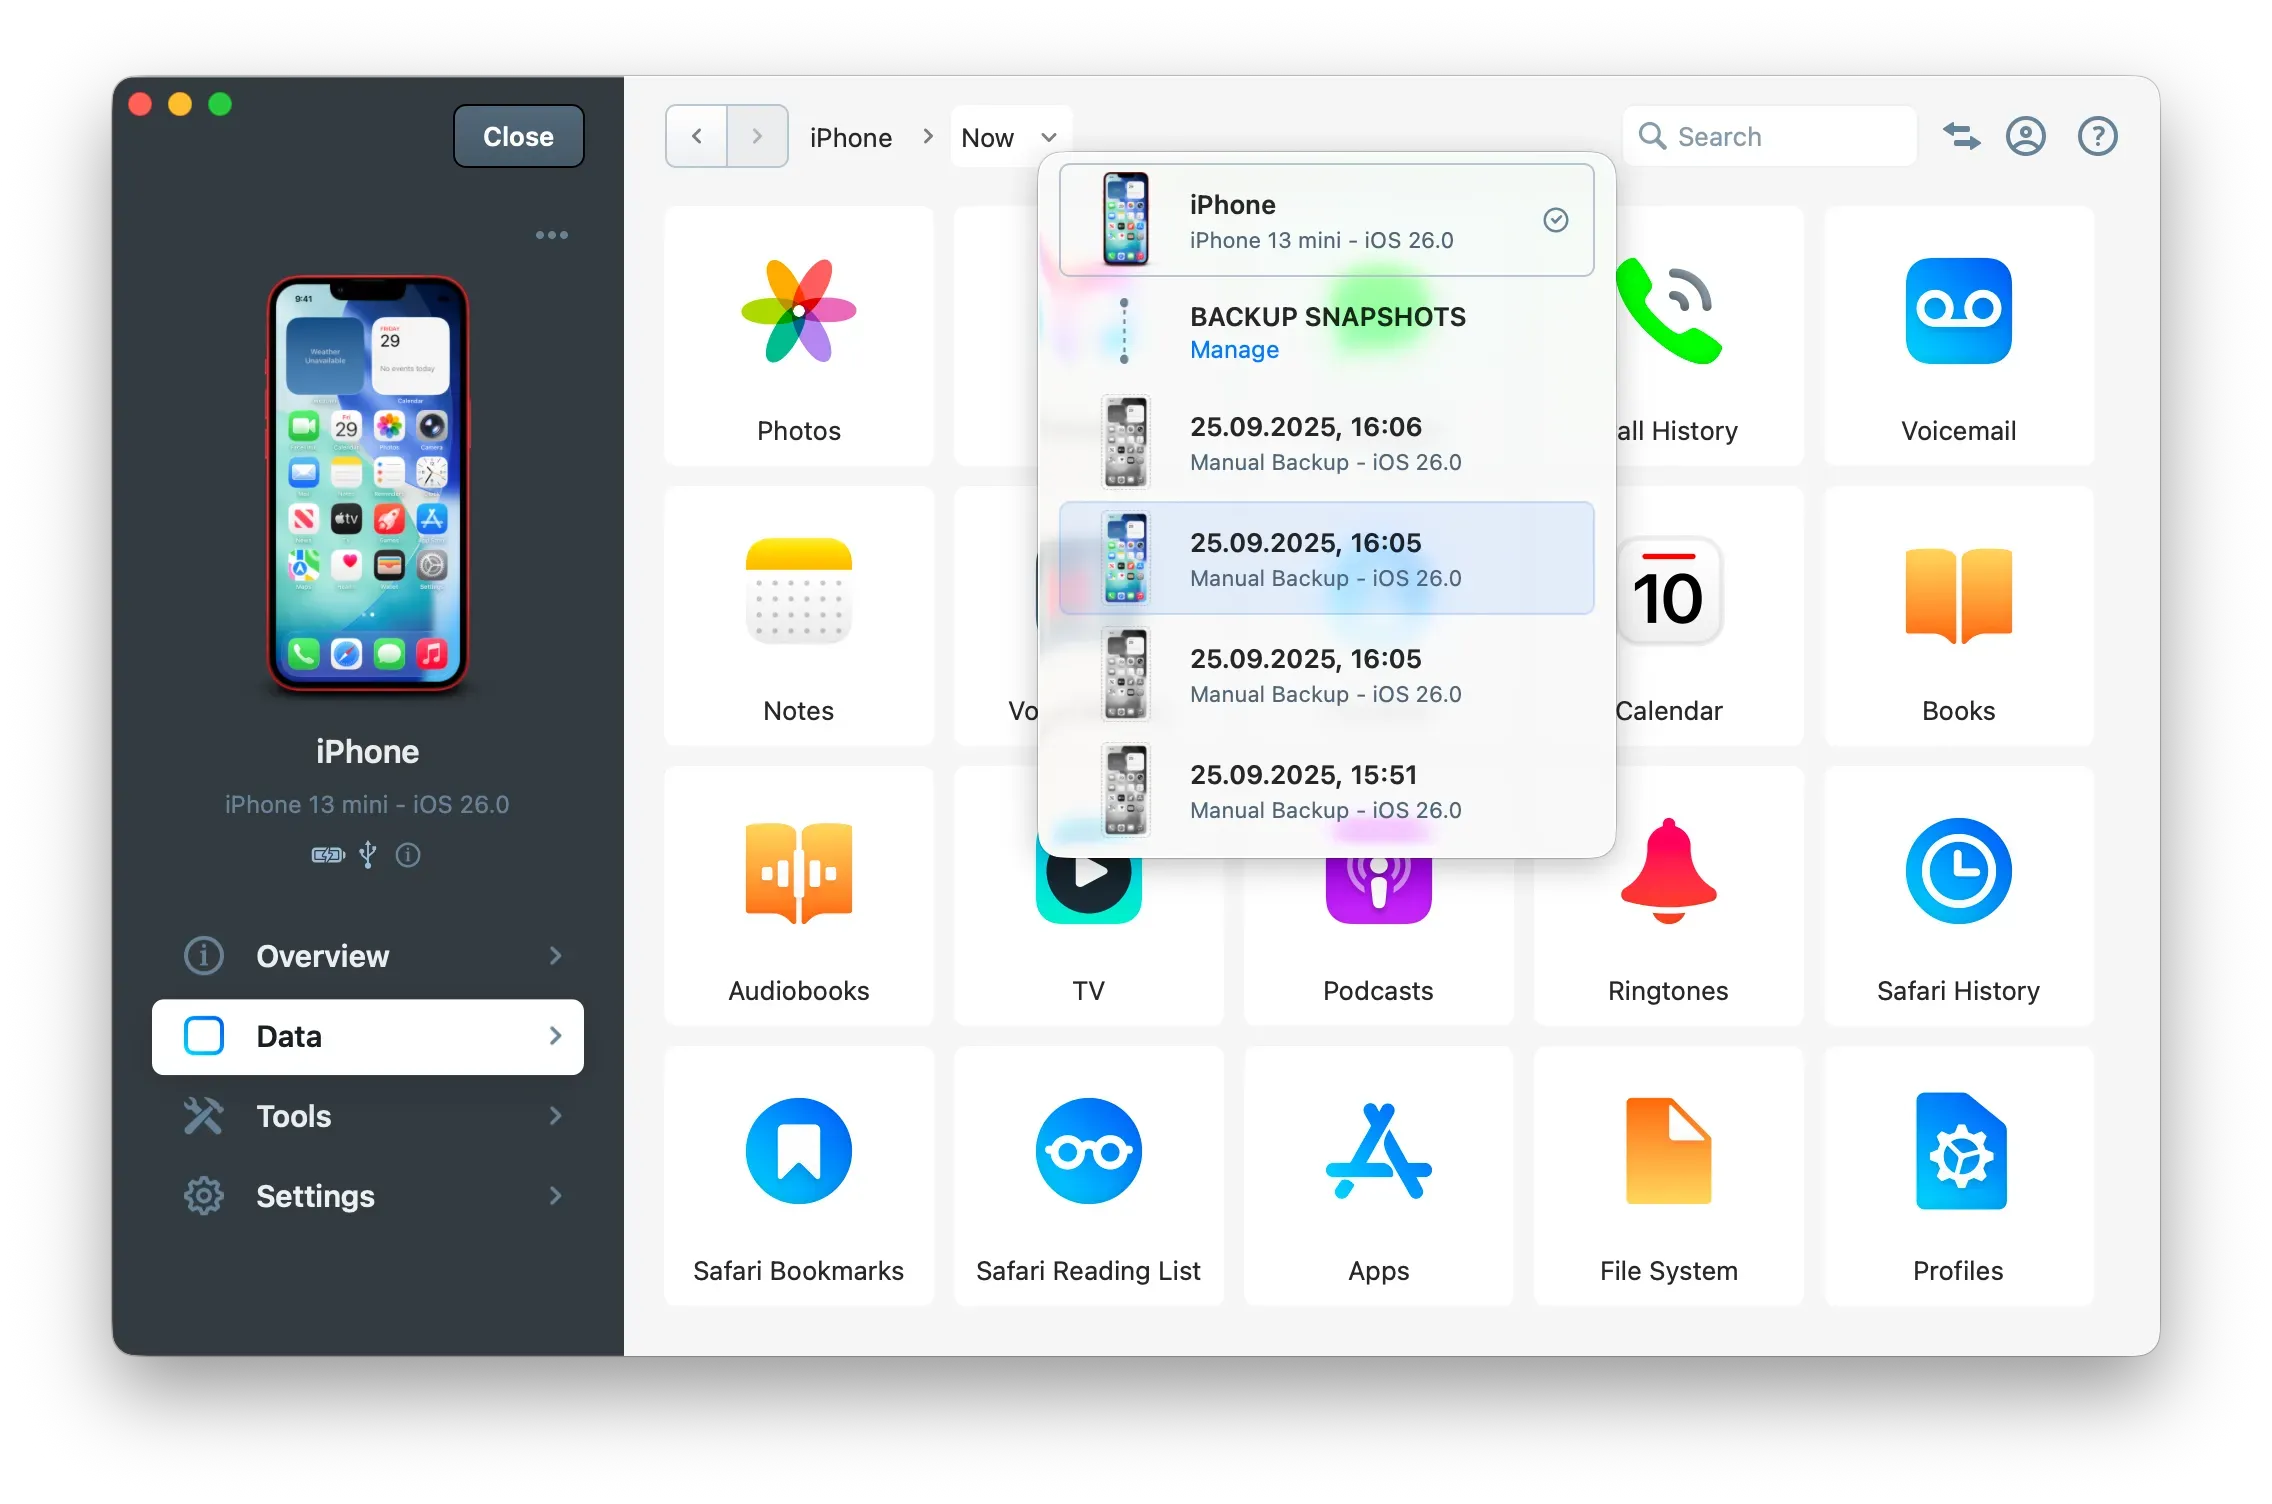
By default, iMazing displays the current state of your device or latest backup. To view the contents of an earlier snapshot, open the Snapshot List from the upper toolbar and select a snapshot.
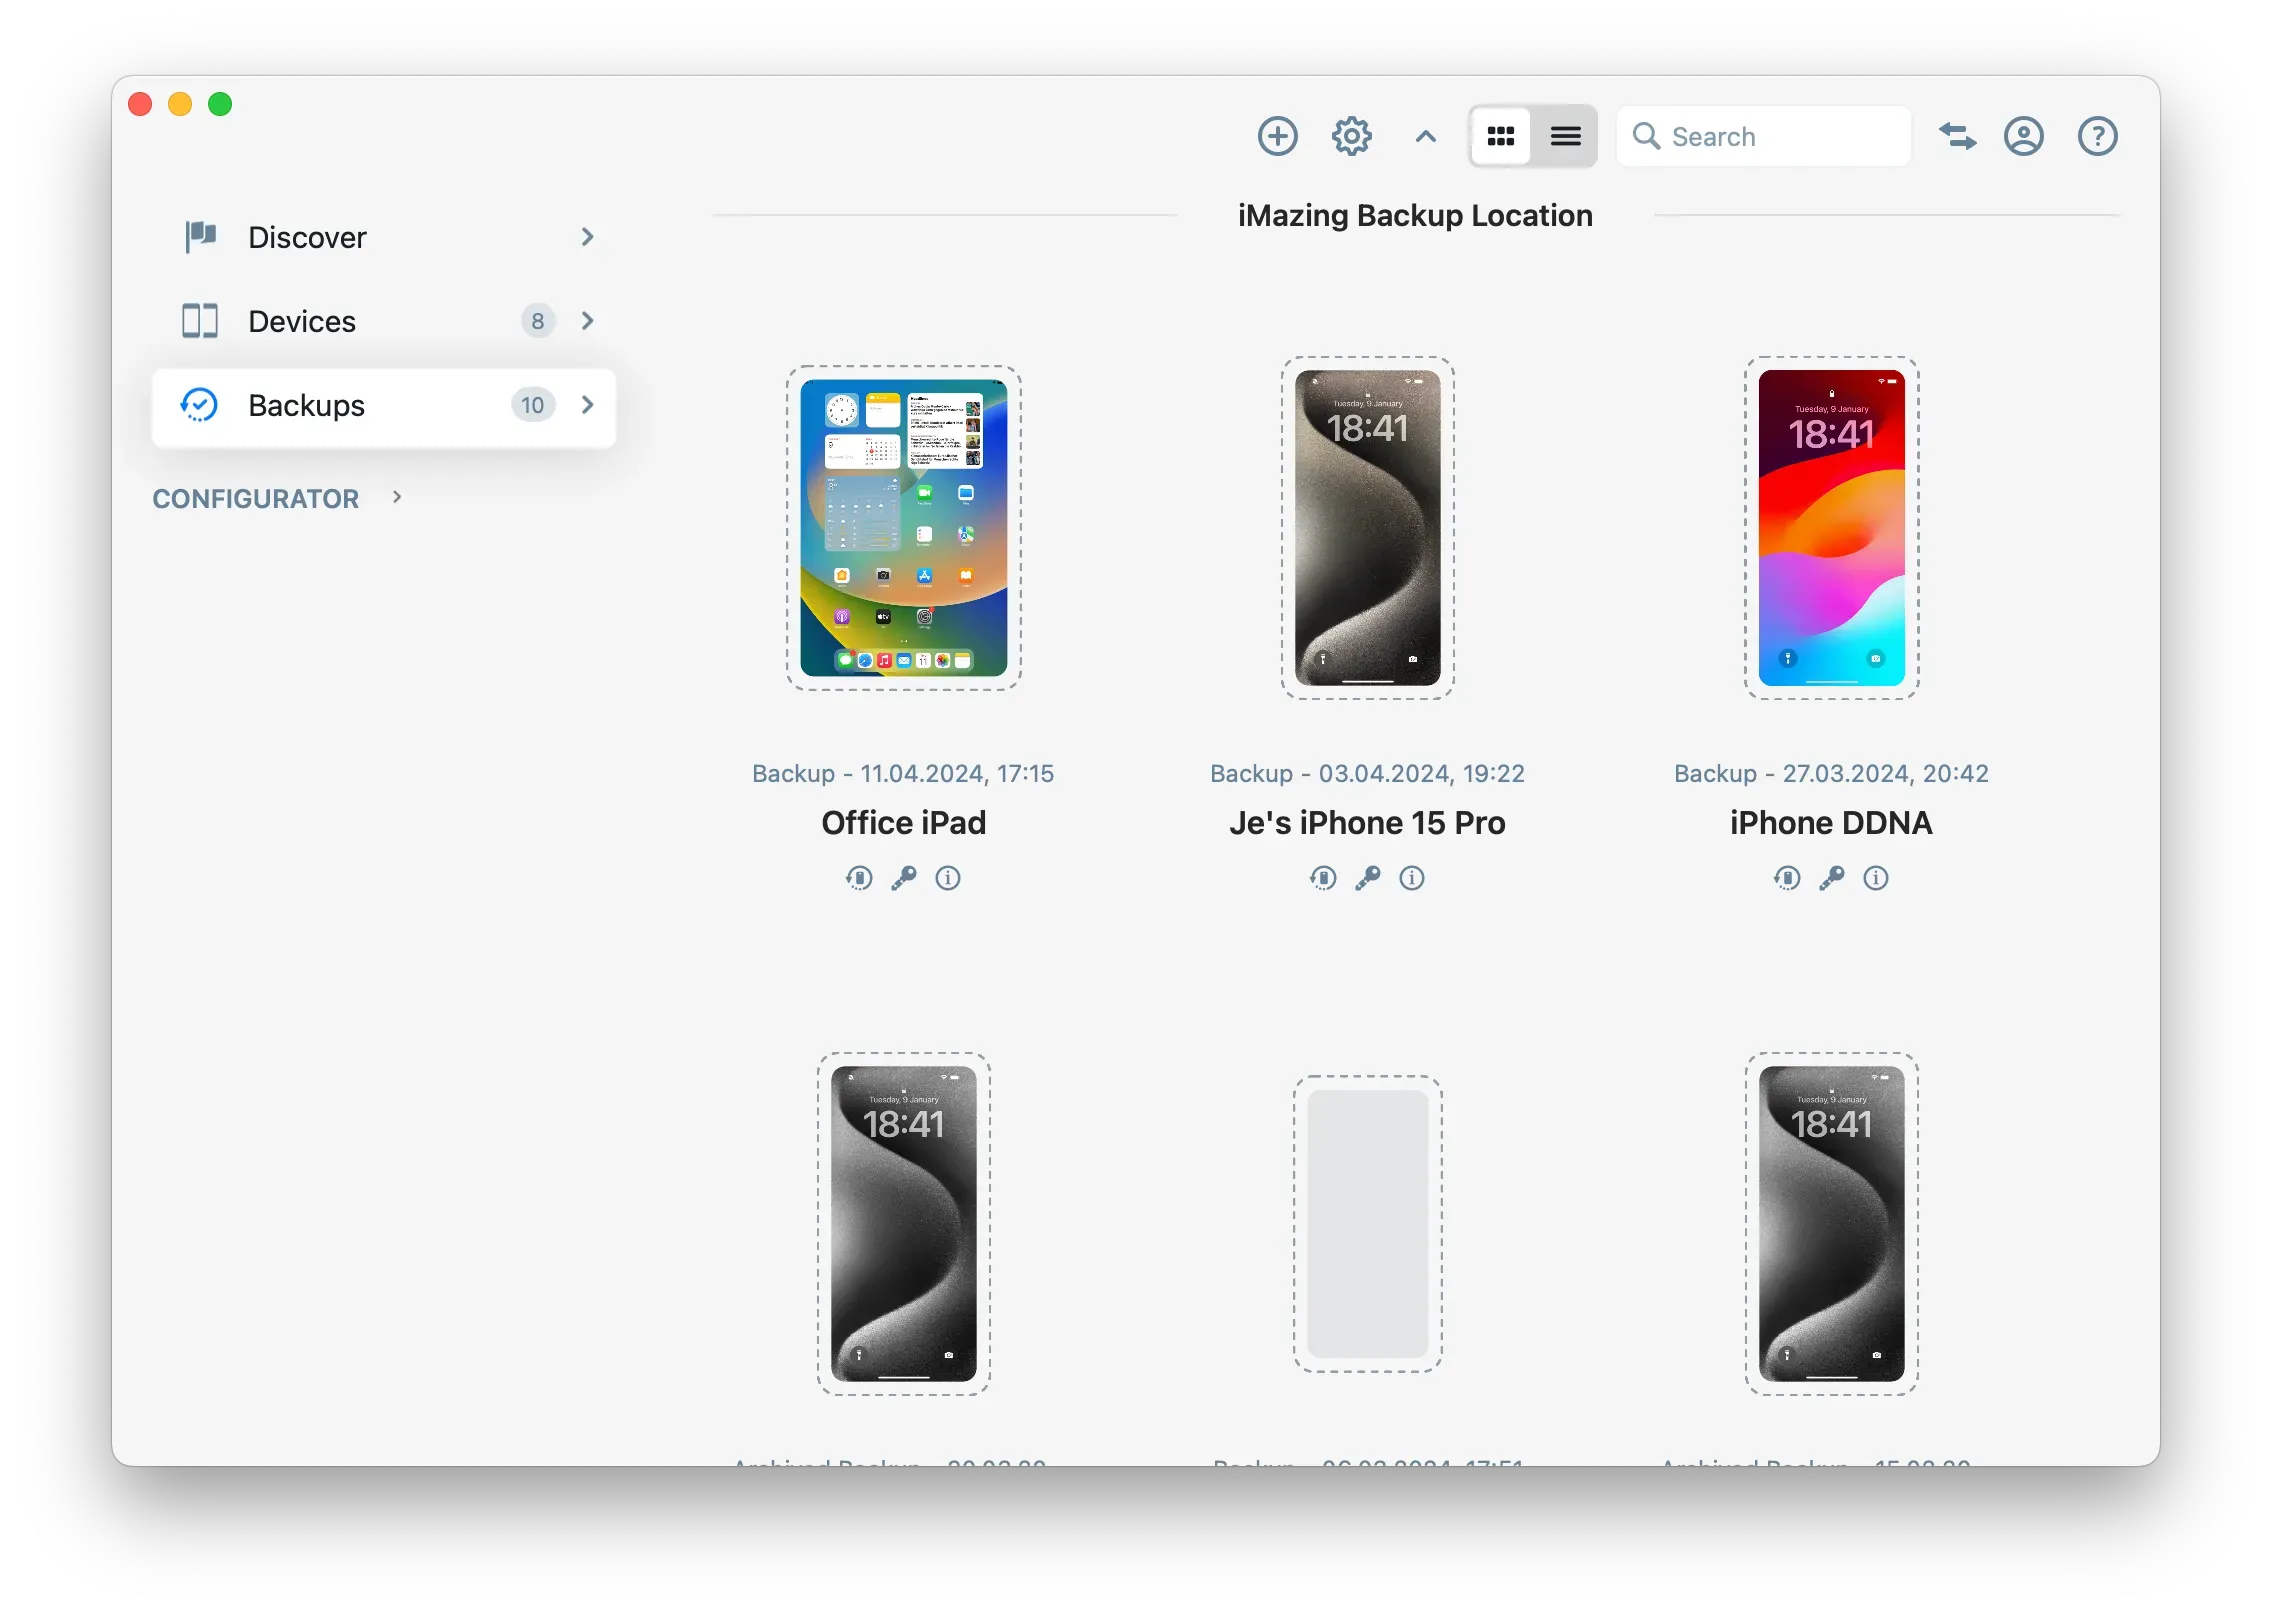
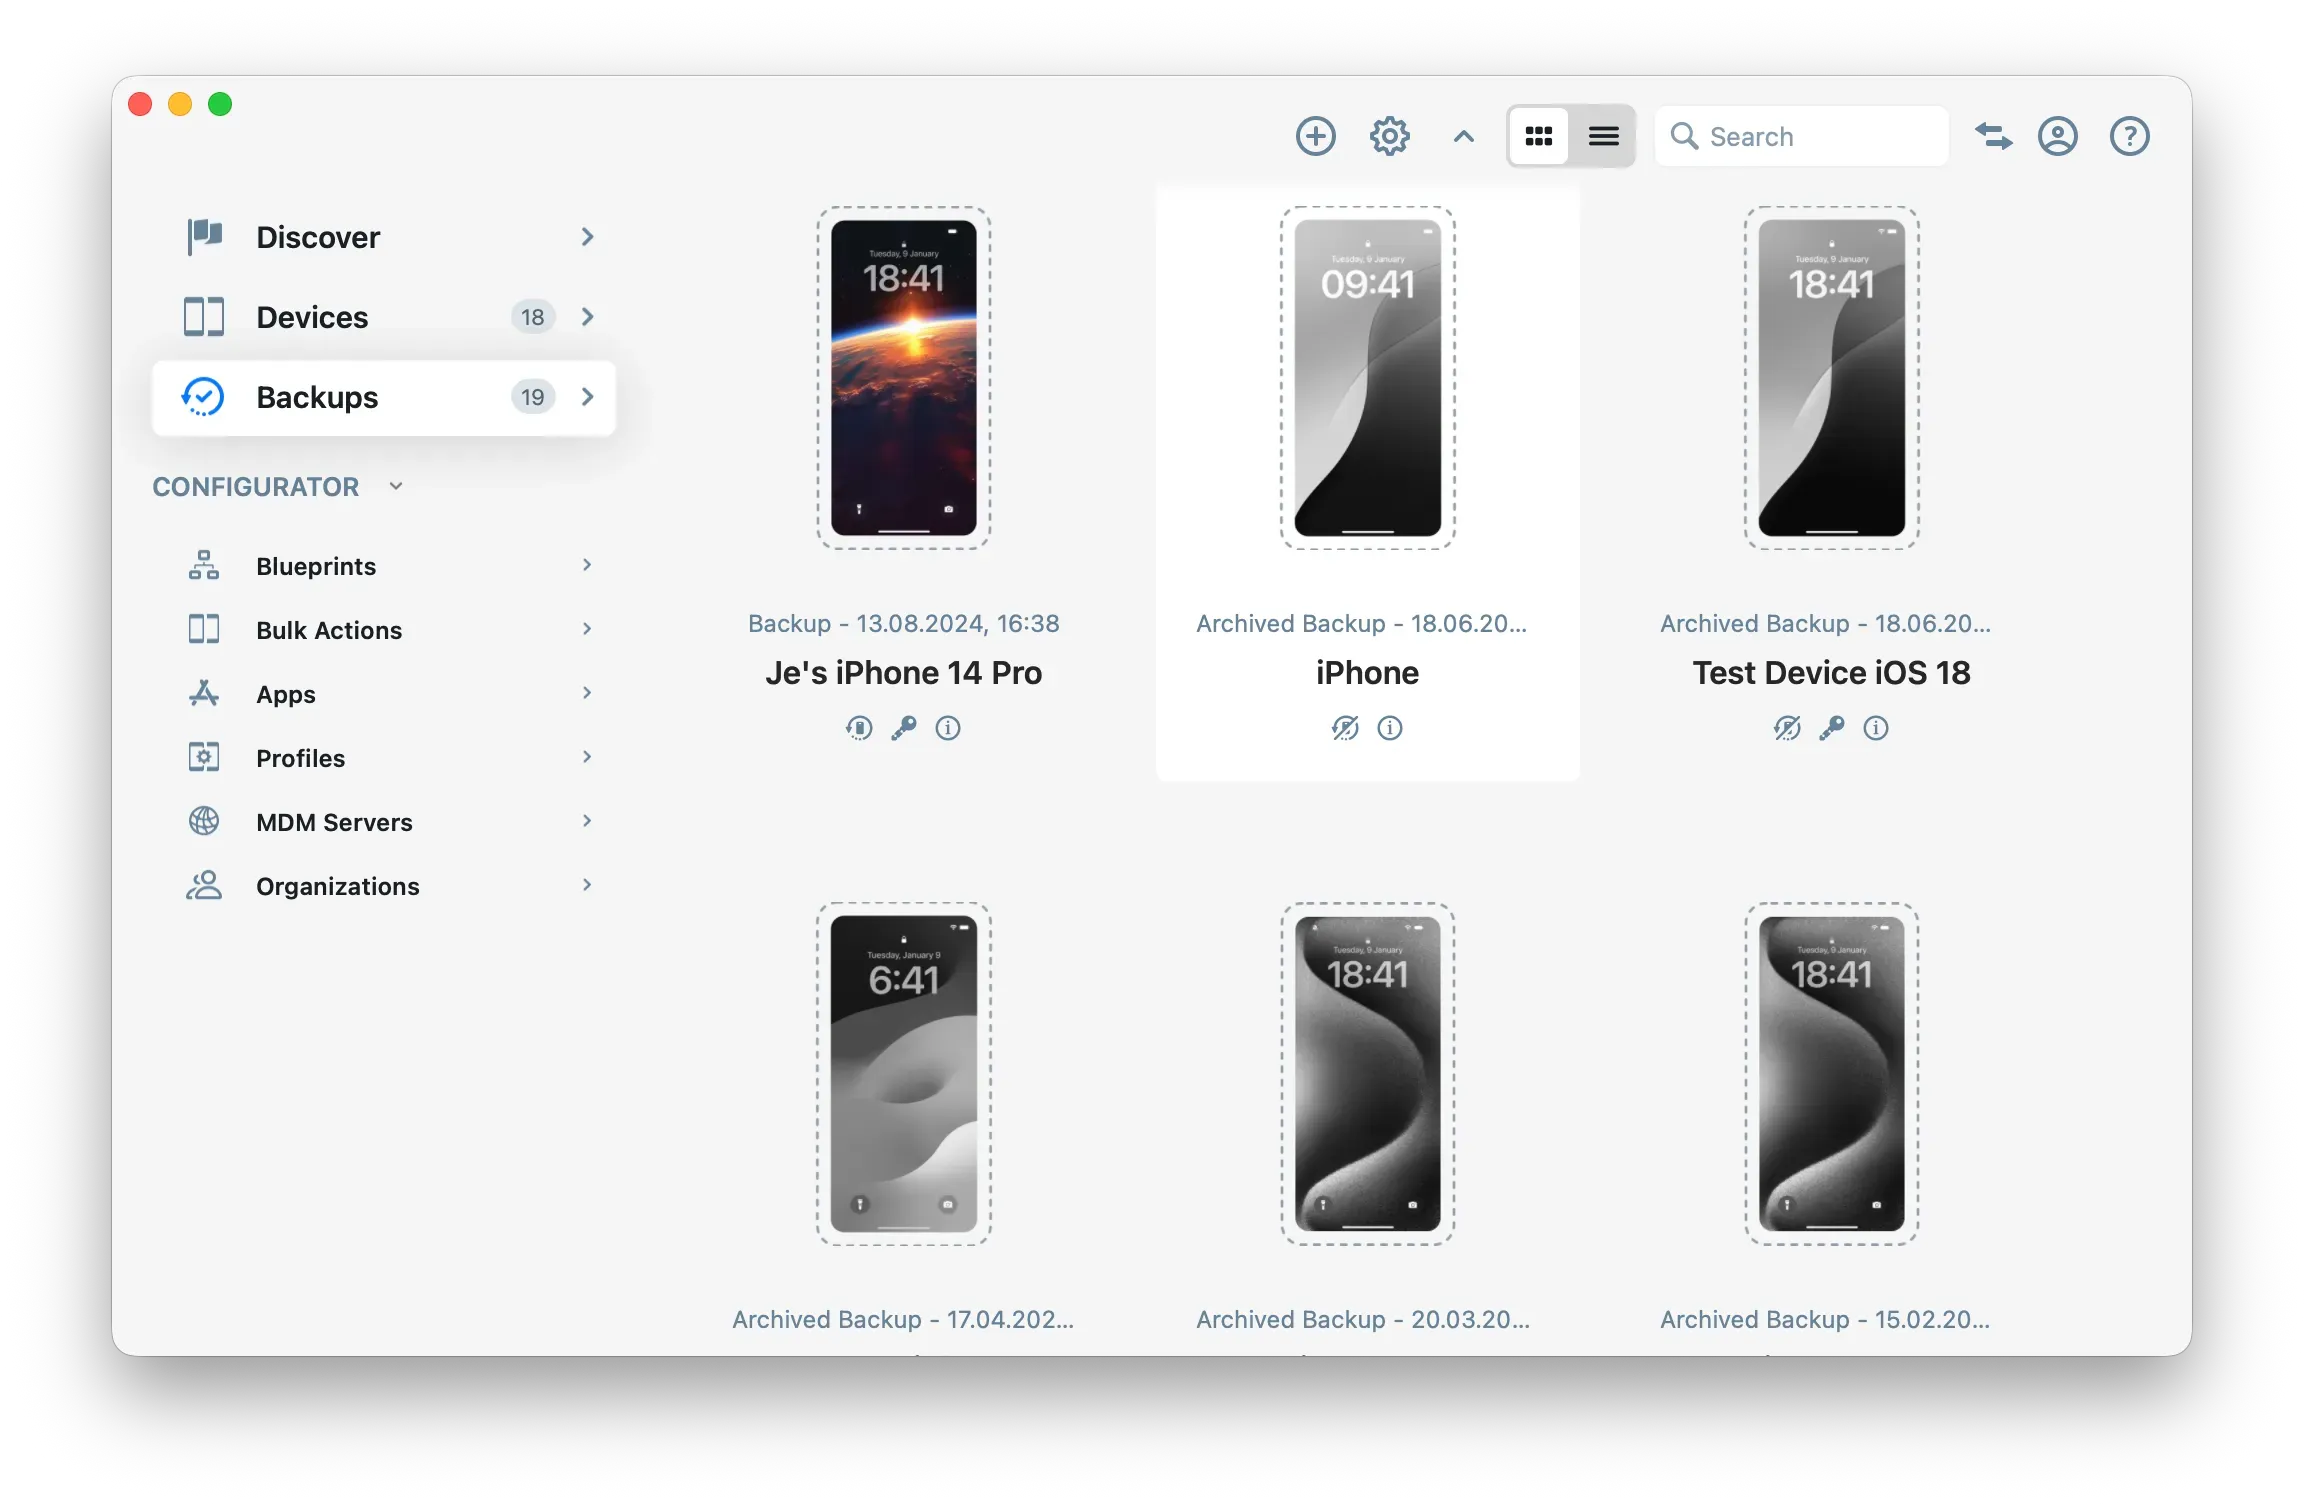
You will find all your backups in the Backups section of iMazing's home screen.
You can also browse your backup snapshots directly through the device itself:
Select a device or backup from iMazing's home screen Devices or Backups section.
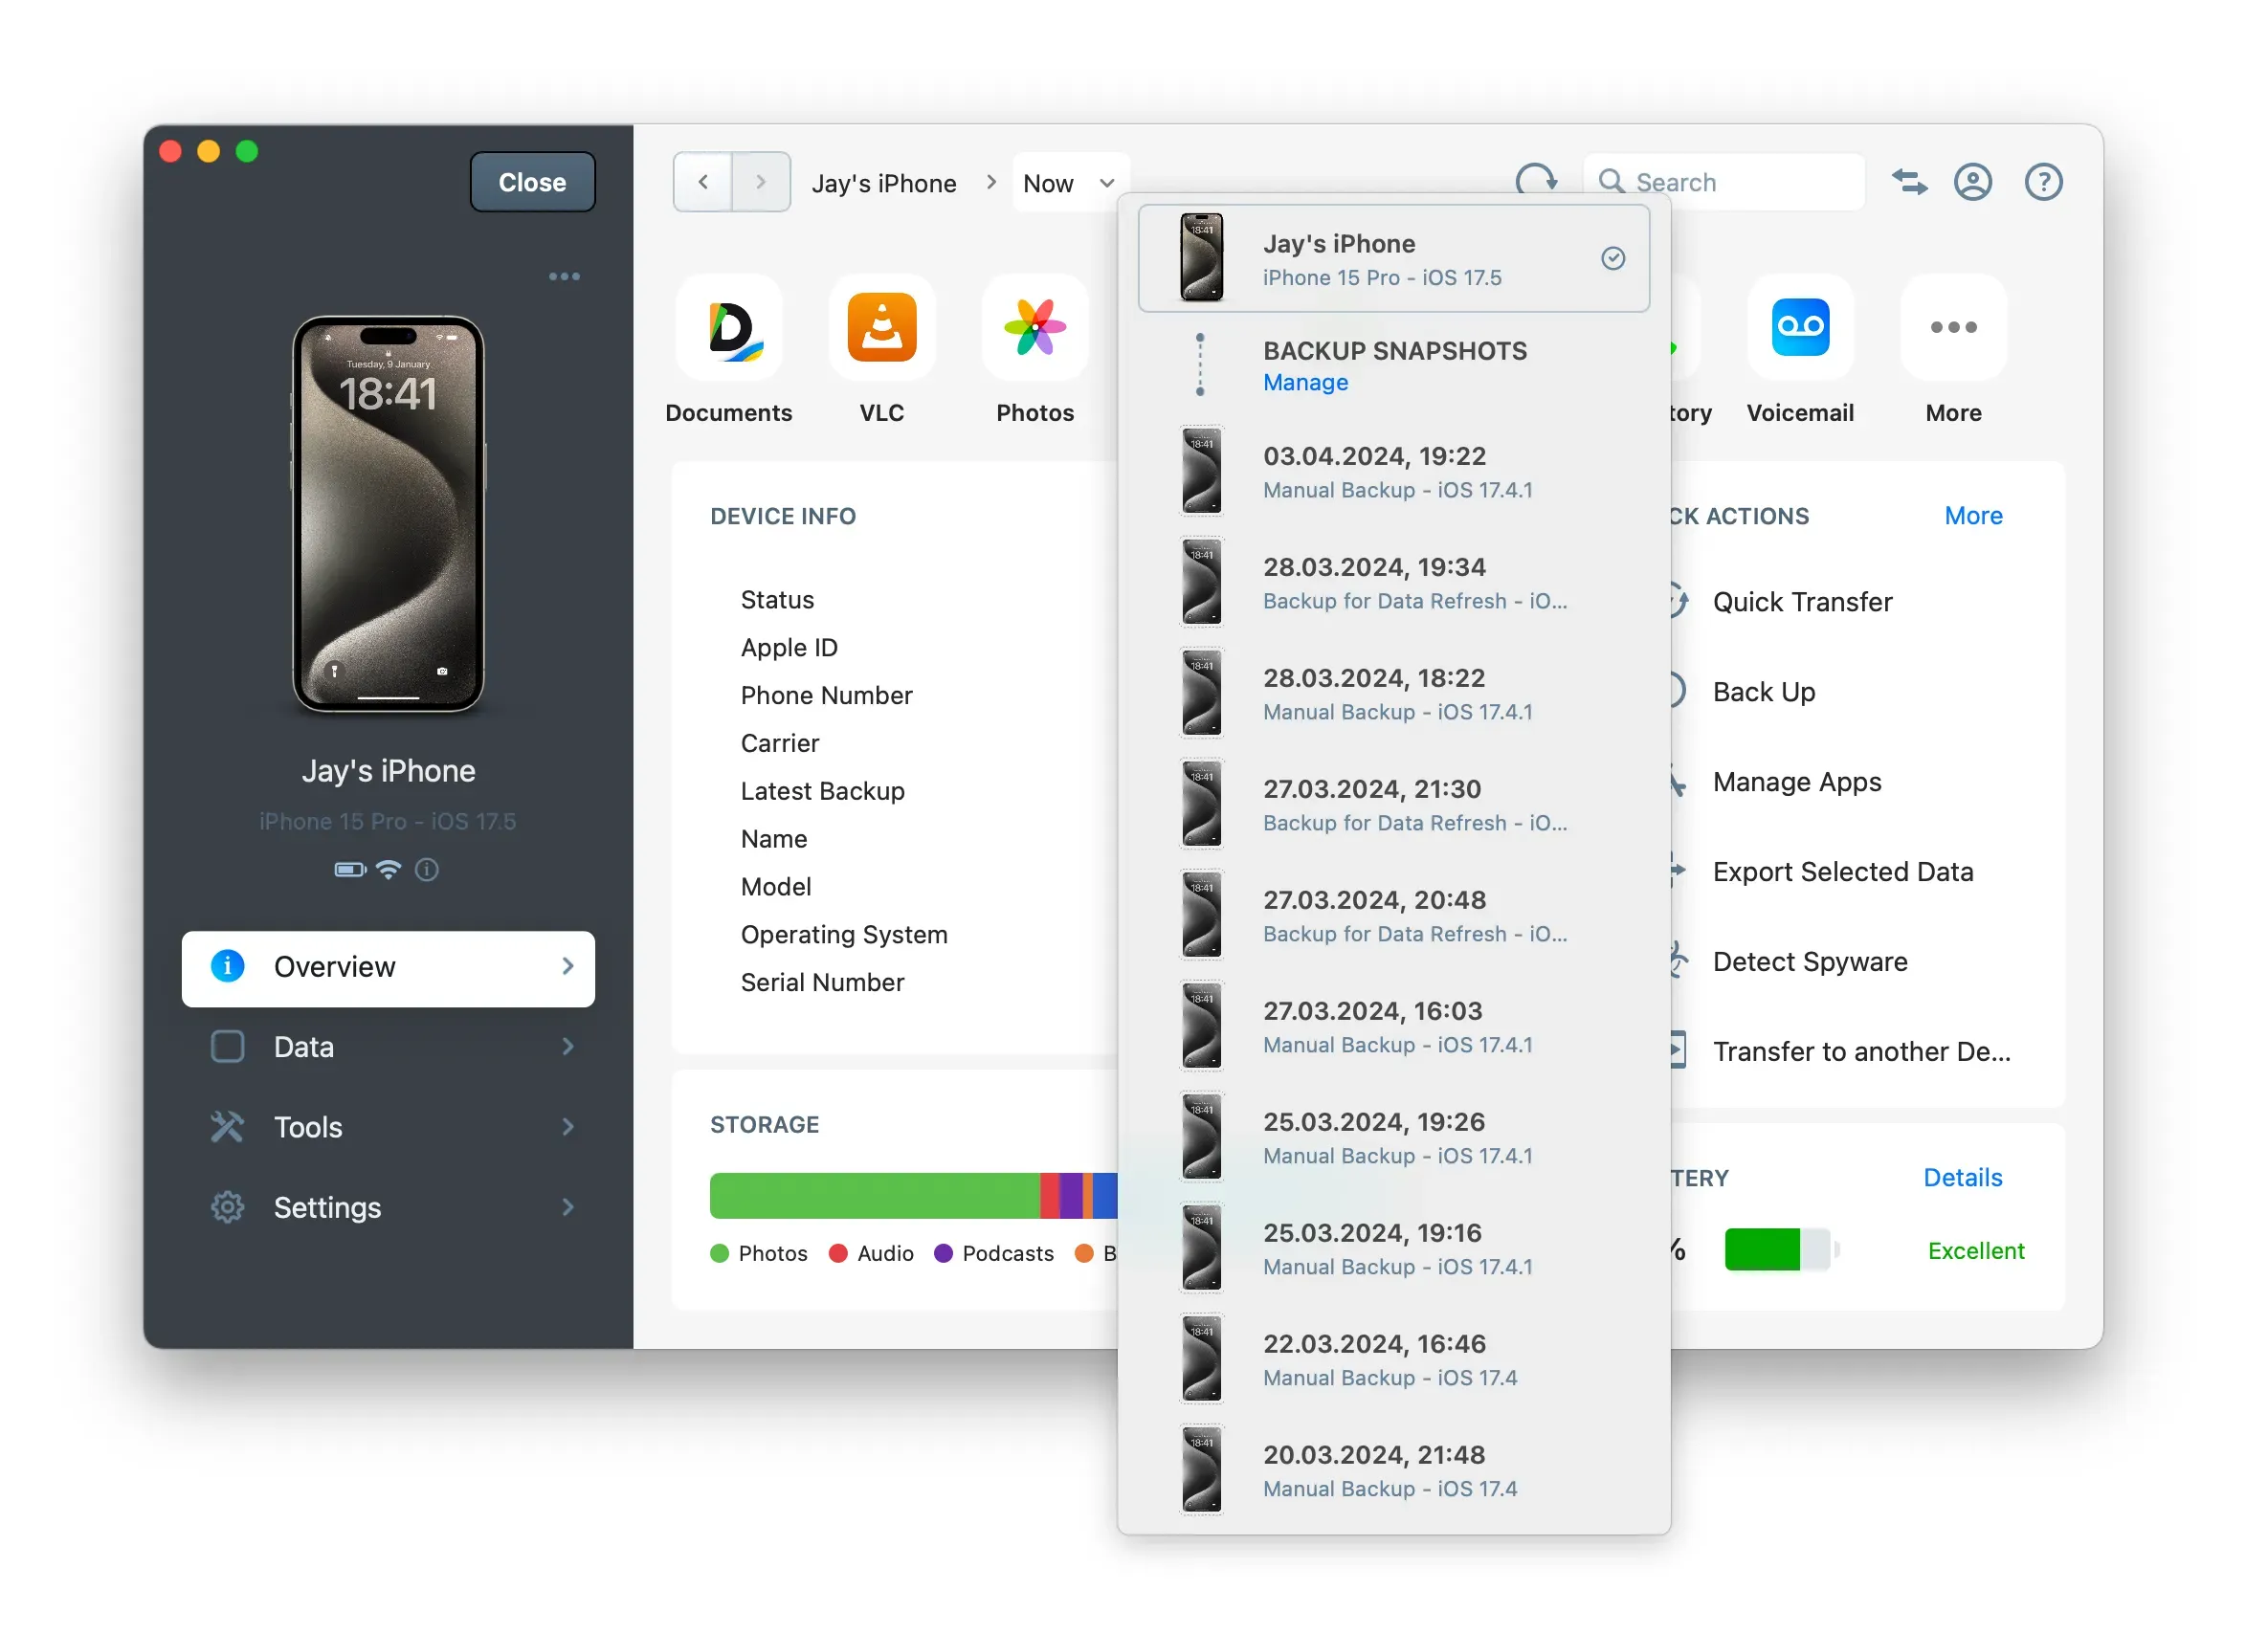
In the upper toolbar, click the Now button. This will open the Snapshot List.
Select a snapshot to view it.
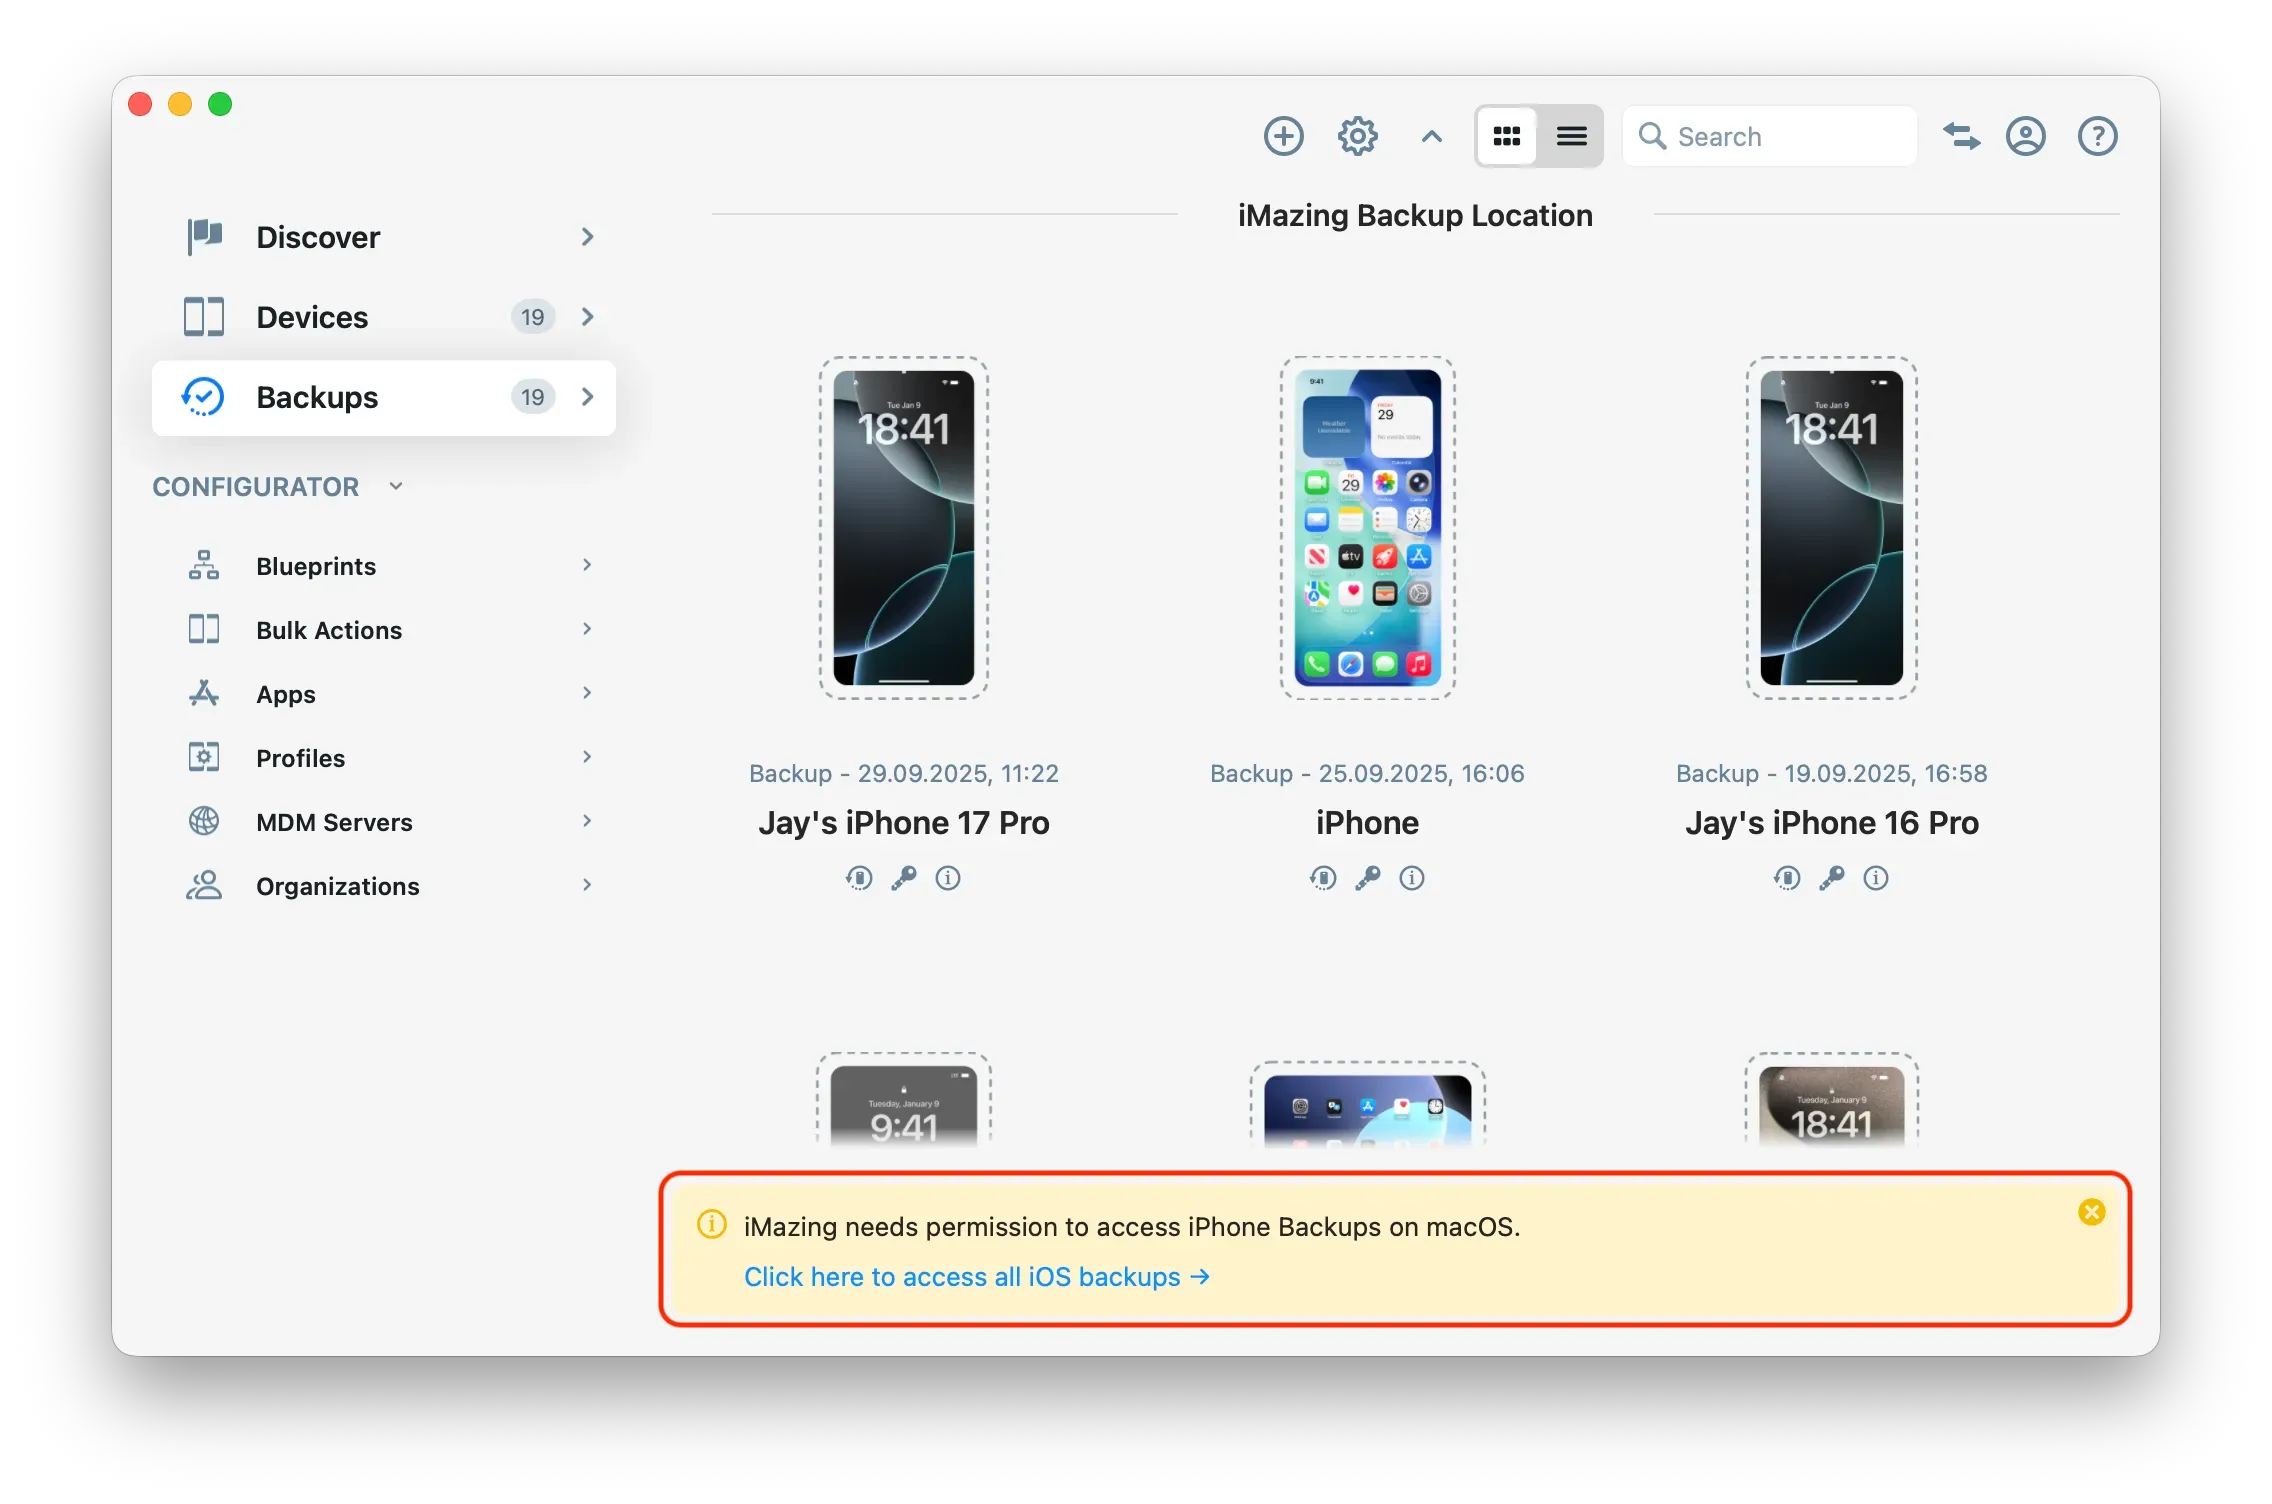
How to view Finder or iTunes backups on macOS?
To access your iOS or iPadOS backups created with macOS Finder or iTunes, you need to enable Full Disk Access for both iMazing and iMazing Mini in your macOS Settings. If you don't enable Full Disk Access, you can still back up your devices and view backups stored in the default iMazing Backup Location. Full Disk Access is only required when you want to access backups created by Finder or iTunes on macOS, which are stored at: /Users/<username>/Library/Application Support/MobileSync/Backup
Click the "Click here to access all iOS backups" link:
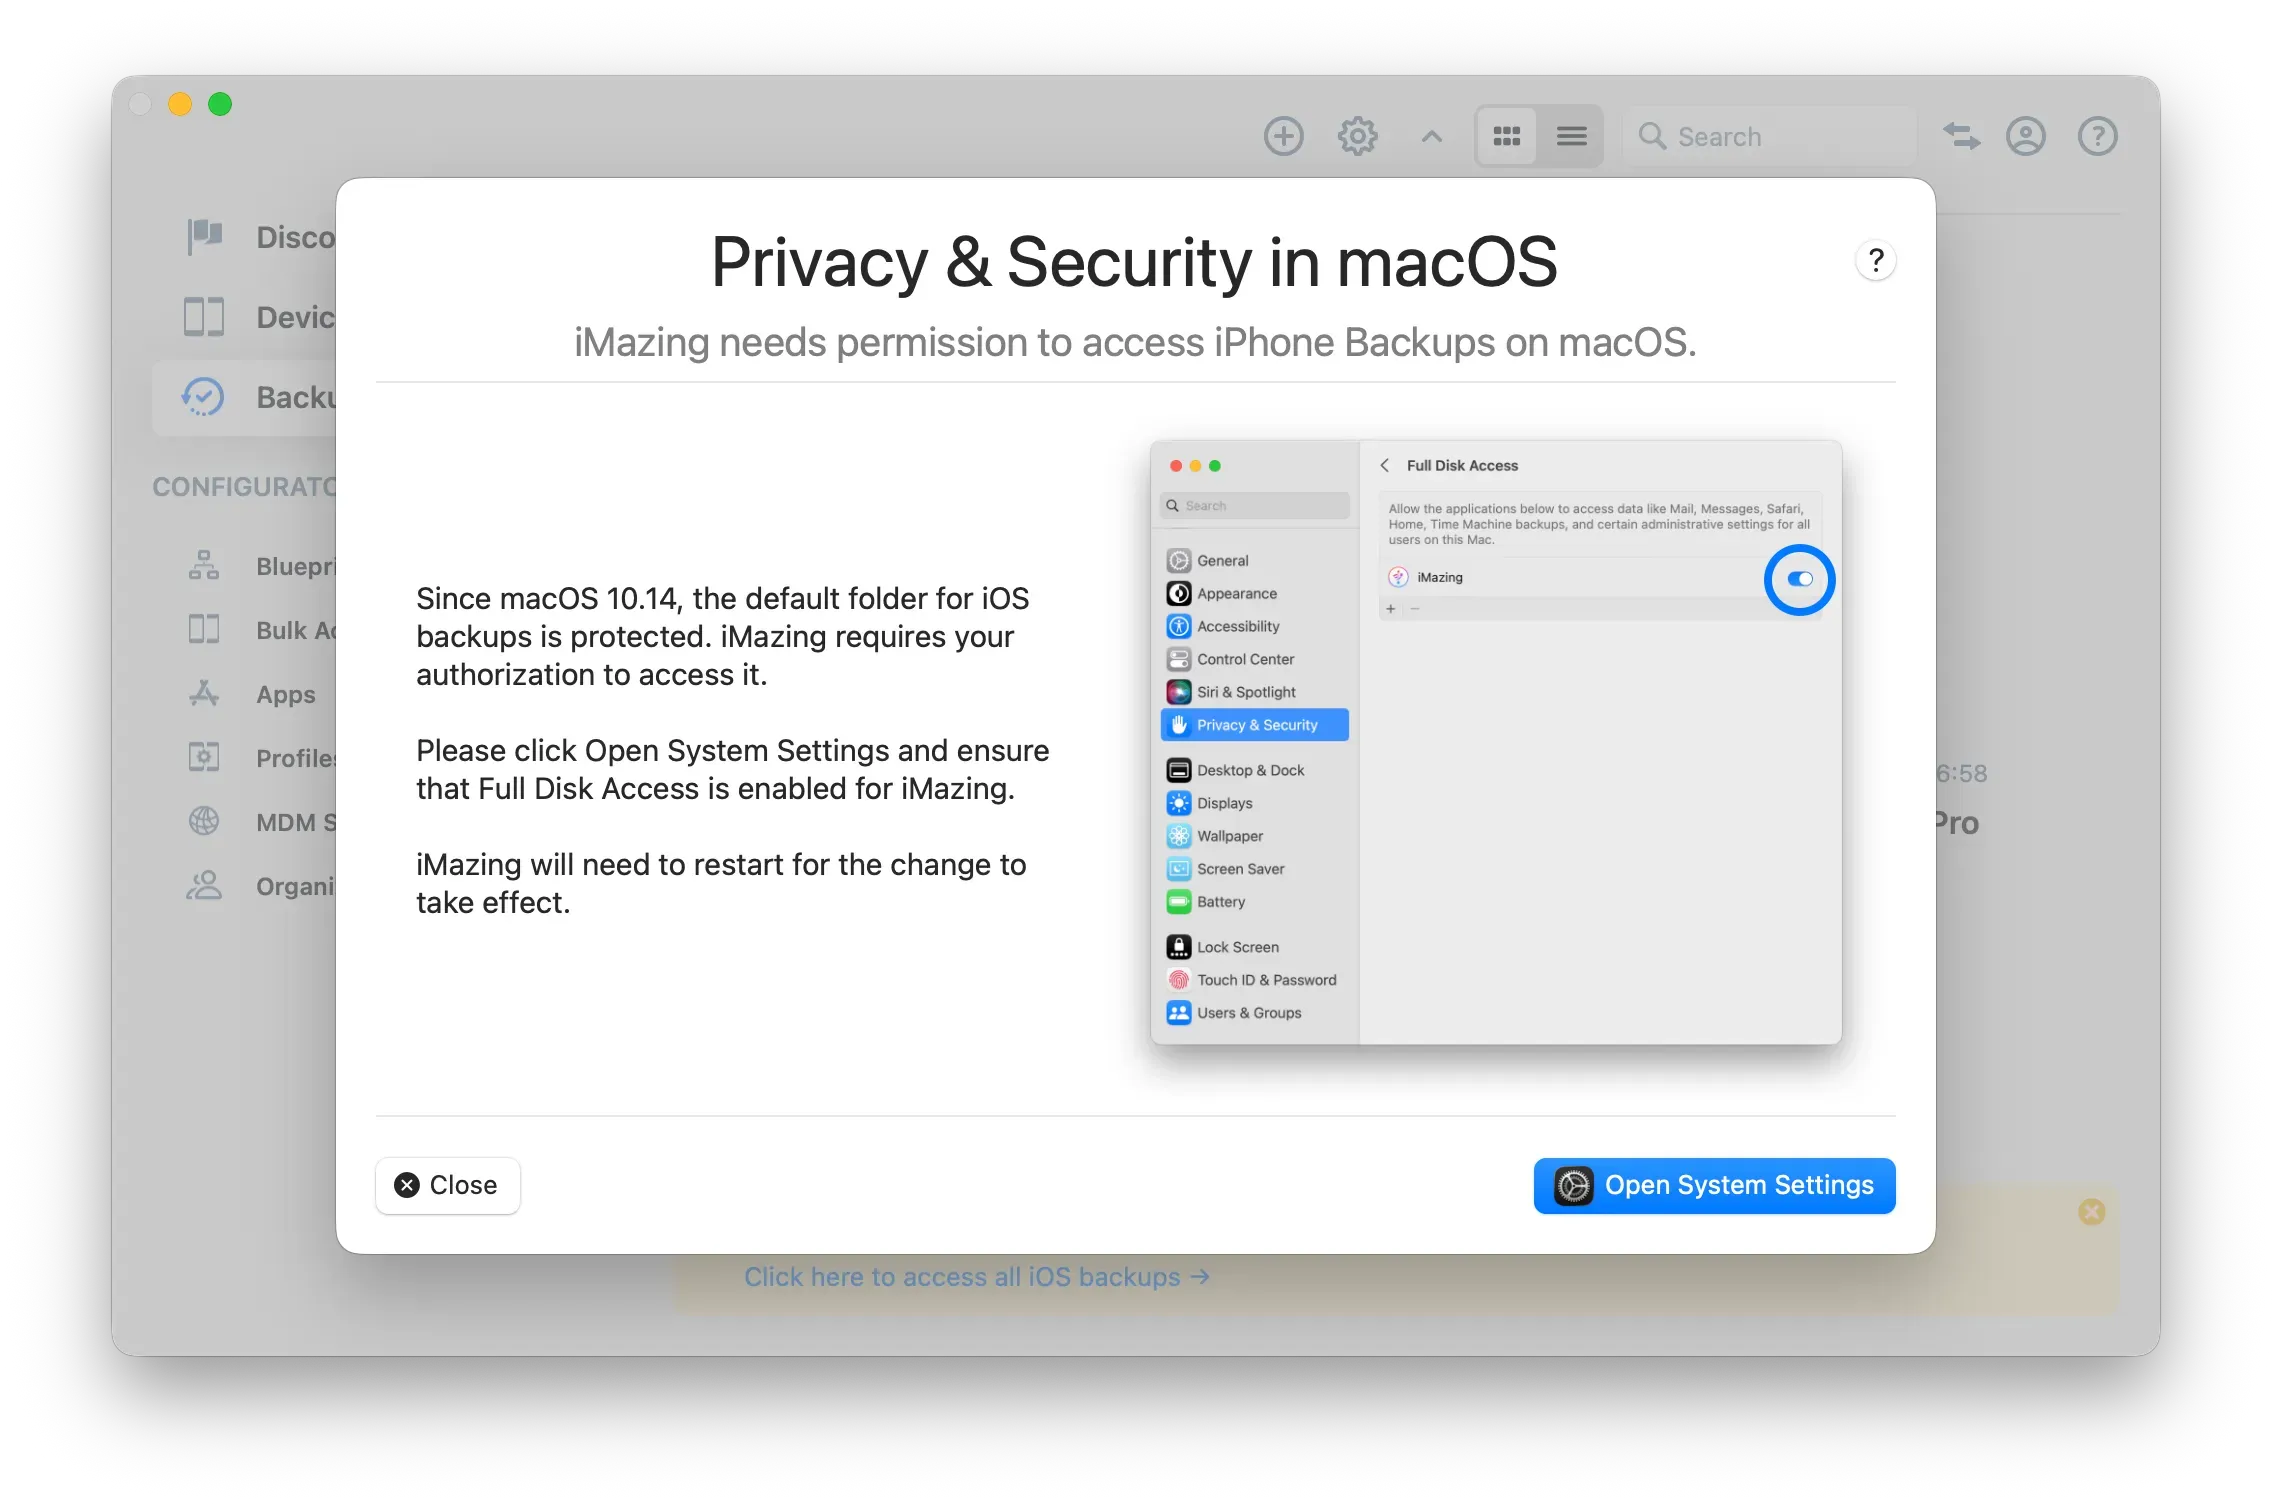
Click the "Open System Settings" button and enable Full Disk Access for both iMazing and iMazing Mini:
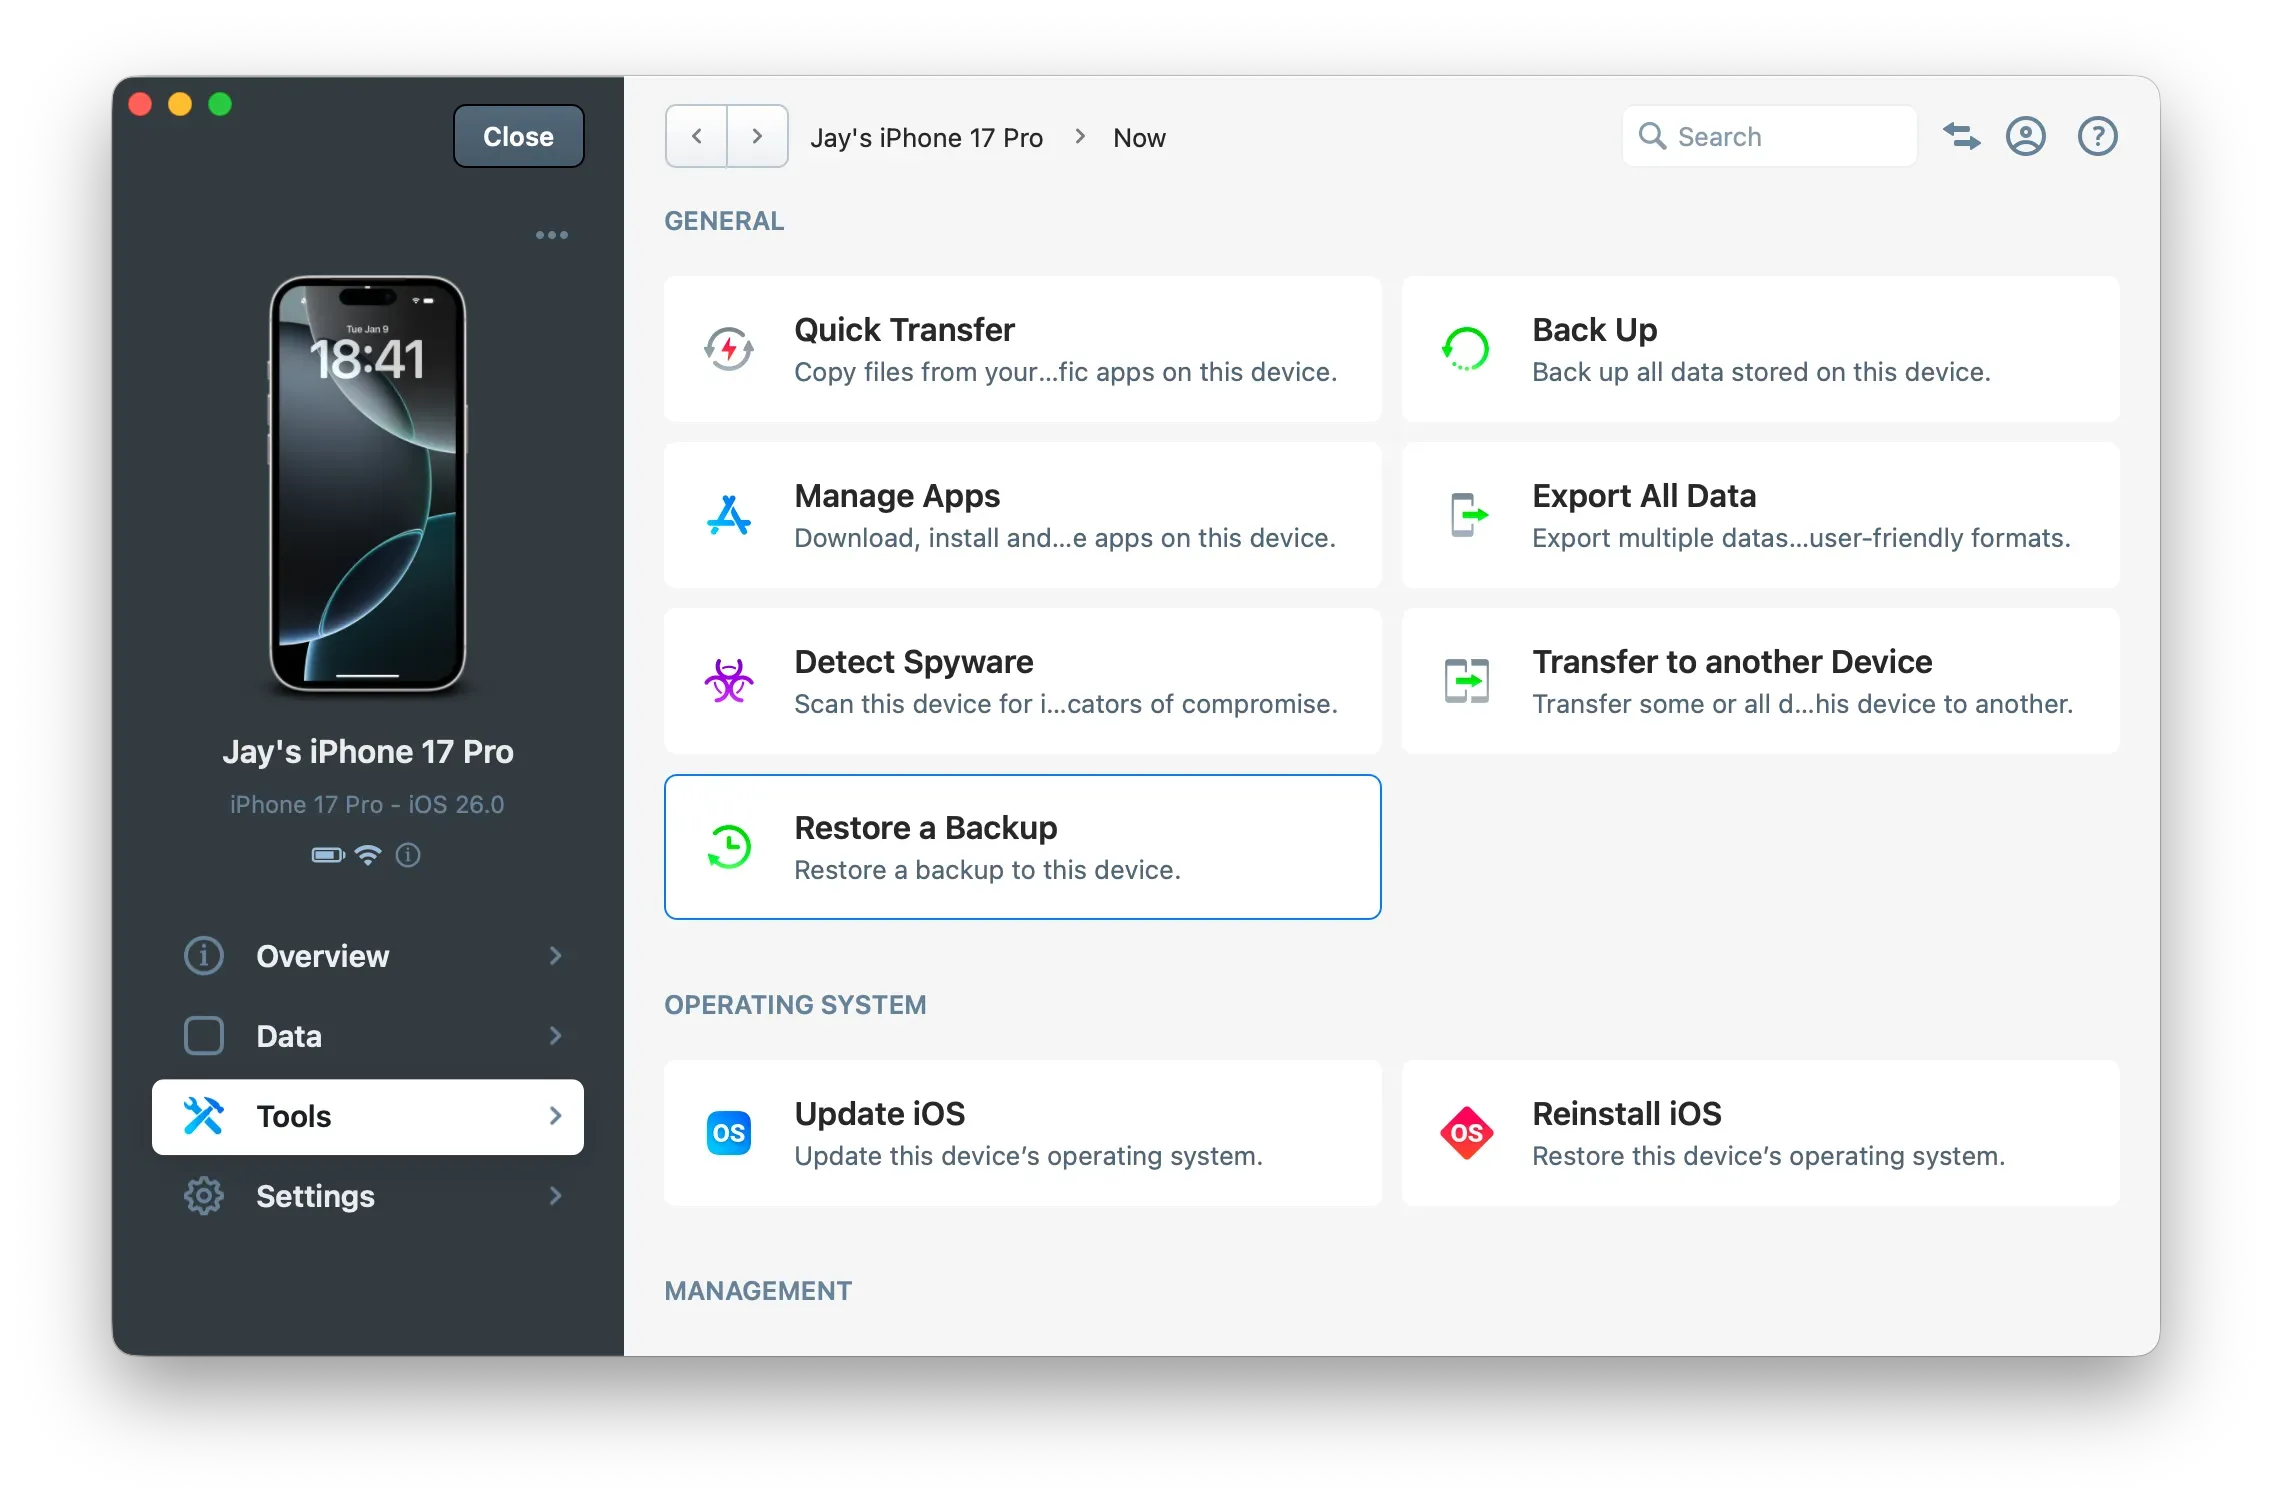
How to restore a backup?
When you restore a backup, you can:
Return your device to the state it was when that backup was made.
Transfer/Migrate your data to a new device.
With iMazing, you can restore the entirety of your backup, or choose what datasets and apps you would like to restore. You can also restore a backup to multiple devices in one action.
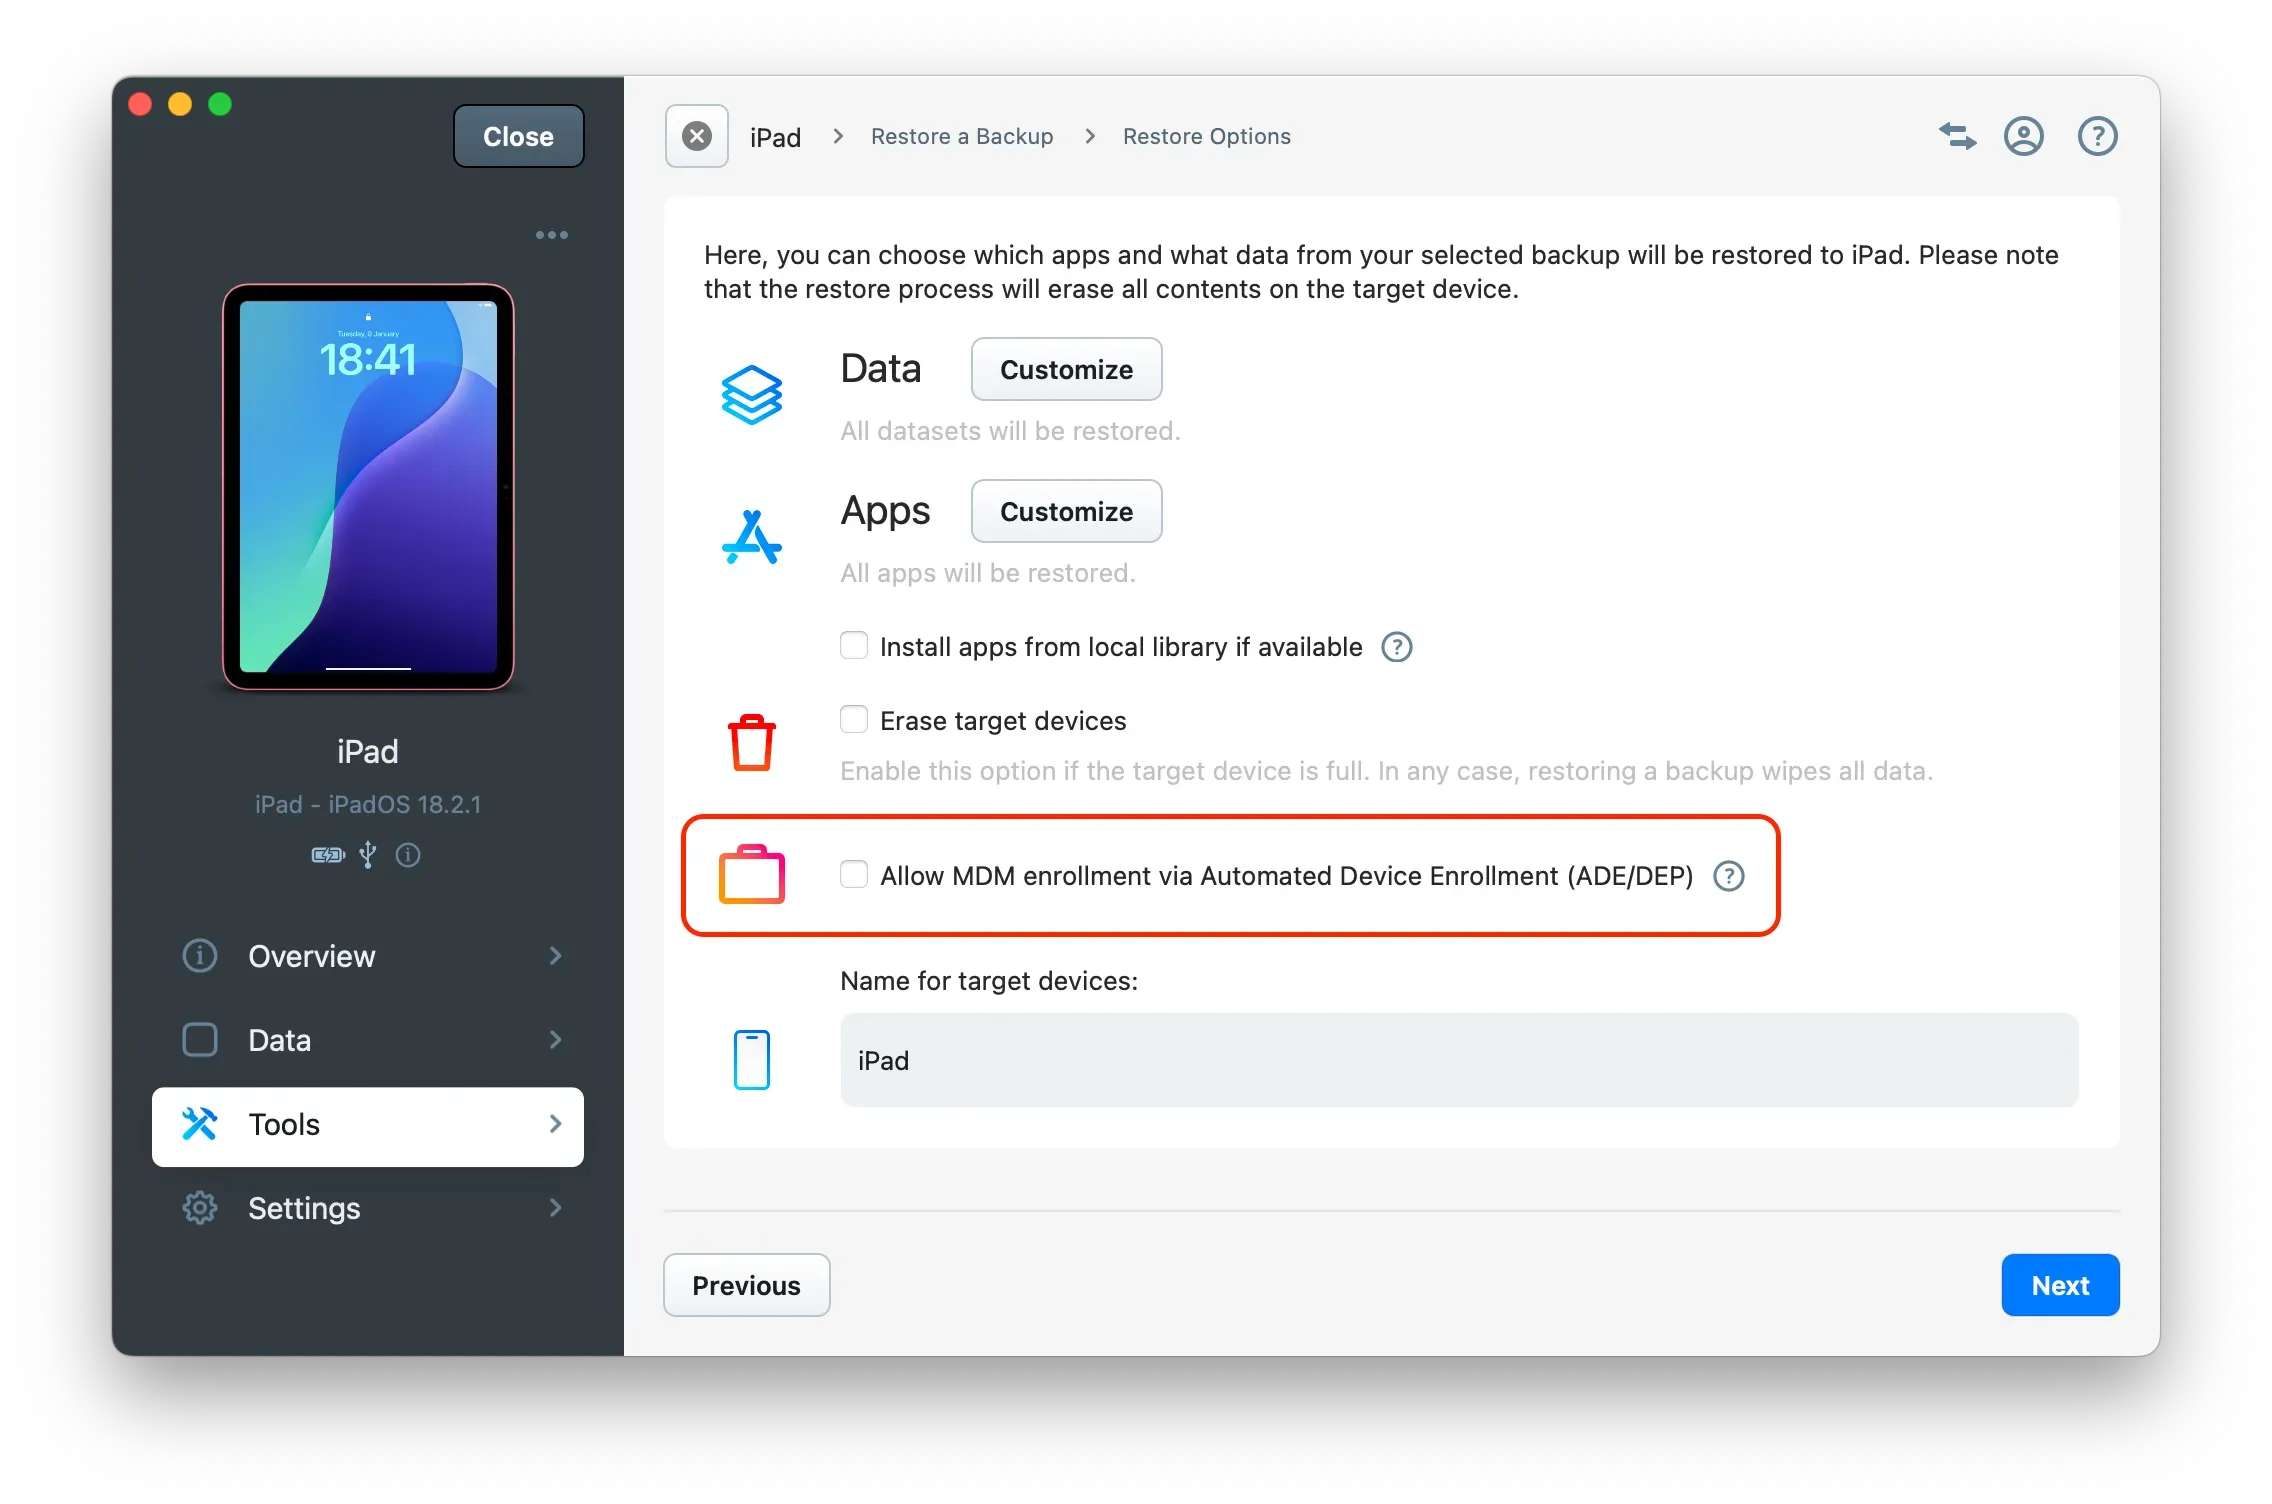
How to restore a backup to a device that needs to be enrolled in an MDM?
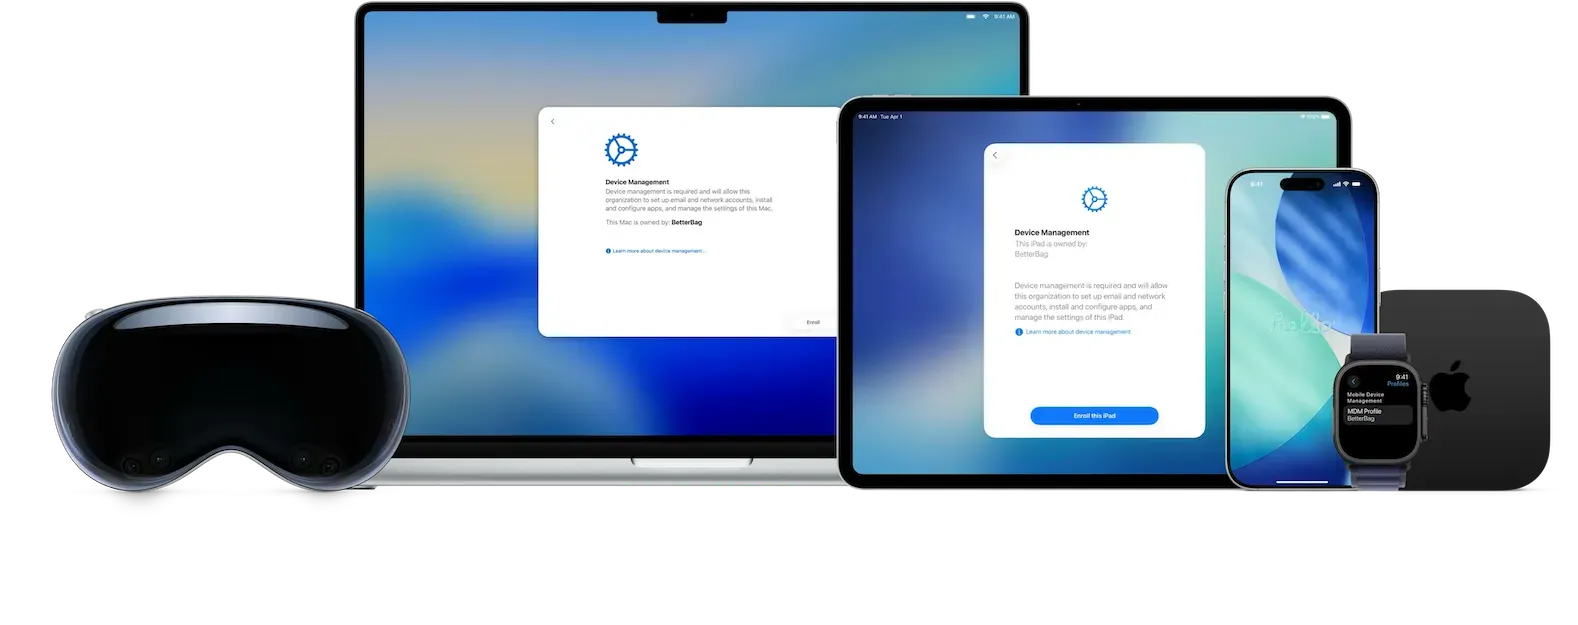
When restoring a backup to a device that needs to be enrolled in a Mobile Device Management (MDM) system, iMazing offers an option called "Allow MDM enrollment via Automated Device Enrollment (ADE/DEP)".
Check this option if you need to enroll the device in an MDM after the backup restoration and device restart. This ensures the iOS Setup Assistant properly displays the "Device Management" screen (previously known as "Remote Management"). Selecting this option erases the MDM configuration from the backup, allowing the new MDM enrollment to occur and the MDM server to install the new configuration.
How to export a backup?
You can export an iPhone or iPad backup with iMazing to a location of your choice.
Export the latest backup:
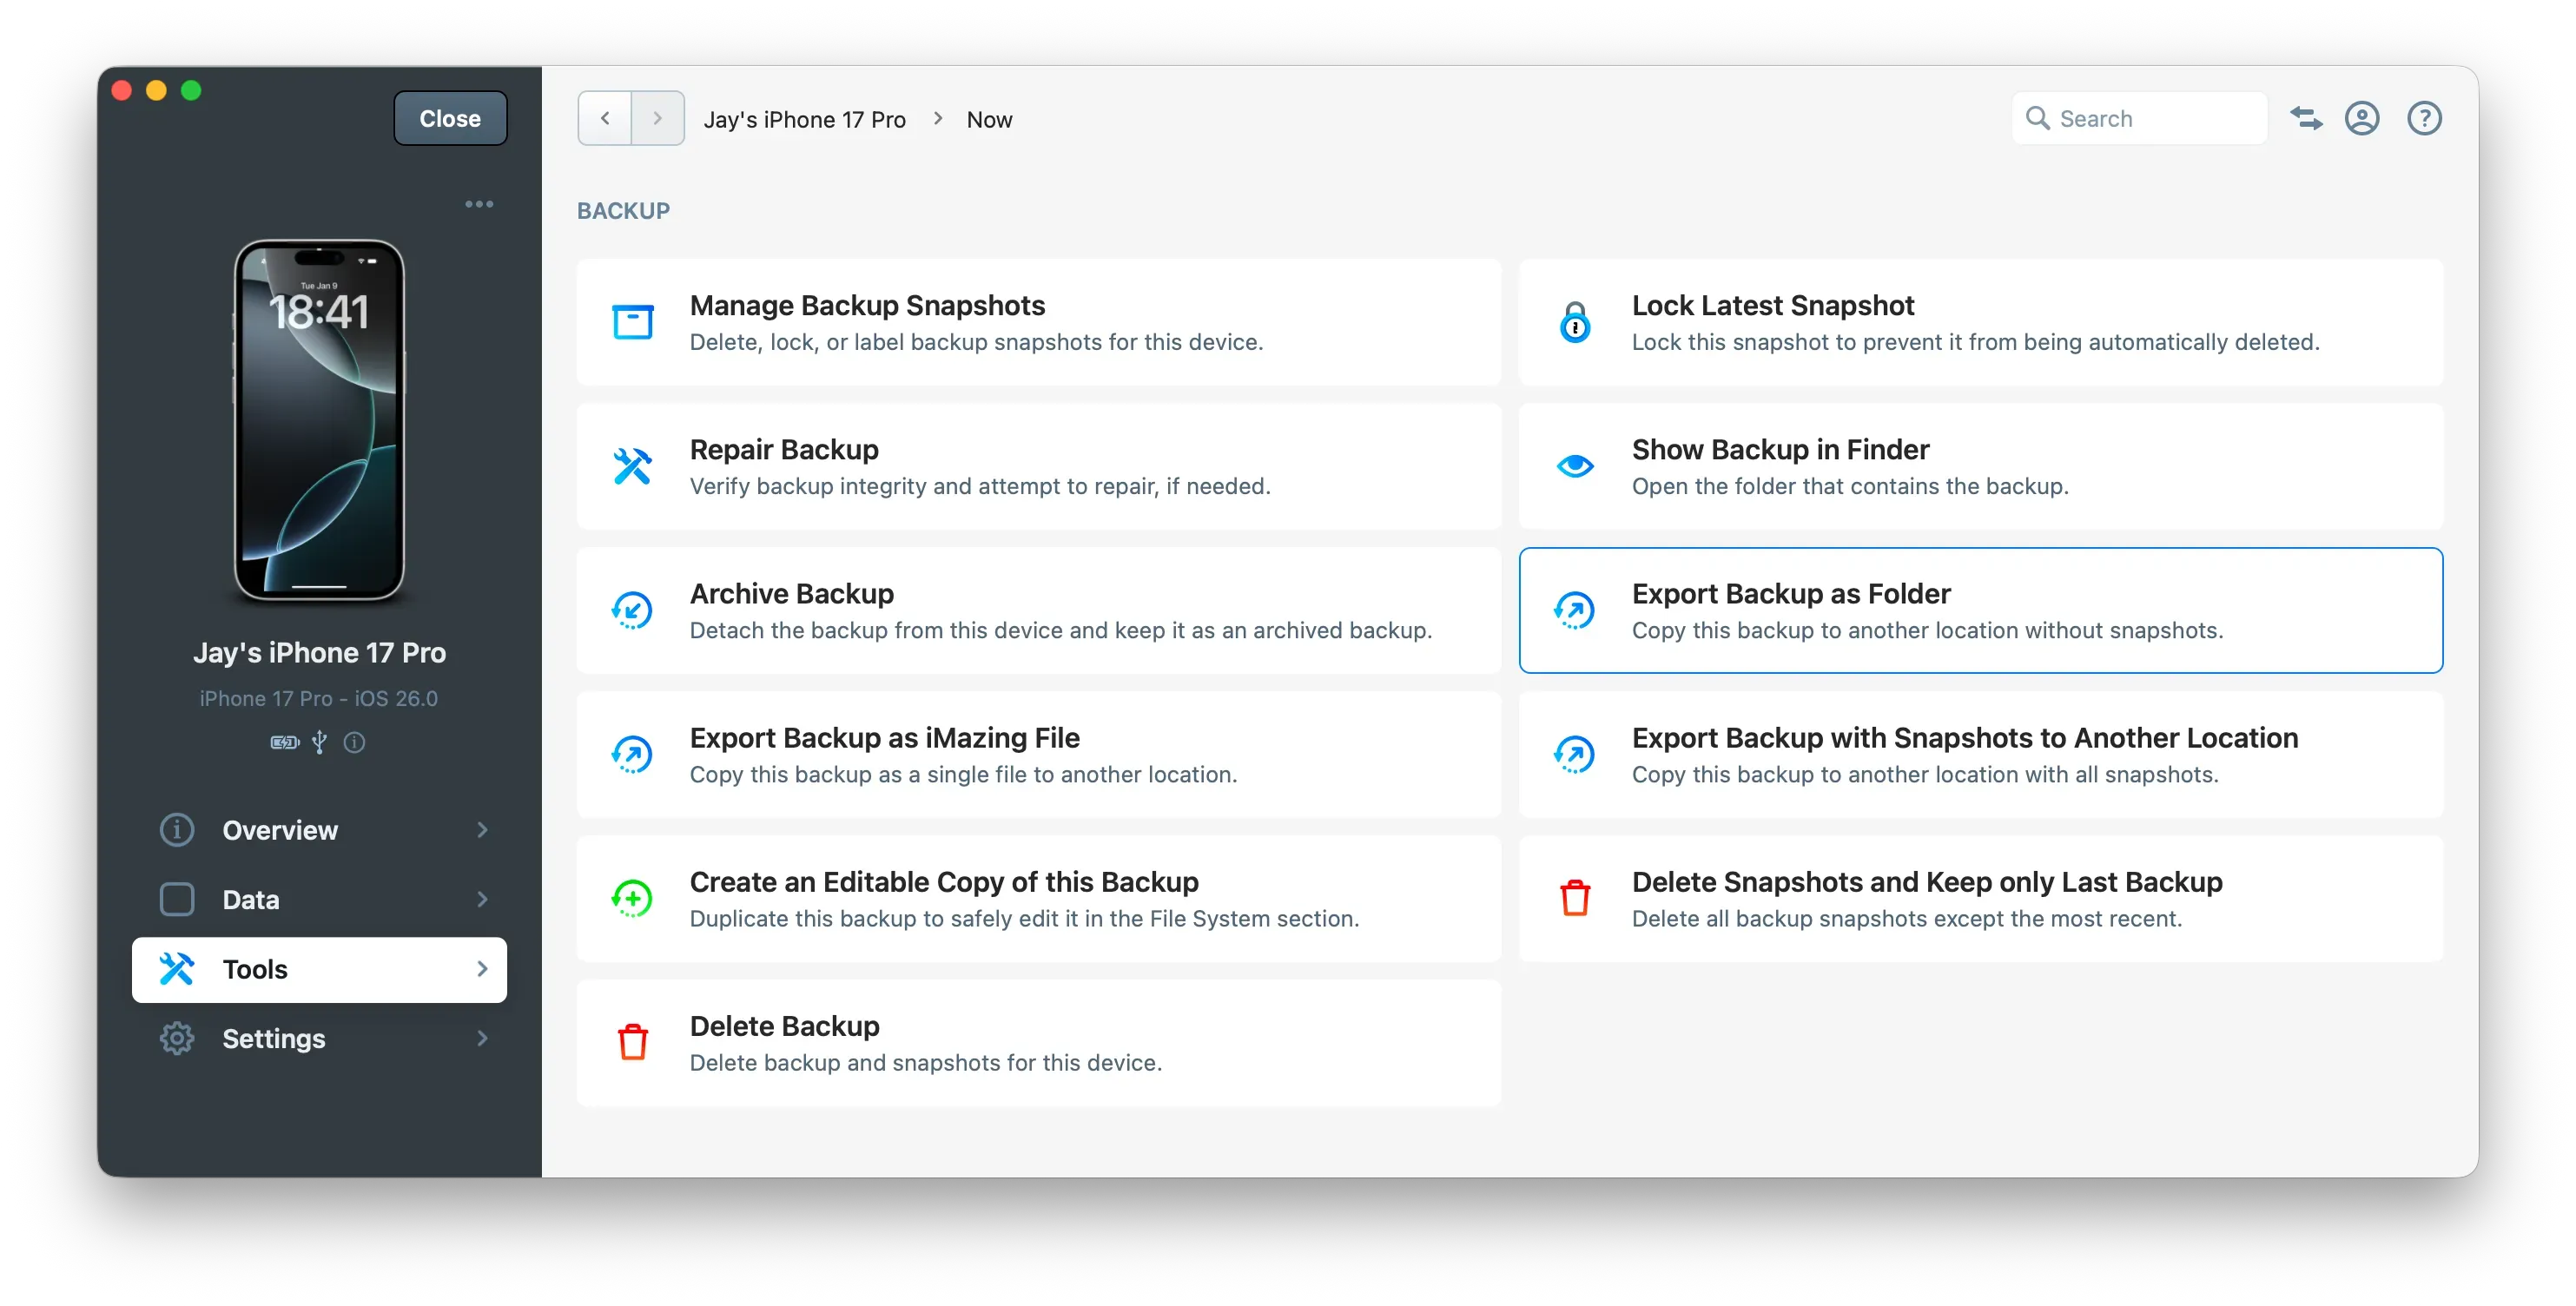
Go to the device's or backup's Tools section and click "Export Backup as Folder", or right-click your device or backup and select Export Backup as Folder.
Choose the location where you want to export this backup.
Export a specific snapshot:
Select a device or backup from iMazing's home screen Devices or Backups section.
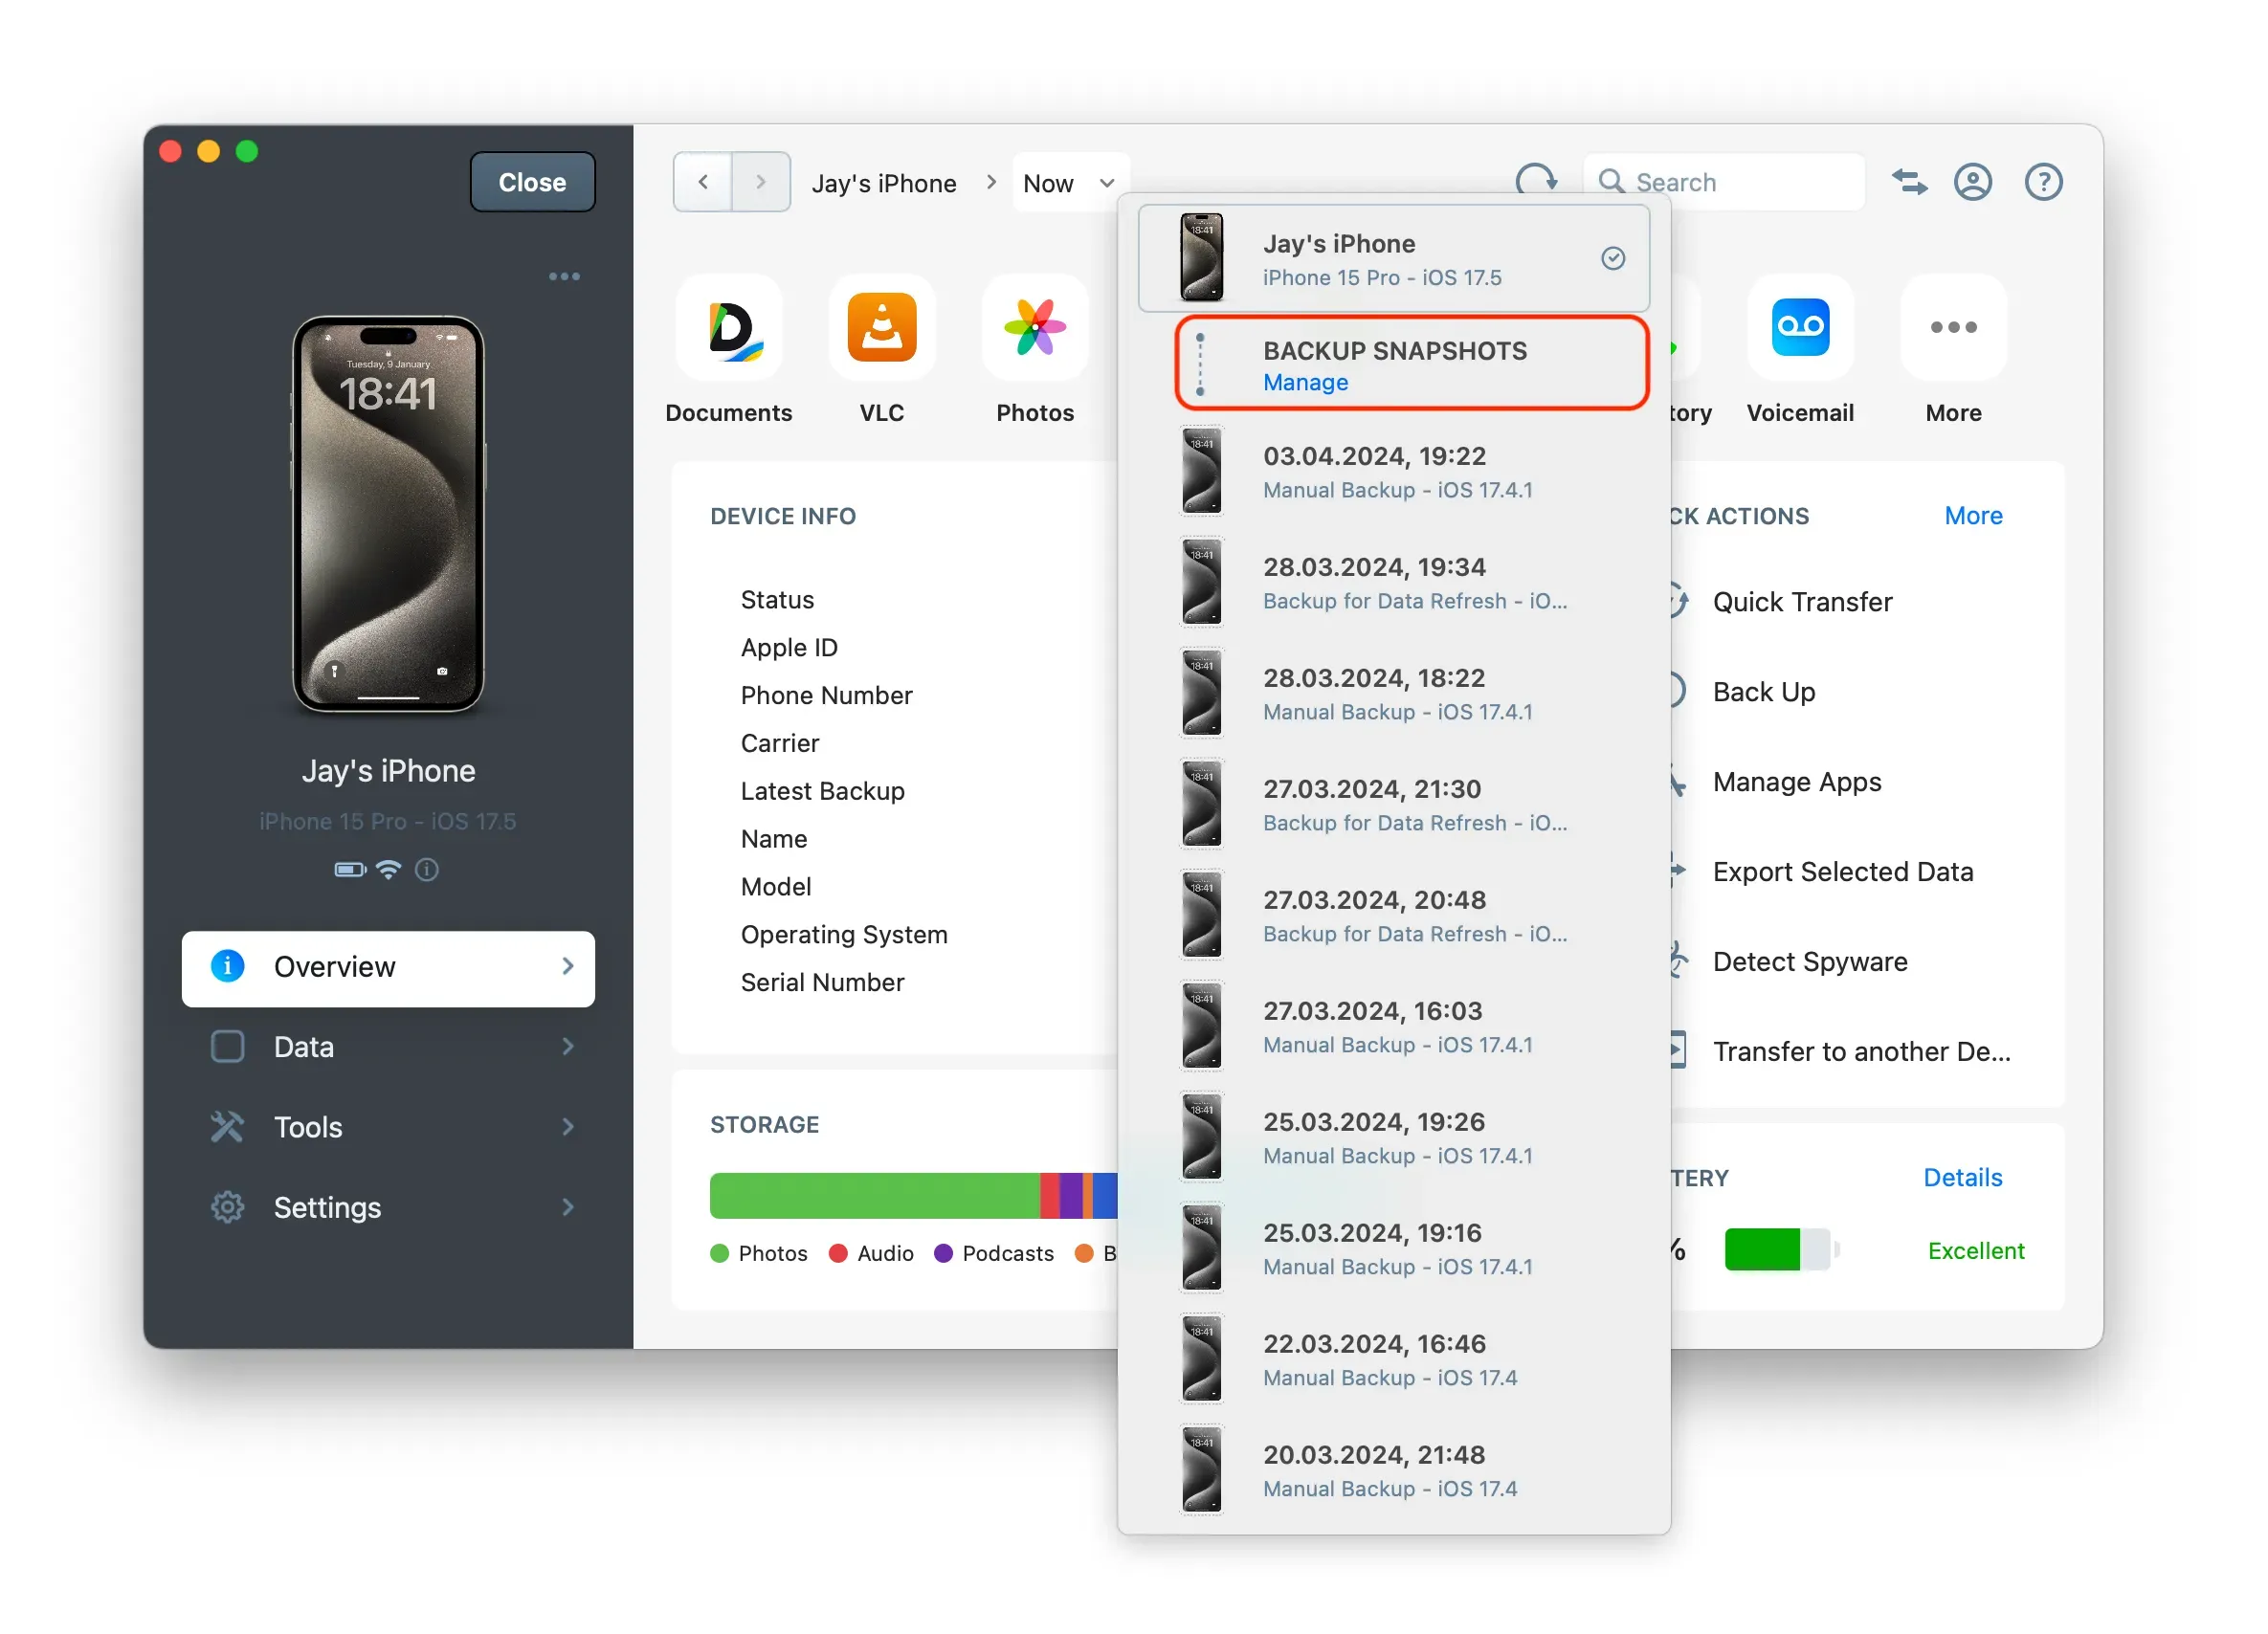
In the upper toolbar, click the Now button. This will open the Snapshot List.
Click the BACKUP SNAPSHOTS | Manage item.
Click the ··· icon next to the snapshot of your choice.
Click Export this Backup as Folder.
Choose the location where you want to export this snapshot.
How to export a backup as a shareable single file?
Export the latest backup:
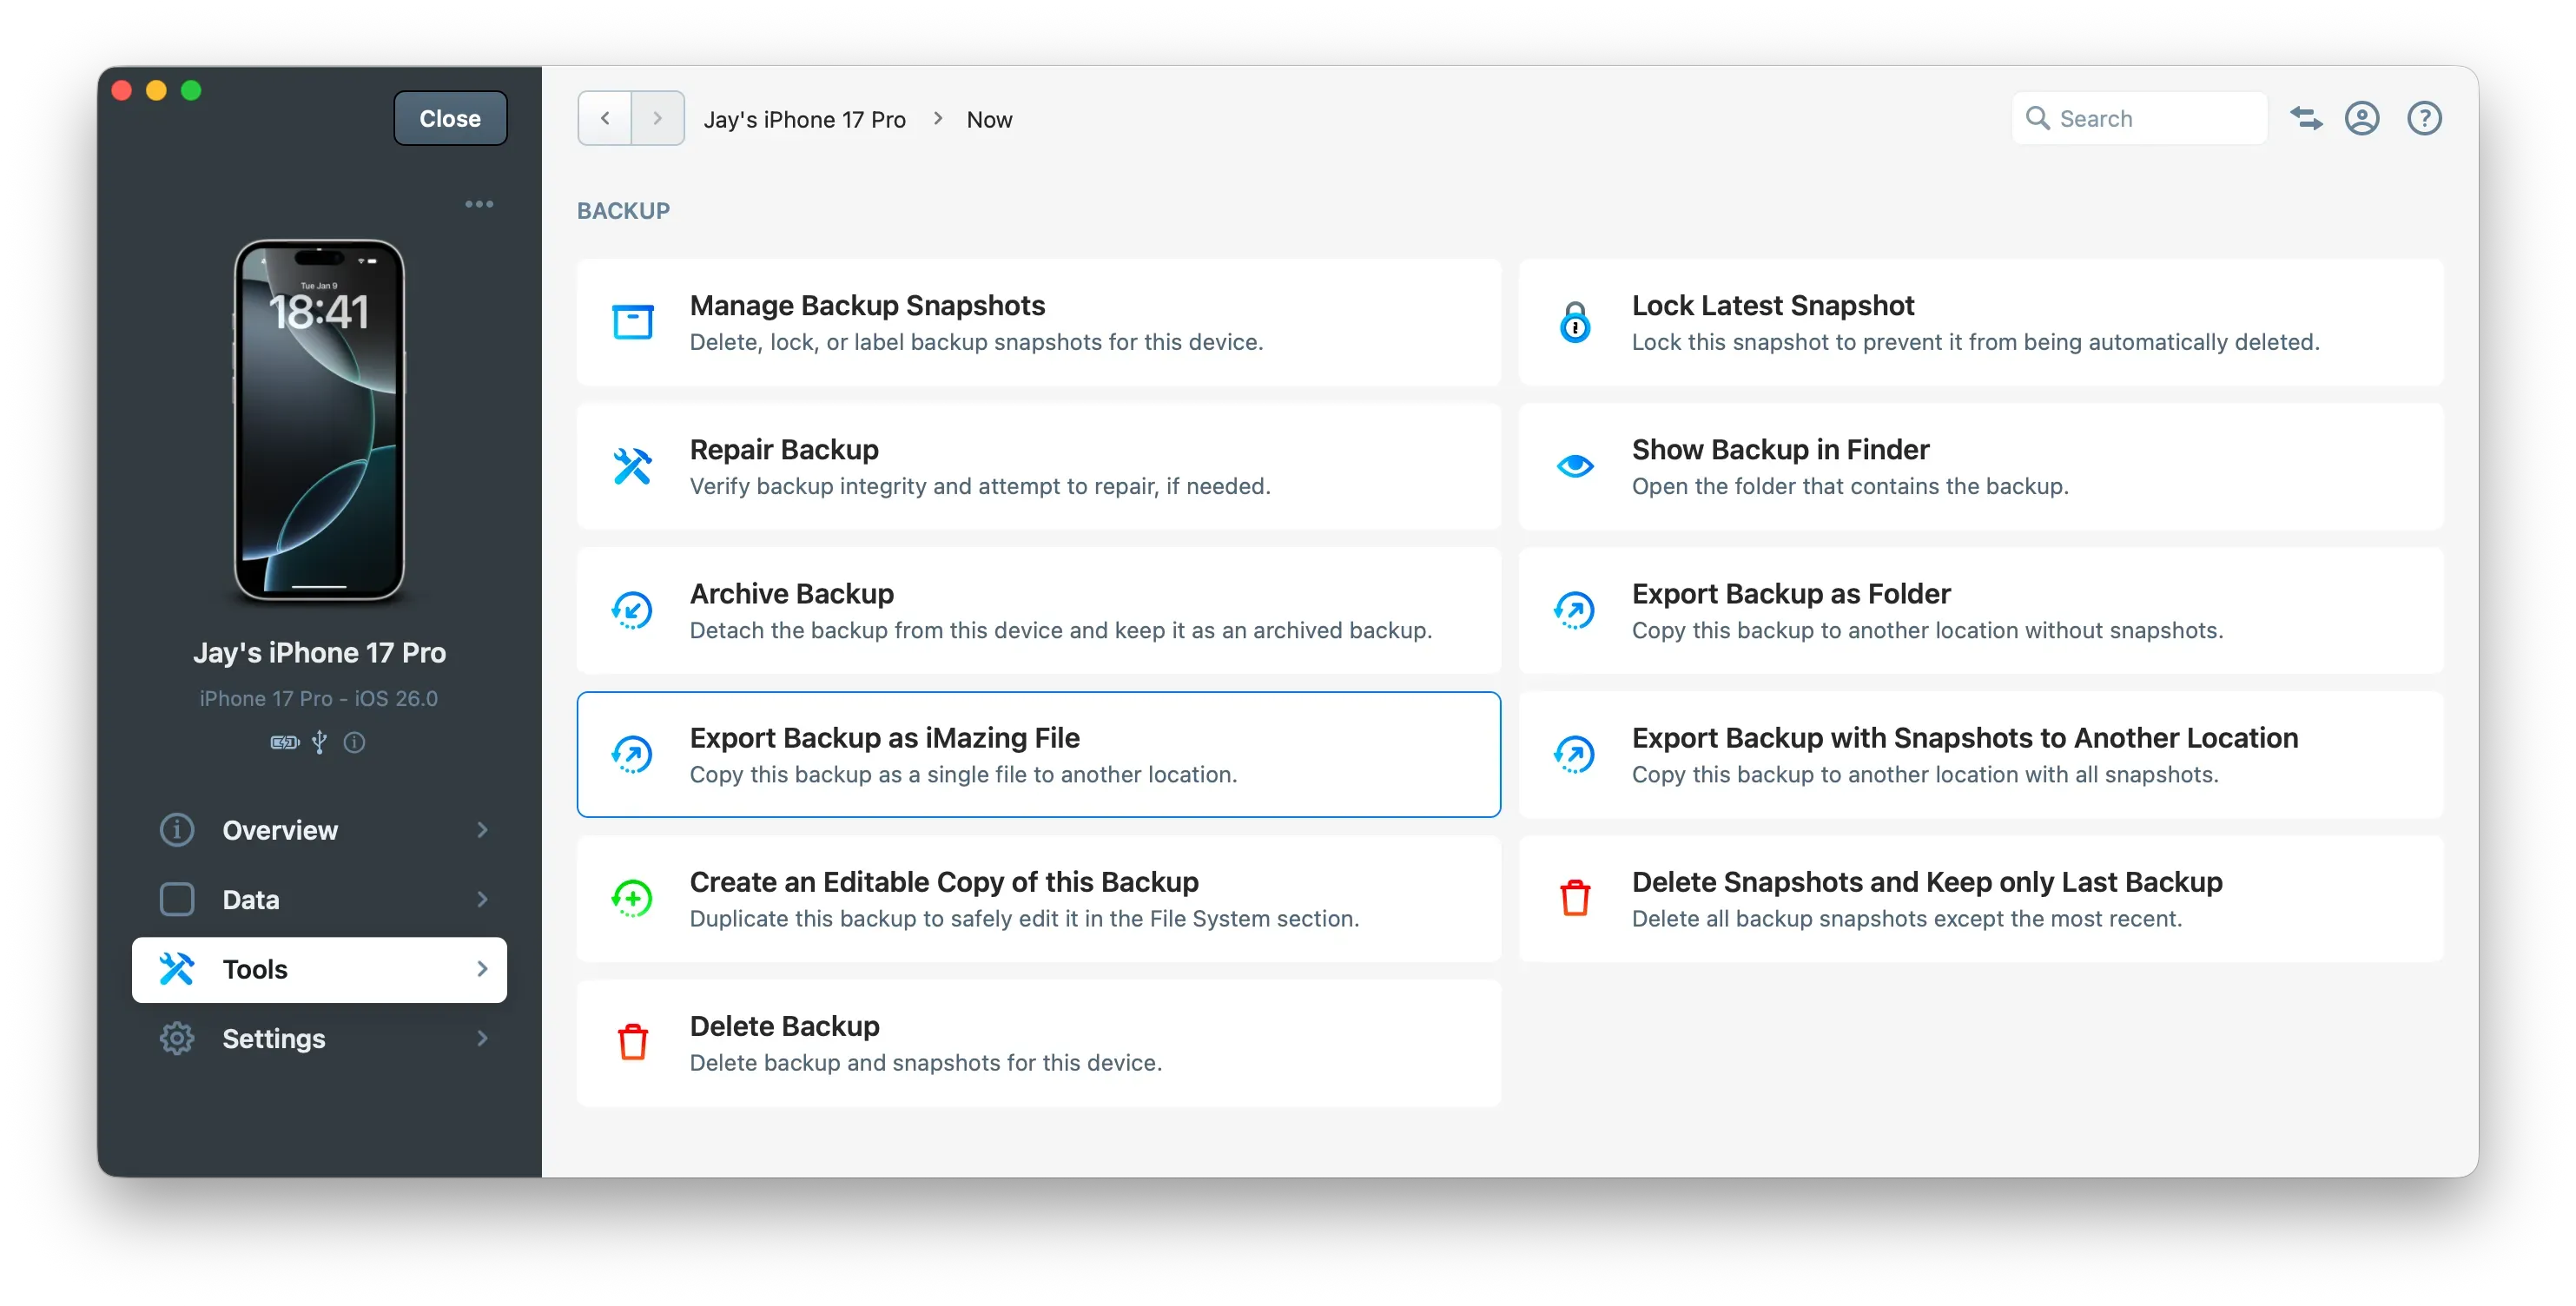
Go to the device's or backup's Tools section and click "Export Backup as iMazing File", or right-click your device or backup and select Export Backup as iMazing File.
Choose the filename of this exported backup with a file extension .imazing.
Export a specific snapshot:
Select a device or backup from iMazing's home screen Devices or Backups section.
In the upper toolbar, click the Now button. This will open the Snapshot List.
Click the BACKUP SNAPSHOTS | Manage item.
Click the … icon next to the snapshot of your choice.
Click Export this Backup as iMazing File.
Choose the filename of this exported backup with a file extension .imazing.
Tip: We generally don't recommend exporting large backups as an iMazing File for local use. The .imazing file is essentially a zip archive without compression. It can take a long time to generate and unarchive when imported into iMazing. This format should be used exclusively for sharing backups with others. If you work locally with an external drive or NAS, you should instead use the Export as Folder action.
How to open or import a backup?
Import or open iPhone or iPad backups not yet shown in iMazing to browse their contents, restore them, or edit them. You can also import all backups from a backup location not yet configured in iMazing.
Go to the Backups section on iMazing's home screen.
Click the + button in the upper toolbar.
Select one of the following options:
Add iMazing File (for .imazing files)
Add Backup Folder (for a single backup folder)
Add Backup Disk (to import multiple backups stored in the same location)
When choosing Add iMazing File or Add Backup Folder, you'll need to decide between two options:
Copy: Permanently imports the backup to iMazing's default location
Open: Temporarily opens the backup from its current location for browsing only
Tip: You can also drag a backup folder directly into iMazing's home screen Backups section to import it.
How to move a backup with all its snapshots to another location?
iMazing can copy a device backup, including all its snapshots, to another drive or location. This is useful when you need to free up space in the current backup location or simply want to store your backup elsewhere.
Go to the device's or backup's Tools section and click "Export Backup with Snapshots to Another Location", or right-click your device or backup and select Export Backup with Snapshots to Another Location.
Choose the location where you want to export this backup.
This operation may take some time. Upon completion, you'll see two consecutive dialogs:
One asking if you want to "add this new backup location in iMazing"
And another asking if you want to "save future backups of this device in this new location" going forward.
iMazing maintains multiple backup snapshots of a device, allowing you to either delete the entire backup with all its snapshots or remove only specific snapshots.
To delete a backup, including all its snapshots:
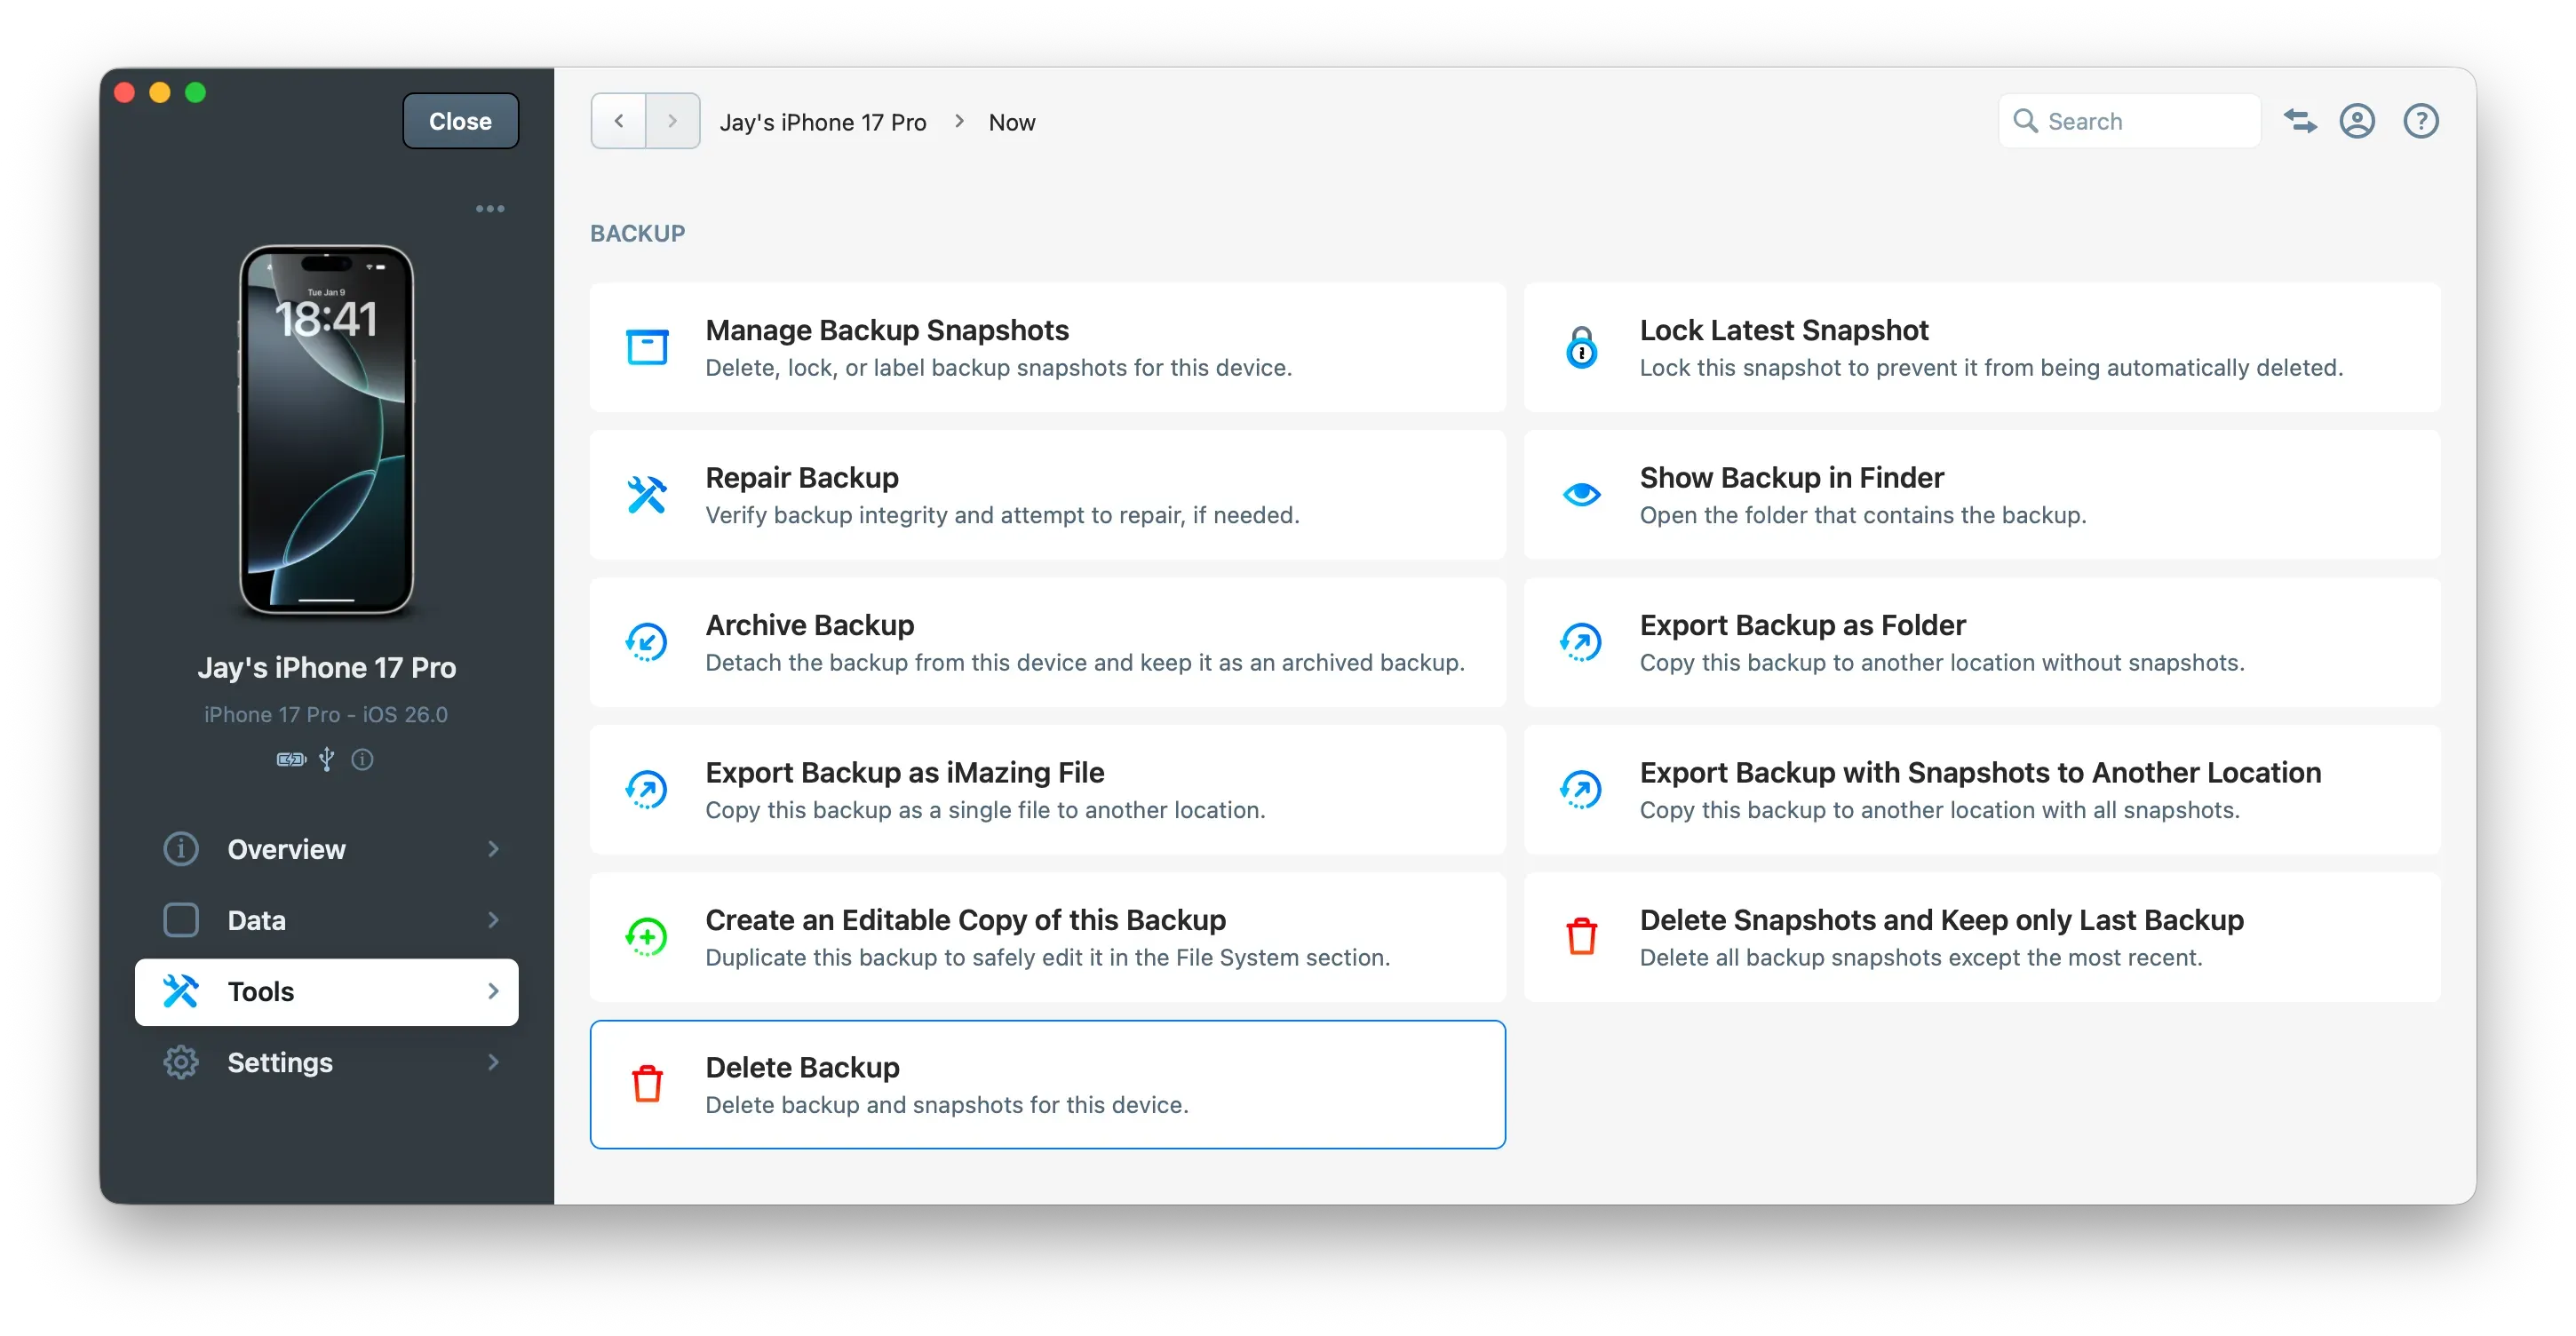
Go to the device's or backup's Tools section and click "Delete Backup", or right-click your device or backup and select Delete Backup.
Click Delete to confirm.
Important: Deleting a device backup including all its snapshots, does not remove the pairing between your device and your computer. To completely remove all traces of your device from your computer, you need to remove your device from iMazing.
Important: When deleting a backup, this operation can take some time as tens of thousands of files need to be removed from the backup location. To prevent delays, iMazing moves the backup to the iMazing.Versions/Trash folder of the backup location and deletes files in the background while you can continue using the application. If you quit iMazing, the deletion process pauses and will resume when you restart the application. You can safely remove the iMazing.Versions/Trash folder manually, but only this folder. As mentioned earlier, all other operations such as deleting snapshots in the iMazing.Versions/Versionsshouldn't be performed manually.
How to delete all snapshots while keeping only the most recent backup?
This action helps you quickly free up storage space on your backup location when you only need to keep the latest backup snapshot rather than multiple ones.
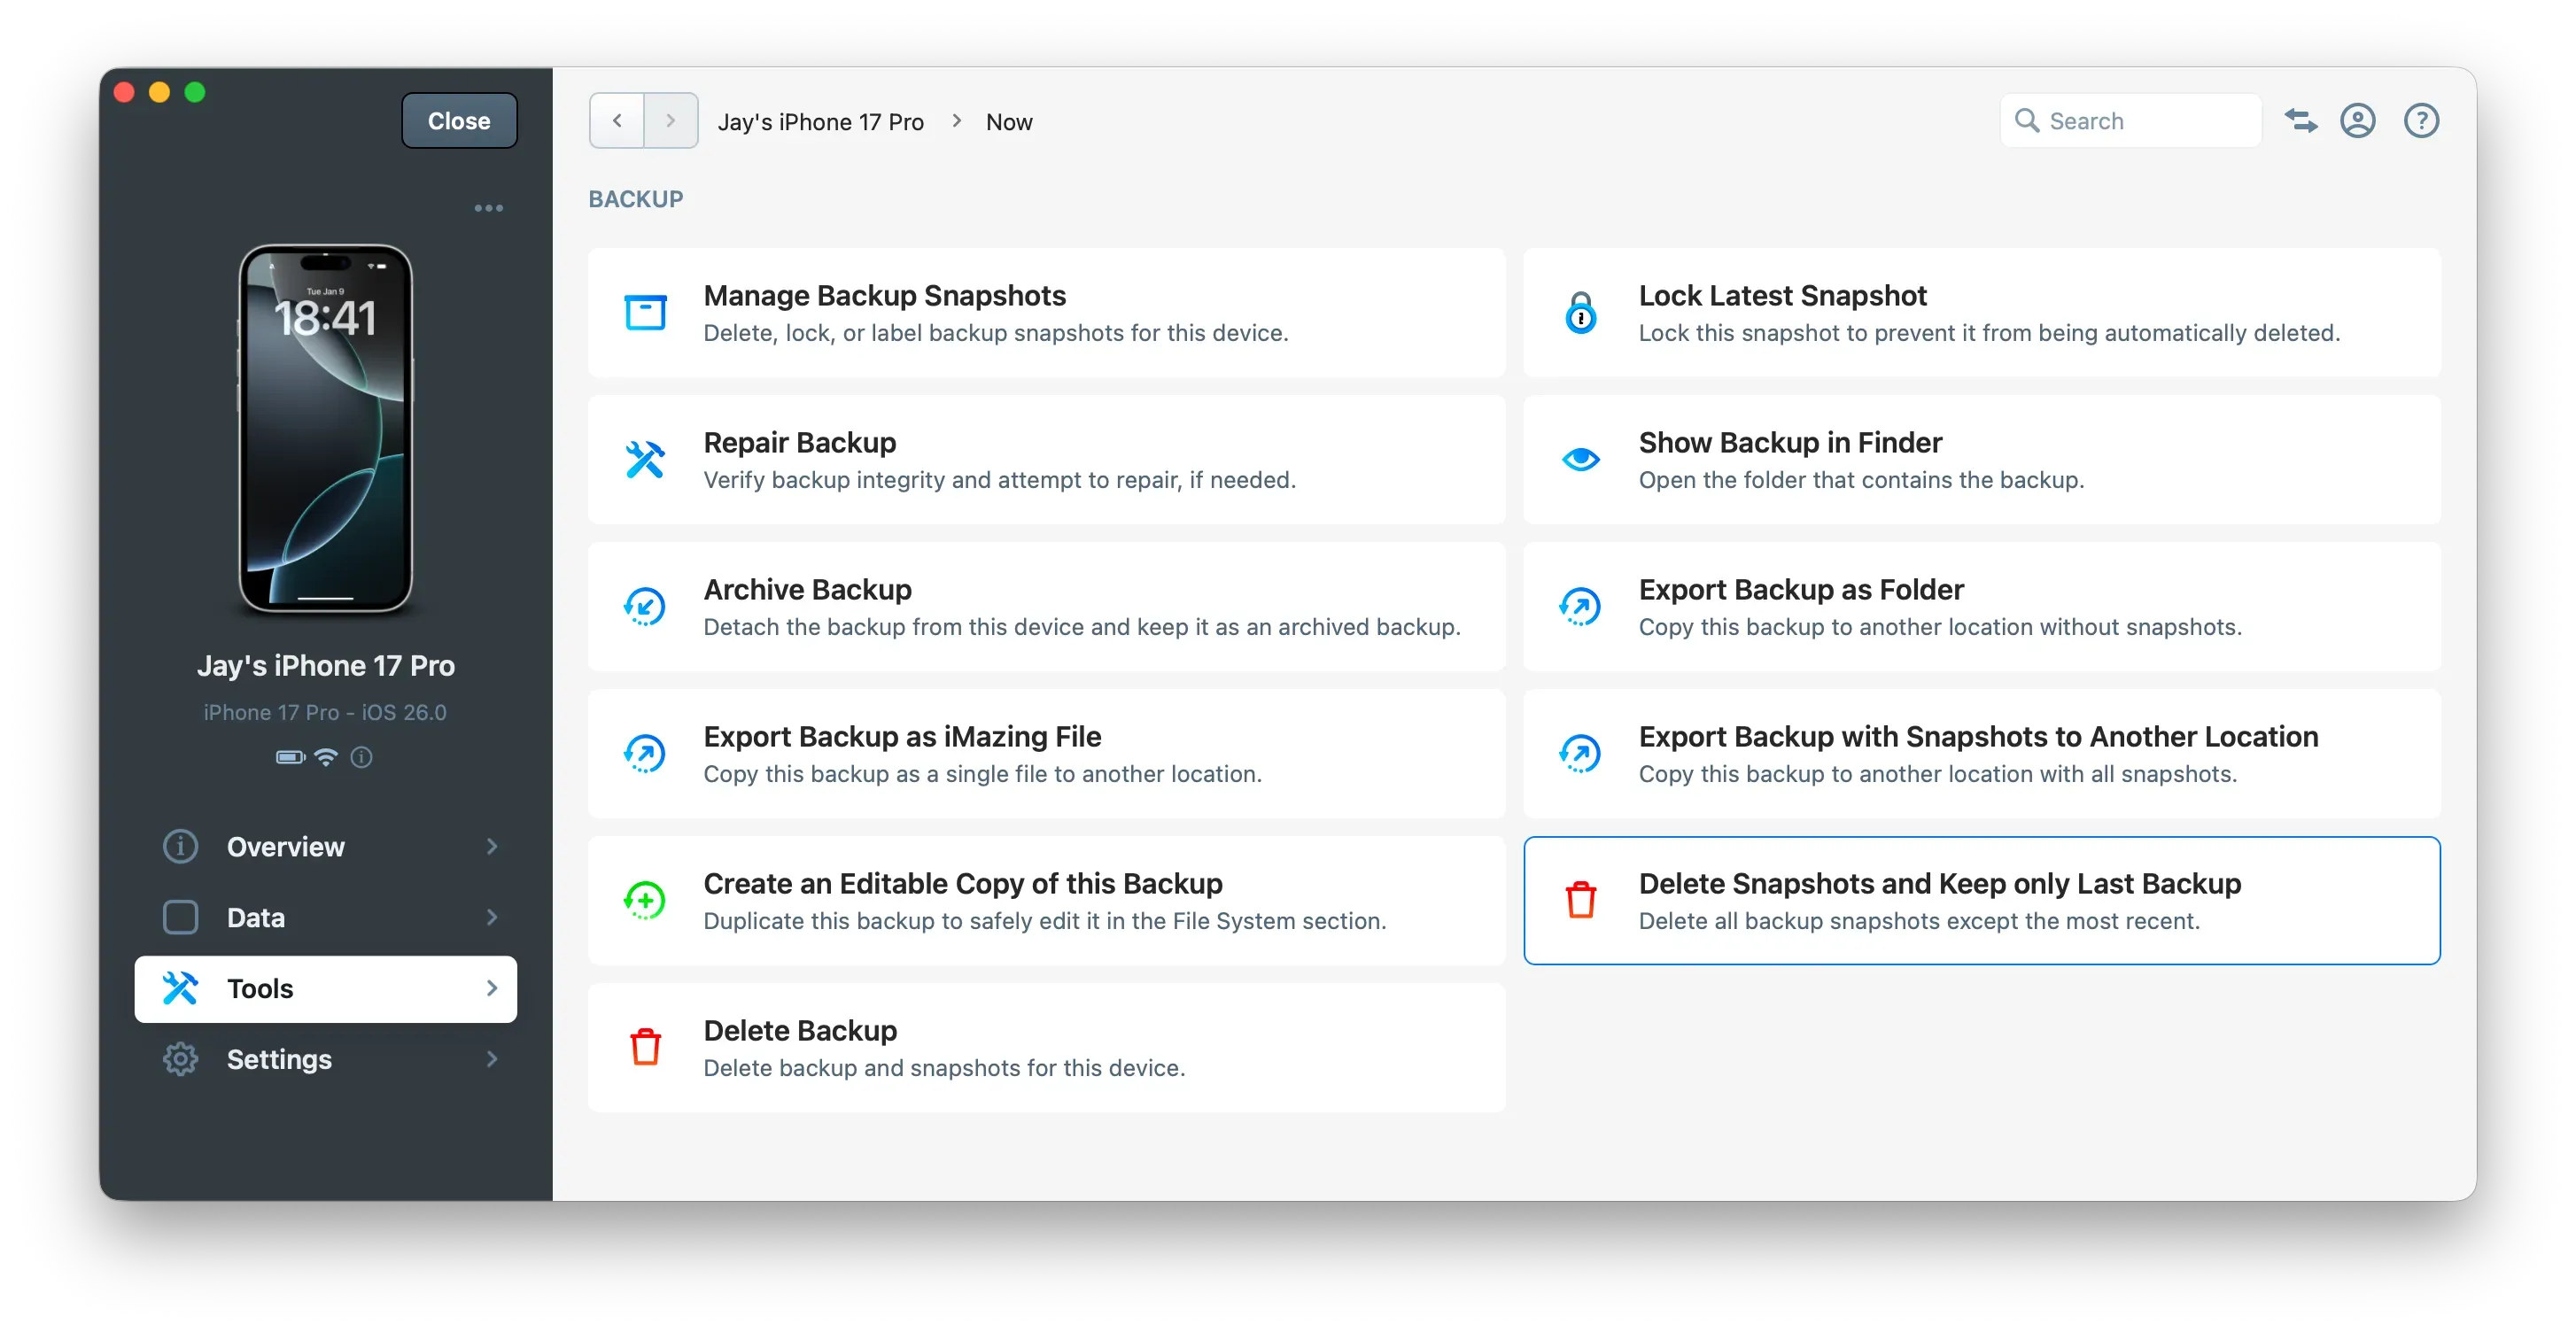
Go to the device's or backup's Tools section and click "Delete Snapshots and Keep only Last Backup", or right-click your device or backup and select Delete Snapshots and Keep only Last Backup.
How to manage backup snapshots?
Select a device or backup from iMazing's home screen Devices or Backups section.
In the upper toolbar, click the Now button. This will open the Snapshot List.
Click the BACKUP SNAPSHOTS | Manage item.
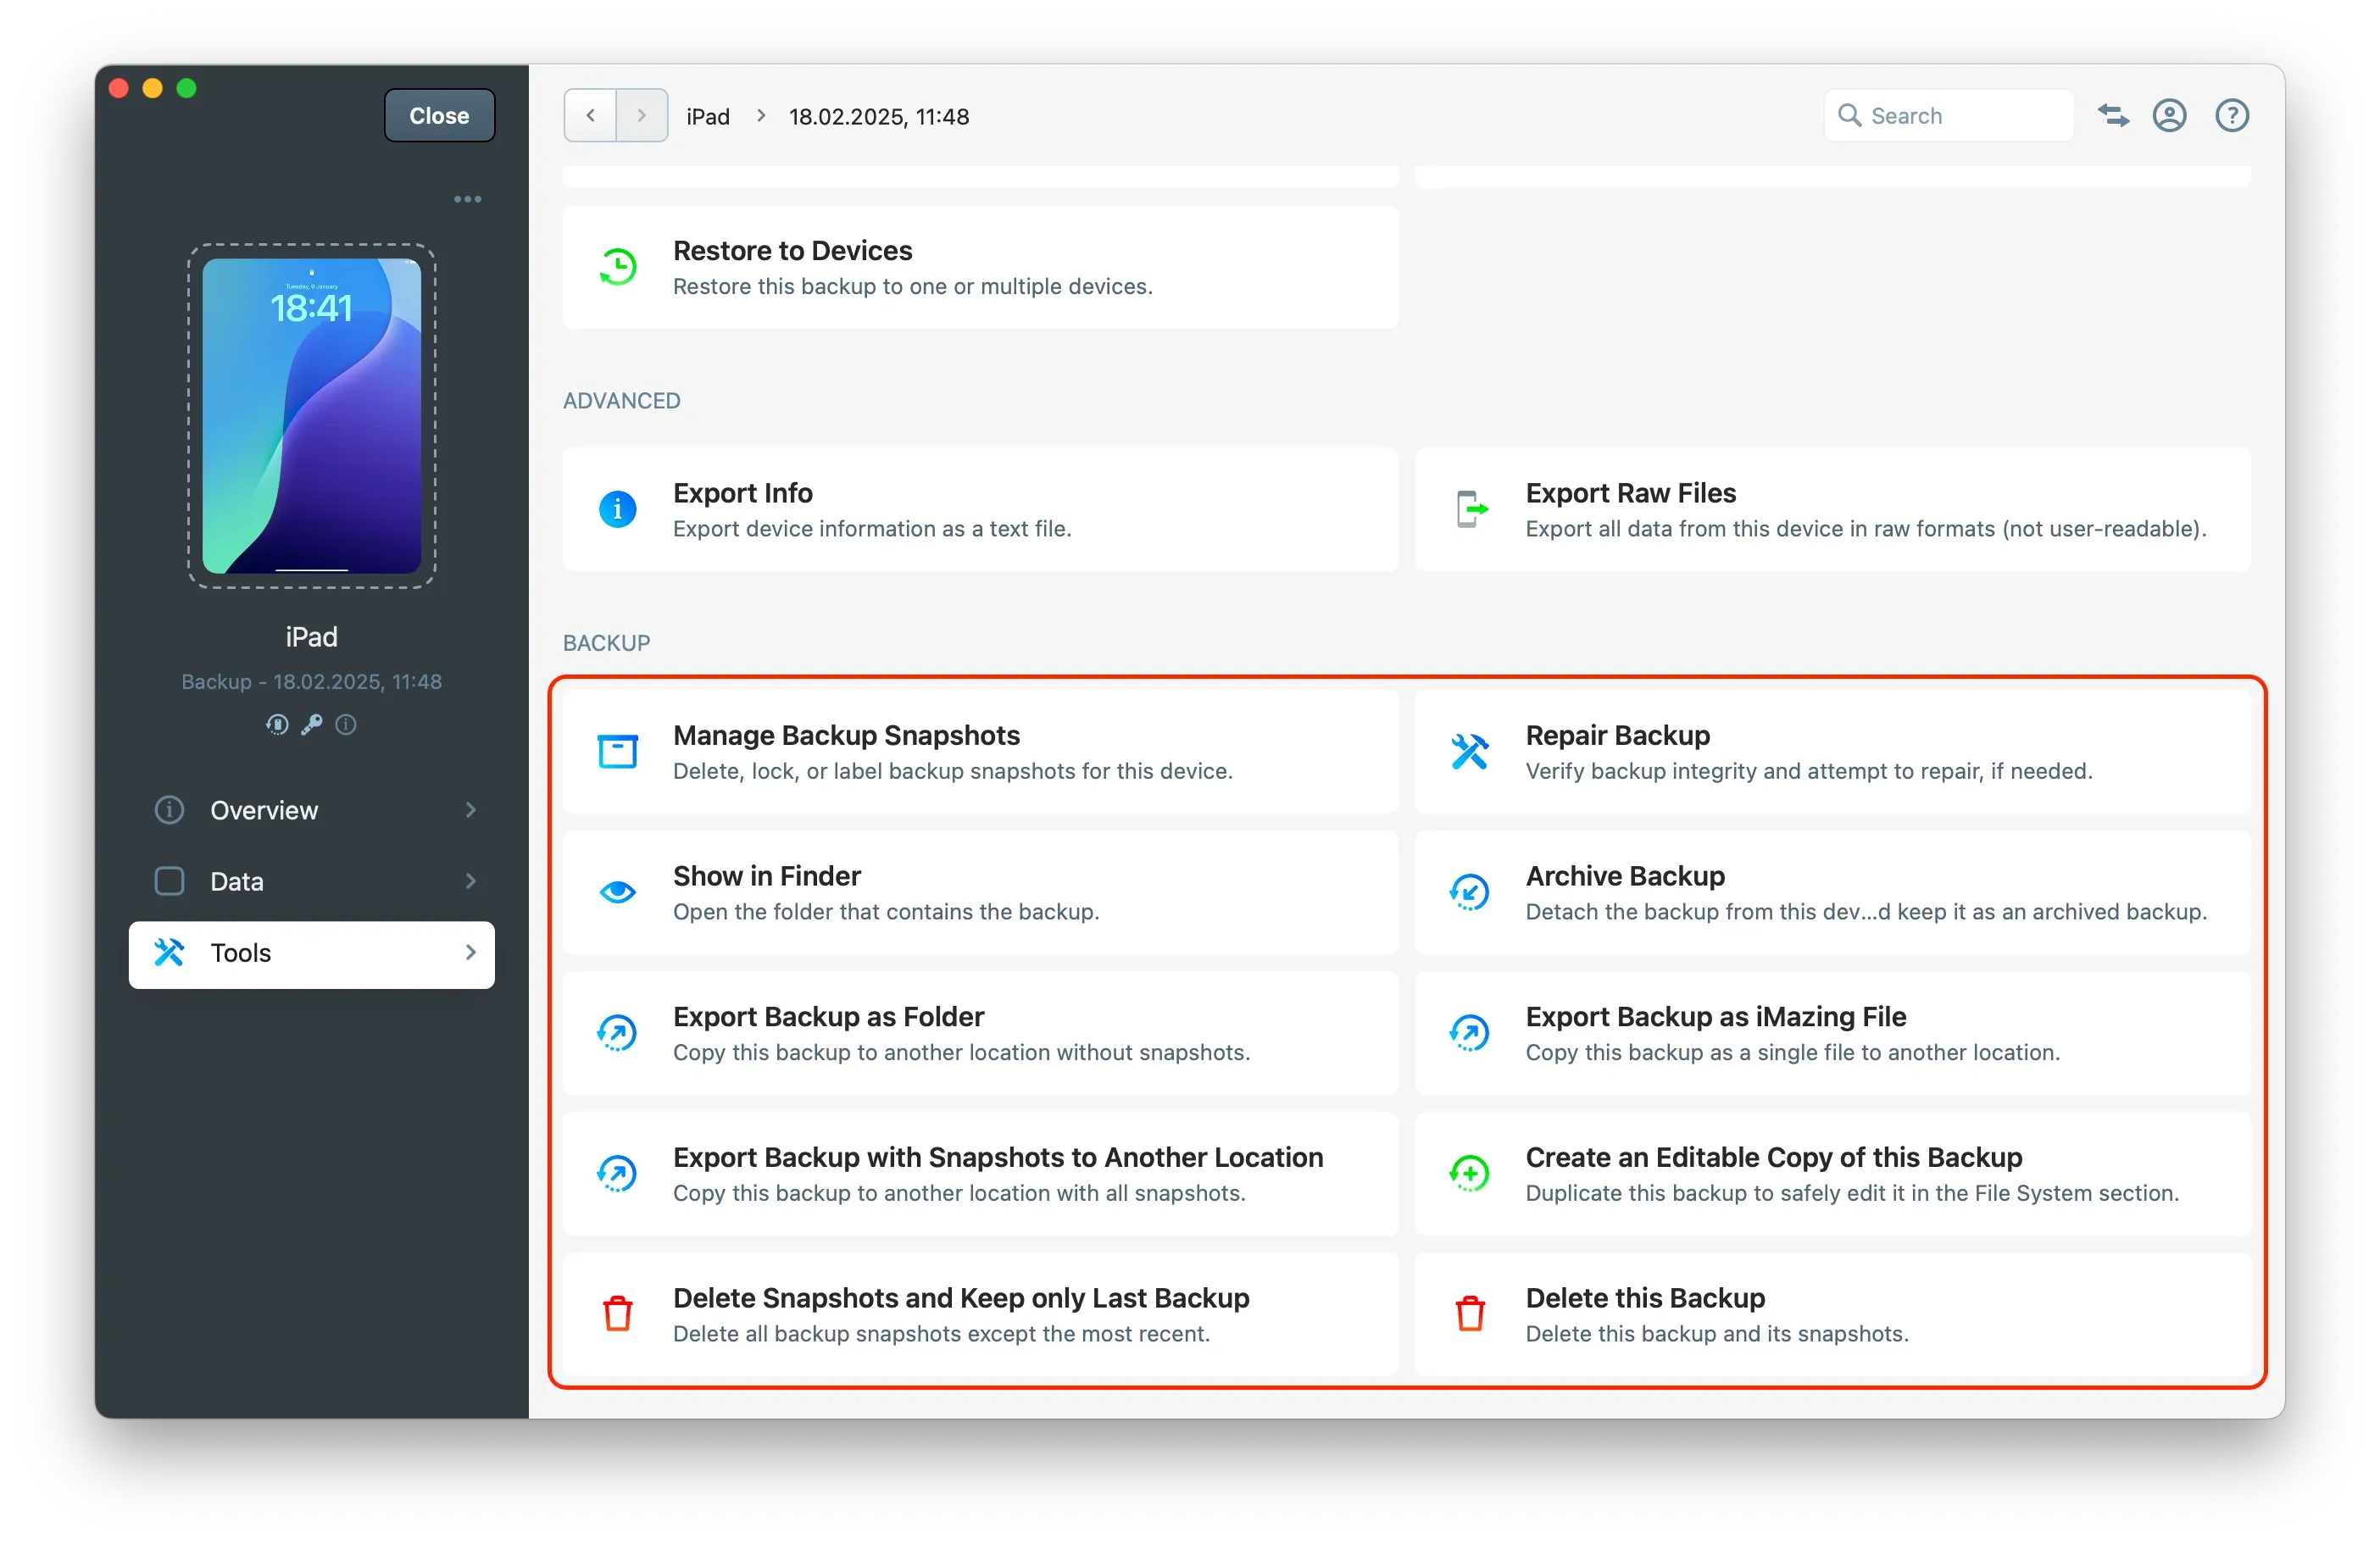
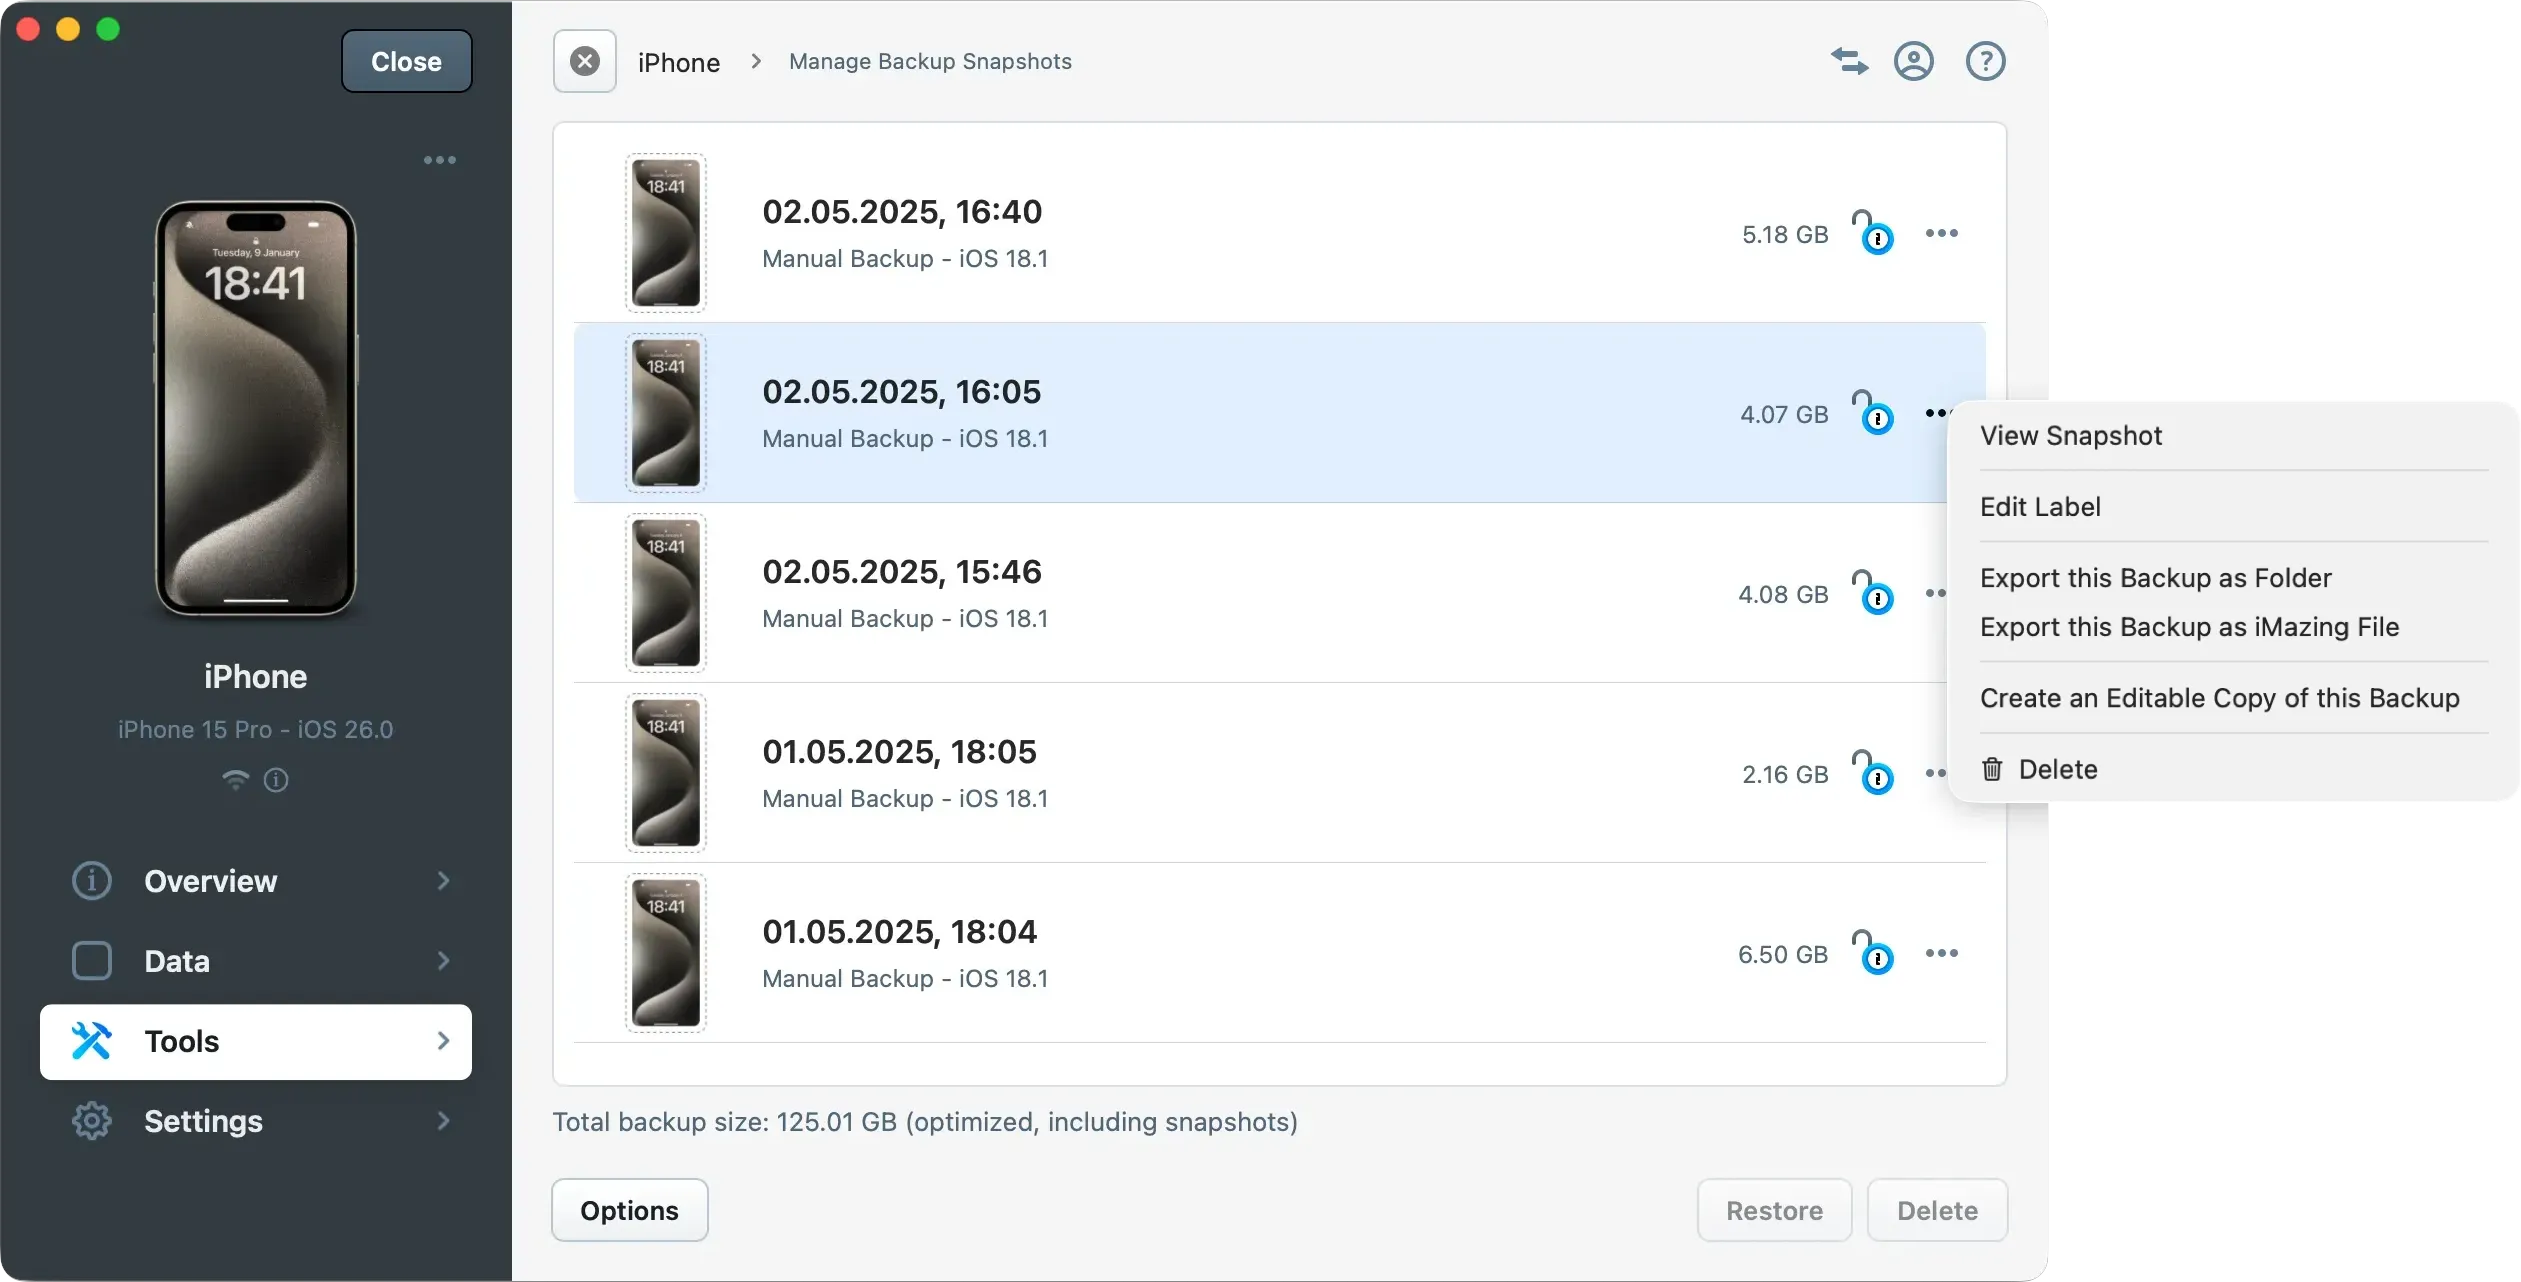
Once you are in the "Manage Backup Snapshots" section, you have the following actions available from the contextual menu when you click the … icon:
View Snapshot
This action lets you view the snapshot content and export data from it, similar to browsing your connected device.
Edit Snapshot Label
You can add a custom label to a snapshot for easier identification.
Lock / Unlock Snapshot
You can lock a snapshot to prevent iMazing from automatically deleting it. iMazing will preserve locked snapshots until you manually delete them or remove the entire backup. Please refer to Backup Options in iMazing to learn how iMazing typically manages old snapshots.
Delete Snapshot
You can delete individual or multiple snapshots by selecting them to free up storage space on your backup location.
How to archive a backup?
Archiving a backup allows you to detach a backup and all its snapshots from its device when you want to start fresh backups for a specific device. Once archived, the backup remains in the same location but is detached from your device and is no longer your active device backup.
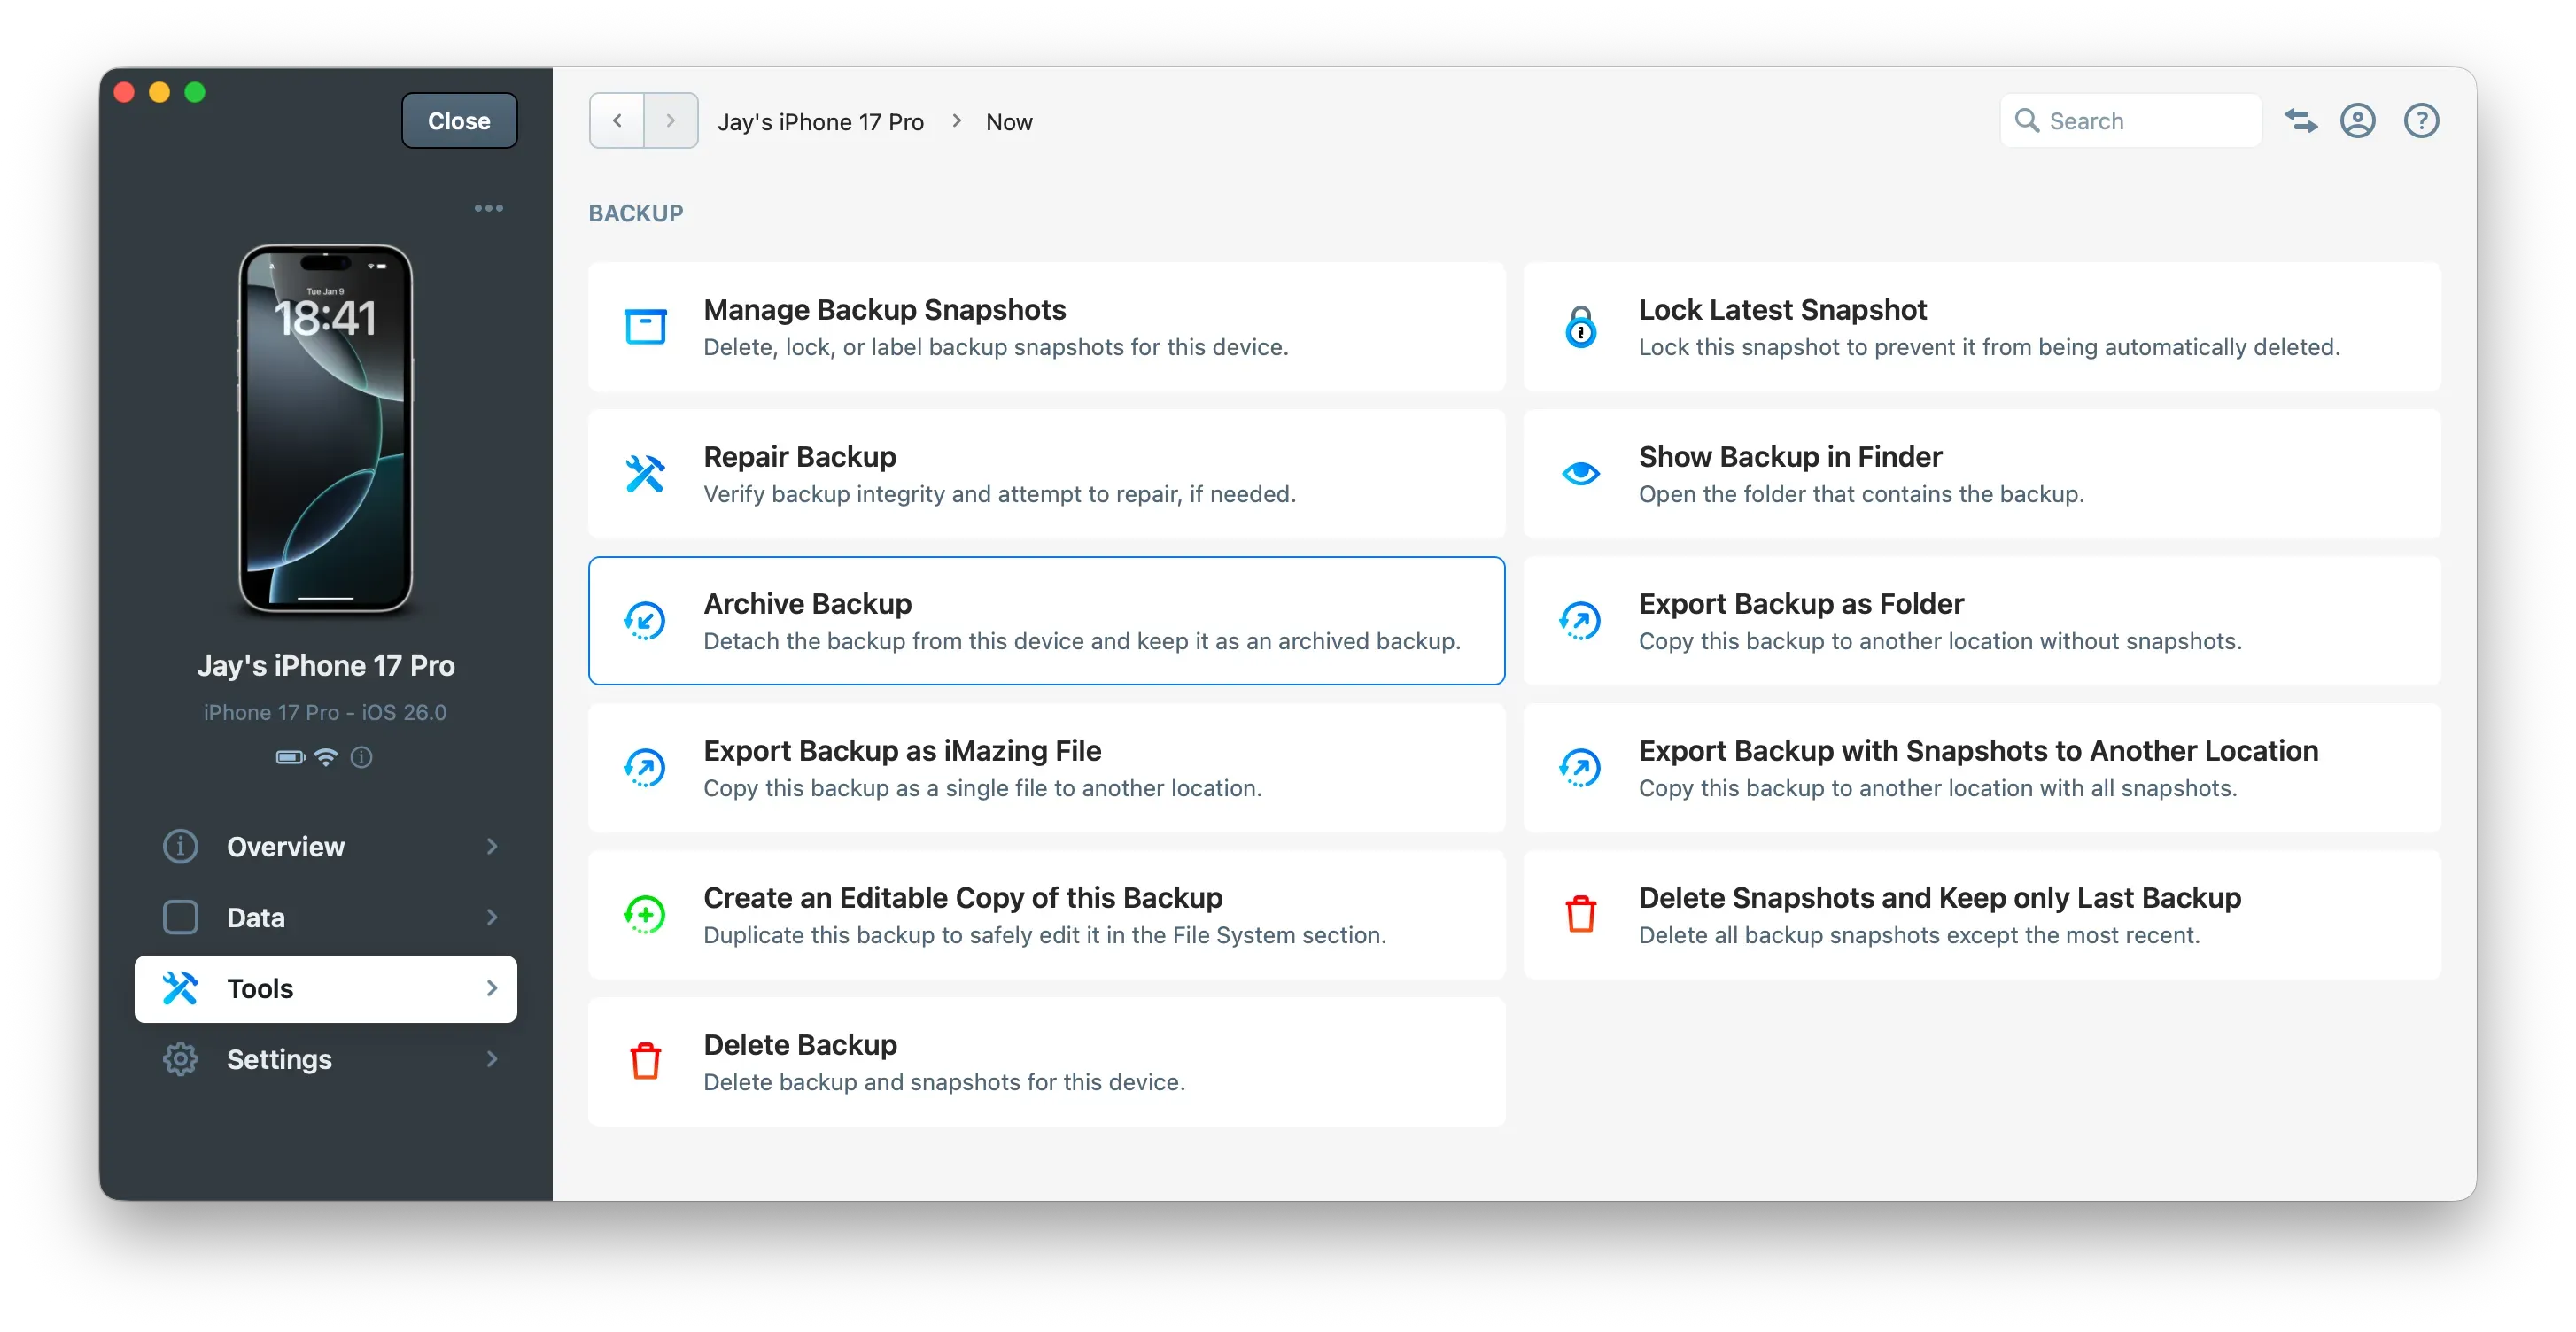
Go to the device's or backup's Tools section and click "Archive Backup", or right-click your device or backup and select Archive Backup.
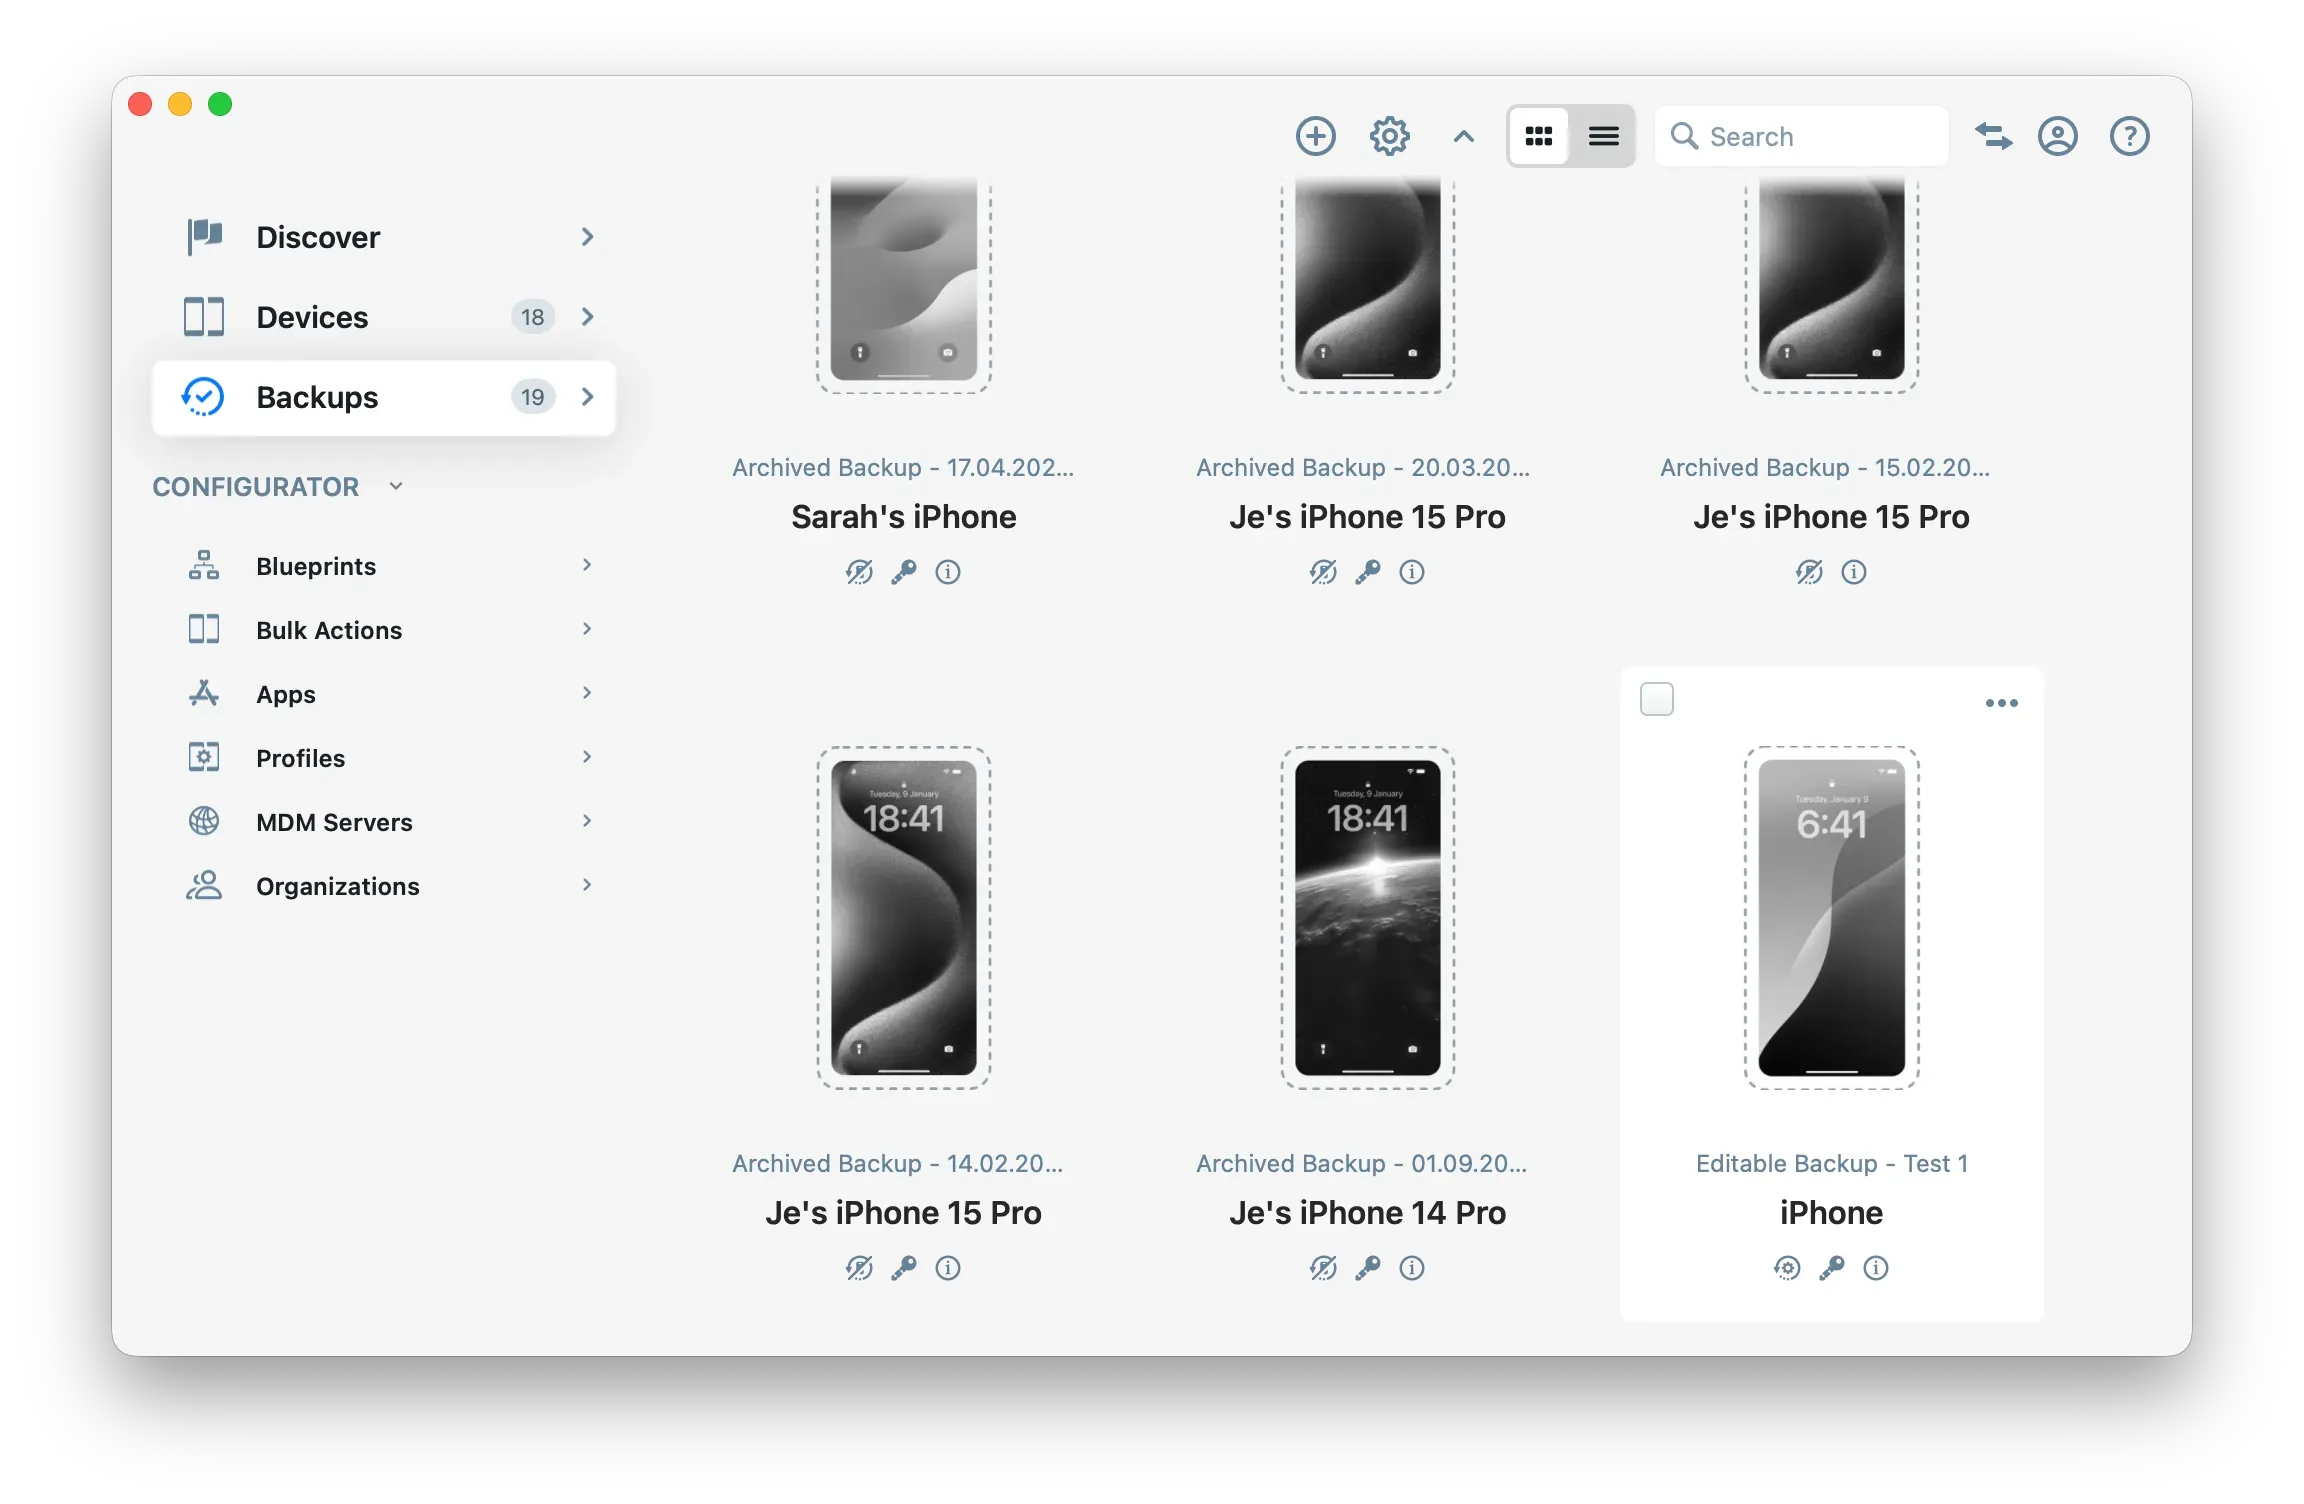
Archived backups appear in the Backups section on the iMazing Home Screen, they are tagged with the label Archived Backup.
You can always use "Unarchive Backup" to make it your device's active backup again.
Important: In some specific cases, iMazing will automatically suggest archiving your current device backup, such as when the backup encryption has changed or when you haven't backed up your device for a very long time.
This may happen when iMazing cannot compare your new device's backups with your previous device's snapshot due to a changed encryption password. It can also occur when there are too many changes between your last snapshot and the new backup, which would result in excessive storage usage on your backup location.
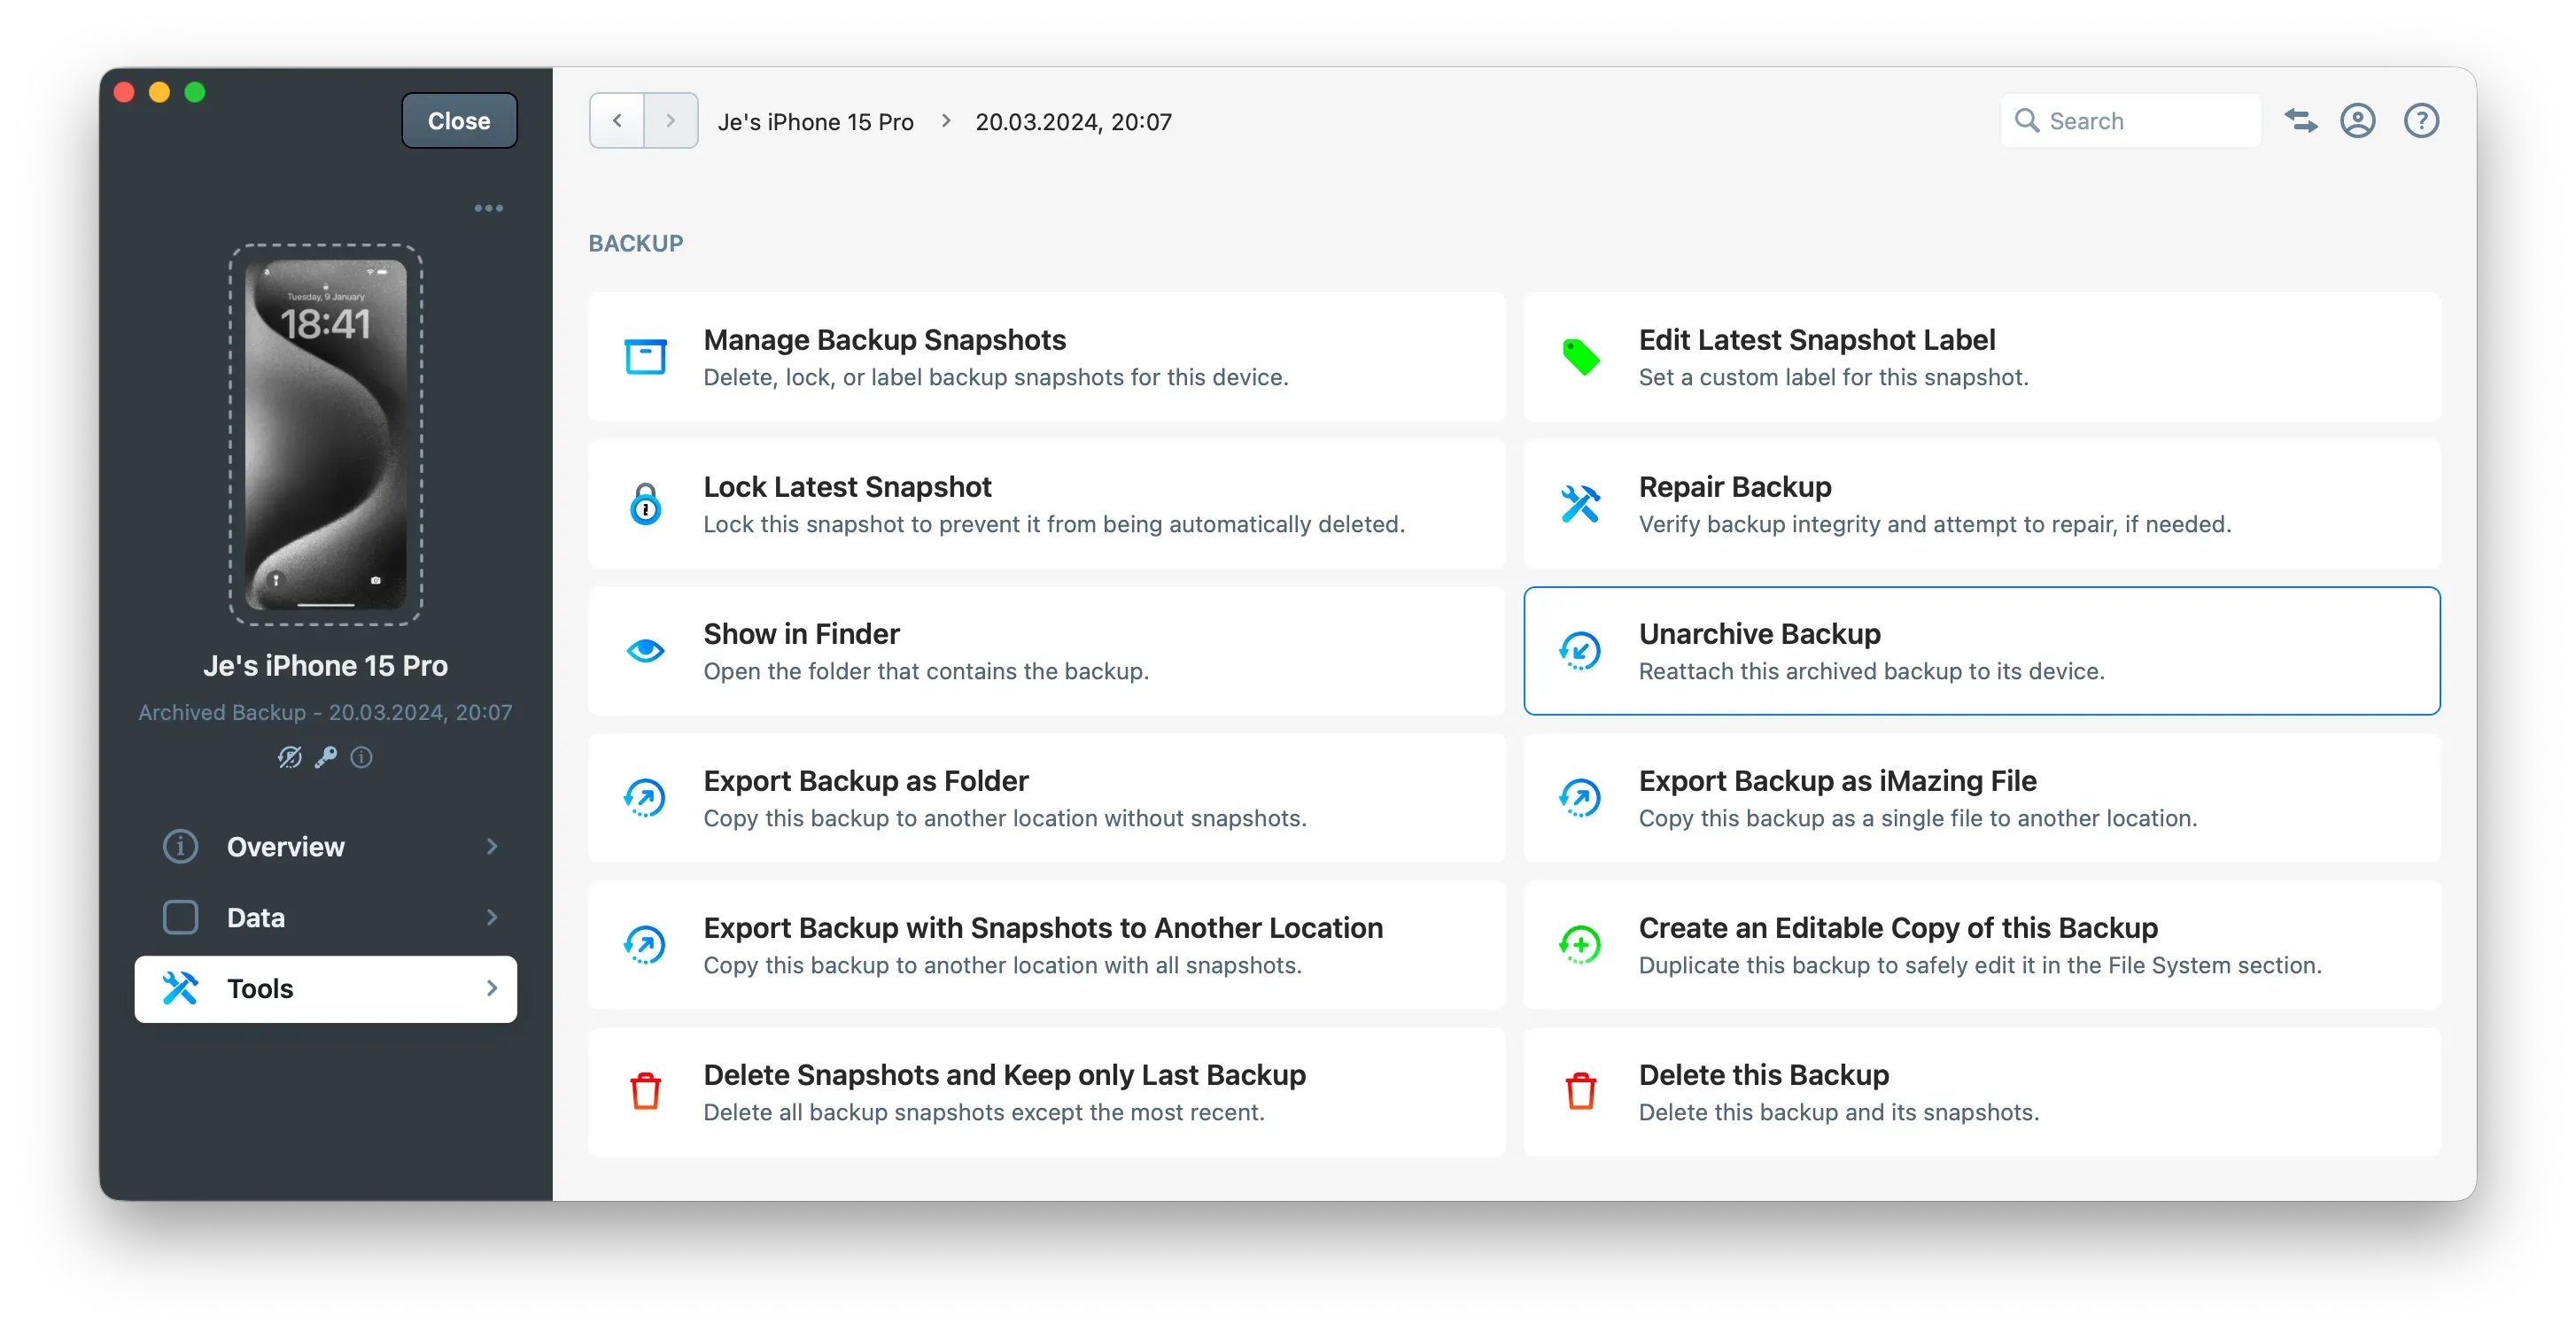
How to unarchive a backup?
You can always use unarchive a backup to make it your device's active backup again.
Go to the device's or backup's Tools section and click "Unarchive Backup", or right-click your device or backup and select Unarchive Backup.
Important: Unarchiving a backup will replace your device's current active backup if one exists, and the active backup will become archived. This process may also change your device backup location if the archived backup that becomes the active one is stored elsewhere.
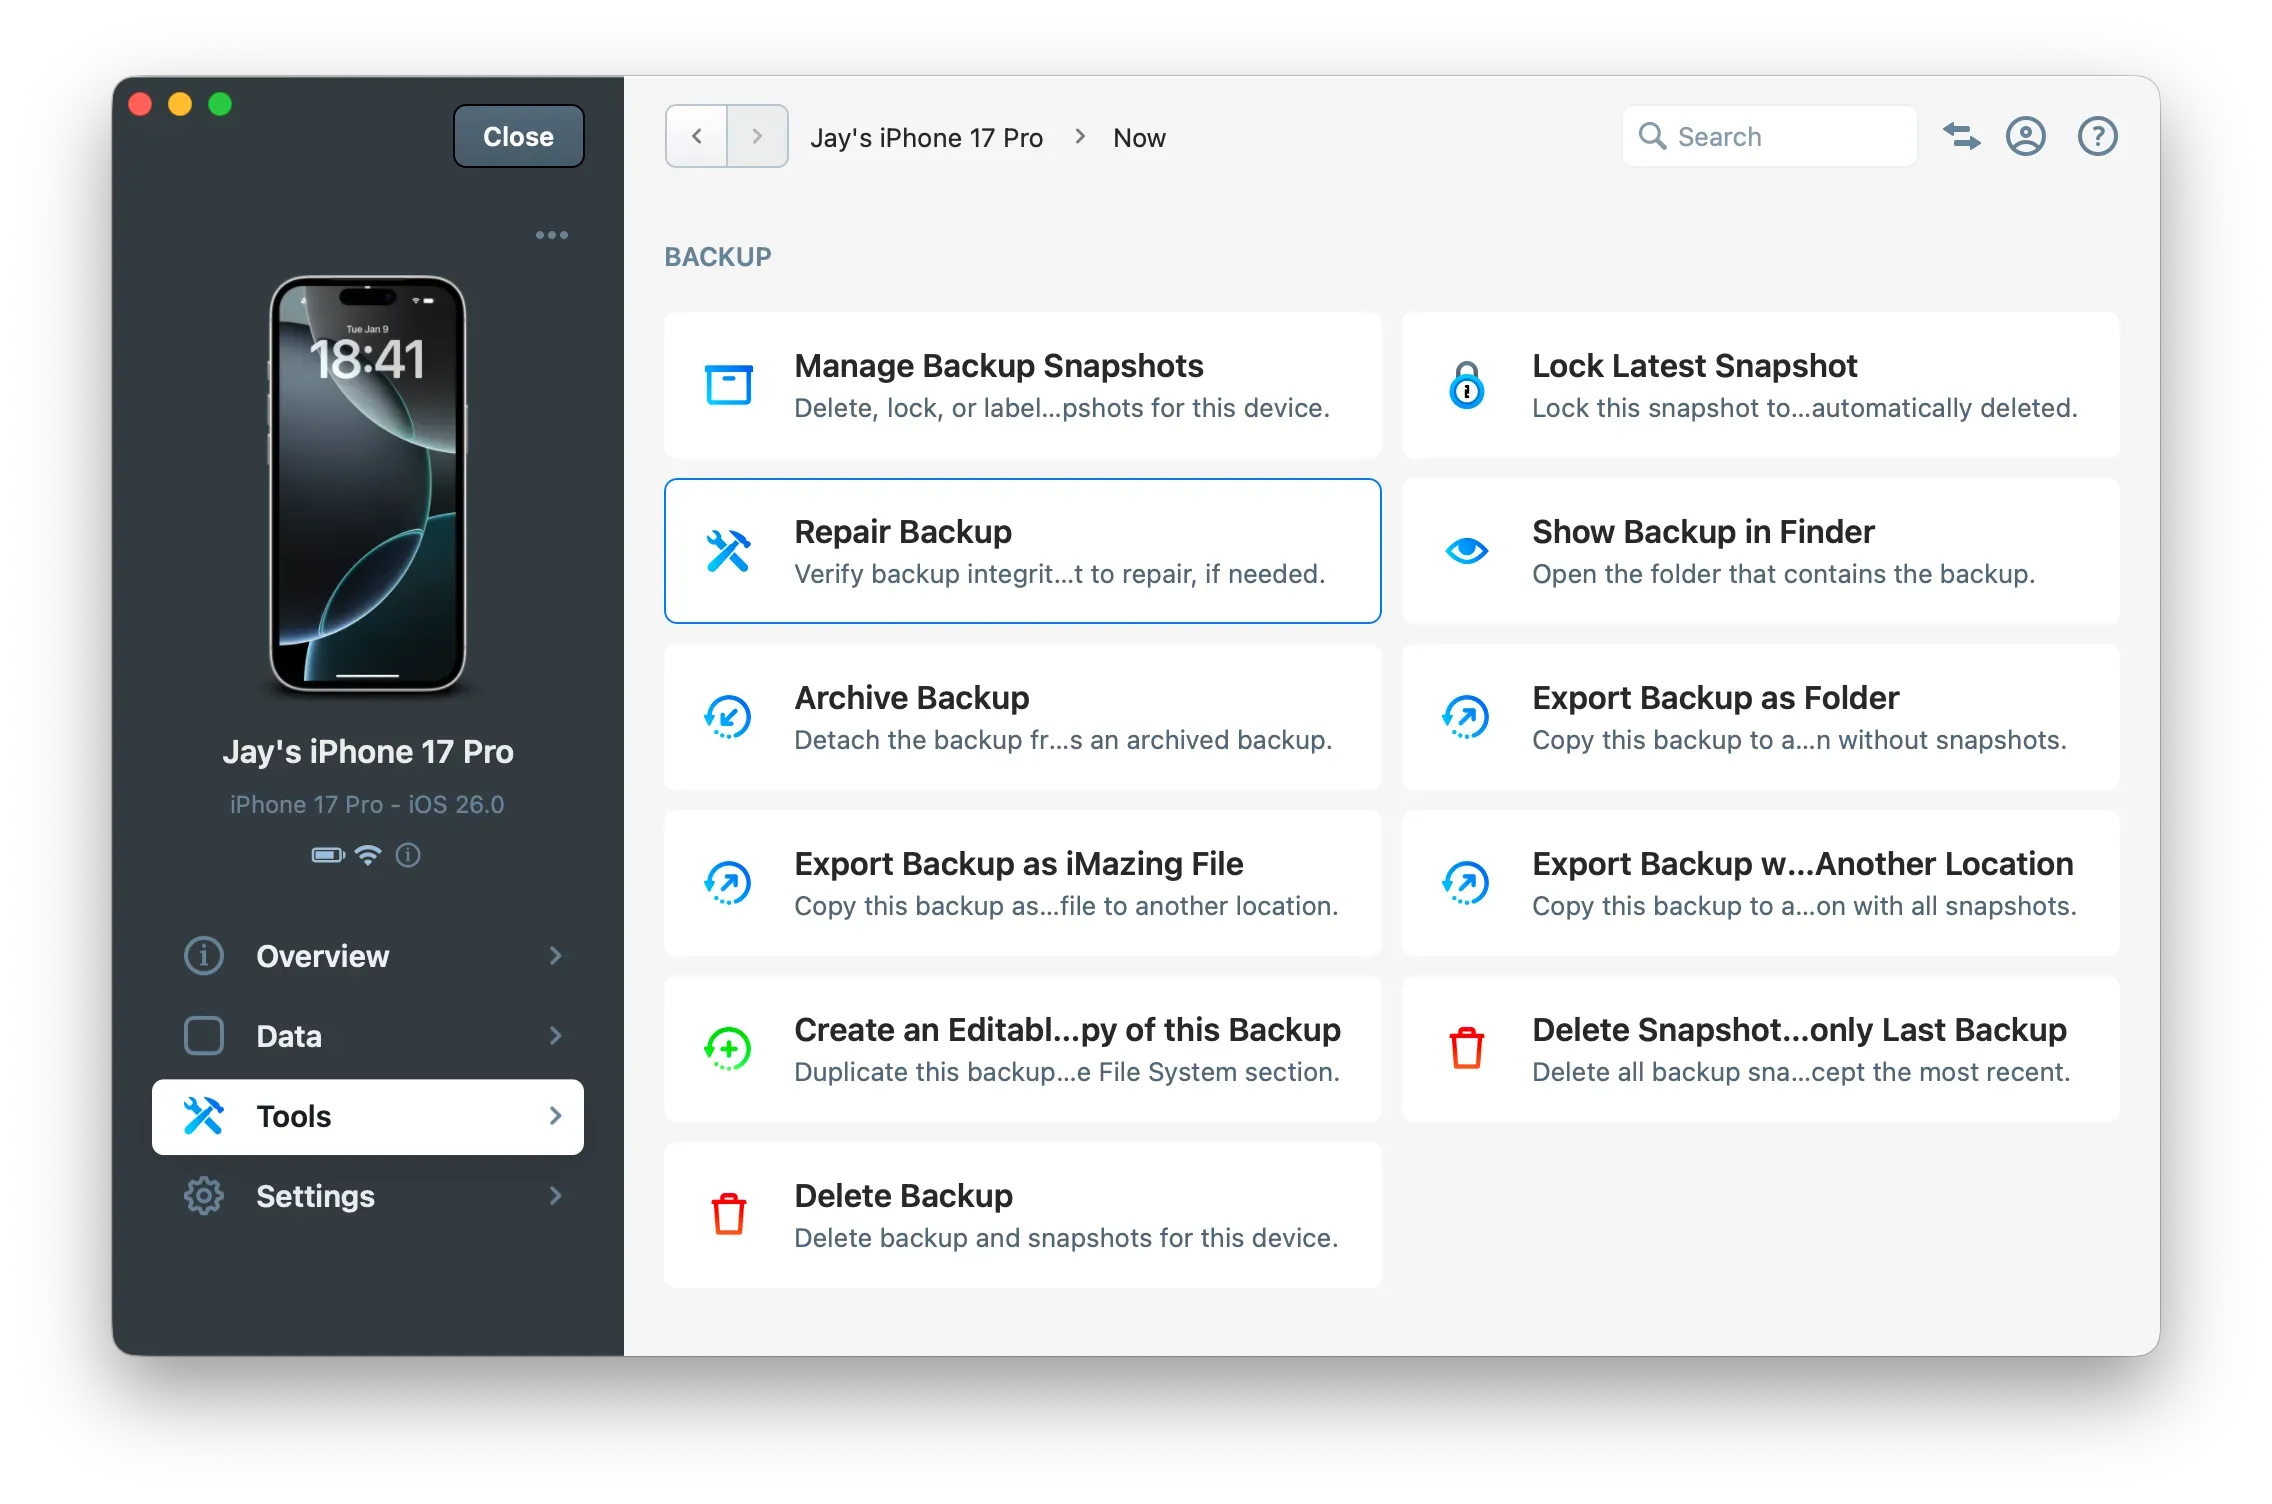
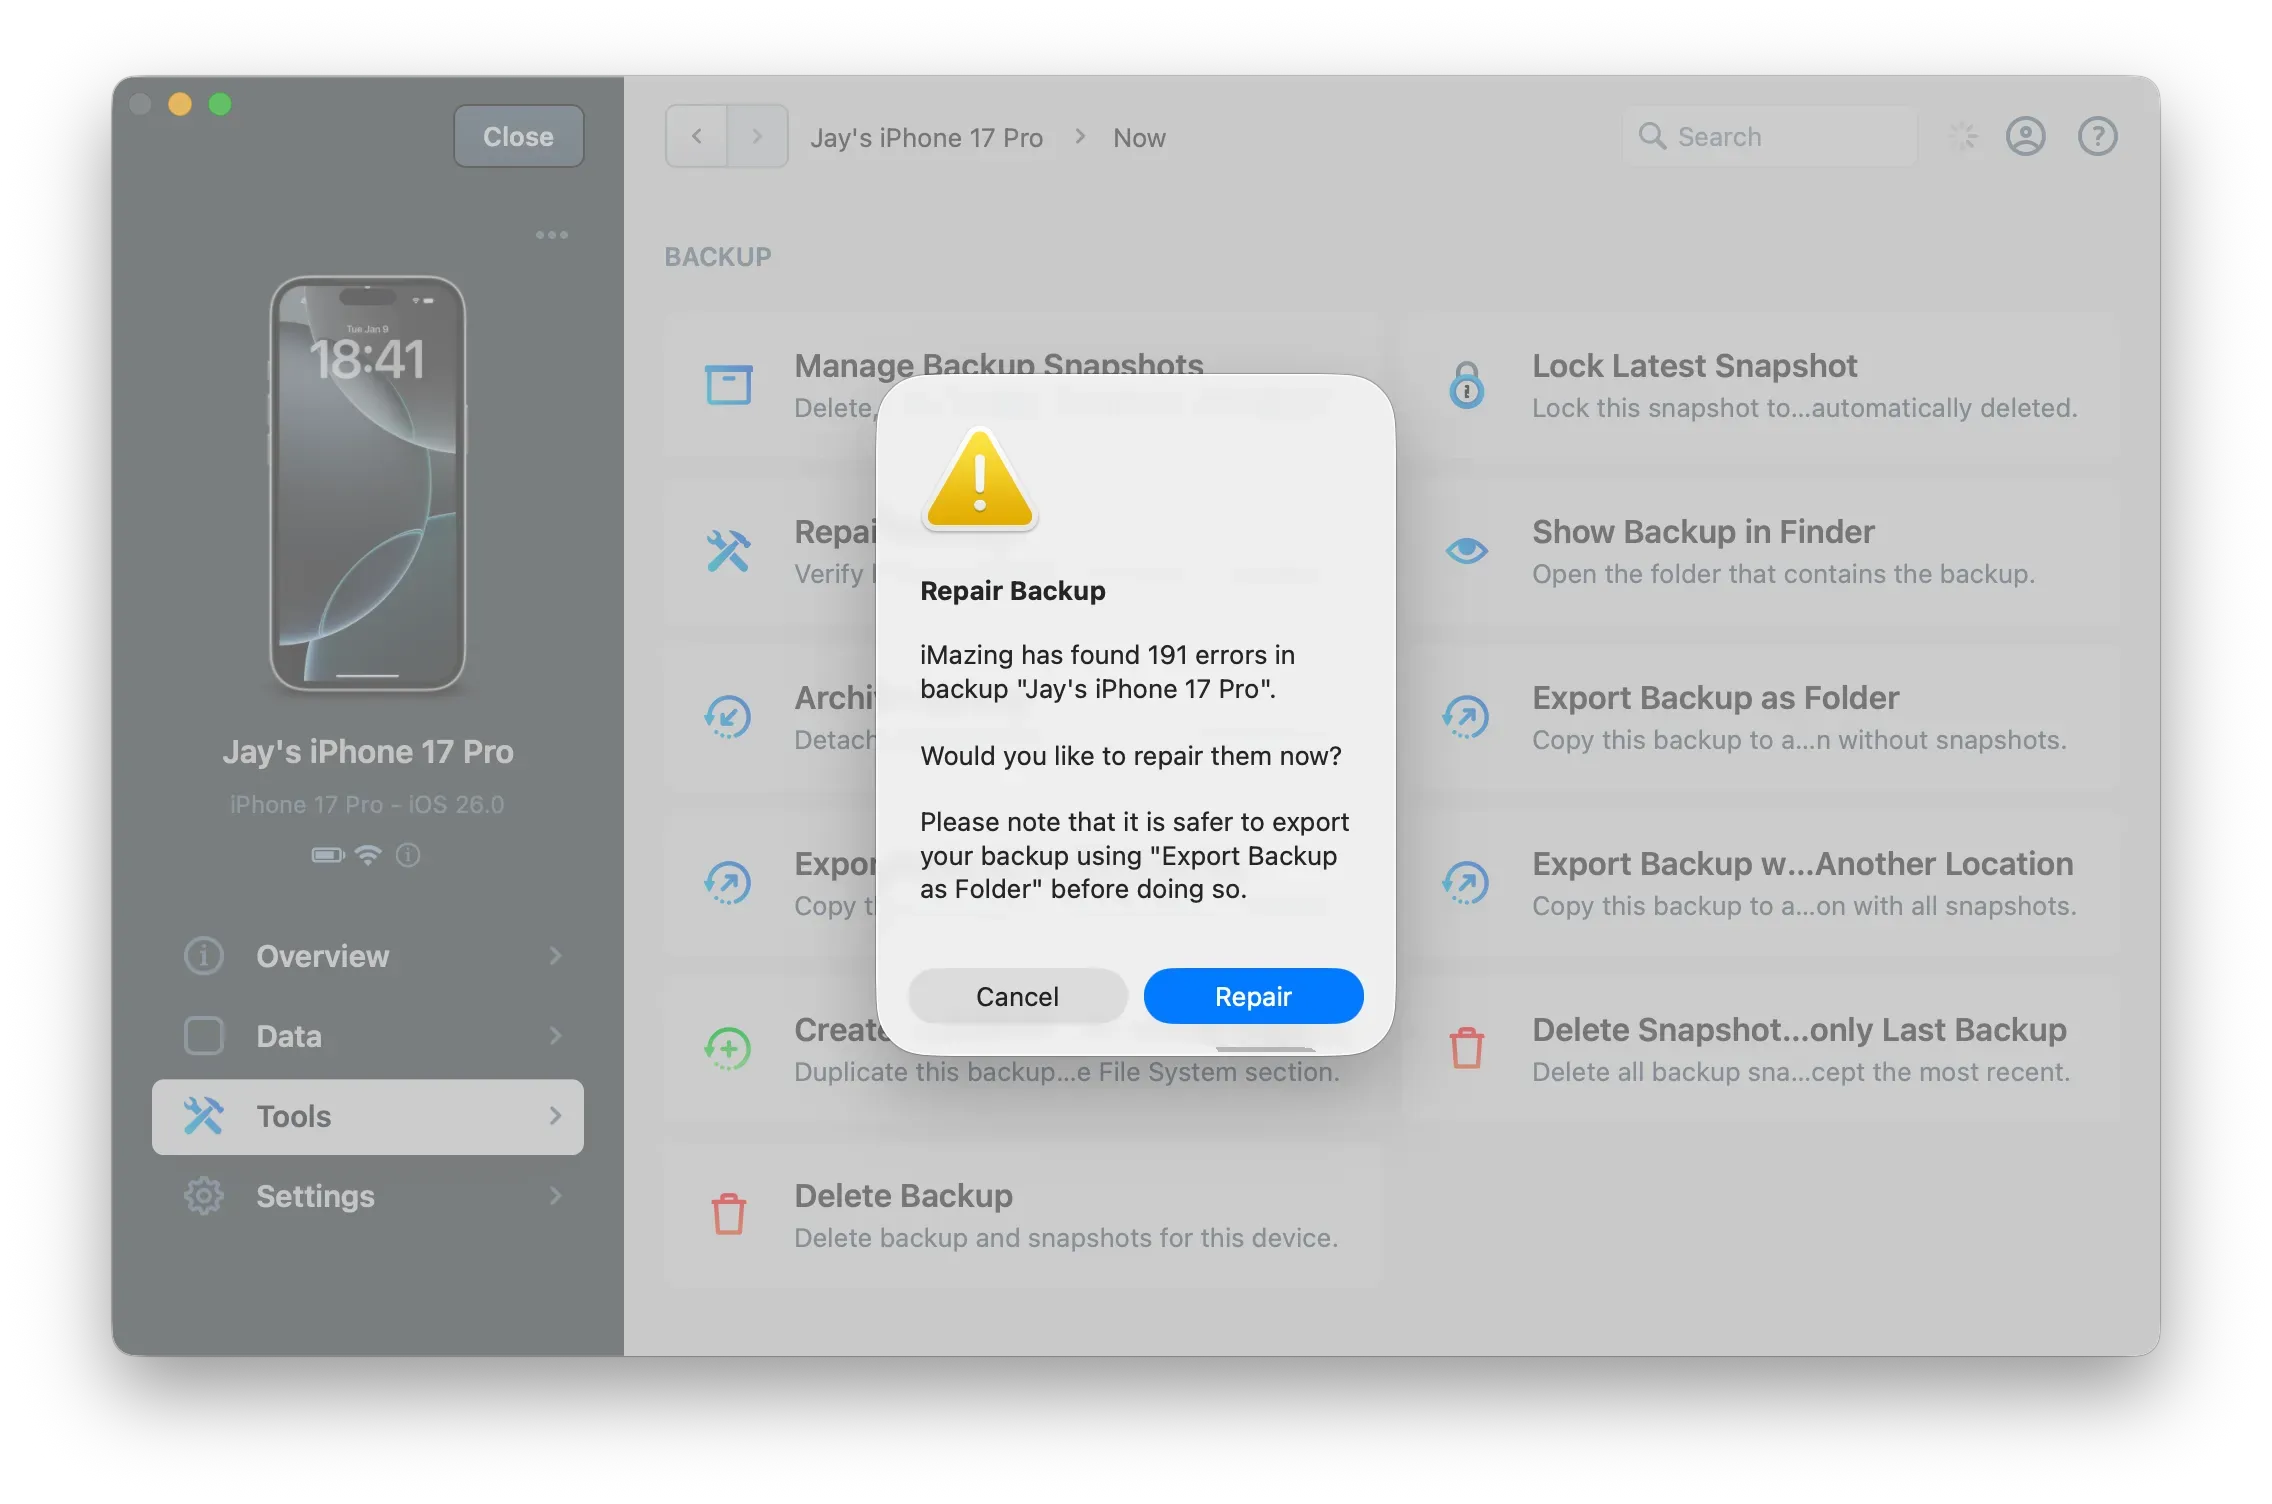
How to repair a backup?
Go to the device's or backup's Tools section and click "Repair Backup", or right-click your device or backup and select Repair Backup.
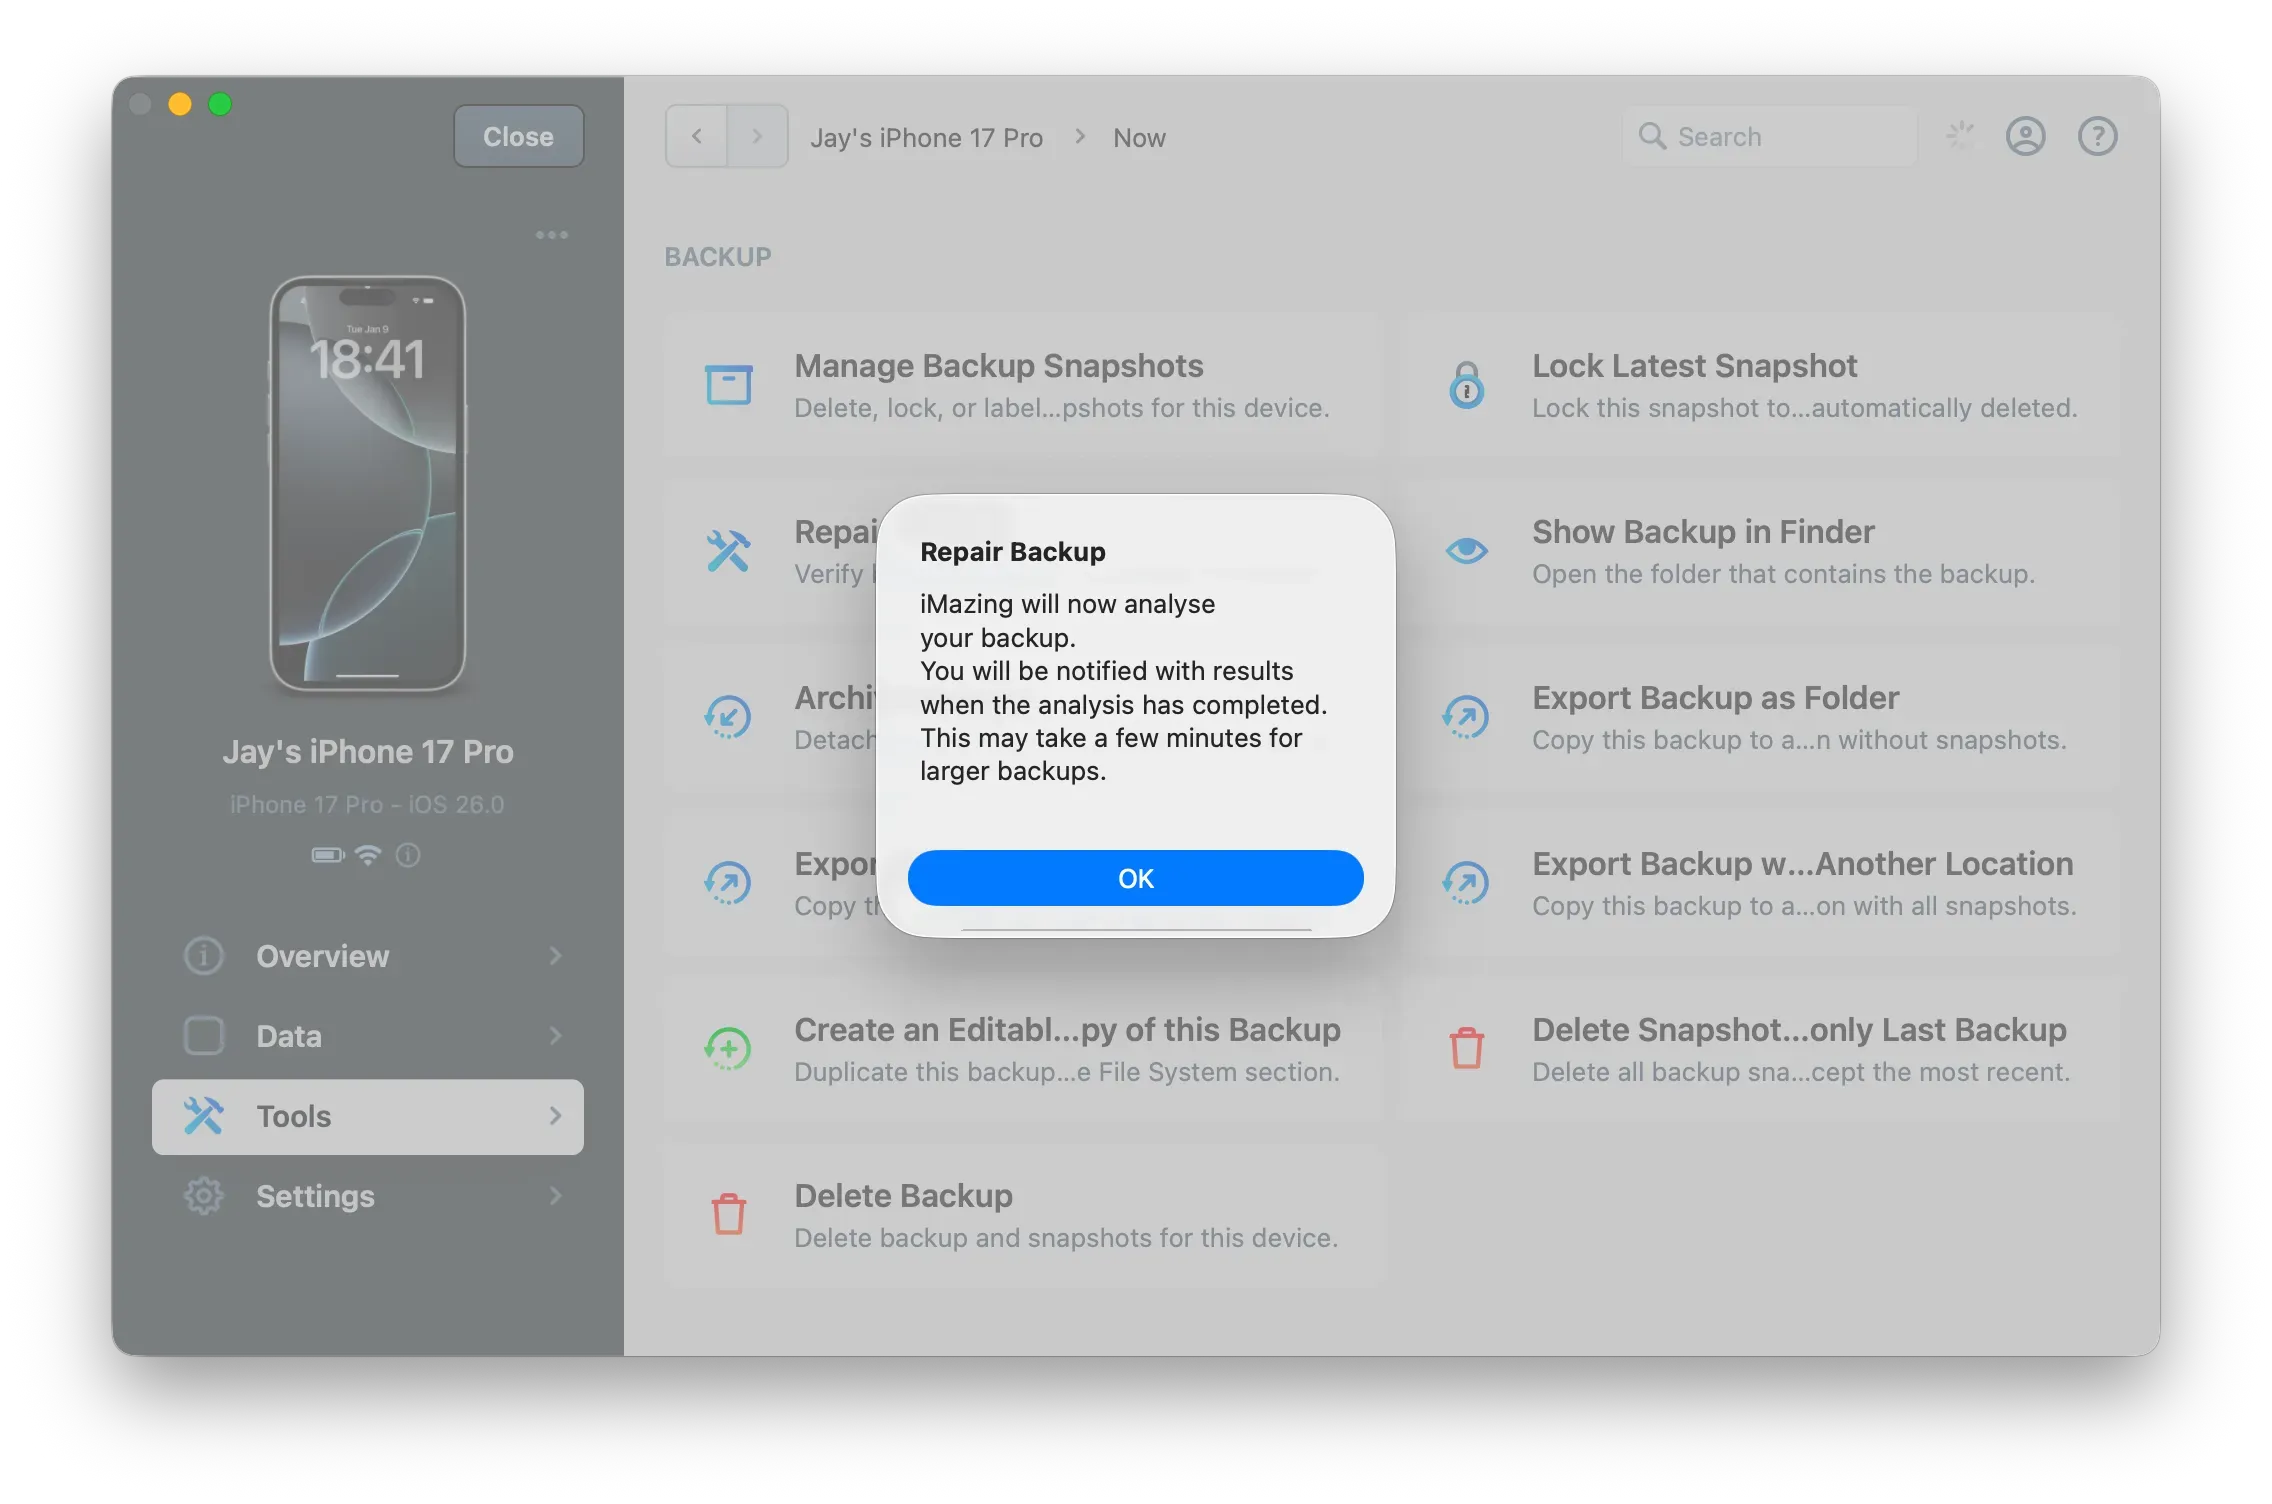
Click "OK" to confirm the analysis.
After a few minutes, iMazing will display the results and the total number of detected errors. If there are errors, you can click the "Repair" button.
Important: It is normal for iMazing to find some errors in backups. For example, empty files (0-bytes files) are sent unencrypted by the iOS BackupAgent, while AES encryption should make them 16 bytes in size. iMazing automatically fixes empty files for older iOS versions, but this isn't necessary for modern versions. You should only use the "Repair Backup" feature when you cannot restore a backup because iMazing displays an error from the iOS BackupAgent (which also handles the restore process).
iOS/iPadOS backups are generally very reliable thanks to the iOS BackupAgent's built-in safeguards and verification processes. Repairs are typically only needed when errors occur during restoration. Backup corruption usually happens when third-party tools modify the backup files or when there's disk hardware failure like bad blocks or other corruption issues. These problems have become less common with modern hard drives.
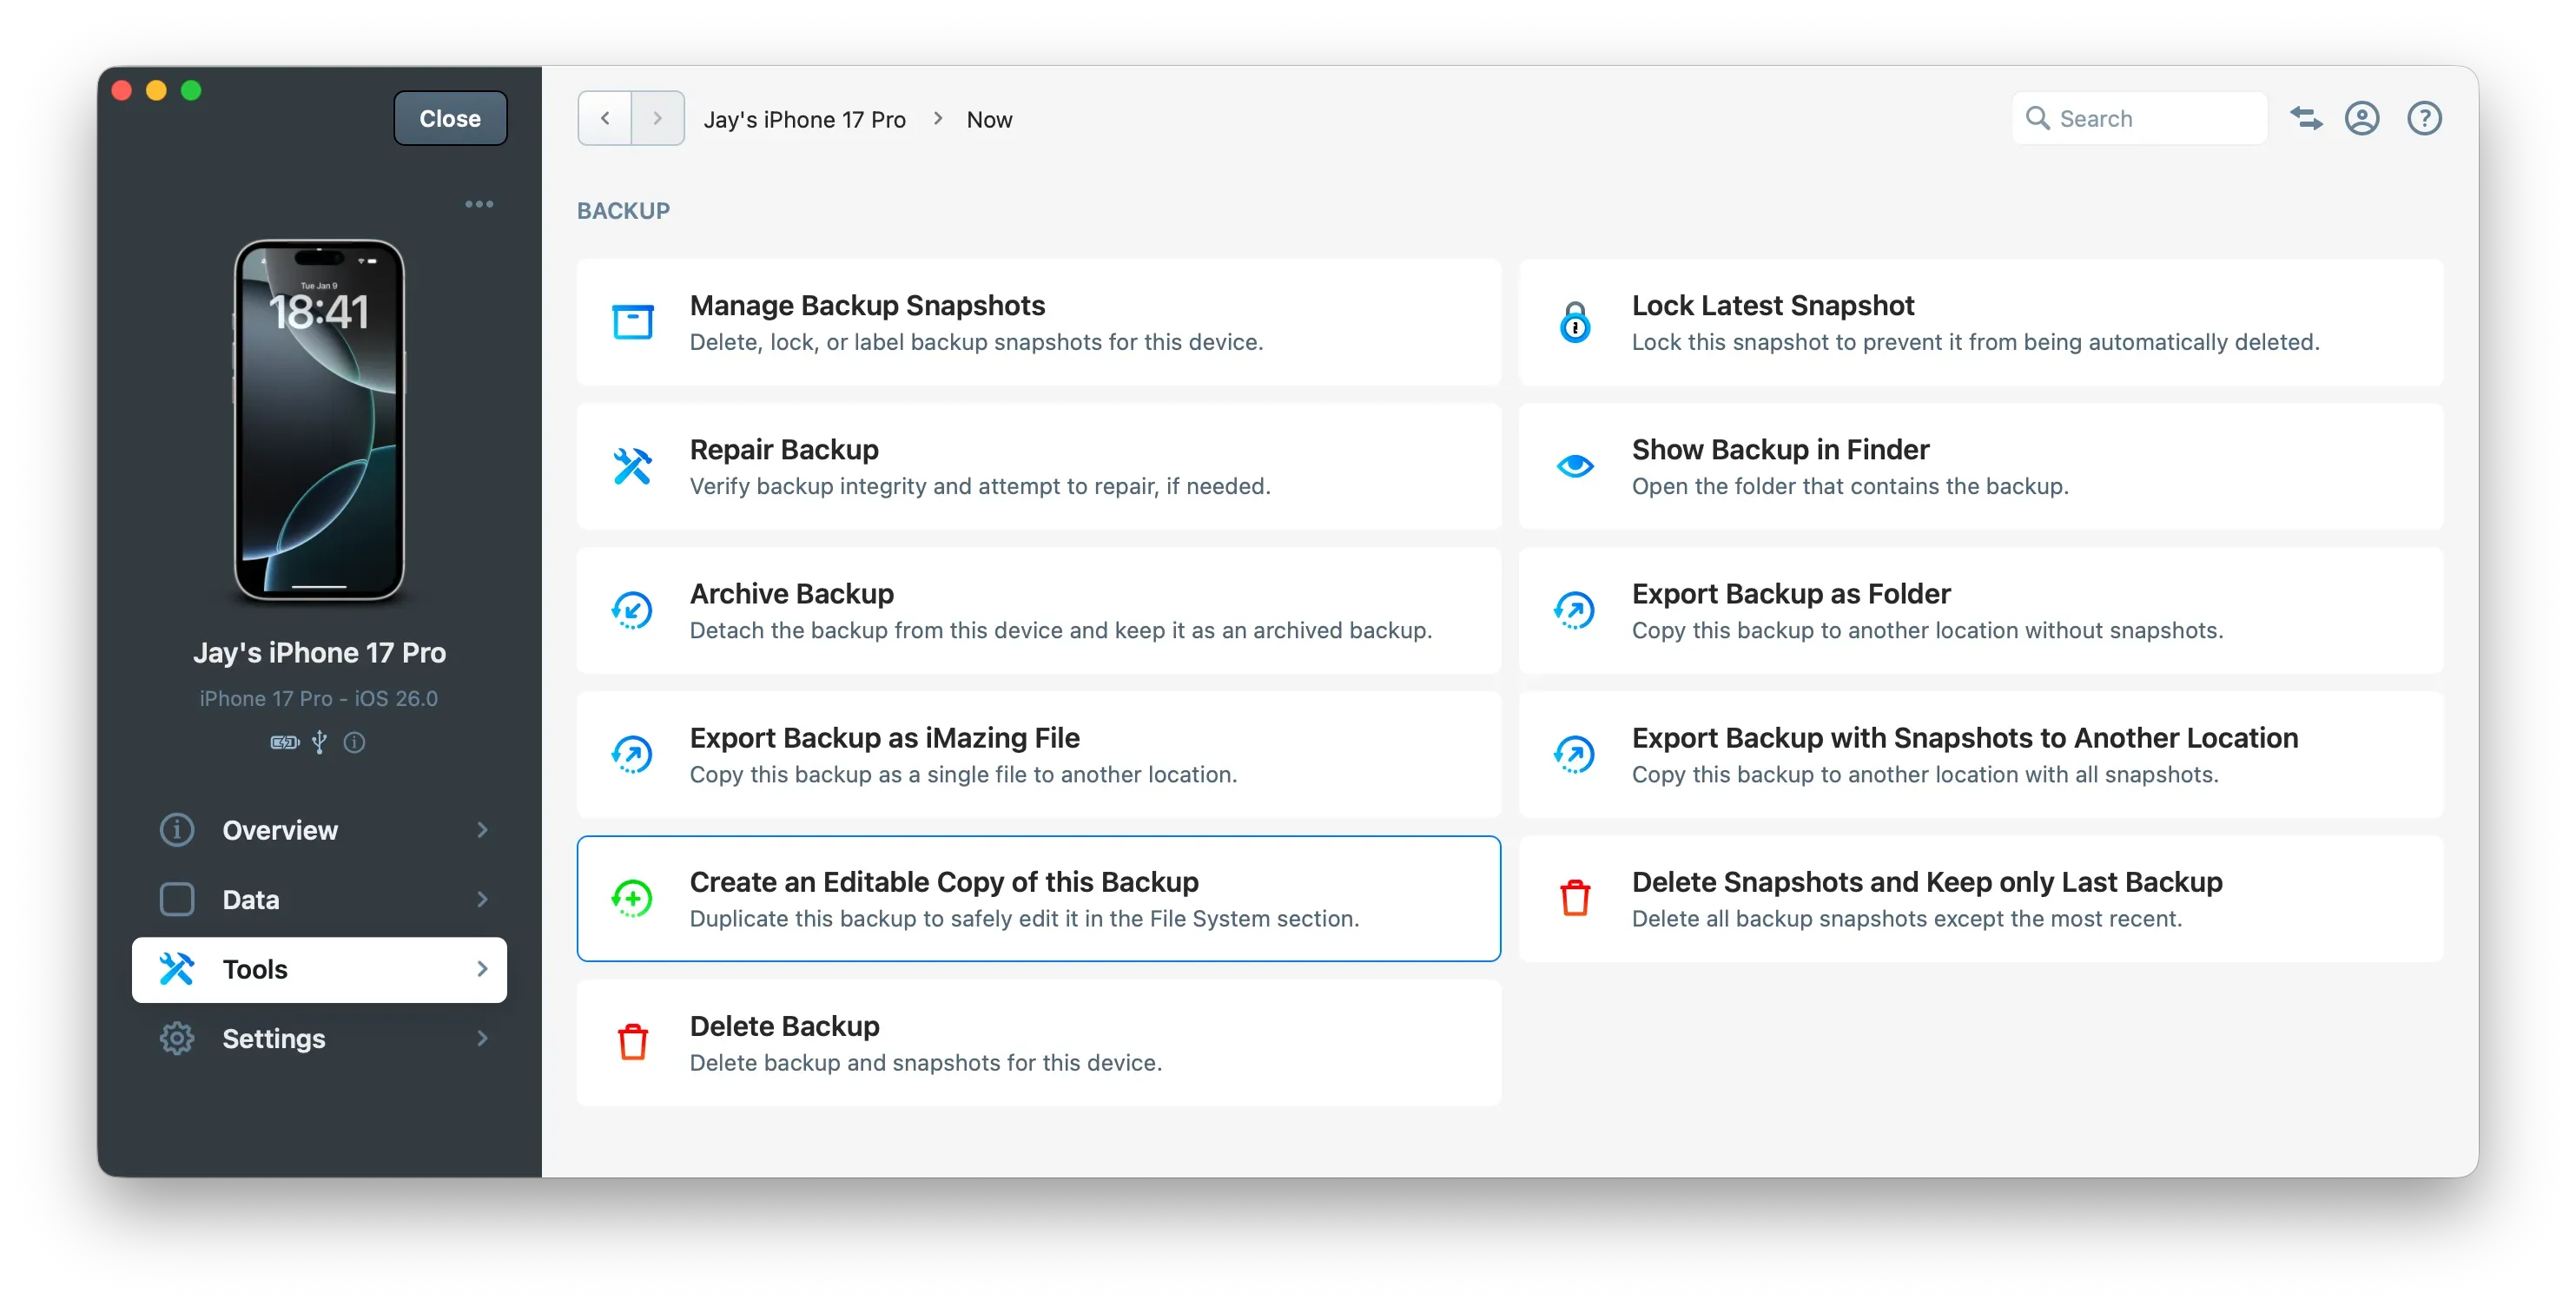
How to edit a backup?
Backups are read-only by design, making them non-editable. With iMazing, however, you can create an editable copy of these backups. This protects the original backup by keeping it safe and unaltered.
Go to the device's or backup's Tools section and click "Create an Editable Copy of this Backup", or right-click your device or backup and select Create an Editable Copy of this Backup.
Editable backups appear in the Backups section on the iMazing Home Screen, they are tagged with the label Editable Backup.
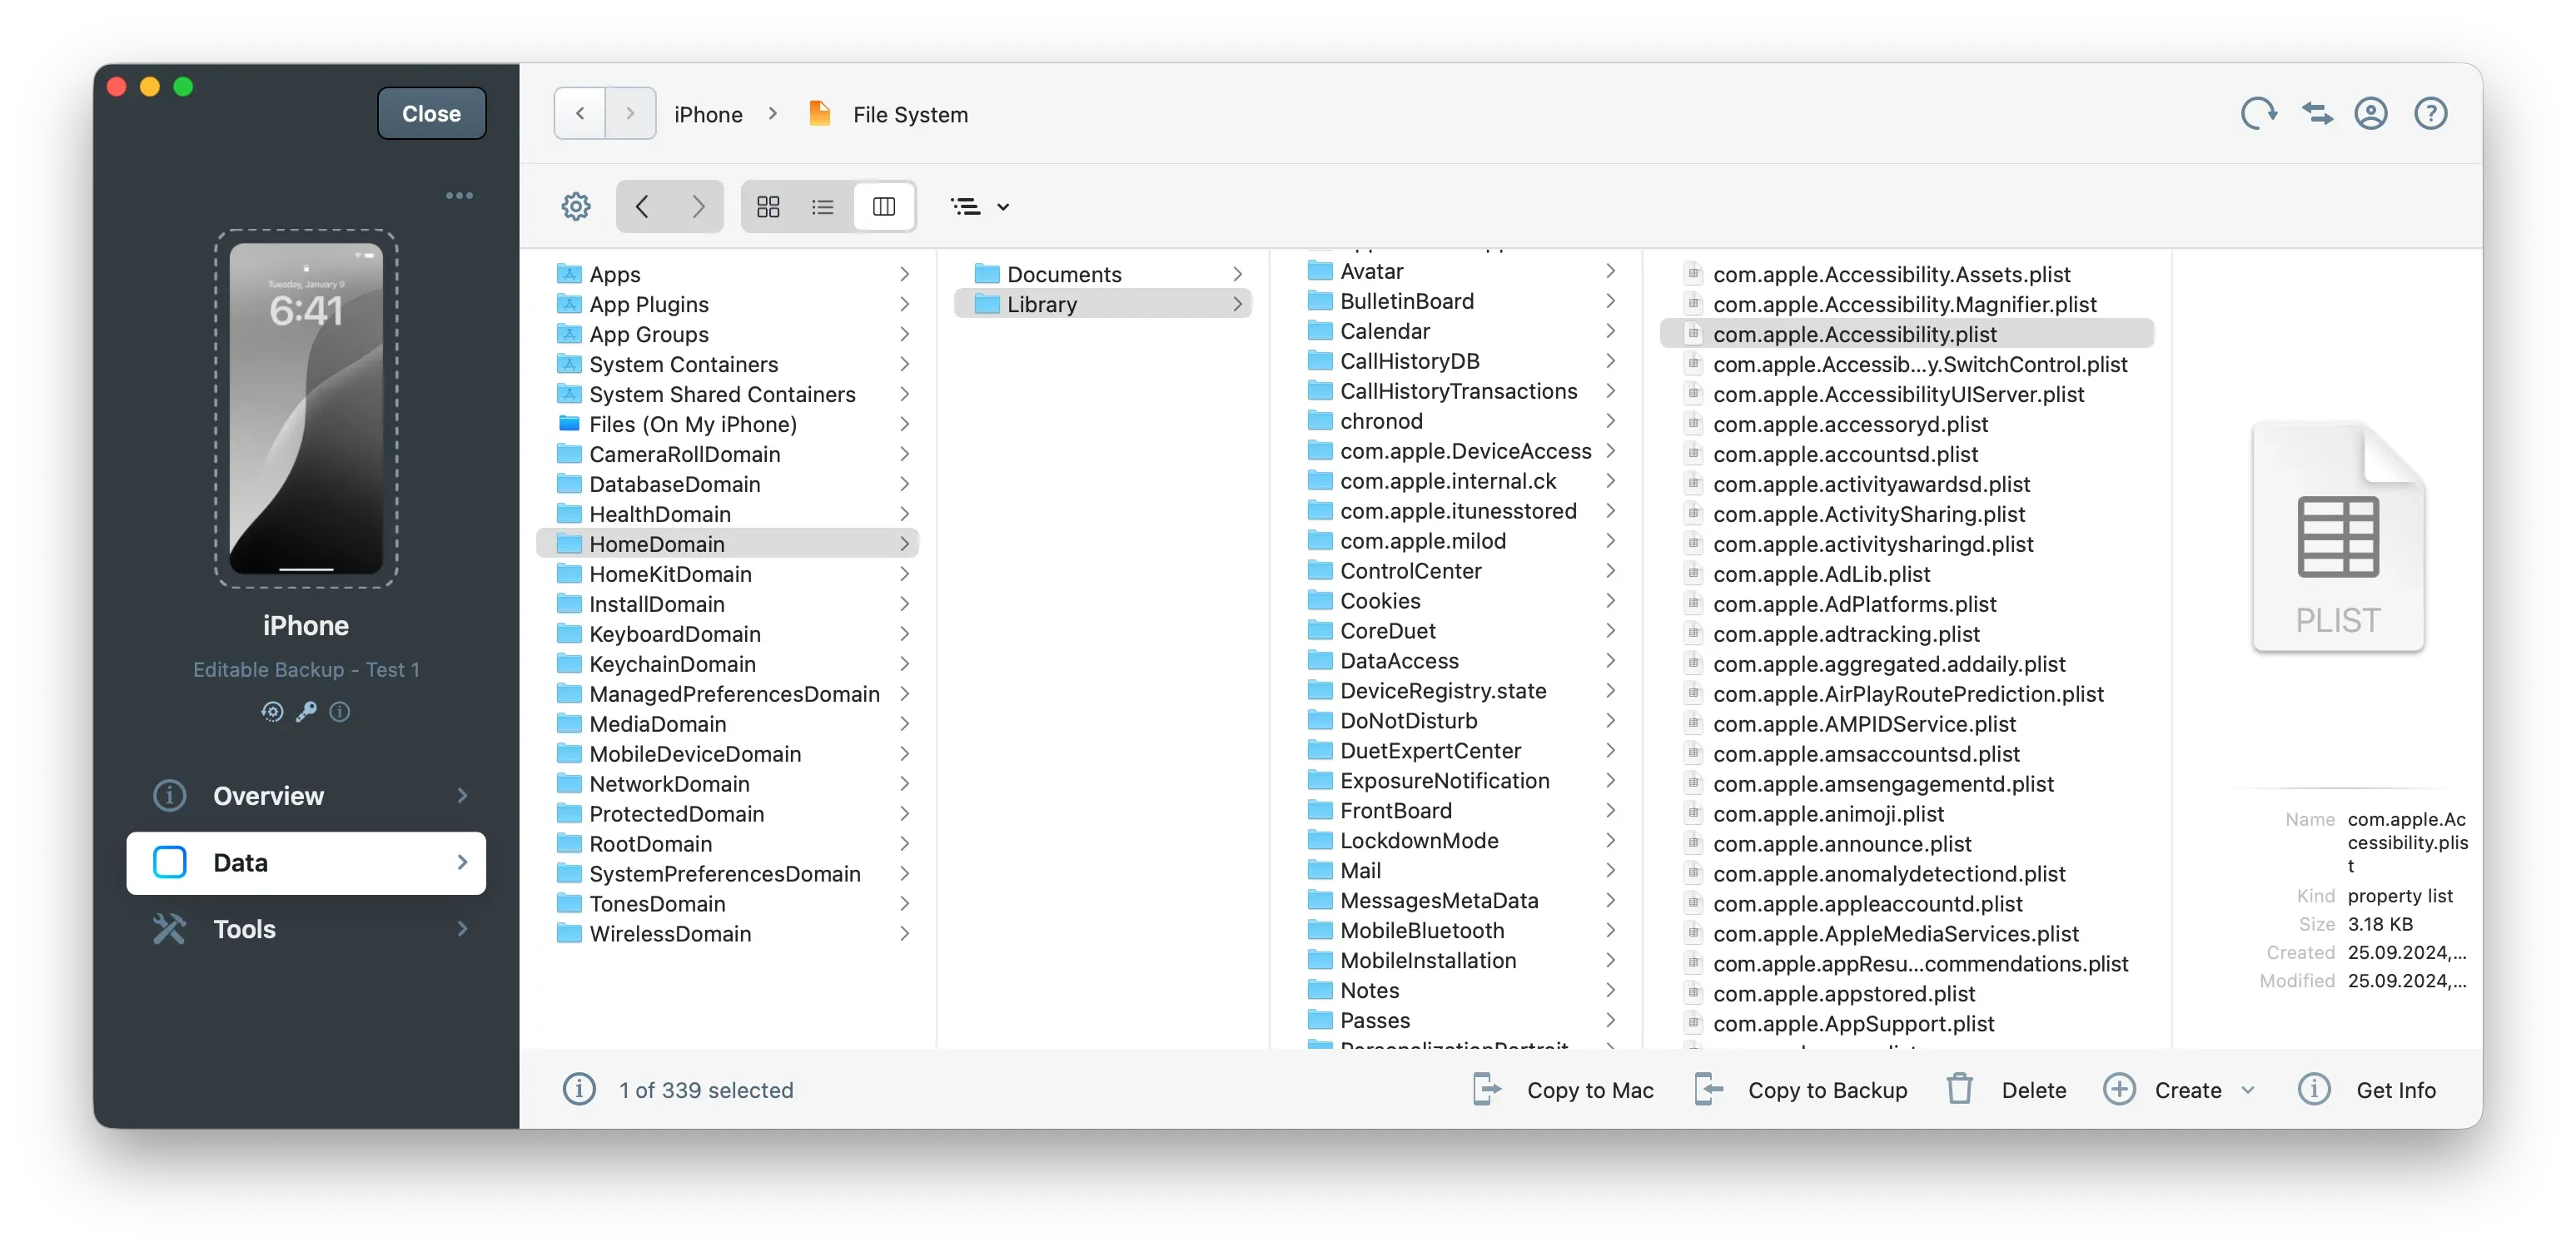
After opening the Editable Backup, navigate to the File System section where you can add, rename, edit, or remove files and folders, as well as removing applications or adding applications (.imazingapp files).
Important: Backup editing is an advanced feature only recommended for experienced users.
You can already customize which data is restored during the backup restoration process, so editing a backup is unnecessary for most purposes. Only use backup editing for specific advanced operations.
You can change iMazing's default backup location and add or remove locations from the iMazing Preferences window.
Each device can be assigned its own separate backup location.
Important:
iMazing creates hard links in the iMazing.Versions/Versions folder located in your backup location. This allows optimized snapshots without duplicating files, saving space on your storage.
Never perform any manual actions in this folder. As mentioned earlier, all operations such as deleting snapshots in this folder should be performed via iMazing.
Learn more about iMazing snapshots, including why folder sizes may appear incorrectly when viewed in Finder or Windows File Explorer: iMazing backup snapshots.
What is a partial backup for "Data Access Only"?
A partial backup is created when you select "Data Access Only" while accessing a dataset that requires a backup for iMazing to access its content.
Partial backups require less storage space than full backups and should be used solely for accessing your content, not for backup purposes.
Partial backups are stored on the local computer hard drive at the following path:
Why is it required to enter the device passcode to back up an iPhone or iPad?
Since version 16.1, iOS and iPadOS require users to enter their device passcode to initiate a backup. Apple introduced this security measure to prevent third-party software from executing backups without user consent, which could potentially lead to privacy issues when Backup Encryption is not enabled.
While we acknowledge that requesting the device passcode serves as an effective security measure to protect user privacy, we believe Apple should offer options in iOS Settings that would allow users to avoid entering their passcode for every backup.
Additionally, we think Apple should provide configurations that exempt organization-supervised devices from requiring passcode entry for each backup.
What key factors should you consider regarding device-to-computer connections via USB or Wi-Fi?
USB:
Standard iPhones use a USB 2.0 interface with speeds limited to 480 Mbps. However, newer models (since iPhone 15 Pro) and iPads support speeds up to 10 Gbps when using an appropriate USB 3.0, USB 3.1 or Thunderbolt cable (not the standard charging cables provided by Apple) and when connected to a compatible port on your computer.
If your device supports this type of USB connection, we strongly recommend connecting it to your computer using the appropriate cable and port. This can speed up backup operations by 3 to 5 times.
When backing up via Wi-Fi, speeds can vary significantly based on your router type (Wi-Fi 6 or 7 offers better performance) and the proximity of both your computer and device to the router.
We recommend making your first backup via USB, after which subsequent backups can be done over Wi-Fi since they're incremental—only new or changed data is backed up once an initial backup exists.
What key factors should you consider regarding backups on External and Network Drives (NAS)?
Using external drives or network-attached storage (NAS) as backup locations can significantly reduce backup speed. Here are factors to improve your experience with both externally connected drives and network drives.
For External Hard Drives:
When using an external drive with iMazing, connect it to your computer using a USB 3.0, USB 3.1 or Thunderbolt cable and to a compatible port on your computer for optimal performance.
Note that the connector type (USB-C or USB-A) doesn't affect performance—what matters is the port specification on your computer and the cable's speed capability.
Format your external drive with NTFS on Windows or APFS (or HFS+) on macOS for better performance compared to other file systems.
Avoid using USB flash drives or SD cards as they typically offer very poor speed performance.
For Network Drives (NAS):
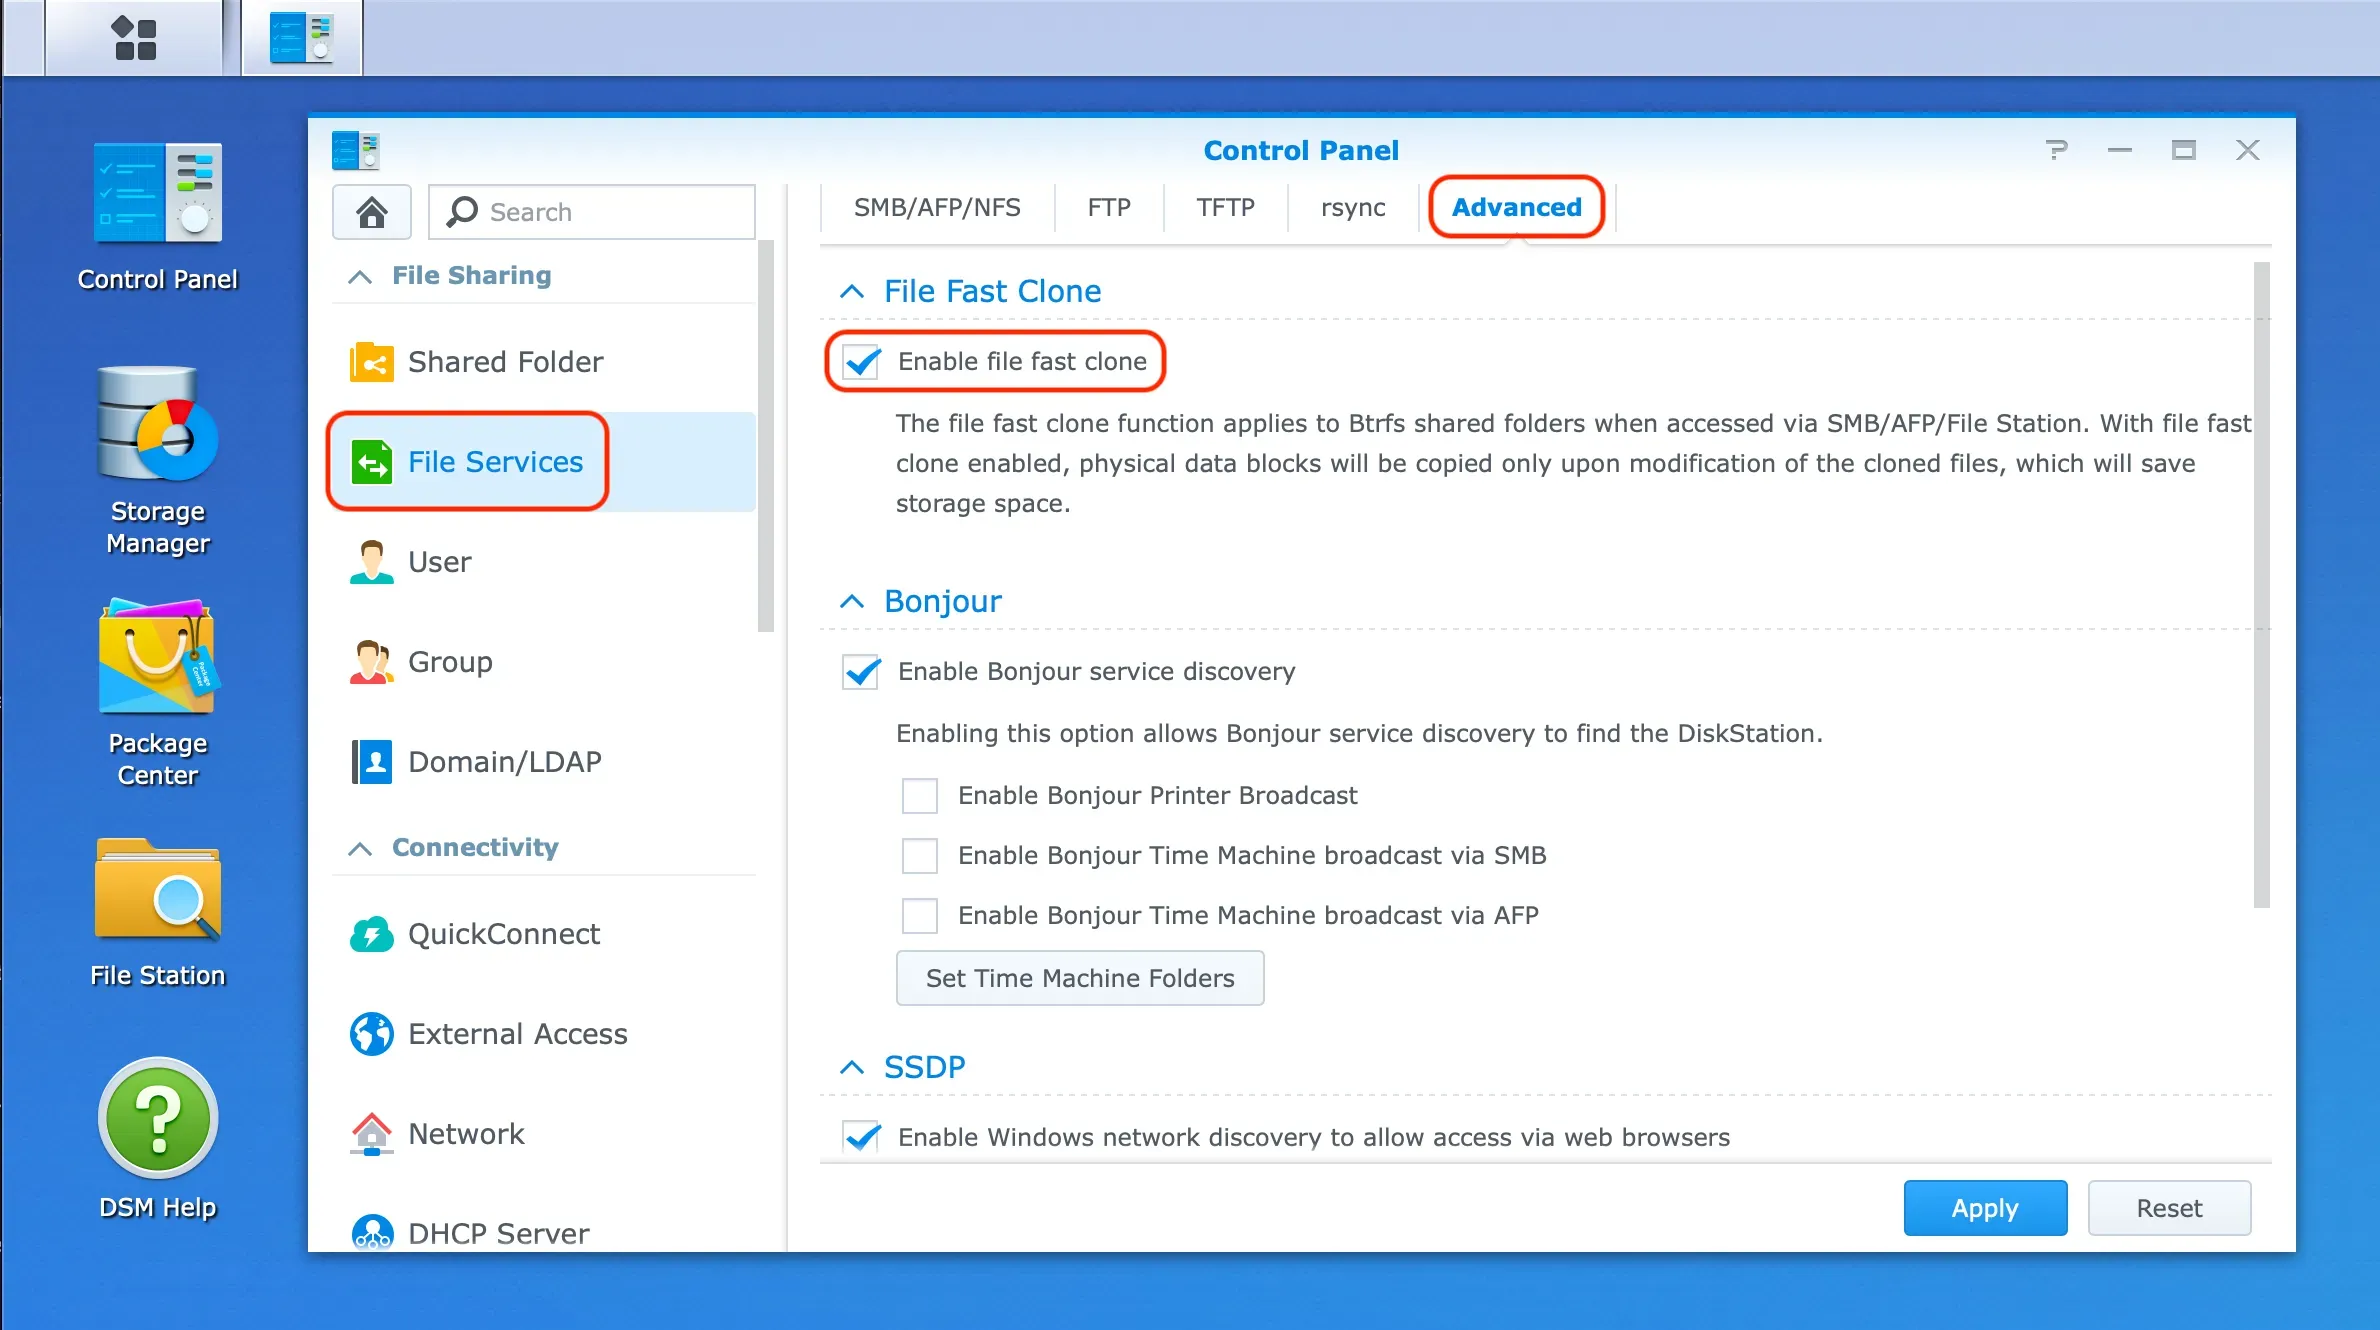
The first key consideration with NAS backups is storage space. Most NAS file systems don't support hard links, preventing iMazing's Backup Snapshot system from optimizing storage. With Backup Snapshots enabled, your backups might require up to twice the space compared to file systems that support hard links. Some NAS devices, like Synology, offer a feature called "File Fast Clone" that can significantly accelerate backup snapshot creation and reduce storage space usage. We recommend enabling Fast File Clone for improved performance and more efficient storage utilization.
The second consideration is the file sharing protocol. On Windows, we recommend configuring your network share with SMB3, which Windows supports well. With modern NAS devices like Synology, this protocol allows file copying to occur locally on the NAS, significantly speeding up snapshot creation.
On macOS, SMB3 support is less robust in our testing. When creating snapshots, files must stream from the NAS to the computer and back again, rather than copying directly on the NAS. This limitation stems from Apple's SMB implementation lacking support for direct NAS copies.
We've observed better performance when using the older Apple's AFP protocol instead. We recommend enabling this protocol on your NAS for file sharing with macOS.
We hope Apple will improve SMB3 support in the future.
First backup:
For your first backup, we recommend connecting your NAS to your Wi-Fi router with an Ethernet cable. If possible, also connect your computer to the router via Ethernet. Additionally, we advise connecting your iPhone or iPad directly to your computer using a USB cable for this initial backup process.
To enable iMazing to access an external or network drive on macOS and Windows, you'll need to configure it properly. For detailed instructions, see: How to change your backup location?
Why do third-party security or cleaning software cause backup issues?
Antivirus, firewall, VPN, or even ad-blockers can slow or interrupt the backup process, sometimes without triggering any error message (from either iMazing or the software causing the issue). CleanMyMac is also known to interfere with iOS backups, so be sure to exclude your backup location in CleanMyMac's settings.
If you encounter backup issues, try quitting or pausing these utilities. Should problems persist, you may need to uninstall the software and restart your computer.
When using third-party antivirus software, exclude your backup location from being scanned.
iOS and iPadOS backups contain tens of thousands of small files, and real-time virus scanners can significantly slow the backup process as they check each file.
Notes:
In general, antivirus software is unnecessary if you're running Microsoft Windows 10 or 11 or recent macOS versions, as these operating systems manage threats adequately on their own.
Even if you've used the same security software alongside iMazing backups successfully for some time, updates can introduce new issues. If you're experiencing new backup problems, don't skip disabling security software just because it wasn't problematic previously.
Why are Cloud Storage services problematic for backup locations?
Avoid using cloud storage (OneDrive, Google Drive, iCloud Drive, Dropbox, etc.) as your backup location. These services have low read/write speeds, connection issues, or file-locking mechanisms that can lead to corrupted backups.
If you must store iOS or iPadOS backups in such locations, temporarily pause the sync during backup.
To pause Cloud Storage services from syncing files:
We also strongly advise against using Western Digital (WD) My Cloud Home for backup. These are extremely inefficient NAS drives that can generate many issues when backing up iOS devices. You should not back up your iOS devices to such drives.
Why should you avoid backing up iOS devices while computer backups are running?
iMazing backups will be more reliable if performed at a different time from any computer backups.
If you schedule automatic computer backups, choose a time that differs from when you back up an iOS or iPadOS device. This is especially important if your iMazing backup location is included in your computer backup schedule—which is almost always the case when backing up a computer's internal drive.
Backup software can also "lock" the contents of an external drive's invisible Temp folder, which iMazing uses to store temporary backup files. When this happens, the backup will almost always fail. Popular solutions like Time Machine, Acronis, Carbon Copy Cloner, and Backblaze can all cause this issue.
Why do iOS/iPadOS devices need minimum storage space for backups?
iOS or iPadOS devices require minimum available space for backups because the operating system needs to prepare and temporarily store files before transferring them to your computer. We recommend having at least 10GB of free space to allow the backup process to handle large chunks of data efficiently. For example, if you have files larger than 5GB, you'll need sufficient space for these files to be copied to the temporary folder used during backup.
What is the iOS BackupAgent? What's its role and how does the iOS backup format work?
Learn how the iOS BackupAgent works, understand the iOS backup format, and discover why it's efficient, reliable, secure, and safe for data integrity here.
What to do if you experience slow backup speeds or unfinished backups?
Downloading numerous files from iCloud or other cloud services during backup, or having many files change on your device while backing up, can significantly extend backup times. This occurs because any added or modified files must be backed up again at the end of the process. If you experience this issue, enable Airplane mode and keep your device idle during backup. This problem typically affects only the first backup. For subsequent incremental backups, you can safely disable Airplane mode.
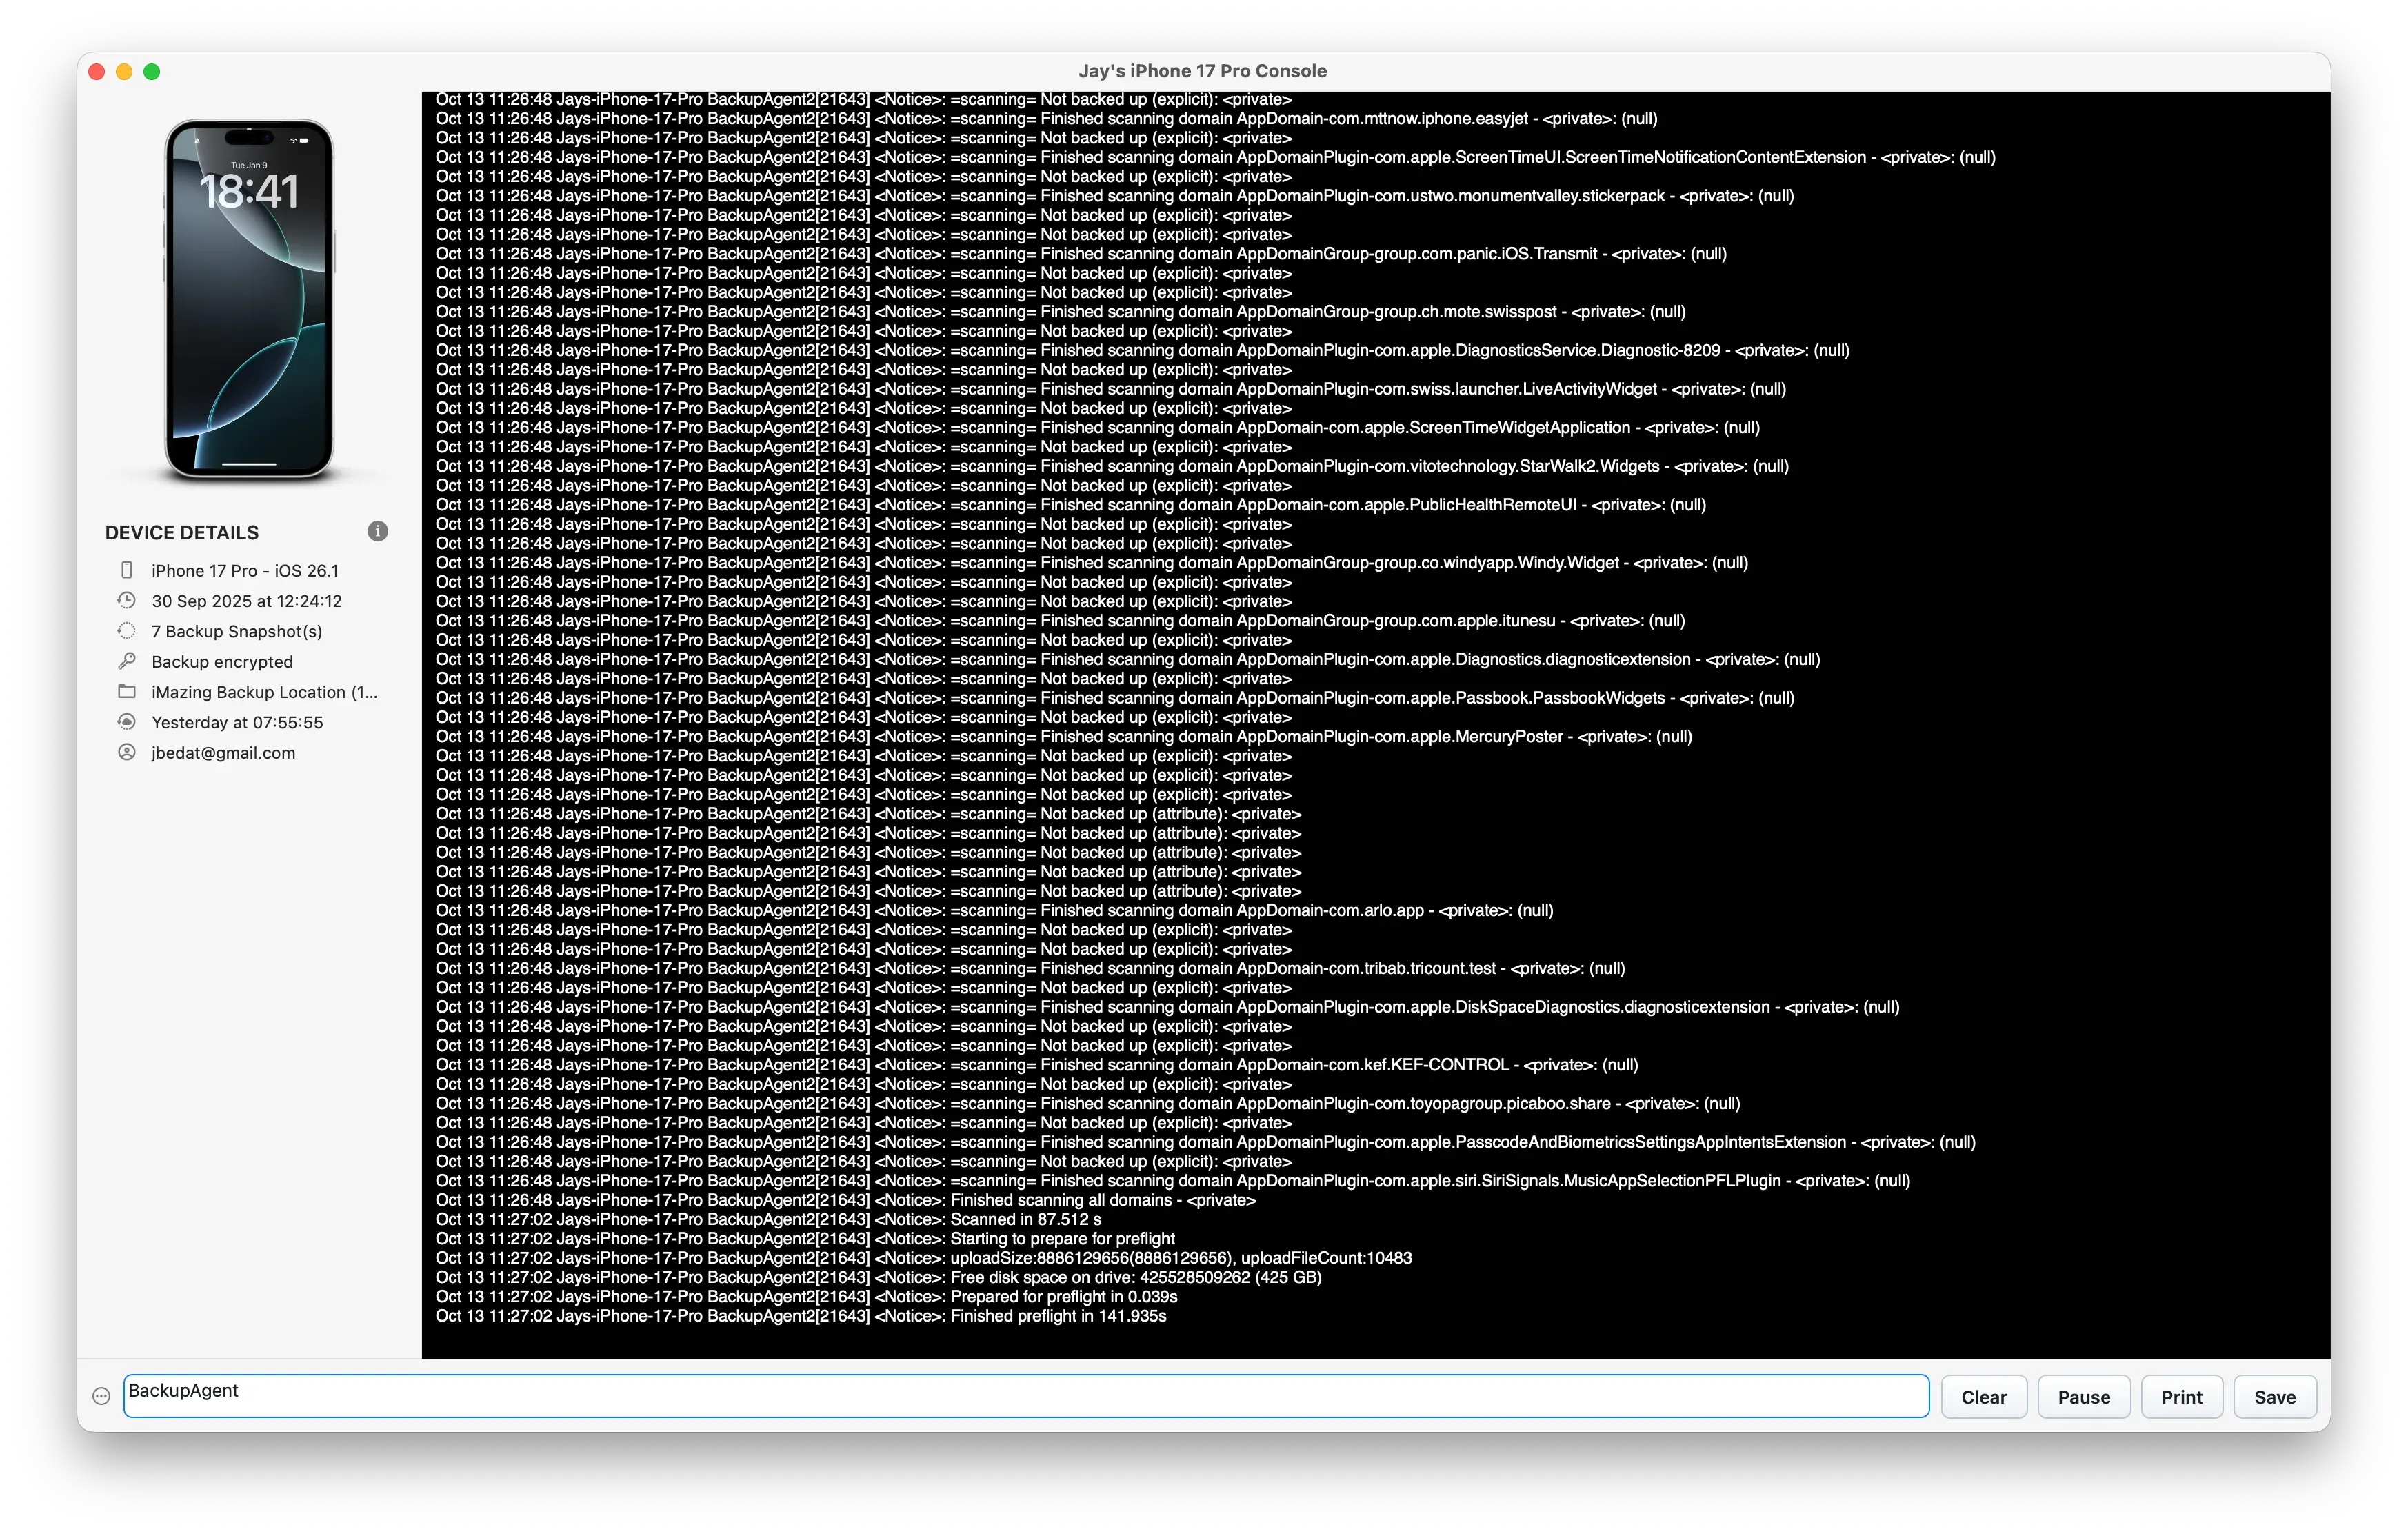
How to troubleshoot backup issues by monitoring BackupAgent logs in the Device Console?
To monitor iOS BackupAgent activity during backup or restore operations, open the Device Console and filter logs with "BackupAgent". If a backup never finishes or a restore fails, you can identify which apps or files are causing the problem.
Once identified, manually remove these files from either the device you're backing up or the backup you're restoring. For backup issues, delete the problematic third-party apps or files from your device. For restore issues, create an editable backup to remove the files preventing restoration. The latest log lines usually reveal what caused the BackupAgent to crash or fail.
Troubleshoot backup or restore issues
If a backup or restore fails, check our dedicated troubleshooting guide: Backup issues. It covers the most common causes (USB connection, third-party software conflicts, cloud storage locations, device disconnections, driver updates) and walks through how to resolve them on macOS and Windows.