Backup Options in iMazing
Updated on May 20, 2026
Reading time ~7 minutes
iMazing offers many options to configure how and where your mobile devices are backed up:
These settings are configured per device, and can be accessed at any time from the Device Settings section.
When you back up a device for the first time, iMazing displays the backup options view, which lets you customize your settings before starting the backup process.
For information on managing iOS/iPadOS backups with iMazing or to learn more about common questions and important considerations regarding backups, please read: Everything you need to know about iOS/iPadOS backups and how to manage them with iMazing.
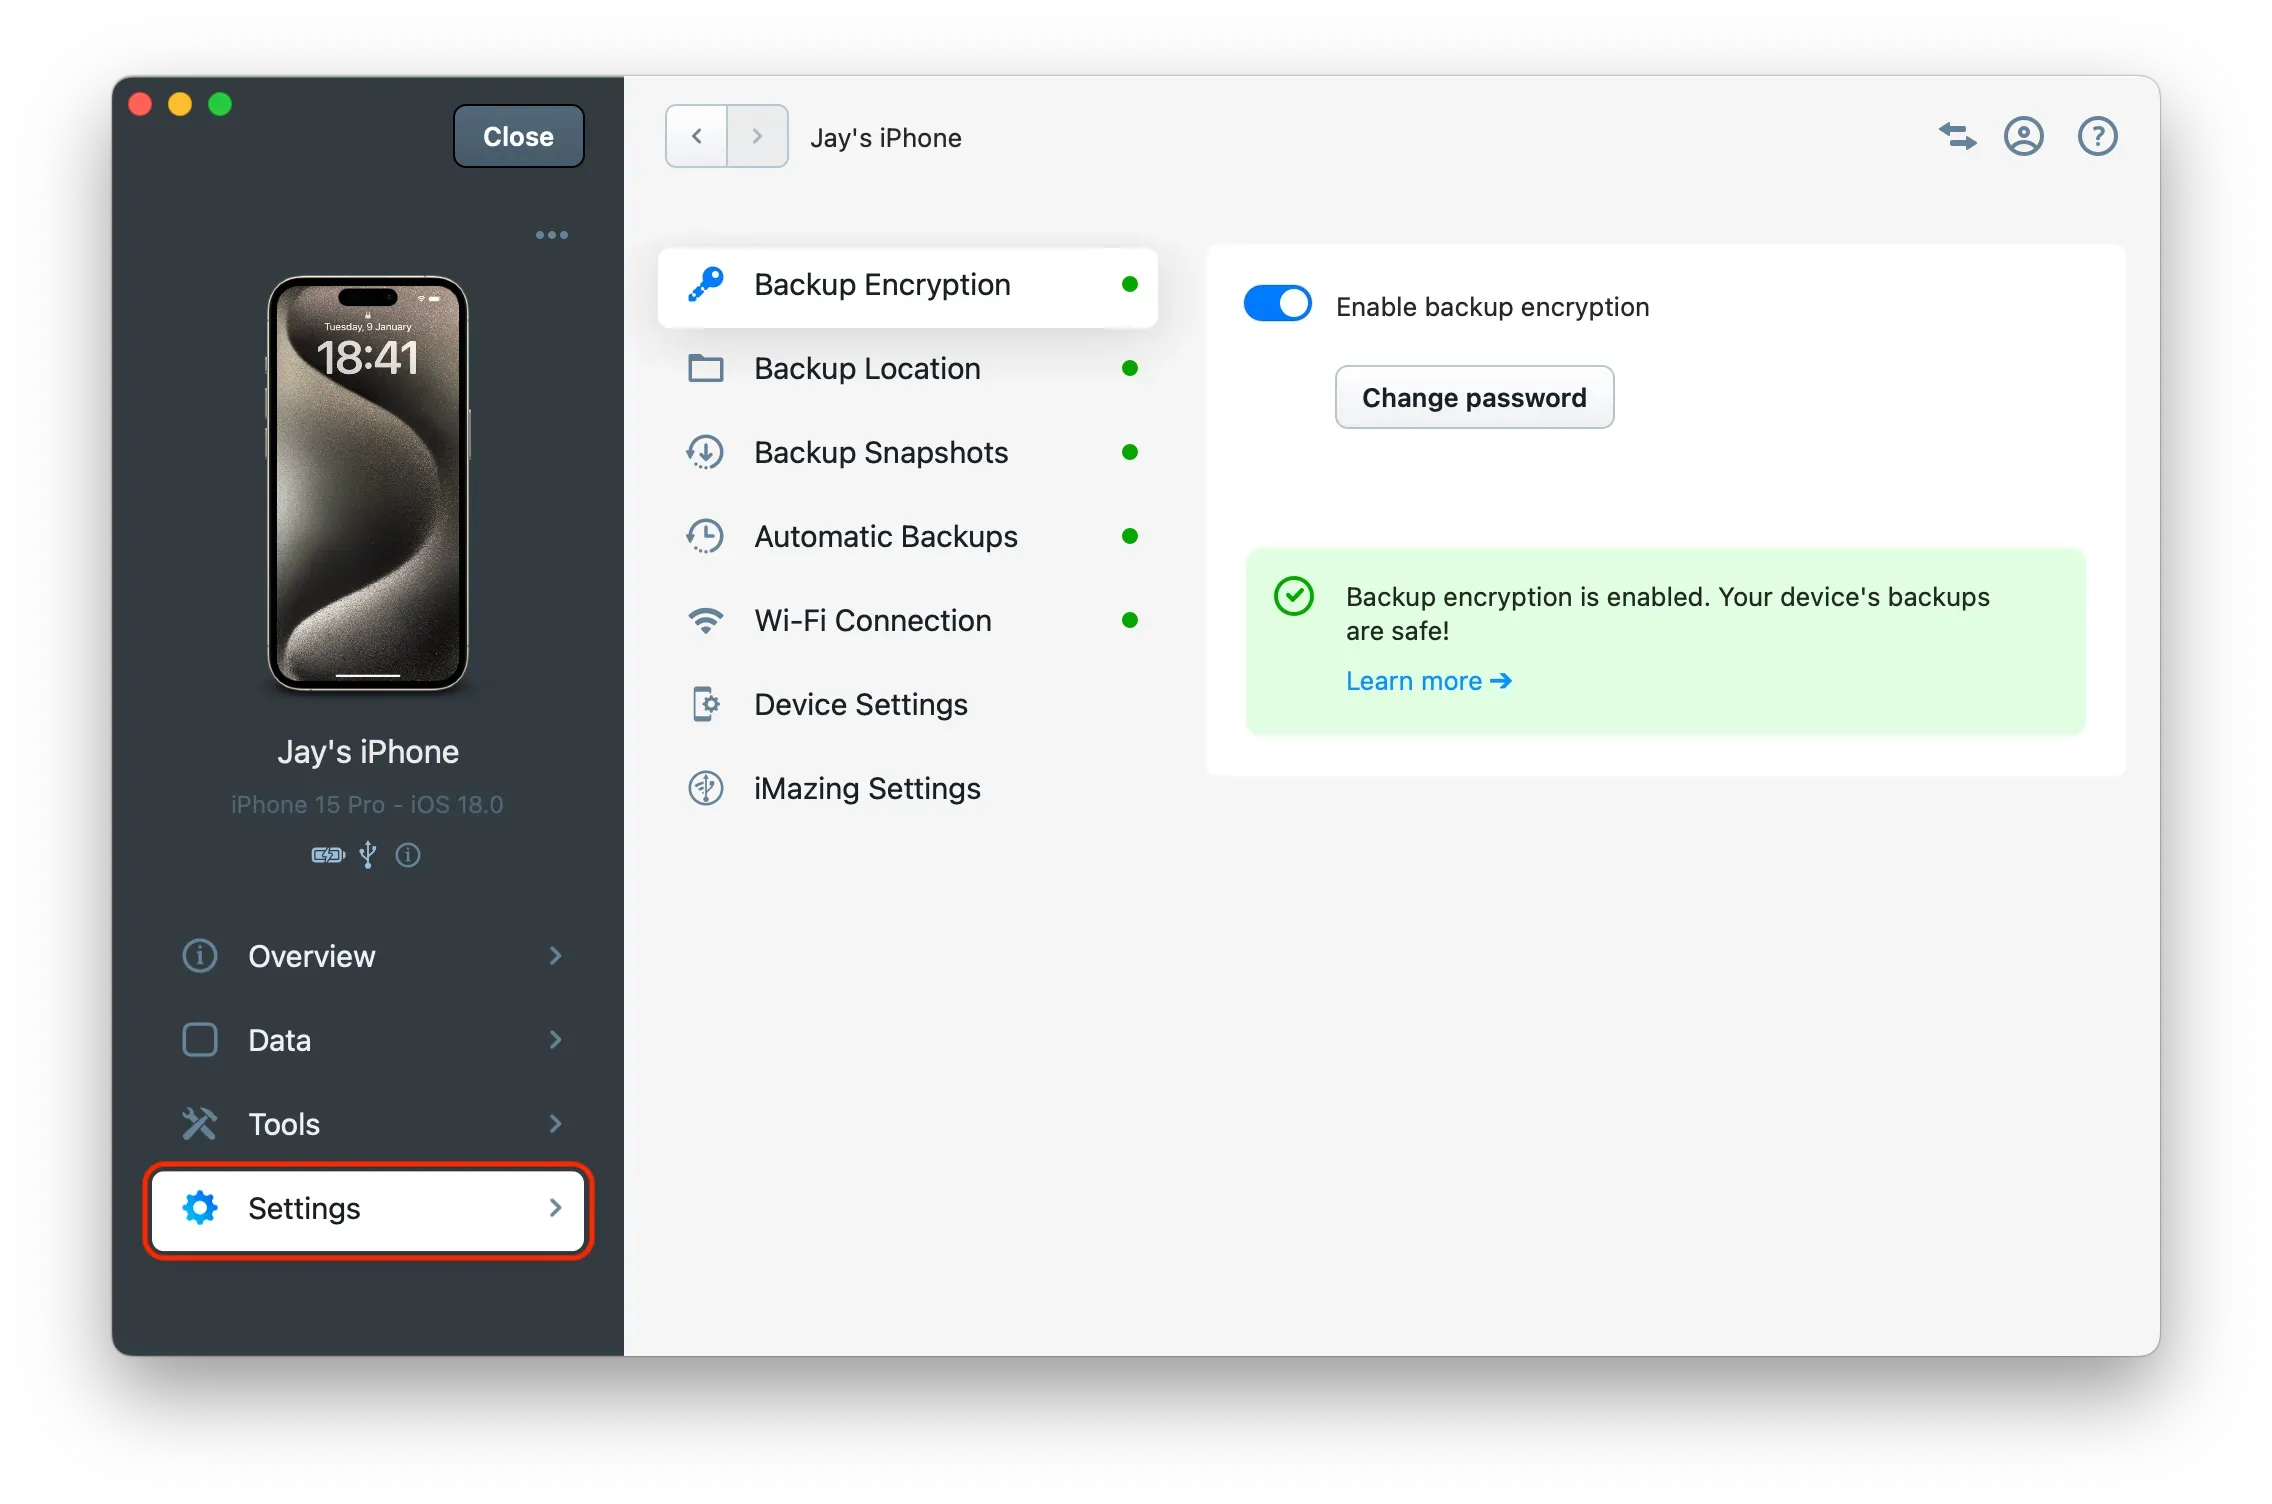
Backup Encryption
Backup Encryption is an Apple security feature that protects your data. An encrypted backup includes data that unencrypted backups do not:
- Keychain/Passwords
- Wi-Fi settings
- Health data
- Home data
- Safari history
- Call history
To allow iMazing to access all your data and keep it secure, we strongly recommend enabling backup encryption for all your devices.
By default, iOS or iPadOS doesn't encrypt backups. To enable encrypted backups, activate the Backup Encryption option and define an encryption password. Once enabled, all future backups of your device will be encrypted, regardless of which backup software you use.
You can enable or disable backup encryption from the "Backup Encryption" panel of the Device Settings section.
Warning
If you lose or forget your encryption password, you will not be able to browse previous backup snapshots or create new ones. Keep this password safe and make sure to click the "Remember Password" checkbox. The password is securely saved in your macOS Keychain or Windows Credentials.
If you lose your backup encryption password, please read Apple's support article: If you can’t remember the password for your iPhone, iPad, or iPod touch encrypted backup.
To learn more about backup encryption please read our dedicated article: Backup Encryption in iMazing.
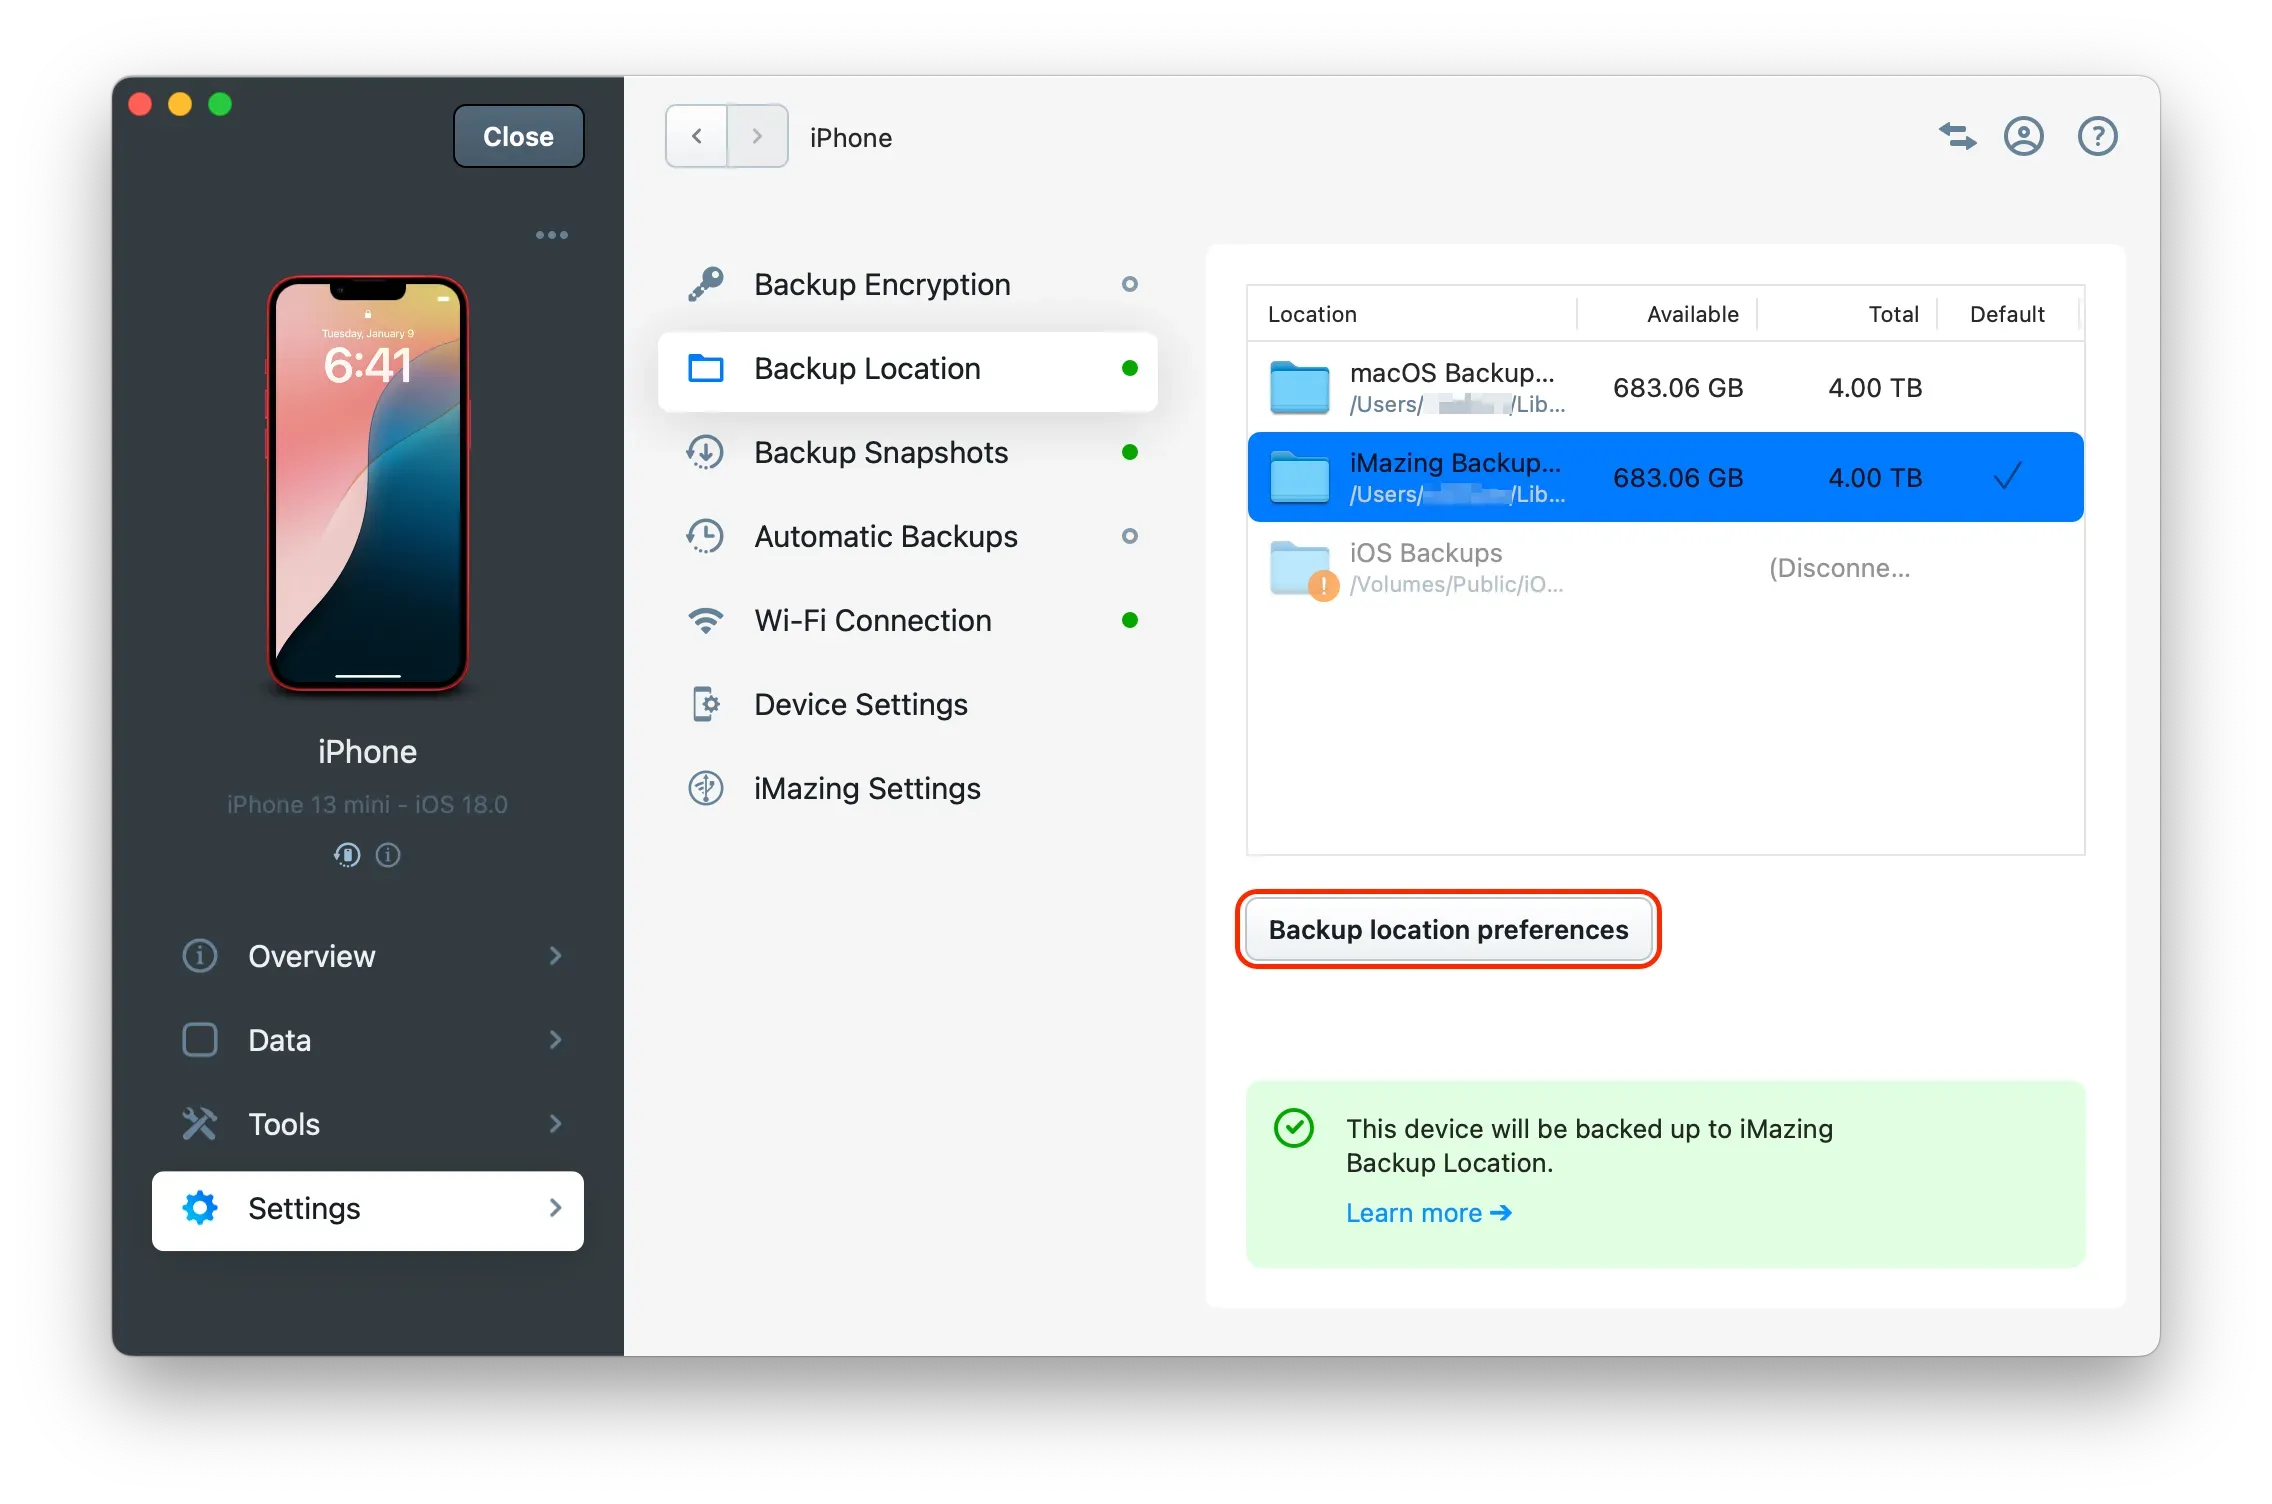
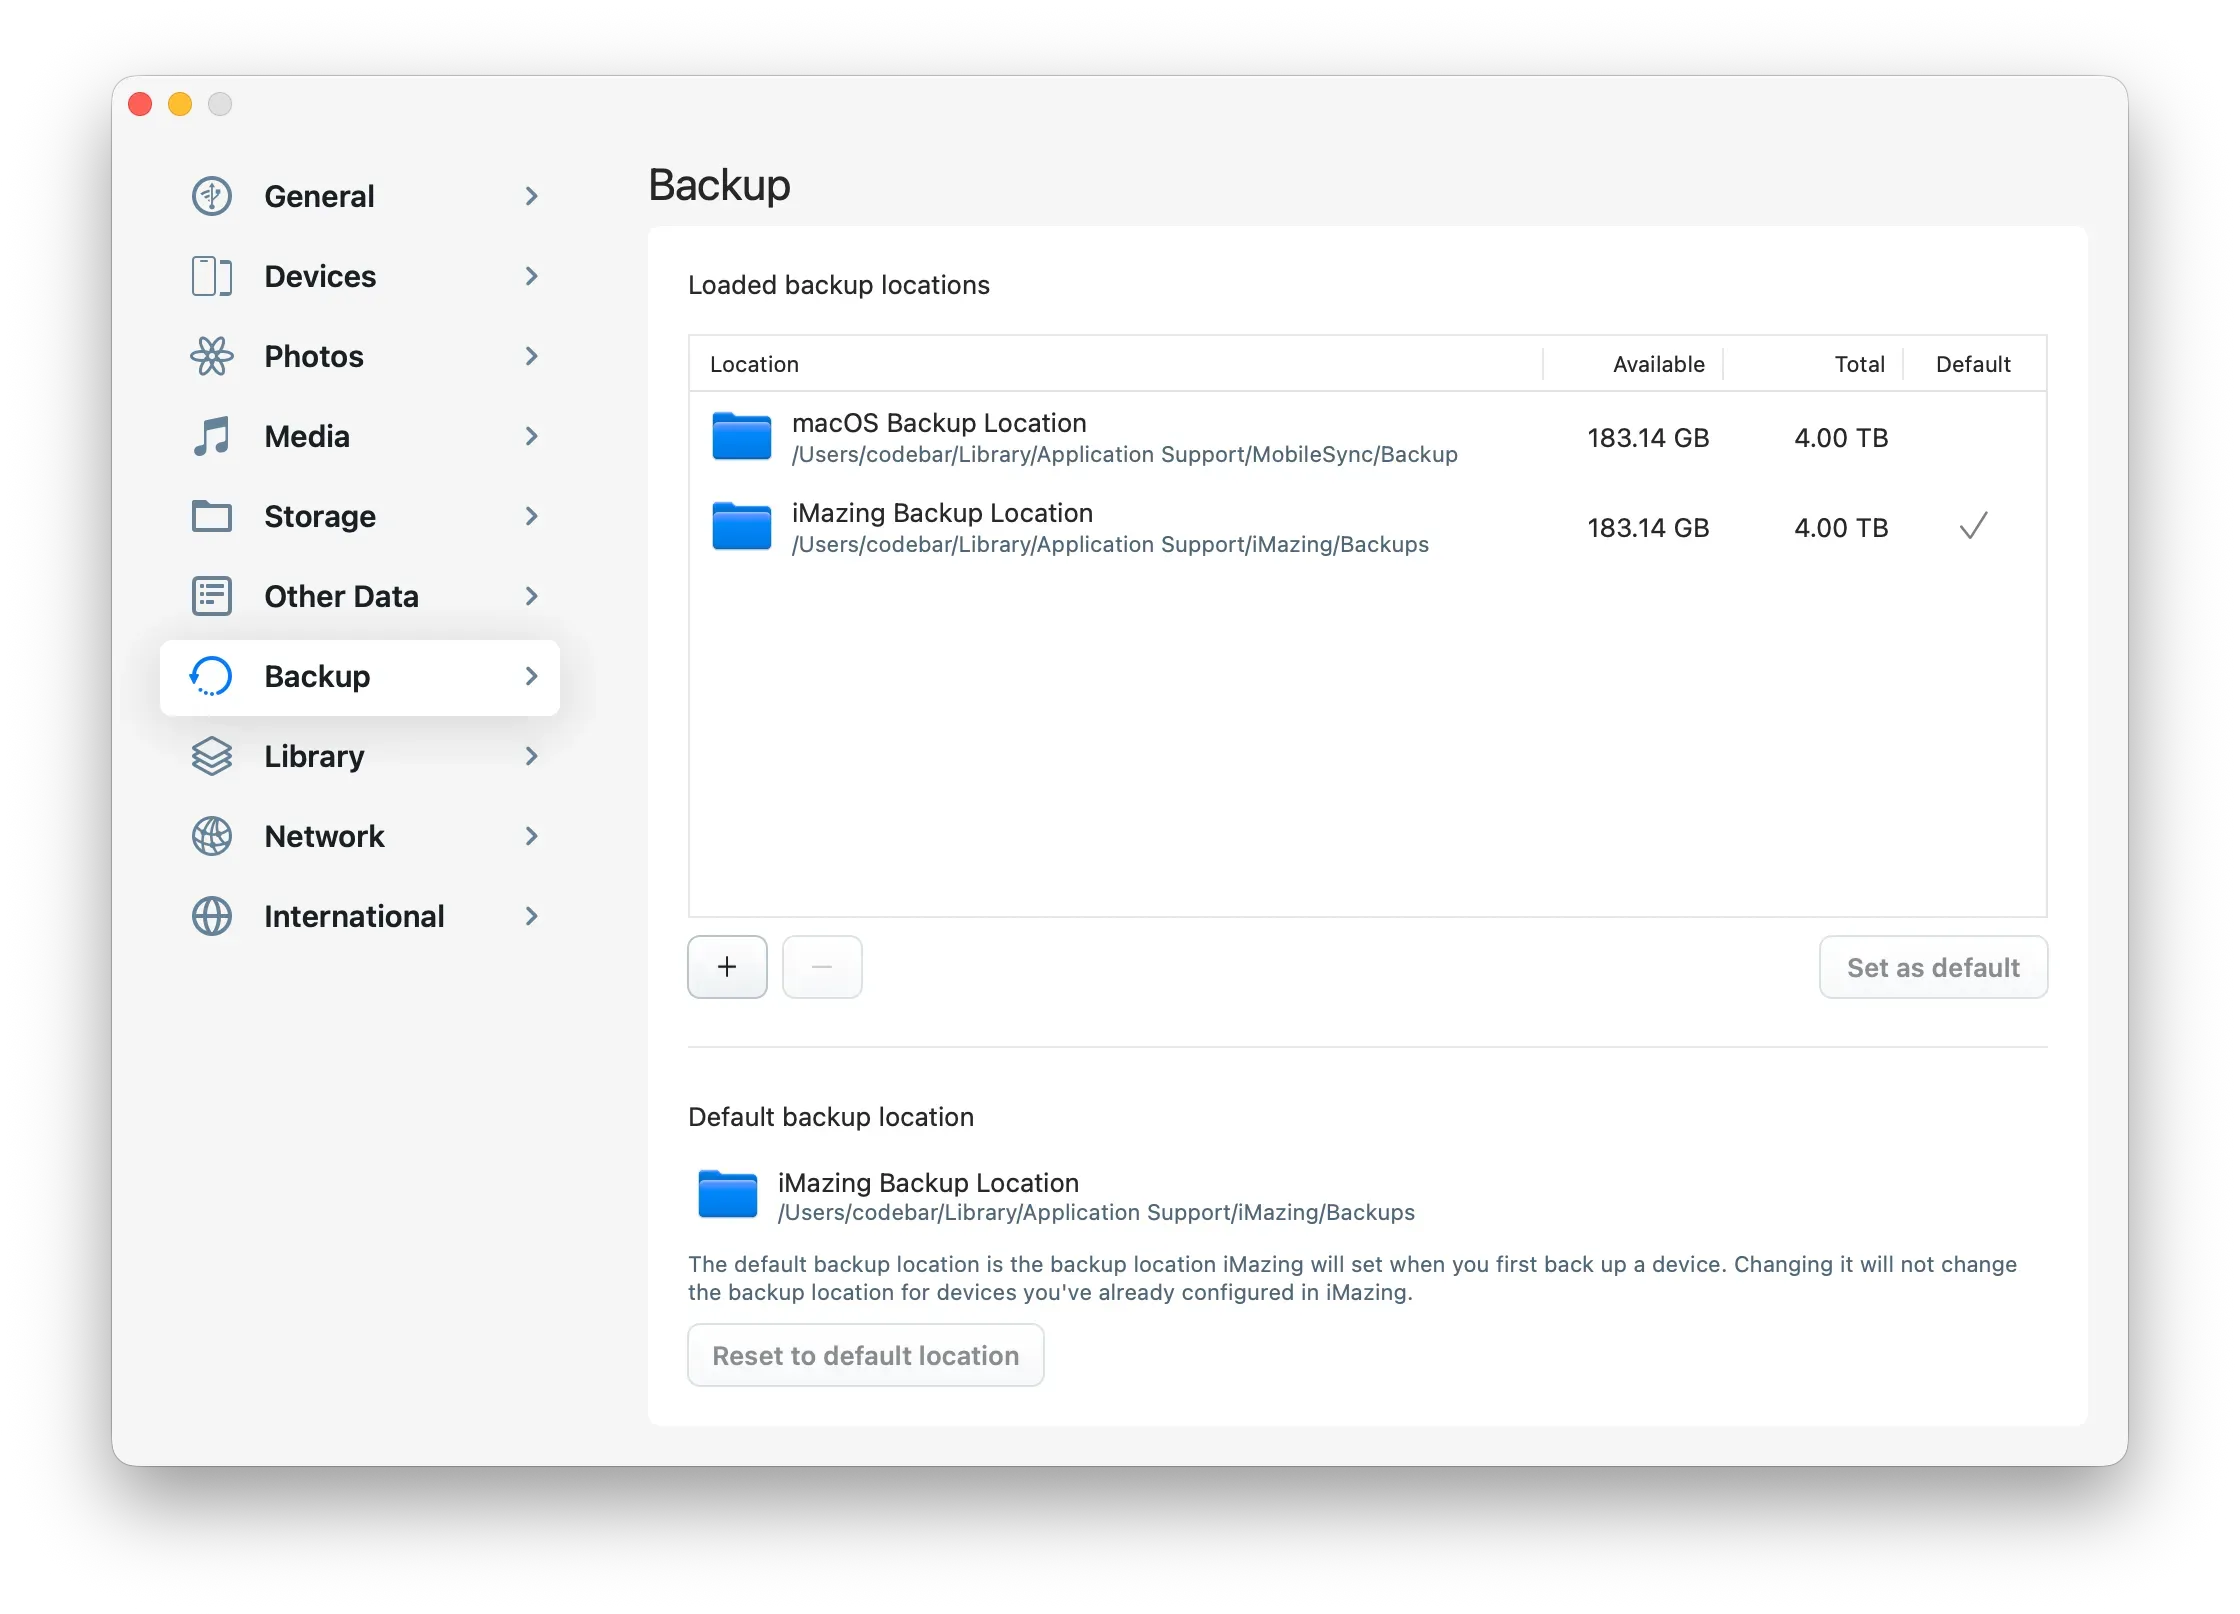
Backup Location
Select the folder or disk where you want iMazing to store backups for your device. You can choose a different backup location for each device.
To change the default backup location where iMazing stores backups for newly connected devices, see: iMazing Preferences - Backup.
For step-by-step instructions on changing your backup location, please read: How to backup an iPhone or iPad to an external drive, or another location?
Select an existing location (recommended)
Select one of the backup locations displayed in the list where you would like iMazing to store your device backup.
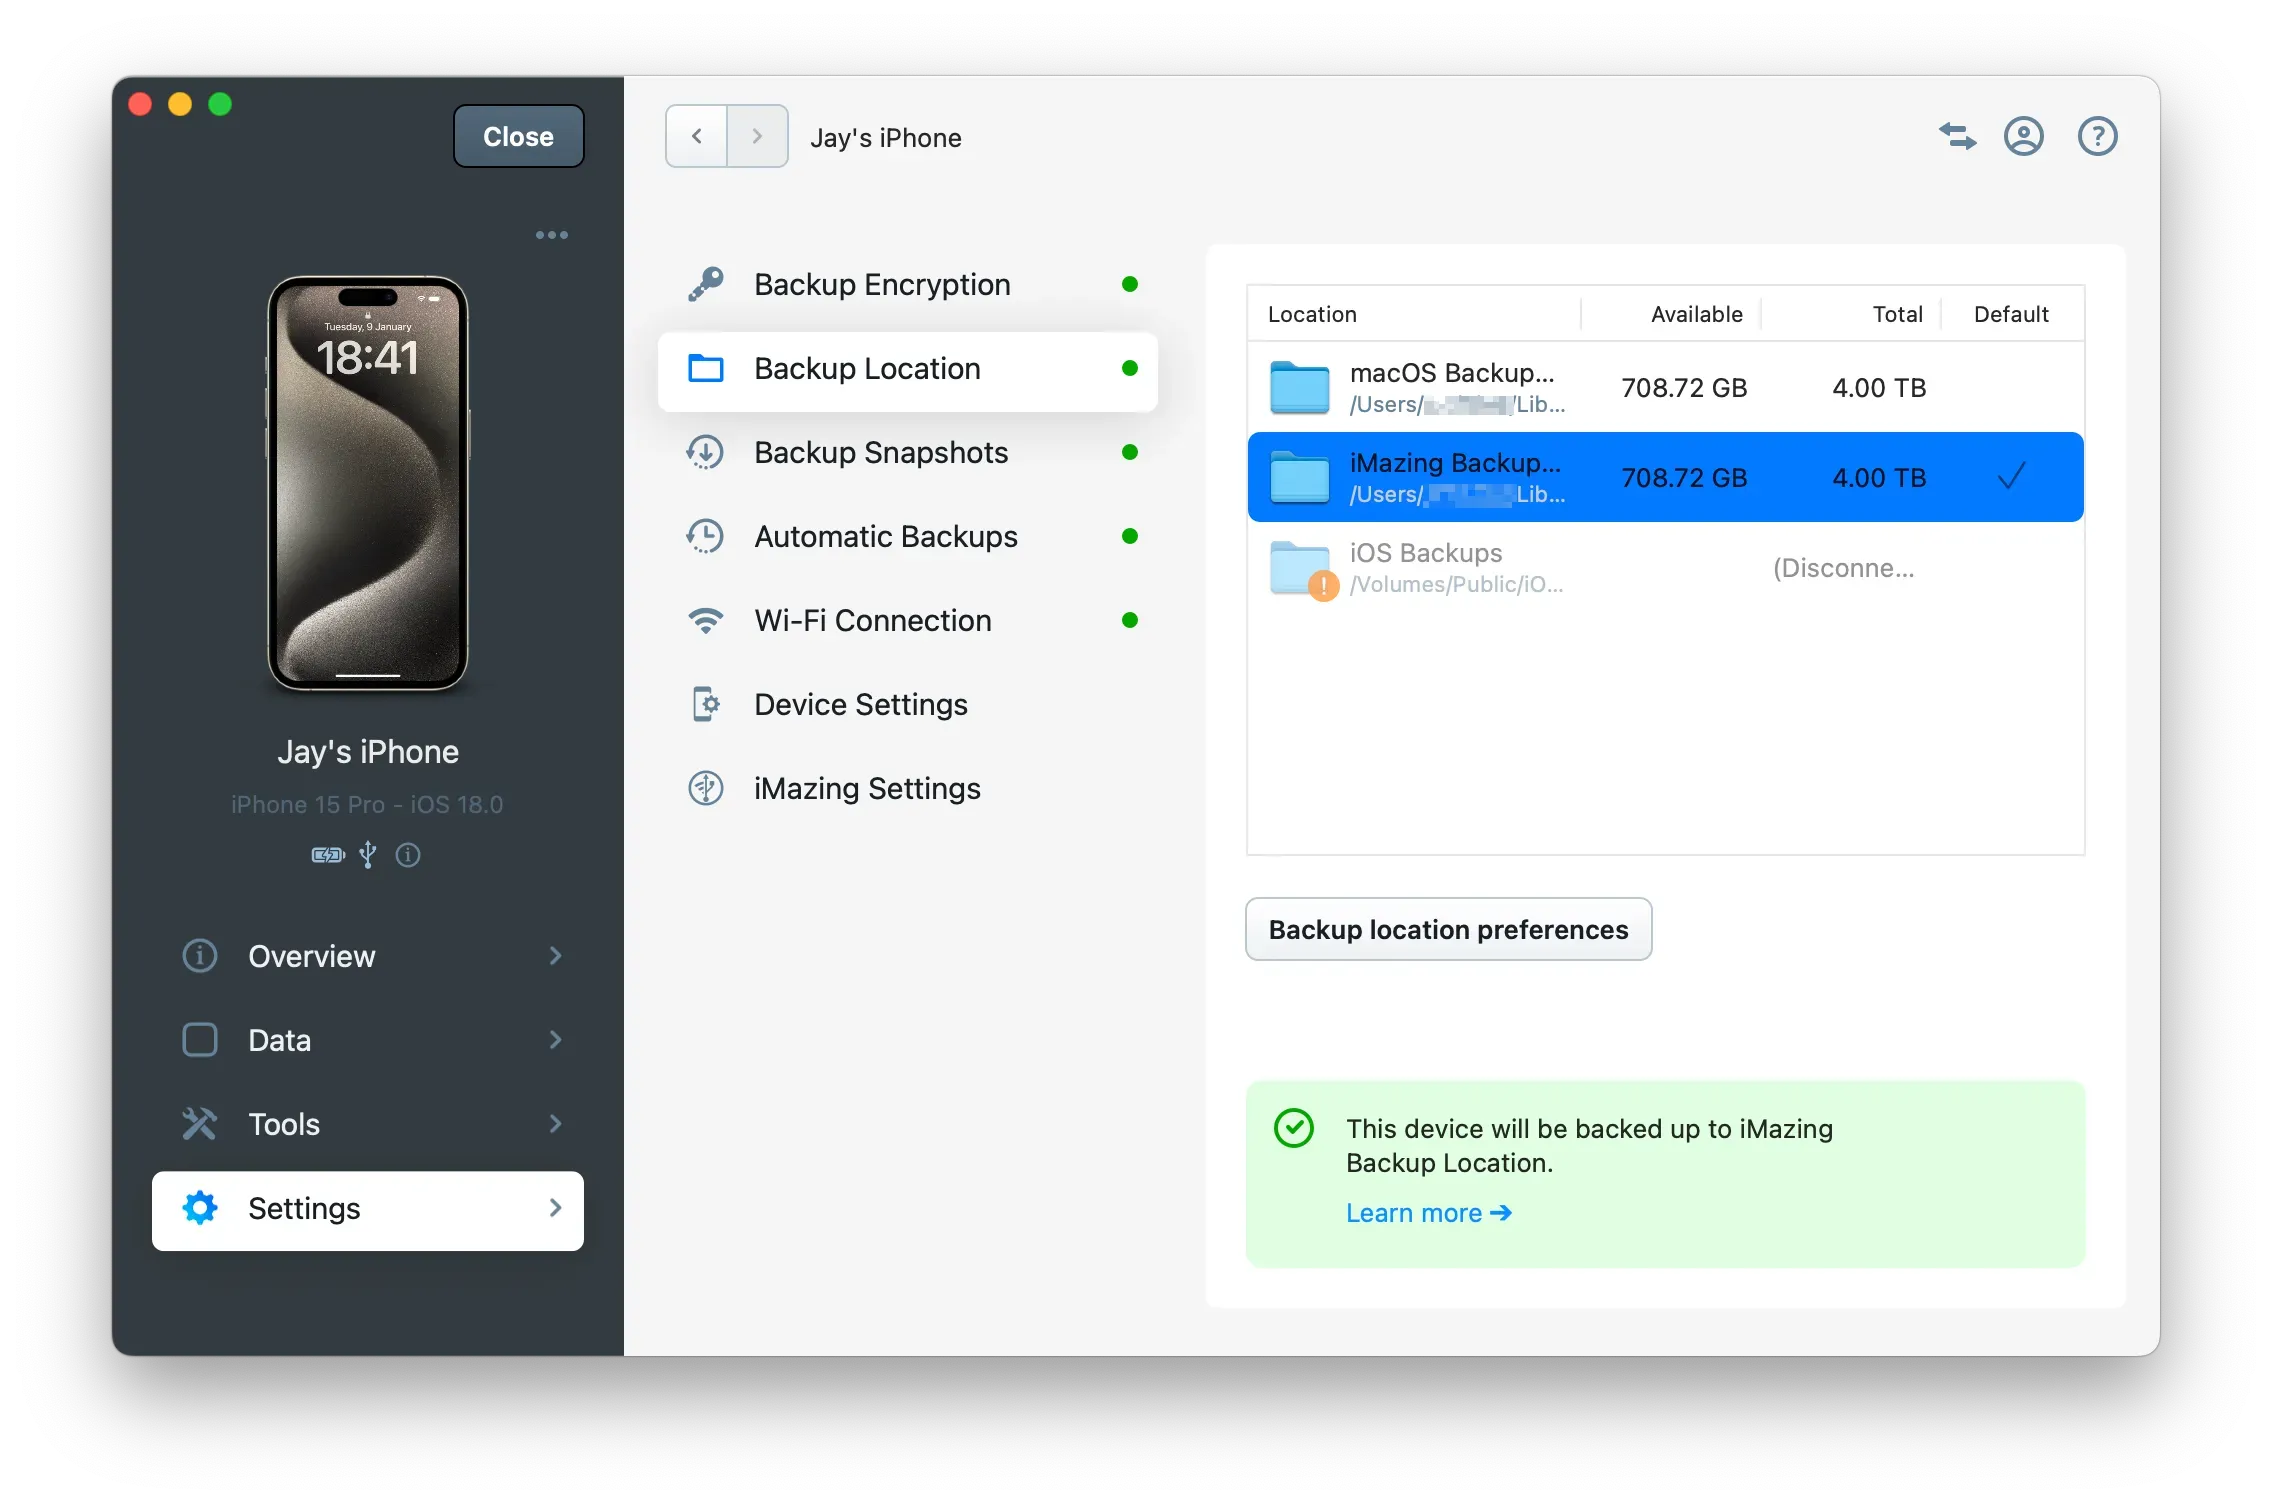
Backup location preferences
Click the "Backup location preferences" button to manage your backup locations and configure new ones.
Important
Select a backup location with adequate space for your backup. A warning icon will appear if space is insufficient. For optimal performance, we recommend using local or external hard drives instead of NAS systems. Backups on NAS devices take longer, particularly when their file systems don't support the hard links needed for the snapshot system.
When adding a disk as a backup location, iMazing will create an
iMazing.Backupsfolder at the root of your disk to prevent permission issues.If you encounter slow backup speeds when using an external drive or NAS, please read: Understanding & fixing slow iPhone or iPad backups.
Configure a Network Drive (NAS) as a backup location
Before using a network drive (NAS) as a backup location in iMazing on Windows, you need to map it to a drive letter.
Follow these steps to map a network drive in Windows File Explorer:
- Open File Explorer from the taskbar, Start menu, or by pressing Windows logo key + E.
- Select "This PC" from the left pane. Then, on the File Explorer ribbon, select More > Map network drive.
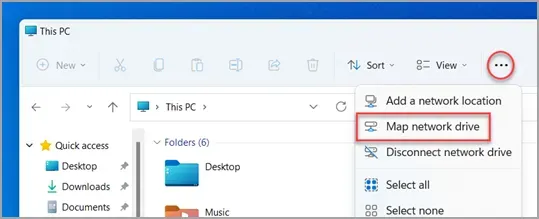
Note: If you don't see Map network drive on the More menu, you can right-click the This PC node in the folder pane and you'll see the command there.
- In the Drive list, select any available drive letter.
- In the Folder box, enter the path of the folder or computer, or click Browse to locate it. Select "Reconnect at sign-in" if you want to connect automatically when you log in.
- Select Finish.
Important: For external drive or NAS usage, we recommend reviewing: What key factors should you consider regarding backups on External and Network Drives (NAS)?
Backup Snapshot
This panel allows you to customize iMazing's unique automatic Backup Snapshots feature. For the best backup management experience, we recommend using the default settings.
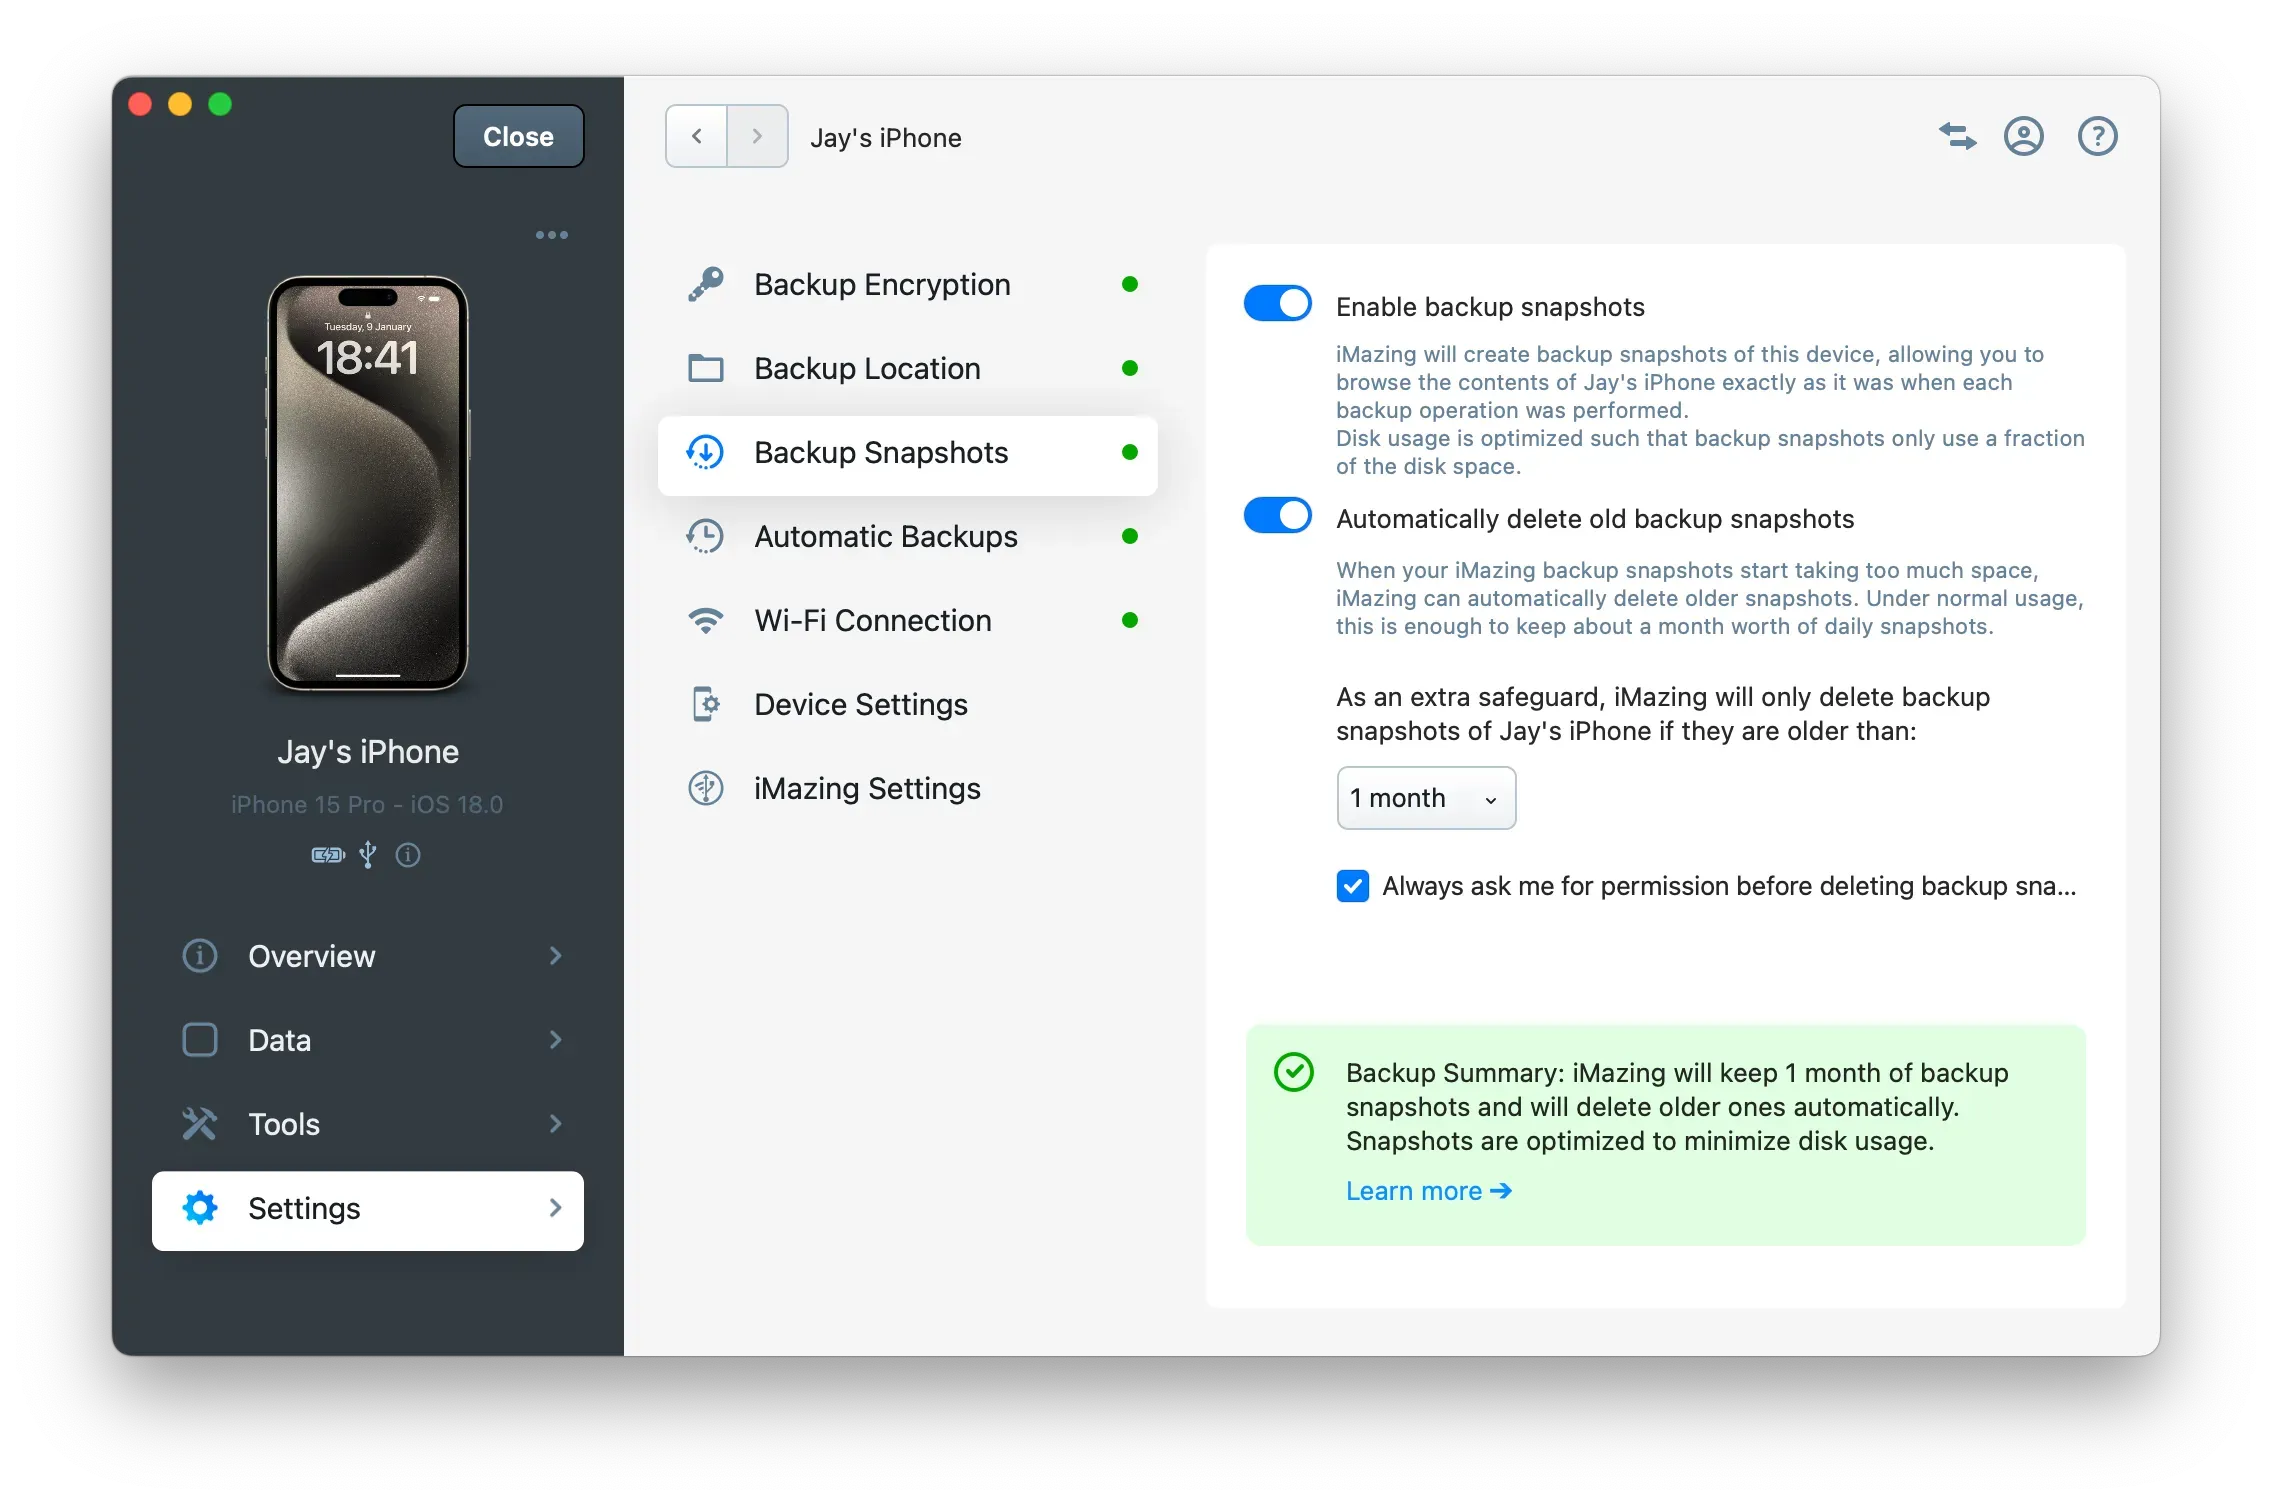
Enable backup snapshots
iMazing automatically takes incremental backups, similar to Time Machine on macOS for your Apple mobile device, allowing you to keep multiple snapshots. Disk usage is optimized, enabling you to easily store dozens of snapshots.
For more information on iMazing backup snapshots, refer to Everything you need to know about iOS/iPadOS backups and how to manage them with iMazing.
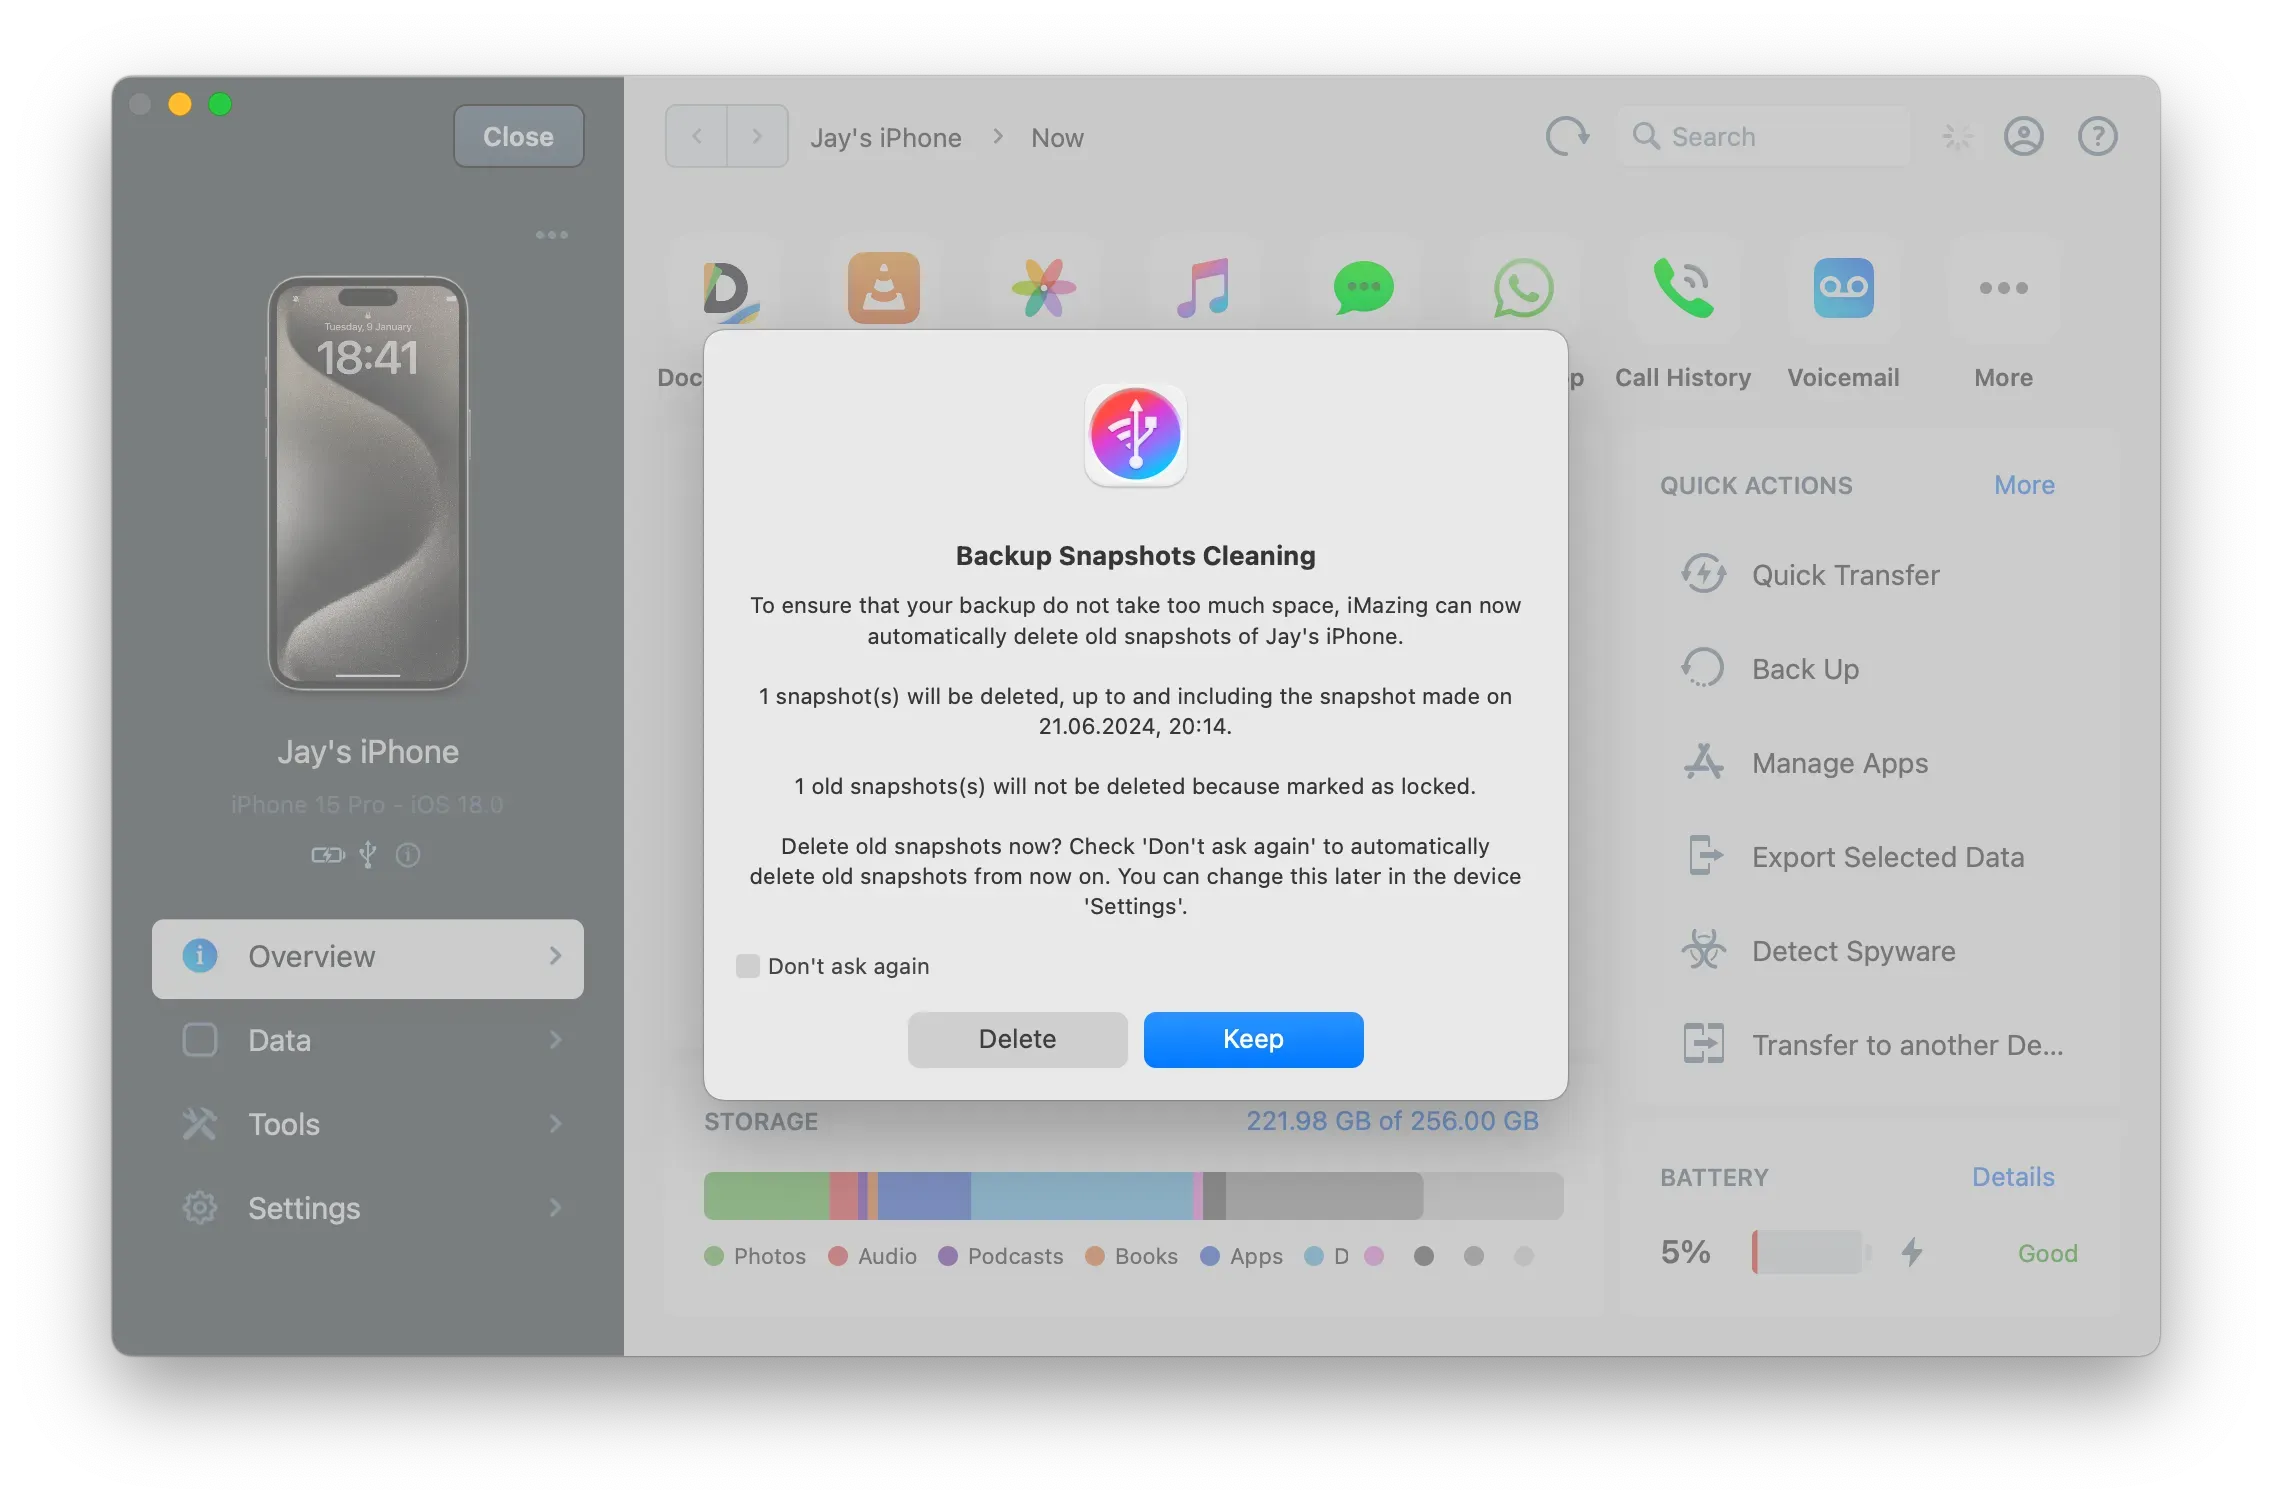
Automatically delete backup snapshots
When this option is enabled, iMazing automatically deletes your oldest snapshots when they start to take up too much space. By default, iMazing will always ask for your permission before doing so.
When disabled, iMazing will never suggest deleting snapshots.
Good to know
iMazing only deletes snapshots when their total size exceeds half of your first backup.
For example, with a 100GB original backup, iMazing allocates 50GB of extra space for snapshots. When snapshots exceed this 50GB limit, iMazing begins deleting the oldest ones to make room for new snapshots.
Backup snapshots retention
As an added safety measure, iMazing only deletes backup snapshots that have reached a certain age.
For example, if iMazing has used 50GB of storage for your snapshots with a retention period of 1 month, and your snapshots reach this 50GB limit within a week, iMazing will not automatically delete your oldest snapshot because it's less than a month old.
If the Always ask me for permission before deleting backup snapshots. checkbox is ticked, iMazing will prompt for your approval before removing older snapshots. This option is enabled by default. Disable it only if you're certain you need to retain just your most recent snapshots.
If you want to prevent a specific snapshot from being automatically deleted, you can always lock it.
Automatic Backups
Enabling "Automatic Backups" activates the iMazing Mini companion app, which performs backups automatically in the background according to your schedule. We recommend creating one backup daily.
You can also set a preferred timeframe for backups to run or set them to occur only when the battery level is over a specified percentage.
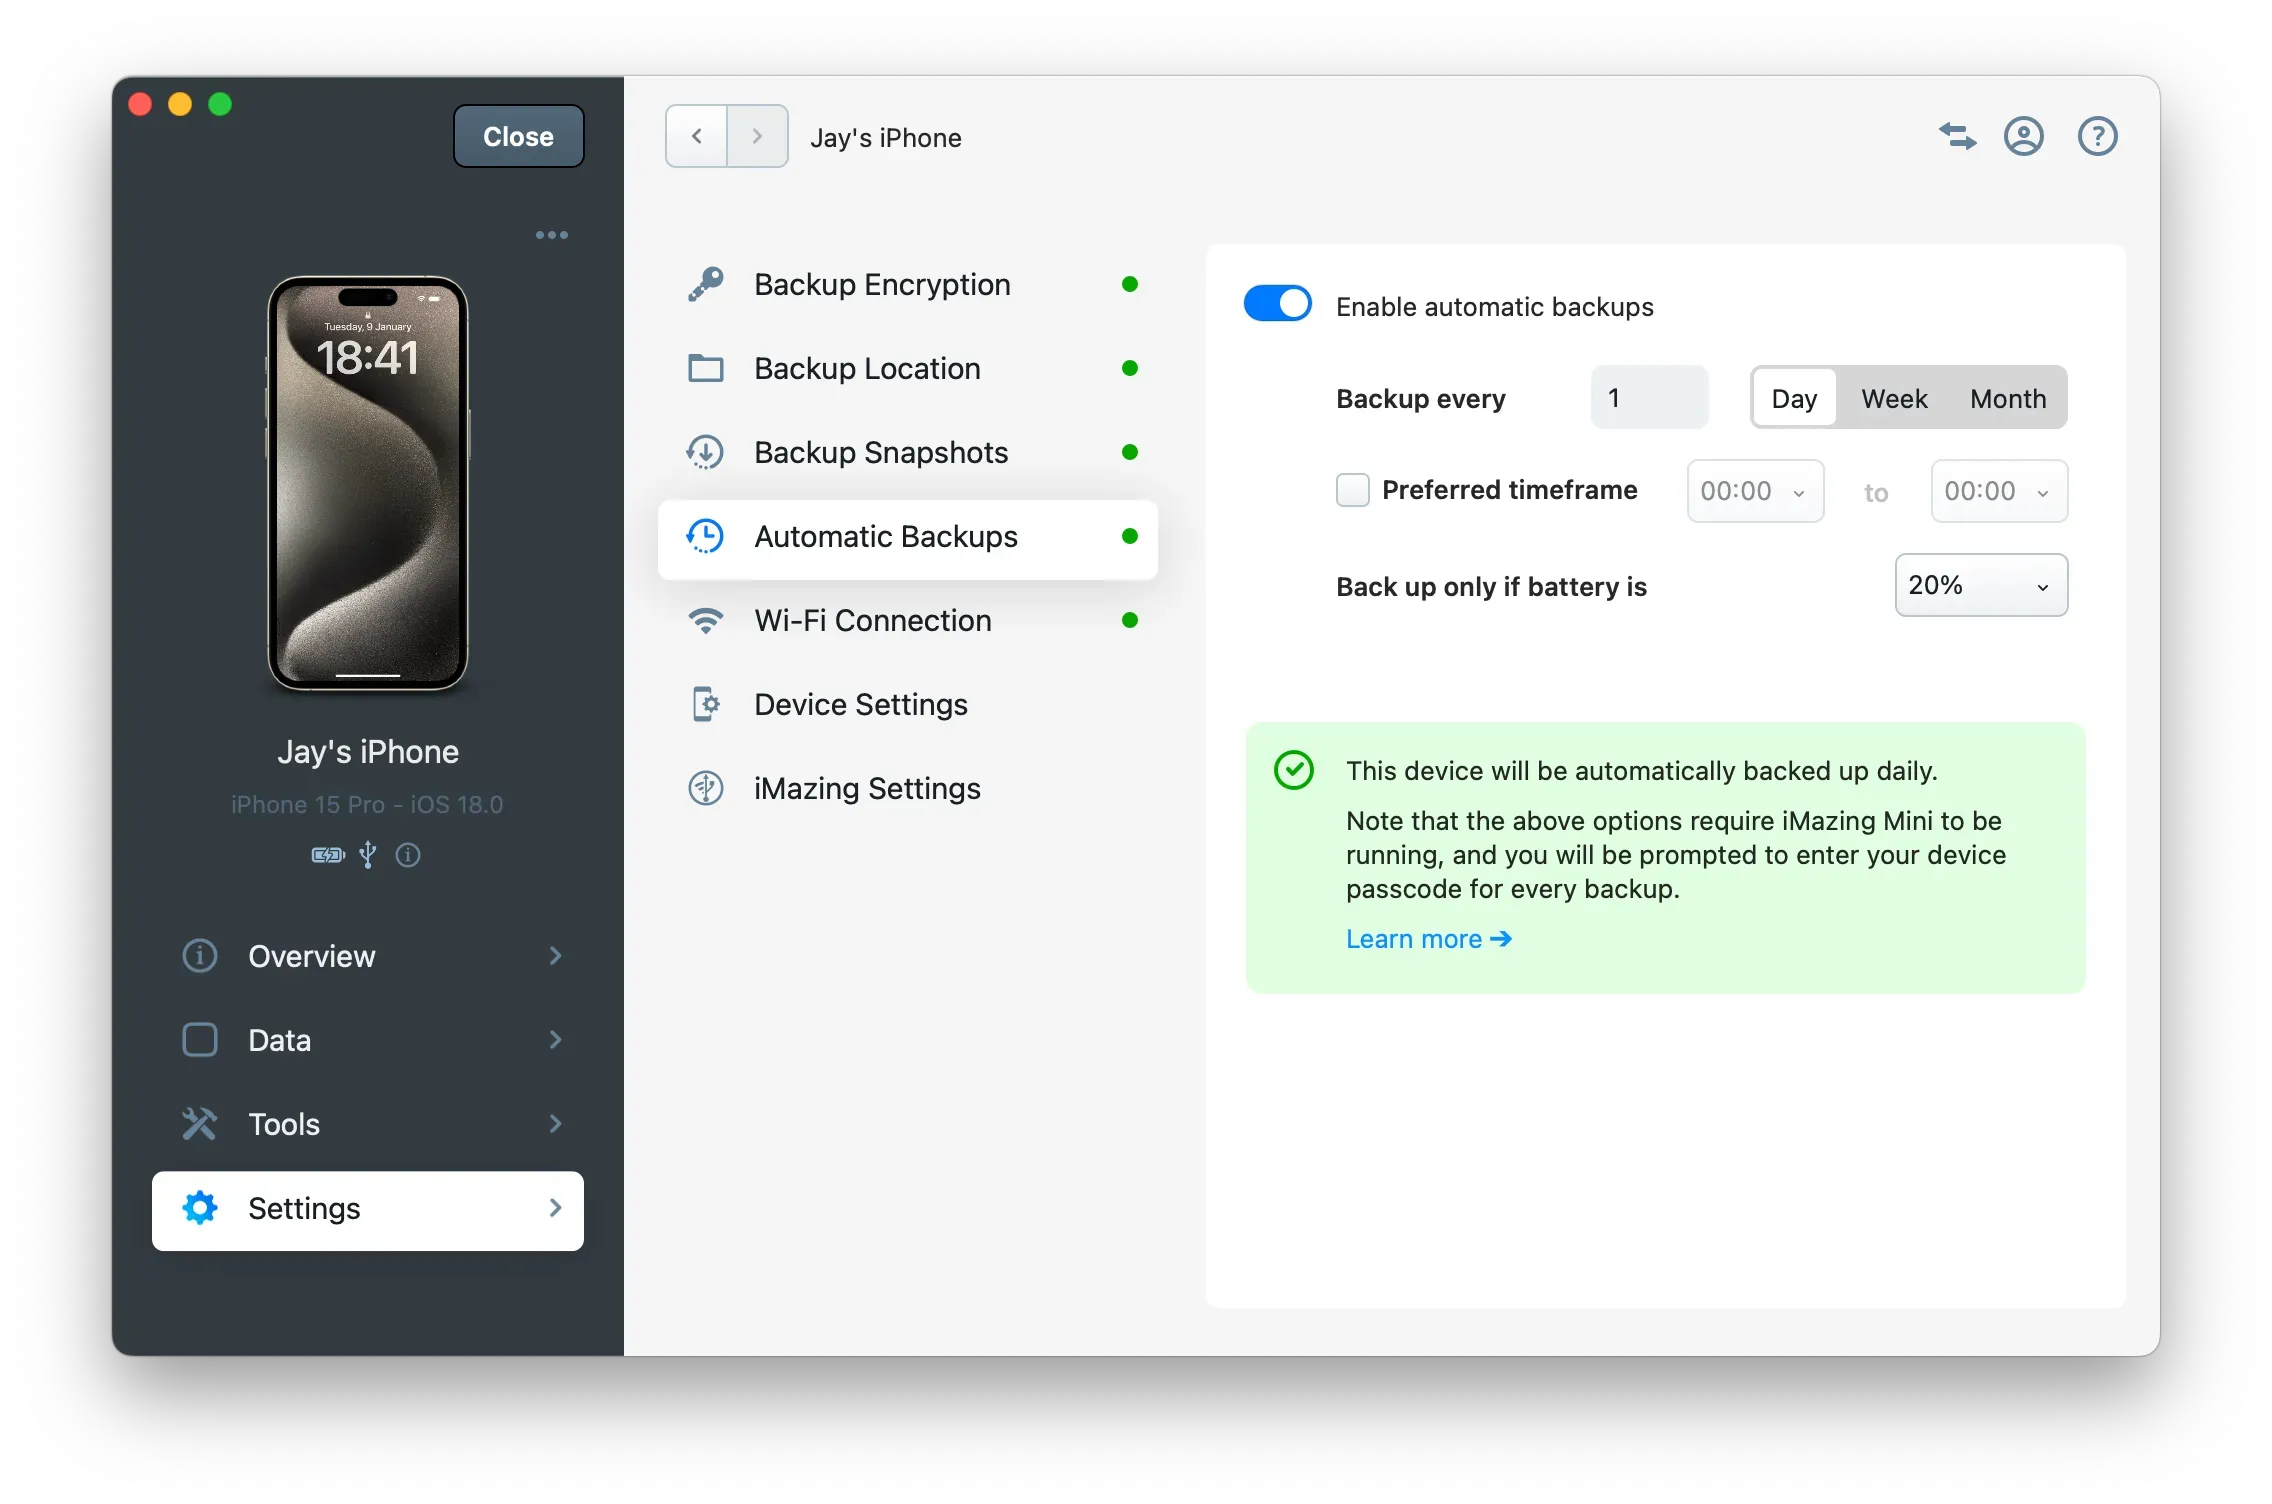
Important
Since iOS 16.1, Apple has implemented an additional security measure requiring you to enter your device passcode to authorize backups. iMazing Mini will display a dialog prompting you to get ready to enter your passcode. You simply need to take your device, unlock it with Face ID or Touch ID, and enter your passcode.
Key Considerations
What to consider when backing up devices with iMazing:
- We strongly recommend enabling backup encryption to protect your data and allow access to your Safari and Call history. Without encryption, iMazing cannot access this information.
- Both iMazing and iMazing Mini can back up your devices over Wi-Fi when your computer and Apple mobile devices are connected to the same network.
- The first backup with iMazing or iMazing Mini may take considerable time, depending on the amount of data on your device. Using a USB cable will speed up this process. Later backups are much faster as they're incremental and can be completed over Wi-Fi. For troubleshooting slow backups, see our article: Understanding & fixing slow iPhone or iPad backups
- Since iOS 16.1, you must enter your device passcode for every backup—a security measure implemented by Apple.
- When you run a manual backup, iMazing Mini considers that day's backup complete and will only perform another automatic backup operation the following day.
For more detailed guidance on managing backups with iMazing and additional important considerations, please see the following article: Everything you need to know about iOS/iPadOS backups and how to manage them with iMazing