Back Up an iPhone or iPad to an External Drive, or Network Drive (NAS)
Updated on Mar 25, 2026
Reading time ~6 minutes
Apple’s default backup (Finder on macOS, iTunes on Windows) saves iPhone and iPad backups to a specific default folder on your computer’s system drive. If you’d rather use an external disk, a NAS, or a specific folder/partition, iMazing lets you do exactly that — on both macOS and Windows.
In order to select an external drive or another folder on your computer, the key step is to add a new backup location in iMazing. Once you’ve added an alternative location, you can:
- keep your original location and use the new one temporarily,
- maintain multiple locations side‑by‑side, or
- set the new location as the default for future backups.
Backup locations in iMazing are per device: each iPhone or iPad has its own backup location, which you can change at any time. When iMazing backs up your device, it creates incremental snapshots — only new or changed data is saved, letting you keep a complete history of backups without using extra space. To learn more about how backup locations and snapshots work, see our guides on backup snapshots and backup locations.
Tip: This guide explains how to back up to an external or custom location. For instructions on moving existing backups, see our separate guide.
Note: If you plan to back up to a network drive (NAS), see the Backing up to an external drive or network drive (NAS) section below. They include setup steps and key compatibility details.
Here's how to Back Up an iPhone or iPad to an External Drive, or Network Drive (NAS):
Before you begin
Always make sure you are running the latest iMazing version, to do so select Check for Updates from the iMazing menu, or just download the latest available version for your computer below.
Download and install iMazing
Launch iMazing on your computer
If you haven’t already, download and install iMazing. For more details, please refer to our guide available for PC and for Mac.
Connect your device to your Mac or PC via USB
iMazing will prompt you to connect the device to your computer on the first time you're using it. To do so use a USB cable, and unlock the device using your passcode, Face ID or Touch ID, and follow the instructions for pairing.
Tip: For more details on connections and pairing refer to this guide.
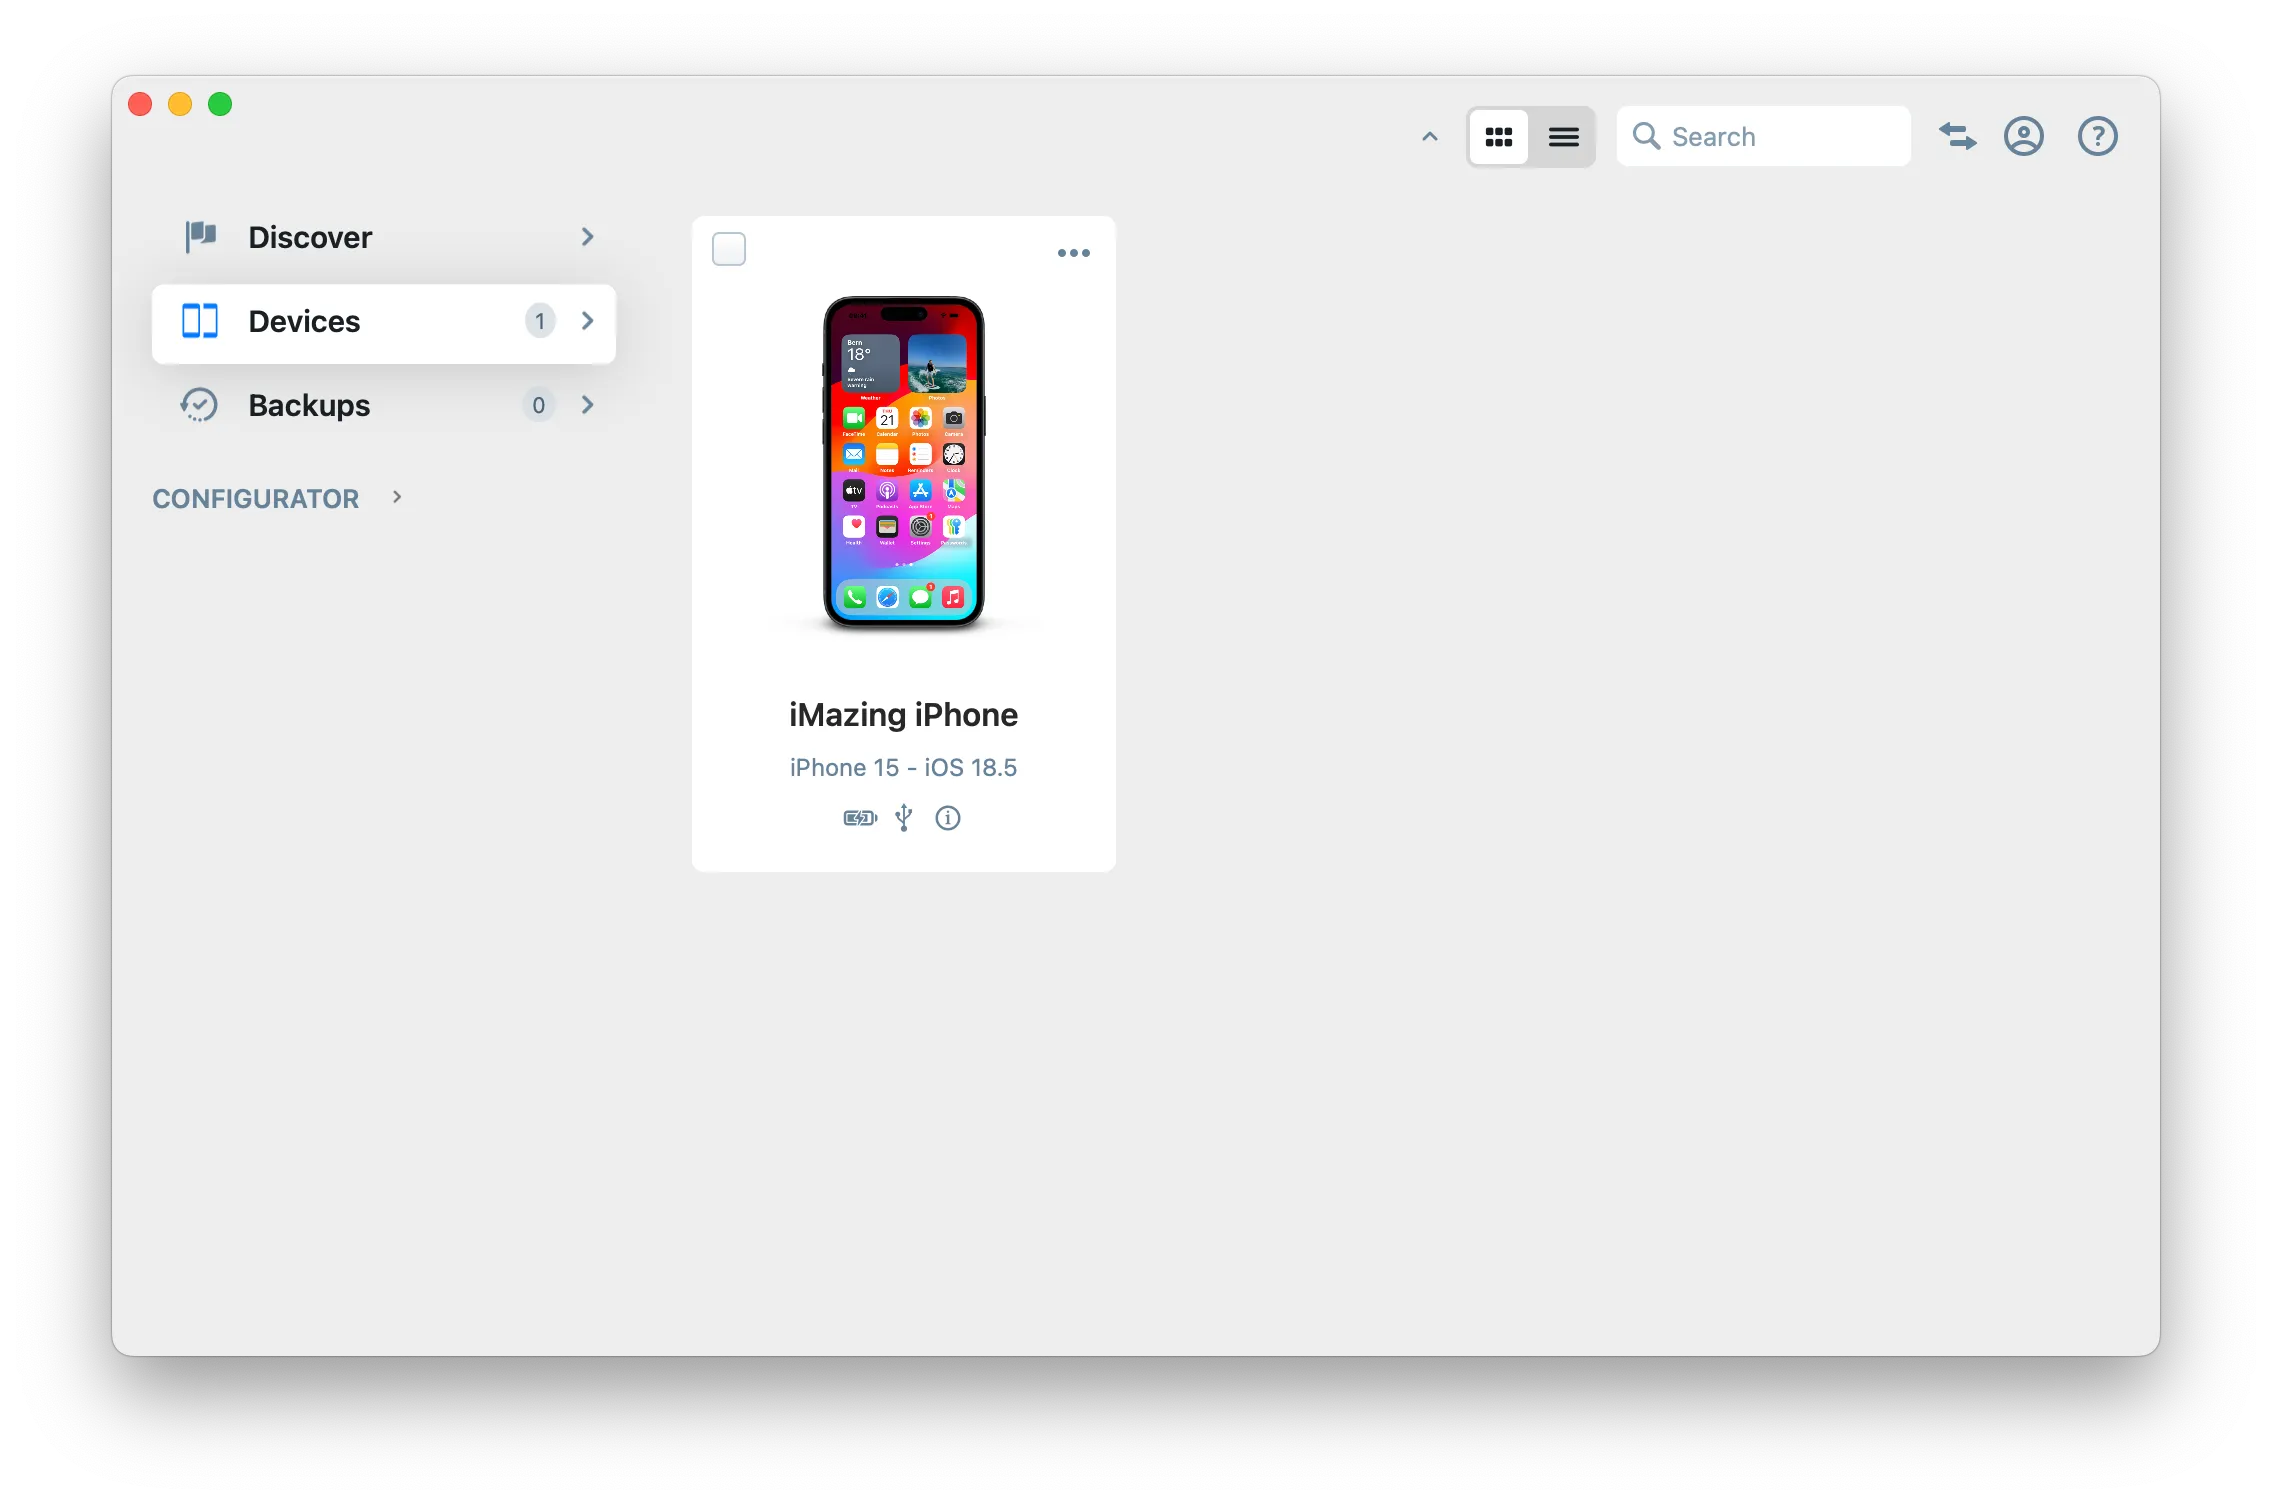
Click on Devices in the left pane
From the devices view you will see all the devices previously connected and paired to your computer. Click to select a device.
Tip
Once your device is connected and paired, you can access any dataset or tool directly in iMazing:
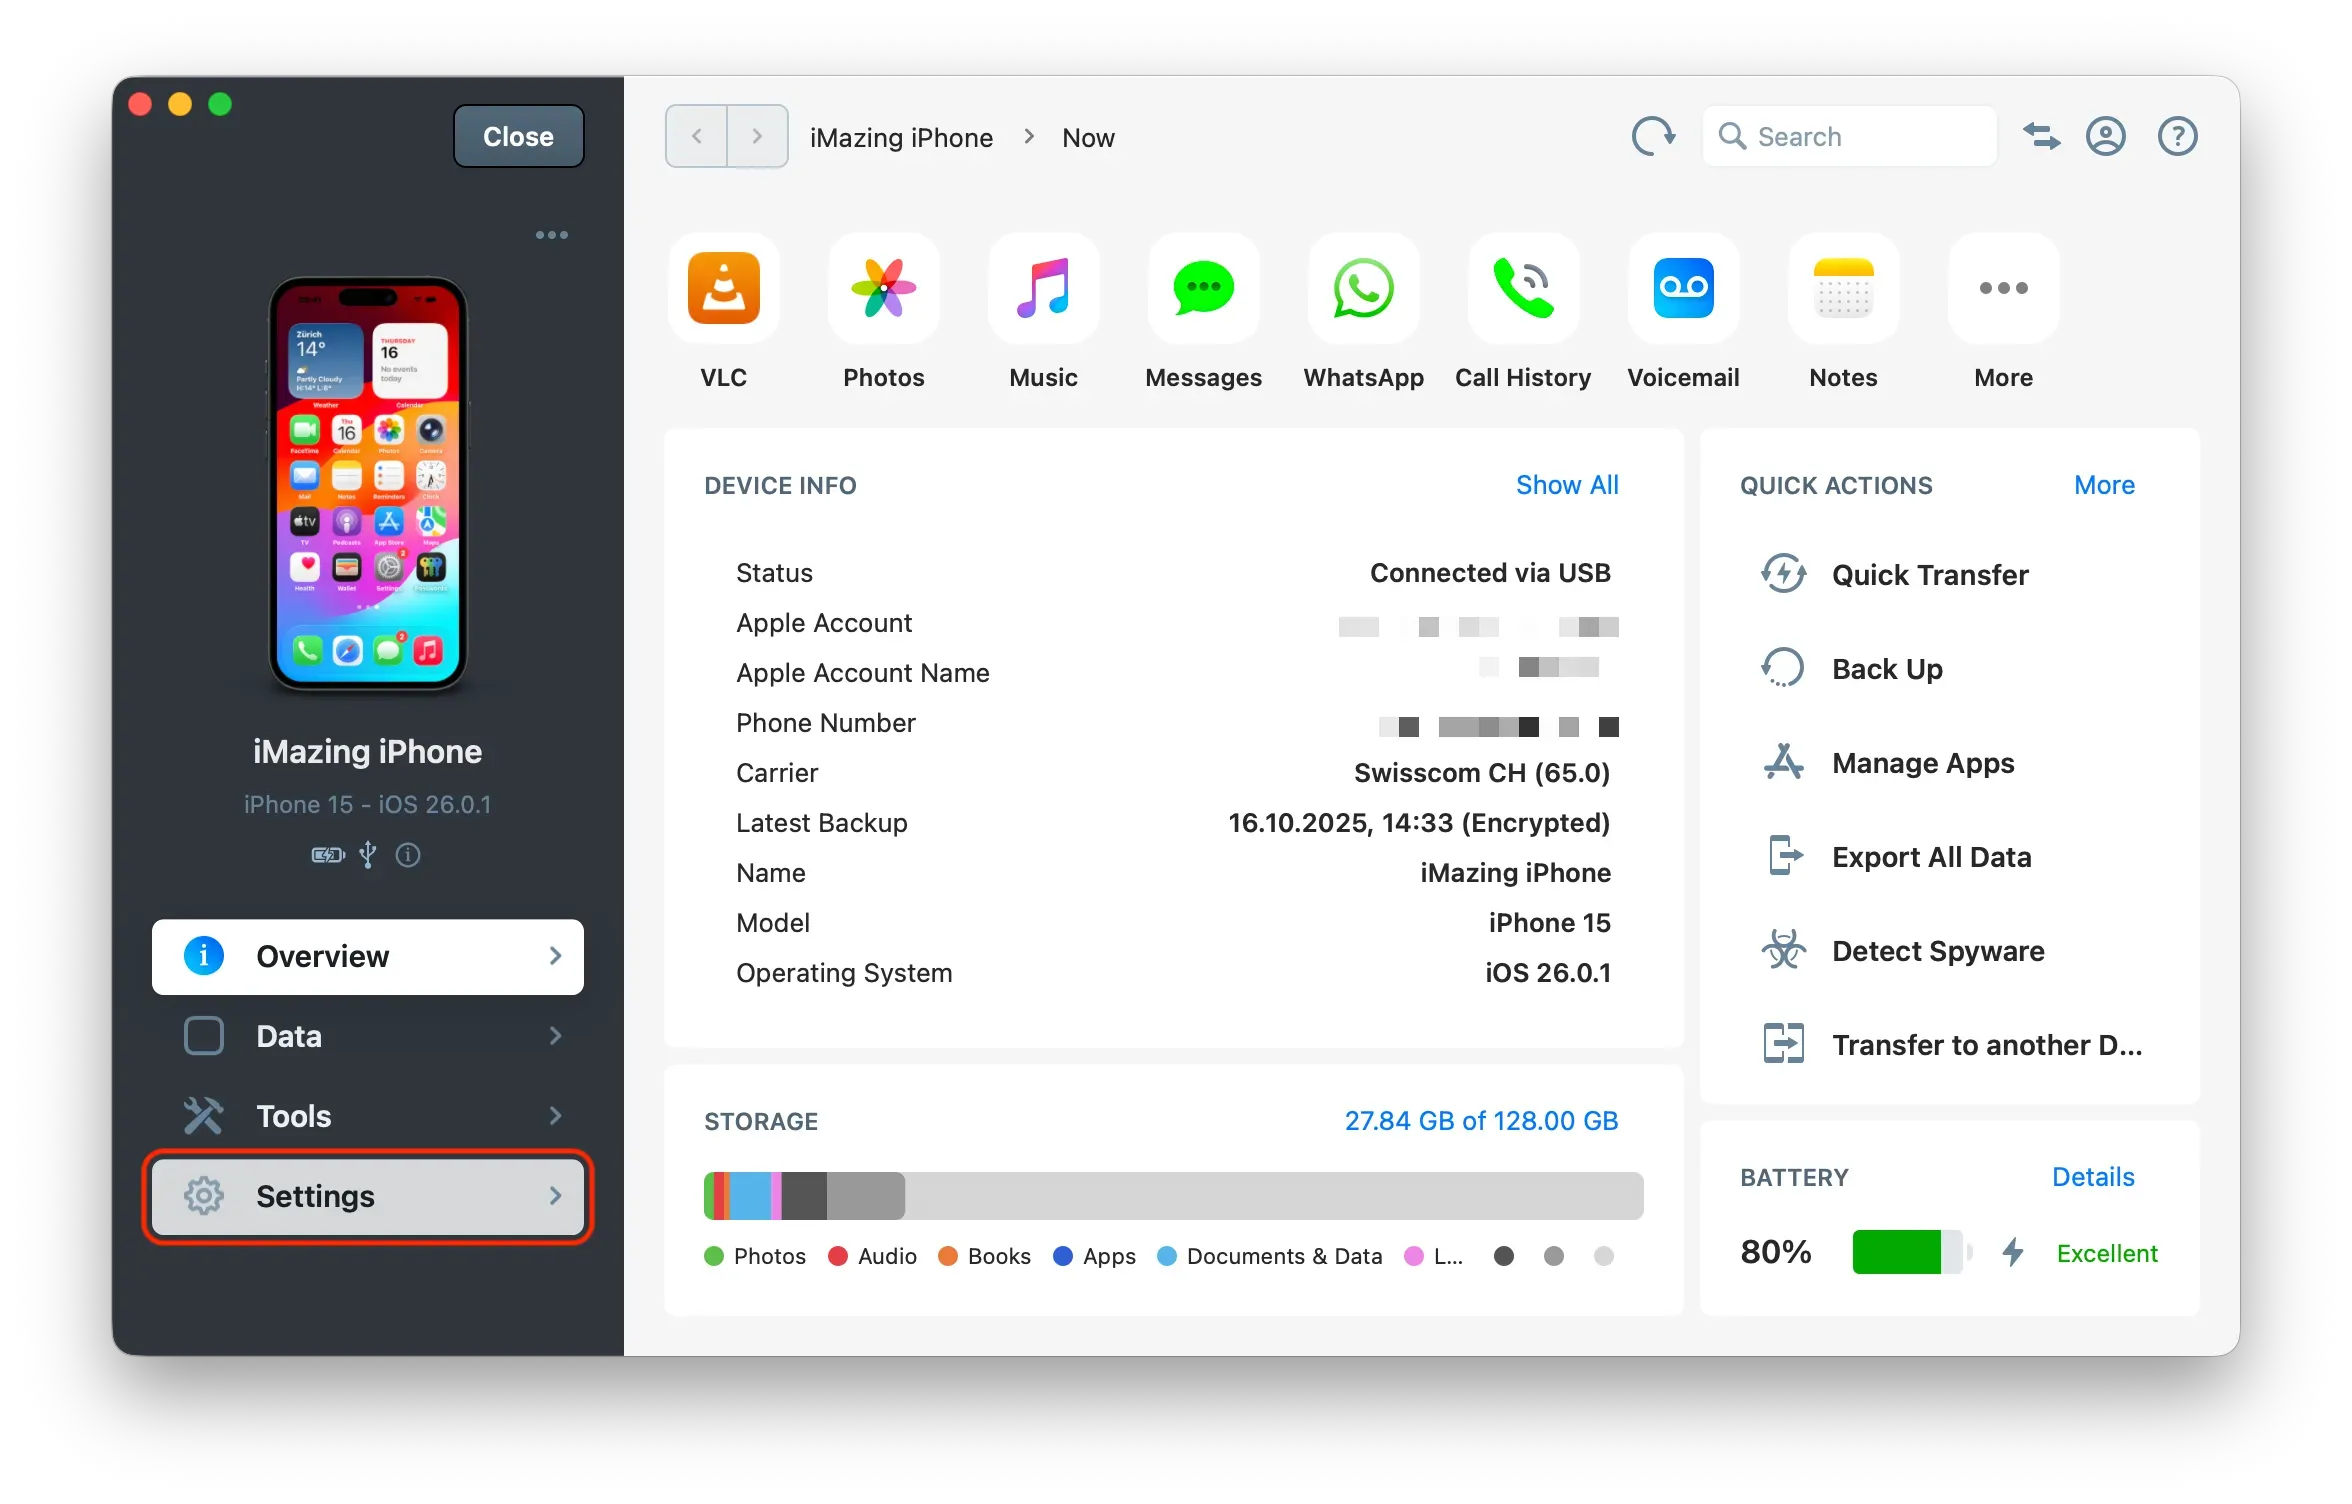
Click on Device Settings
Once you’ve selected a device, iMazing opens its Overview screen. From the left pane, select Settings to access the device’s specific options.
Tip: Device Settings are specific to each iPhone or iPad — including backup location, snapshot retention, and more. To adjust iMazing’s global settings instead, open Preferences from the iMazing menu on macOS or the Edit menu on Windows. See the dedicated Preferences guide for details.
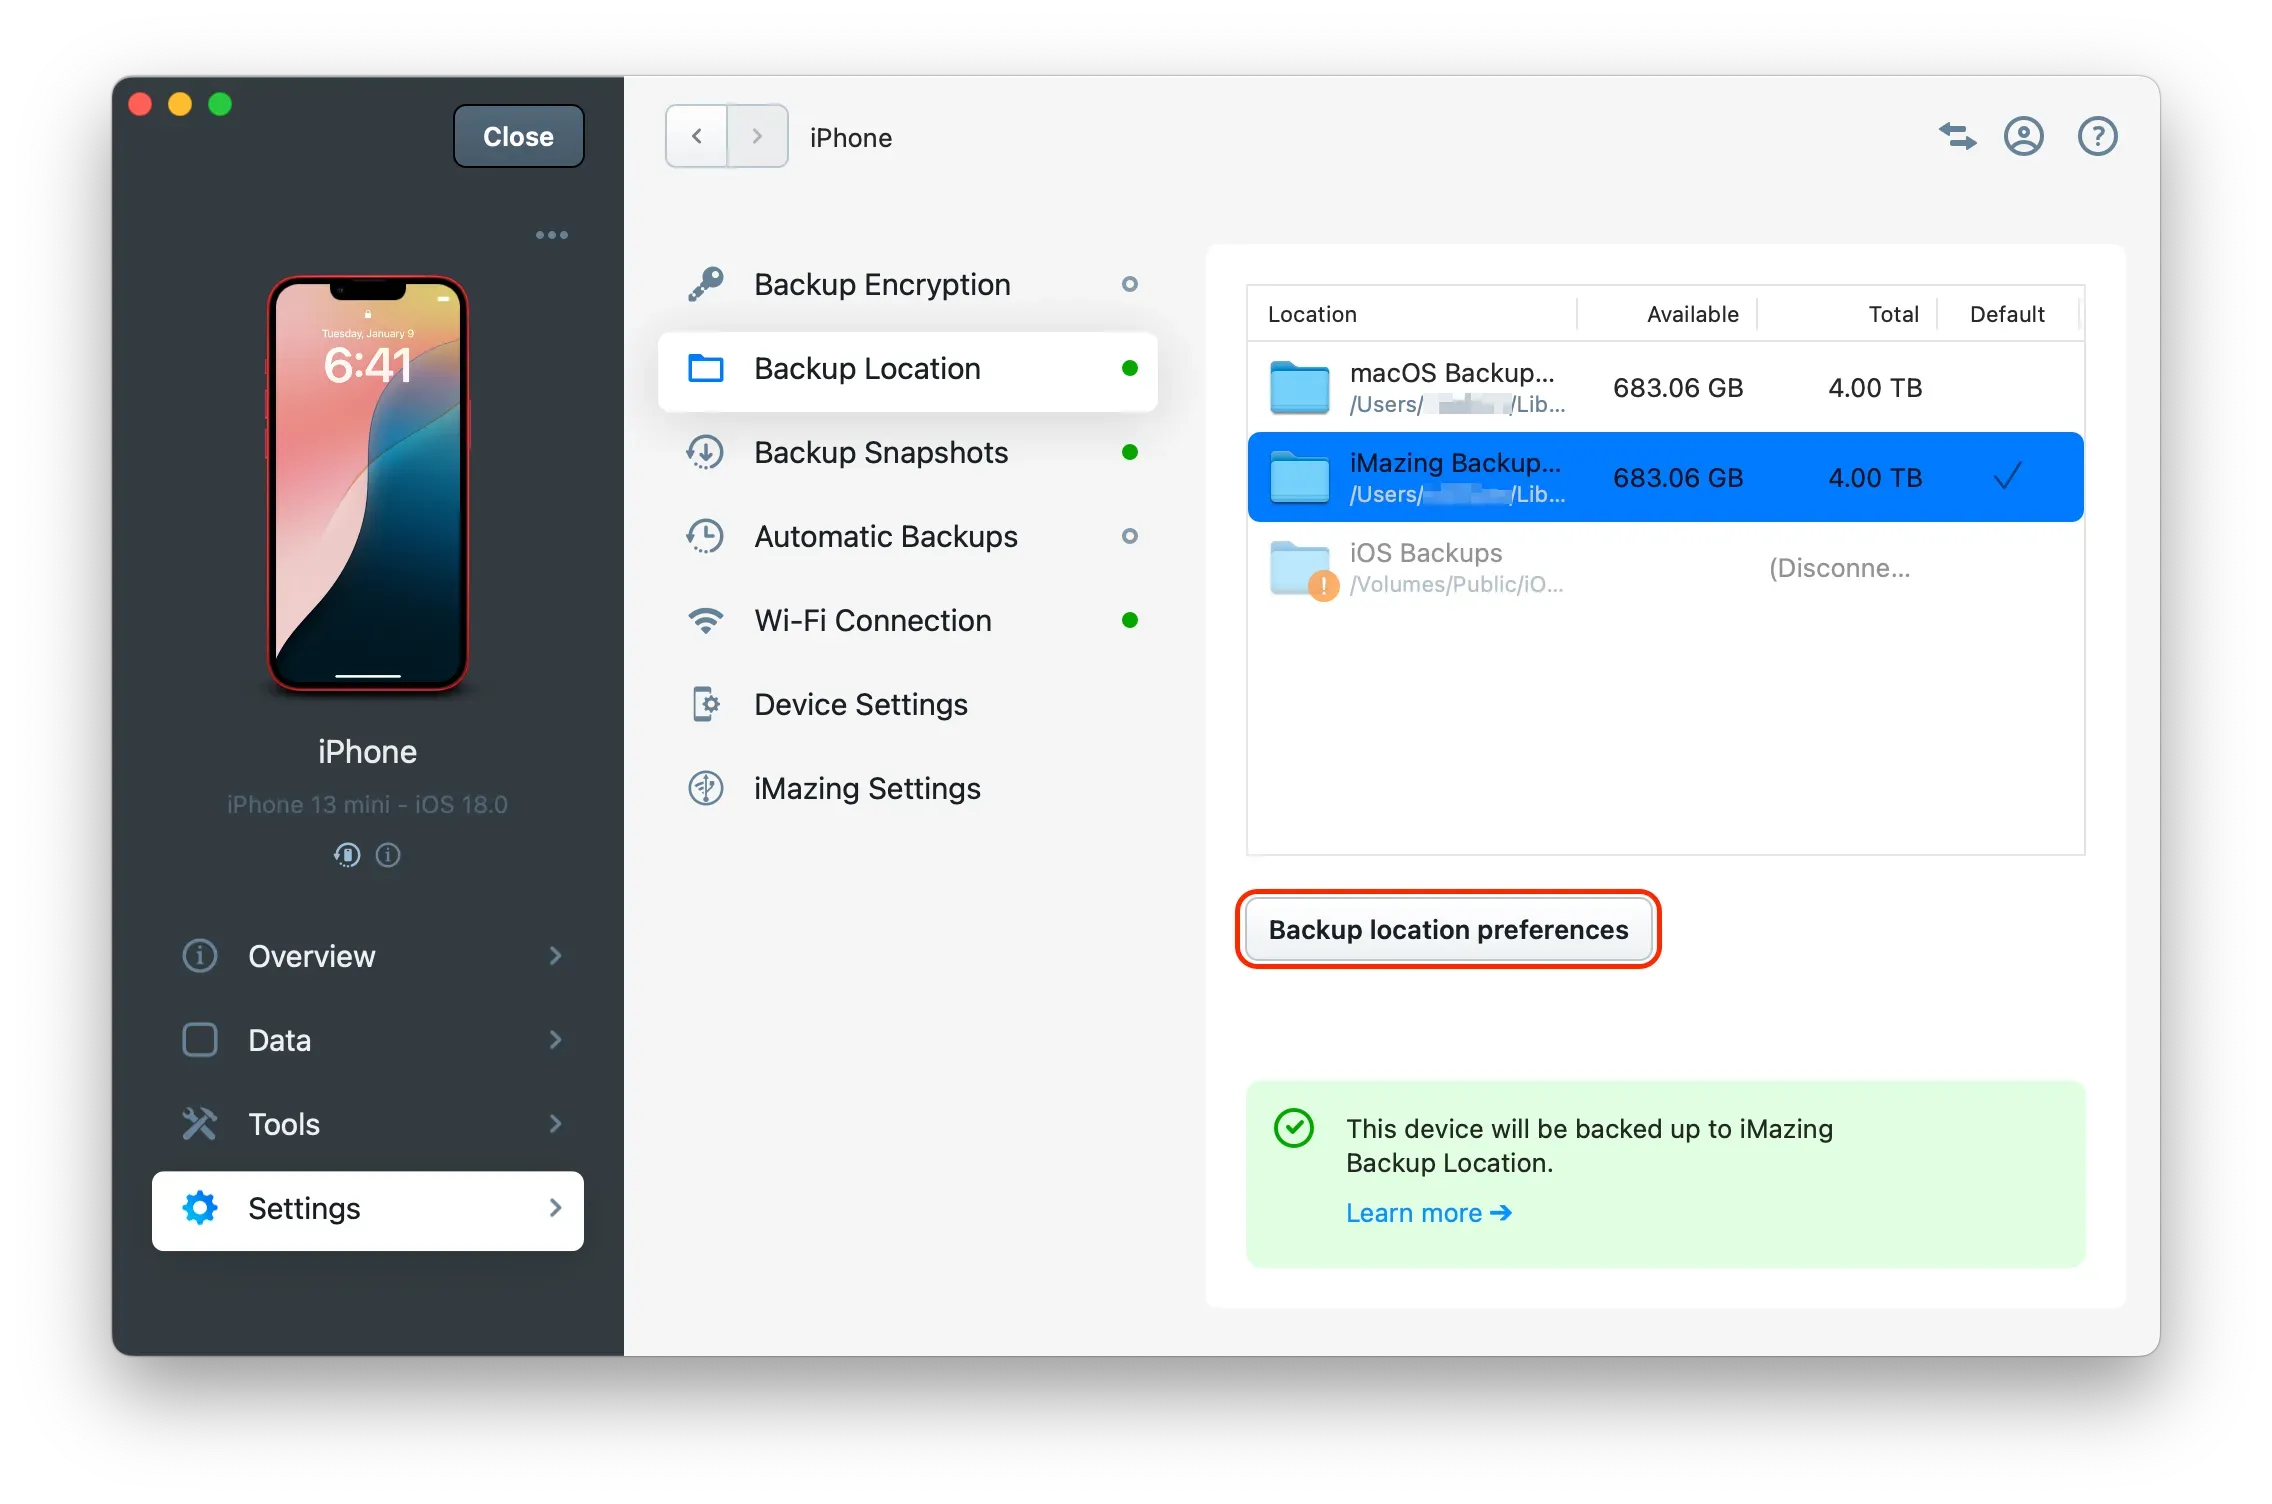
Access Backup Location preferences
In the device’s Settings view, choose Backup Location from the center column, and click the Backup Location Preferences button in the main window to open the management screen.
Add a new backup location
In the Backup Location Preferences screen, click the Add Backup Location button to open a file dialog. From there, select your external drive or any folder of your choice, and confirm.
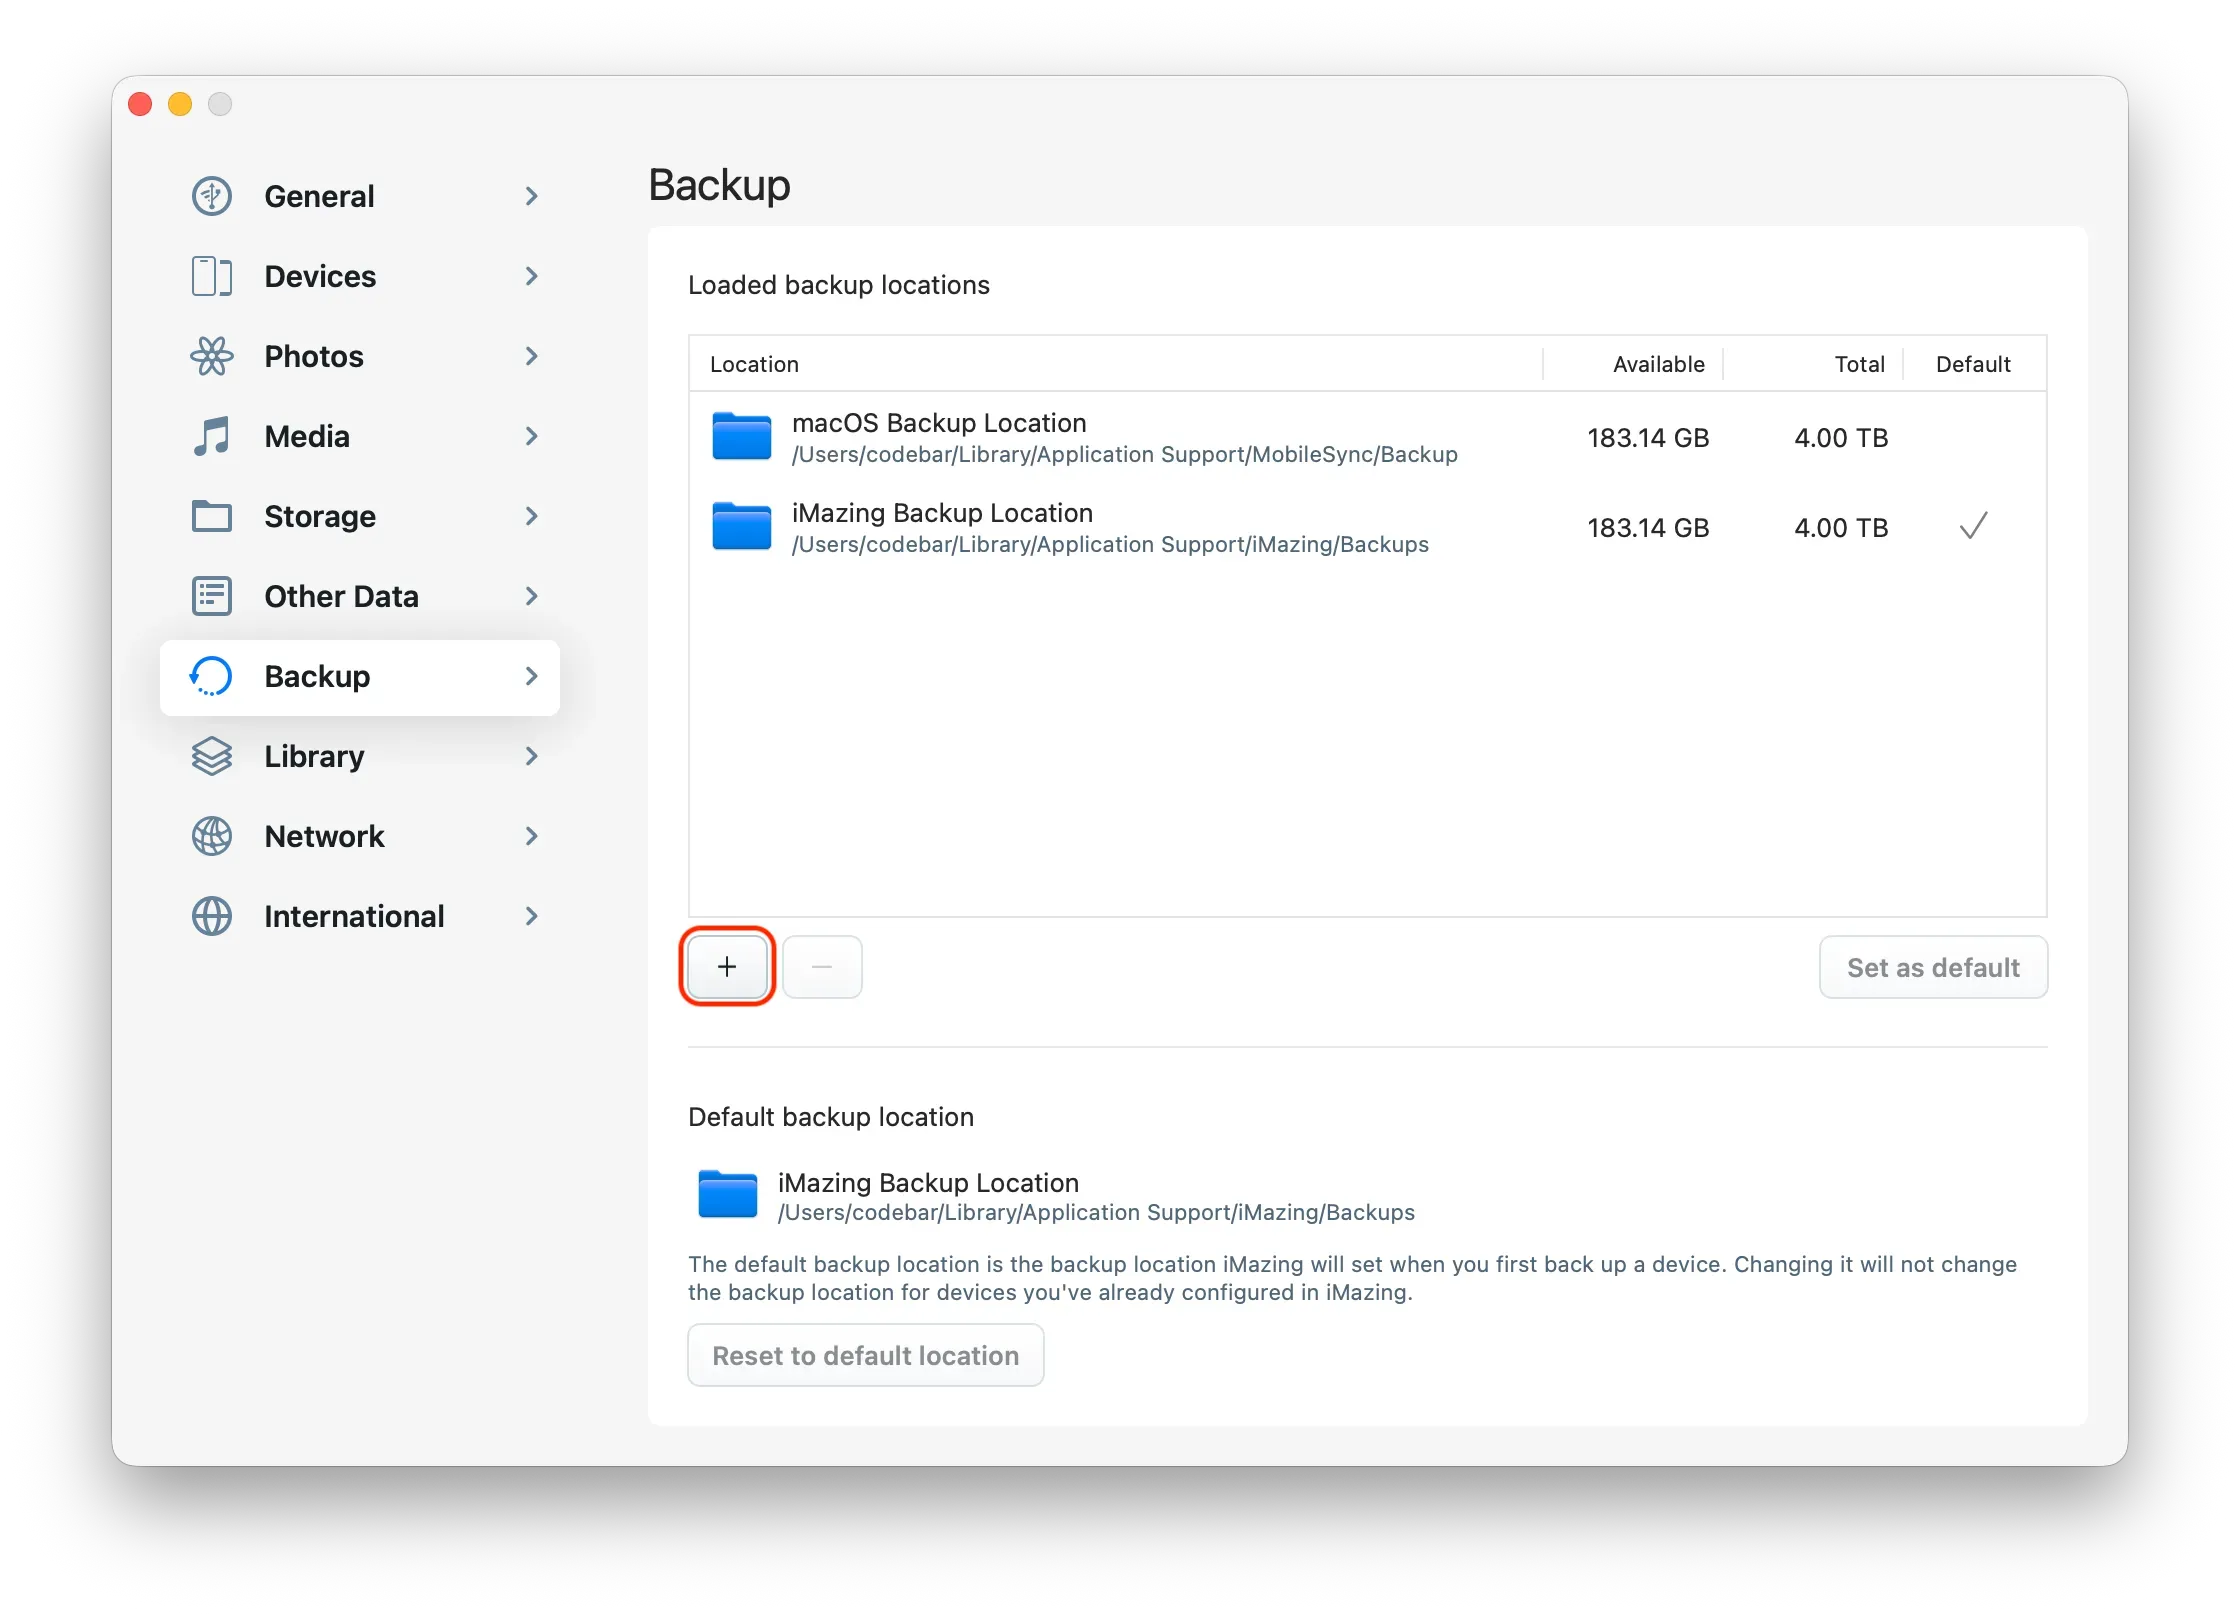
Notes:
- When you add a new backup location, iMazing opens its global Preferences to create a location available to all devices, including the one you’re configuring.
- The Default label marks the location used for new devices unless you specify otherwise. You can still assign a different location for each device, including the one you’re setting up now.
Tip: For best performance and reliability, use an external drive formatted in NTFS, APFS, or macOS Extended (Journaled).
Select the new backup location for your device
Once you’ve added a new location, it appears in the list of available backup destinations. Select it, then click Save to confirm it for your device.

Copy exisiting backups (optional)
When you change a device’s backup location, iMazing will ask if you’d like to copy the existing backup from the previous location. Choose Yes to keep your full backup history in the new location — or No if you prefer to start fresh.
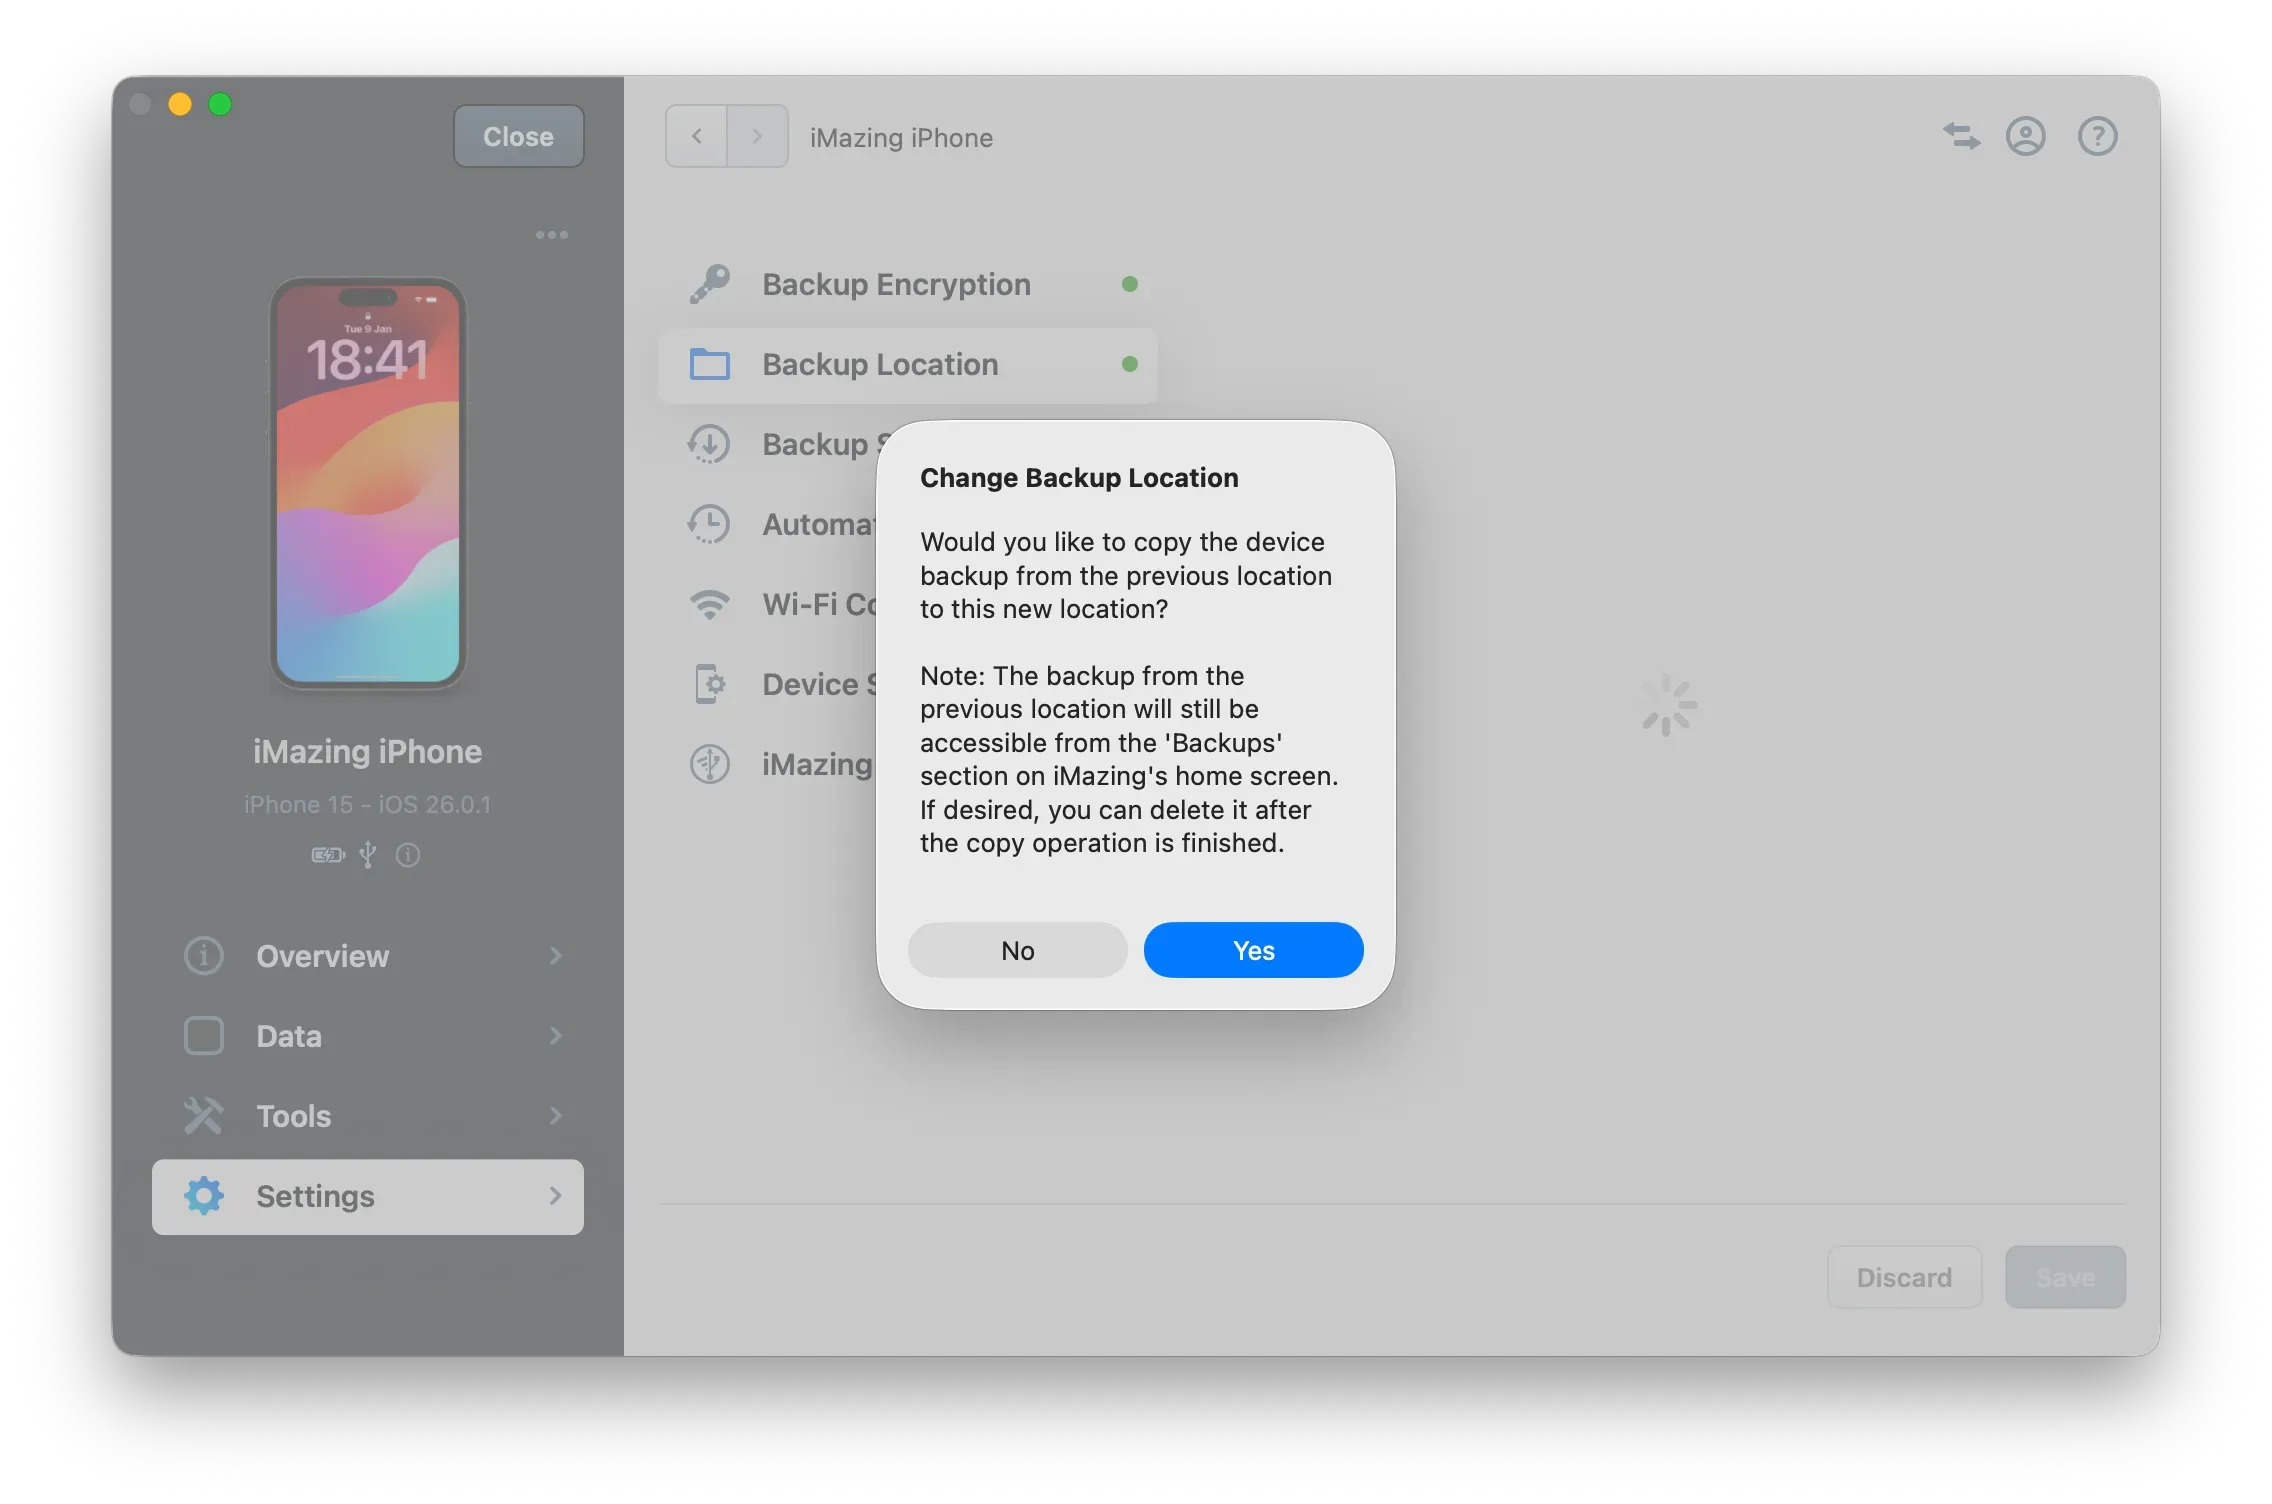
Notes:
- The original backups stay available in the Backups section on iMazing’s home screen. Once the copy to the new or external location has finished, you can safely delete the old ones if no longer needed.
- When saving to a disk, iMazing creates an iMazing.Backups folder at the drive’s root. If the disk isn’t writable (for example, a Time Machine drive), you’ll see a warning. In that case, manually create a folder at the drive’s root in Finder or File Explorer, and select it as the backup location in iMazing.
Backing up to an external drive or network drive (NAS)
iMazing is capable of backing up iOS devices to network drives such as Synology NAS, Time Capsule or SMB shares, but there are a few limitations to be aware of.
Backing up to a network drive on Windows
iMazing can back up iOS devices to network drives such as Synology NAS or SMB shares on Windows, but the drive must first be mapped to a letter. Once mapped, you can add it in iMazing like any other external drive and use it as a backup location. For detailed steps, see Microsoft’s official Microsoft guide to mapping a network drive.
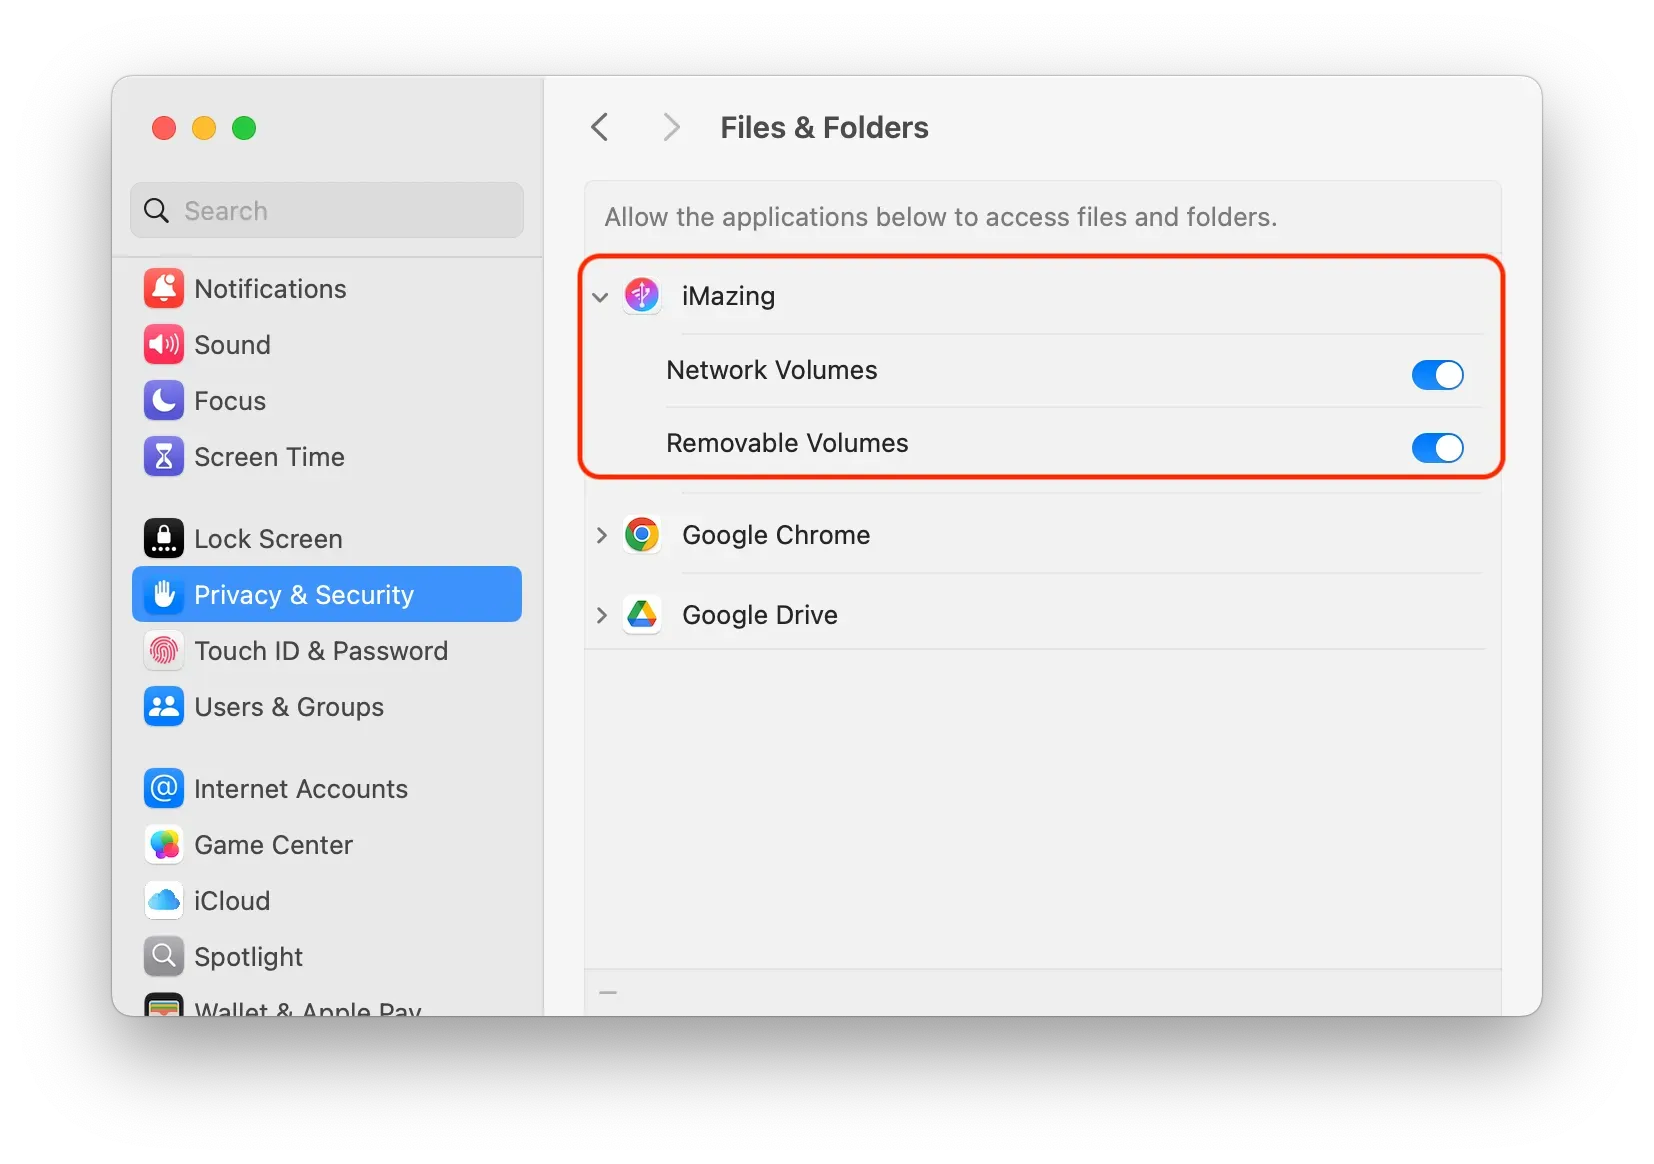
Backing up to an external drive on macOS
With macOS, to allow backing up to an external drive or NAS with iMazing, you must go to your Mac's System Settings > Privacy & Security > Files & Folders and allow iMazing to access Network Volumes and Removable Volumes.
Backing up to Time Capsule (macOS) or personal cloud
iMazing supports Time Capsule volumes, but backup speed may be significantly slower than with direct or wired drives. Time Machine activity can also affect performance if both backups run at the same time. For smoother results, ensure Time Machine isn’t running during iOS backups, or use a dedicated external drive instead.
Note: Incompatible personal cloud solutions
Western Digital's My Cloud Home is not not compatible with iMazing. In general, sync solutions that first copy contents to a temporary local image before uploading them modify the backup as they are created, making them unsuitable as an iOS backup location. They can be used to store old backups though.
Tips:
- The first backup takes longer than subsequent ones. For faster results, enable Airplane Mode and avoid using the device during the process — otherwise, iOS may detect changes and repeat certain steps.
- For large backups, first back up to your main drive, then copy the backup to the network drive and select it in iMazing as the new location. Always use iMazing to delete the original; removing it manually may trigger a rebuild.
- On macOS 10.15 or later iMazing may request permission to access external drives, network drives, or protected folders like Documents and Desktop. This occurs only when you back up to or load from those locations. Watch our video on recent macOS privacy changes.
Help and Further Reading
Troubleshooting slow or not finishing backups to a NAS
- Connect your network drive directly to your computer with an Ethernet or USB cable for the first backup (if possible).
- Enable the SMB3 protocol on your NAS to speed up the backup snapshot creation.

Enabling SMB3 on a Synology NAS - Go to File Services > SMB/AFP/NFS > SMB Advanced Settings

Enabling SMB3 on a Synology NAS - Set Maximum SMB protocol to SMB3
Note: For more details, please refer to Synology's official guide on how to enable SMB3.
- Enable the File Fast Clone option on your NAS to accelerate backup snapshot creation and significantly reduce storage space usage. To do this on a Synology NAS, go to File Services > Advanced > File Fast Clone
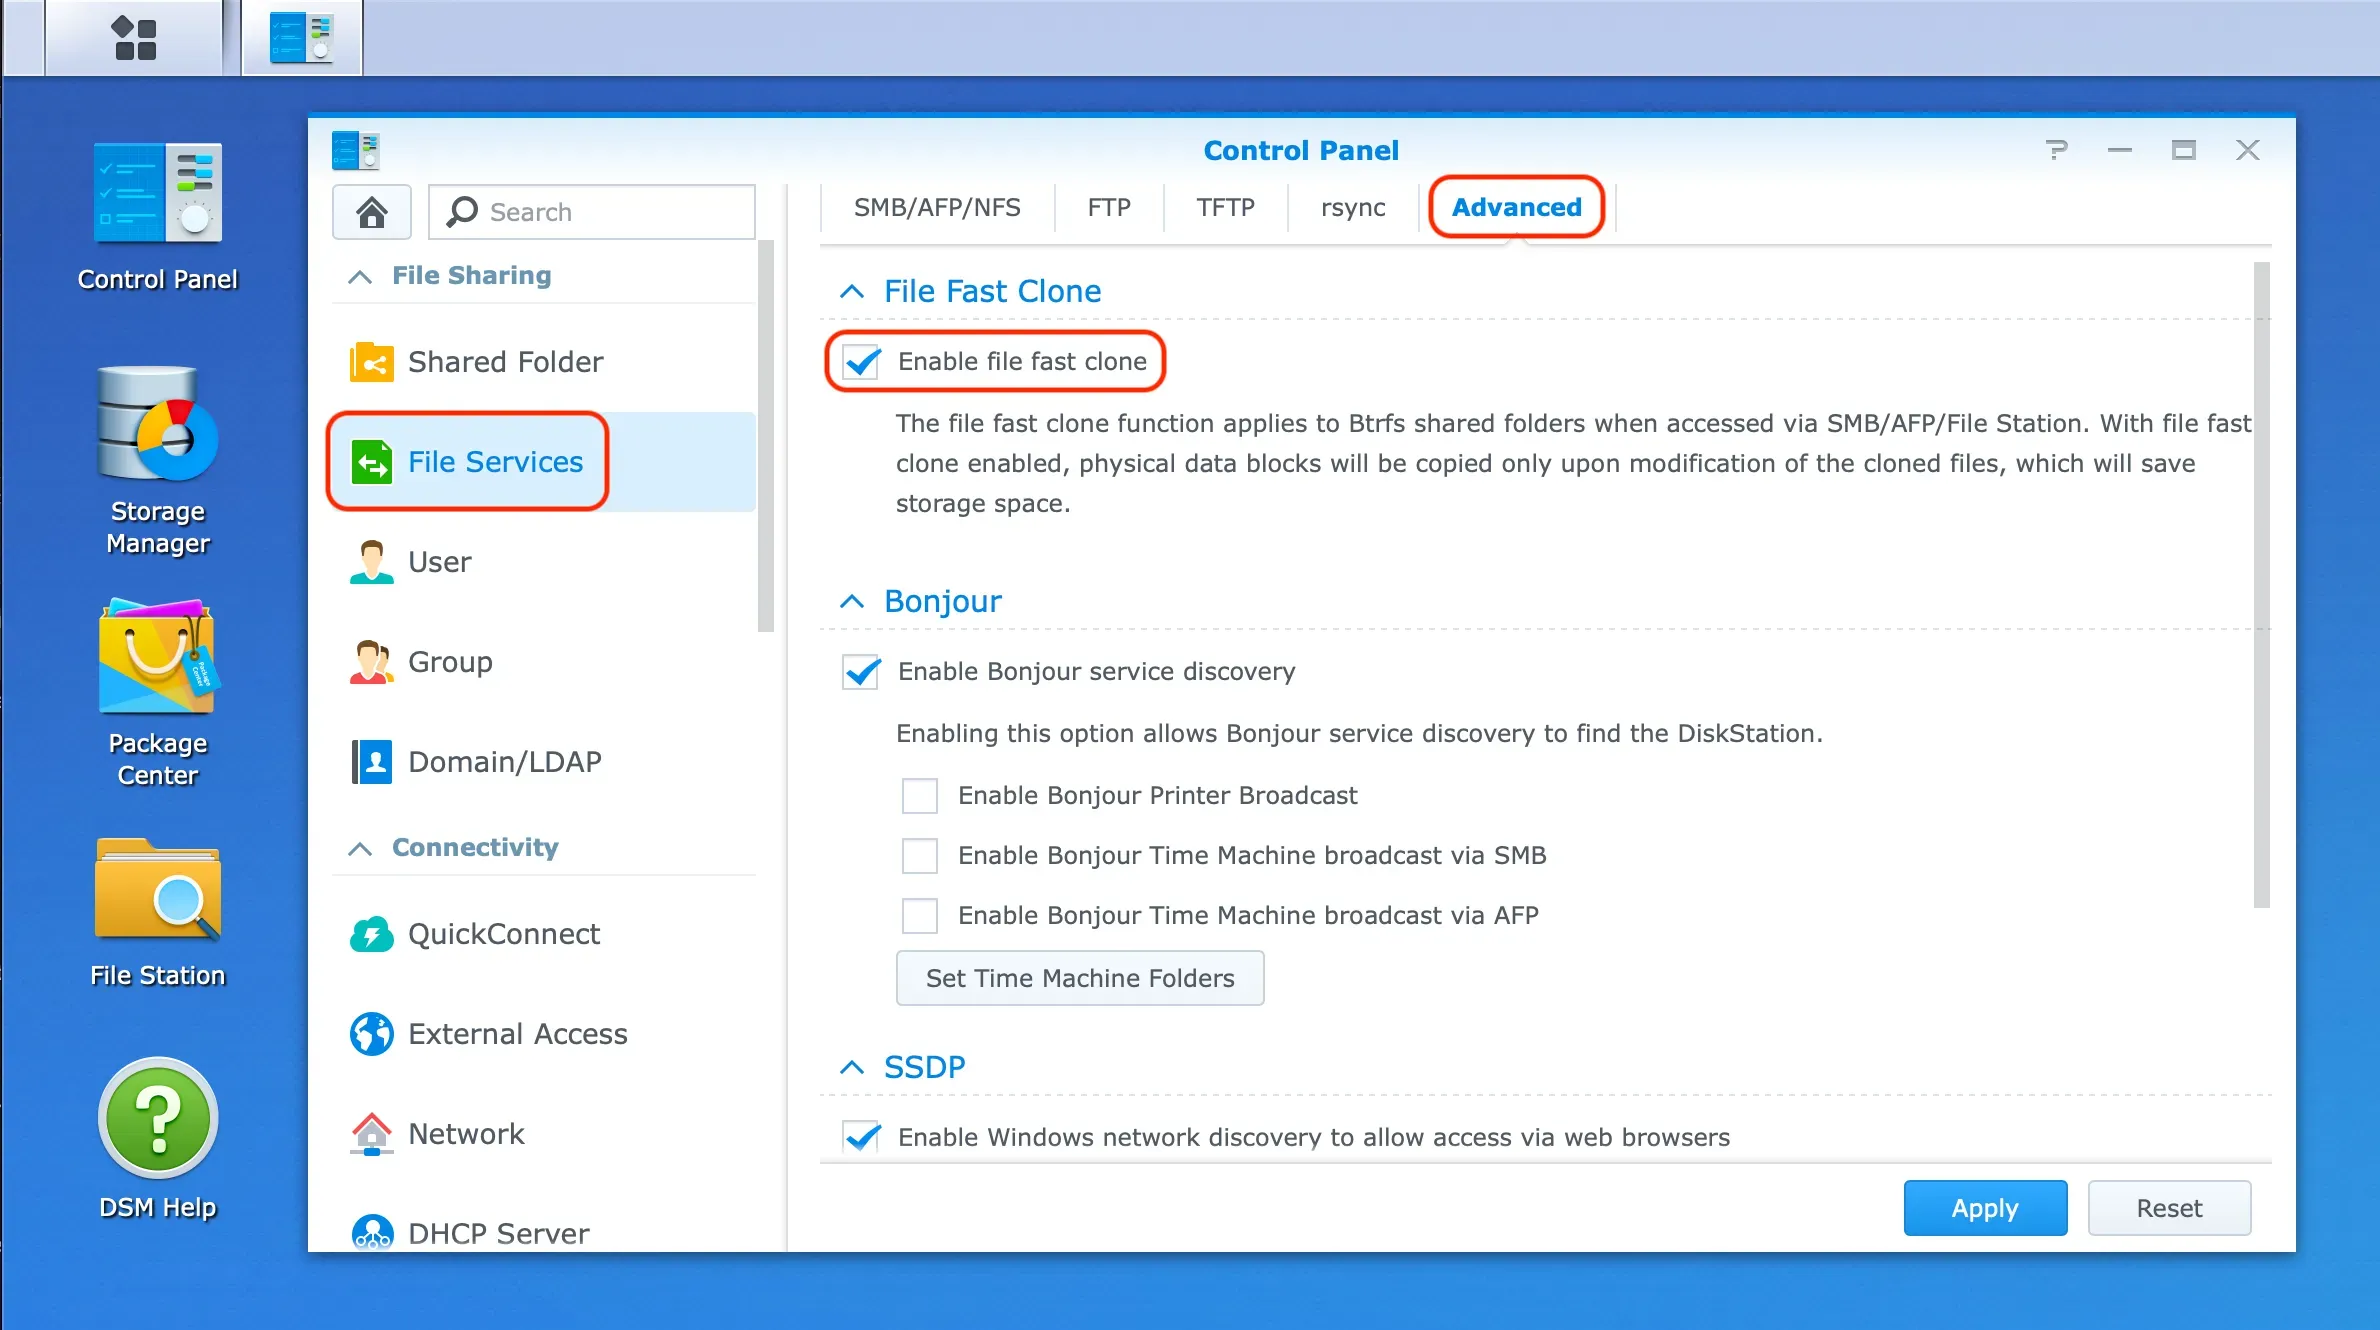
Enabling 'File Fast Clone' on a Synology NAS
Notes:
- For more details, please refer to Synology's official guide on how to enable File Fast Clone.
- For best performance, pause any other backup software while iMazing is running — including Time Machine on Mac
Accessing the macOS backup folder on macOS 10.14 Mojave and later
To access existing macOS or former iTunes backups in iMazing, please refer to our dedicated guide. If you’d like iMazing to back up your device to the same location, follow the steps below.
Starting with macOS 10.14 Mojave, Apple introduced new privacy protections that require apps to be explicitly authorized to access certain data — including iTunes and Finder backups.
When you select the macOS backup folder as the destination for iMazing backups, iMazing displays on-screen instructions showing how to grant the necessary access.
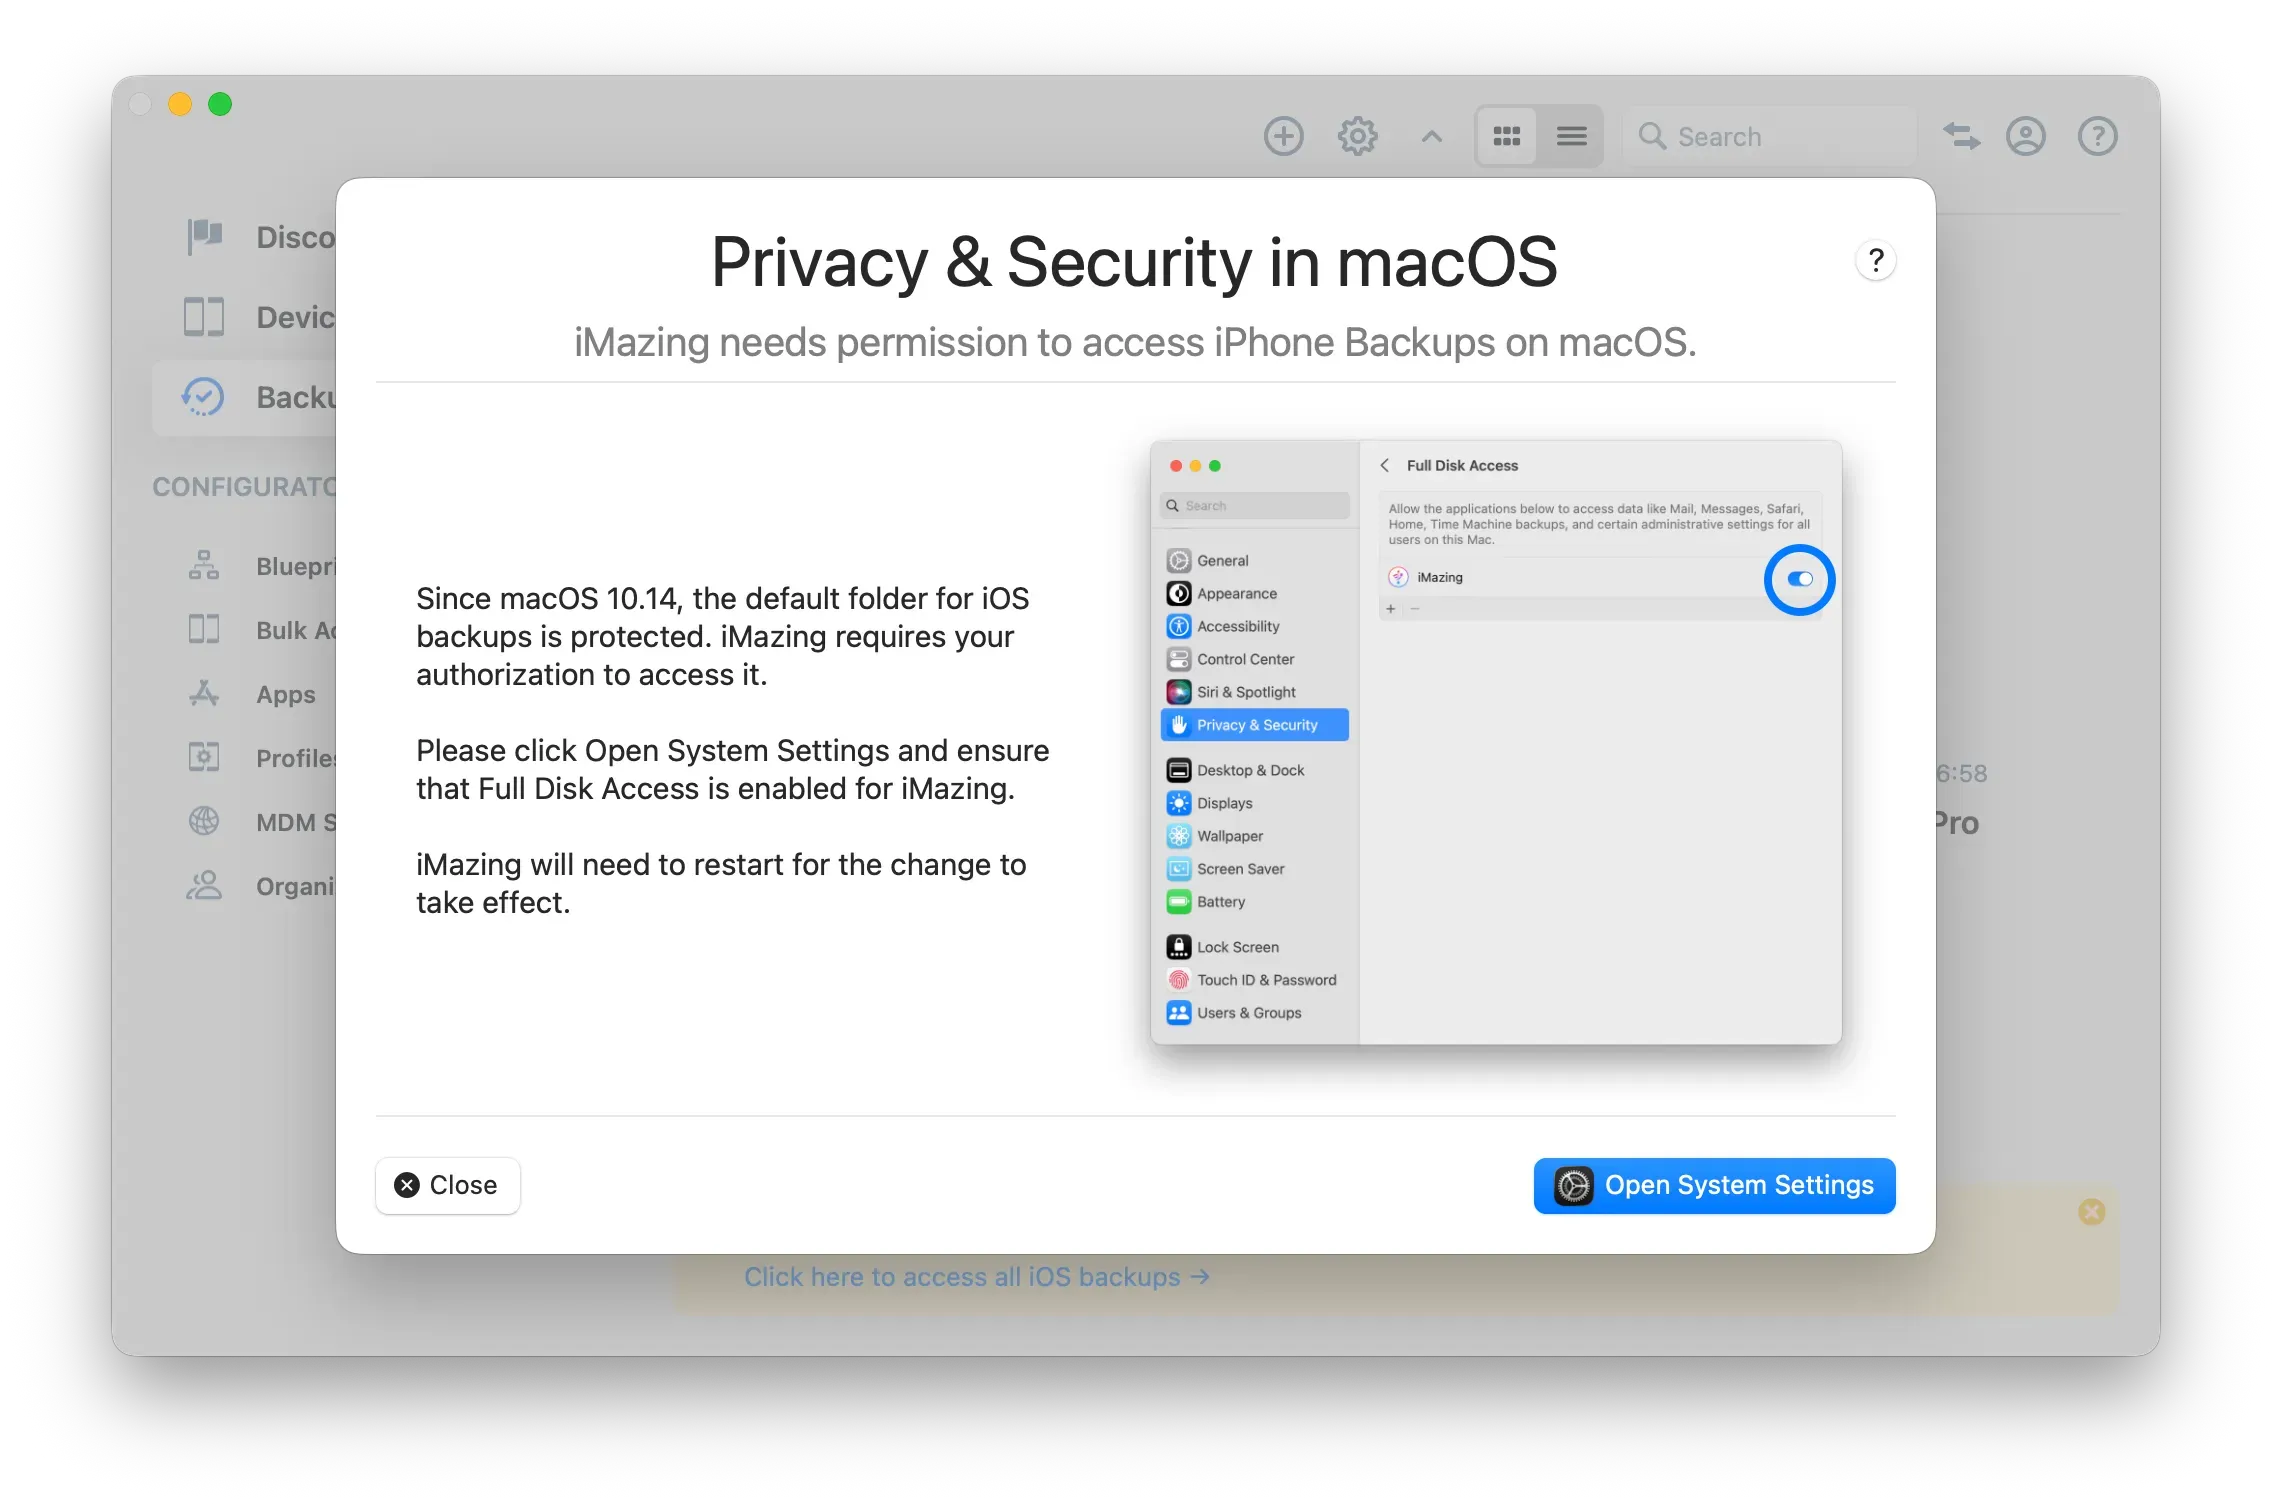
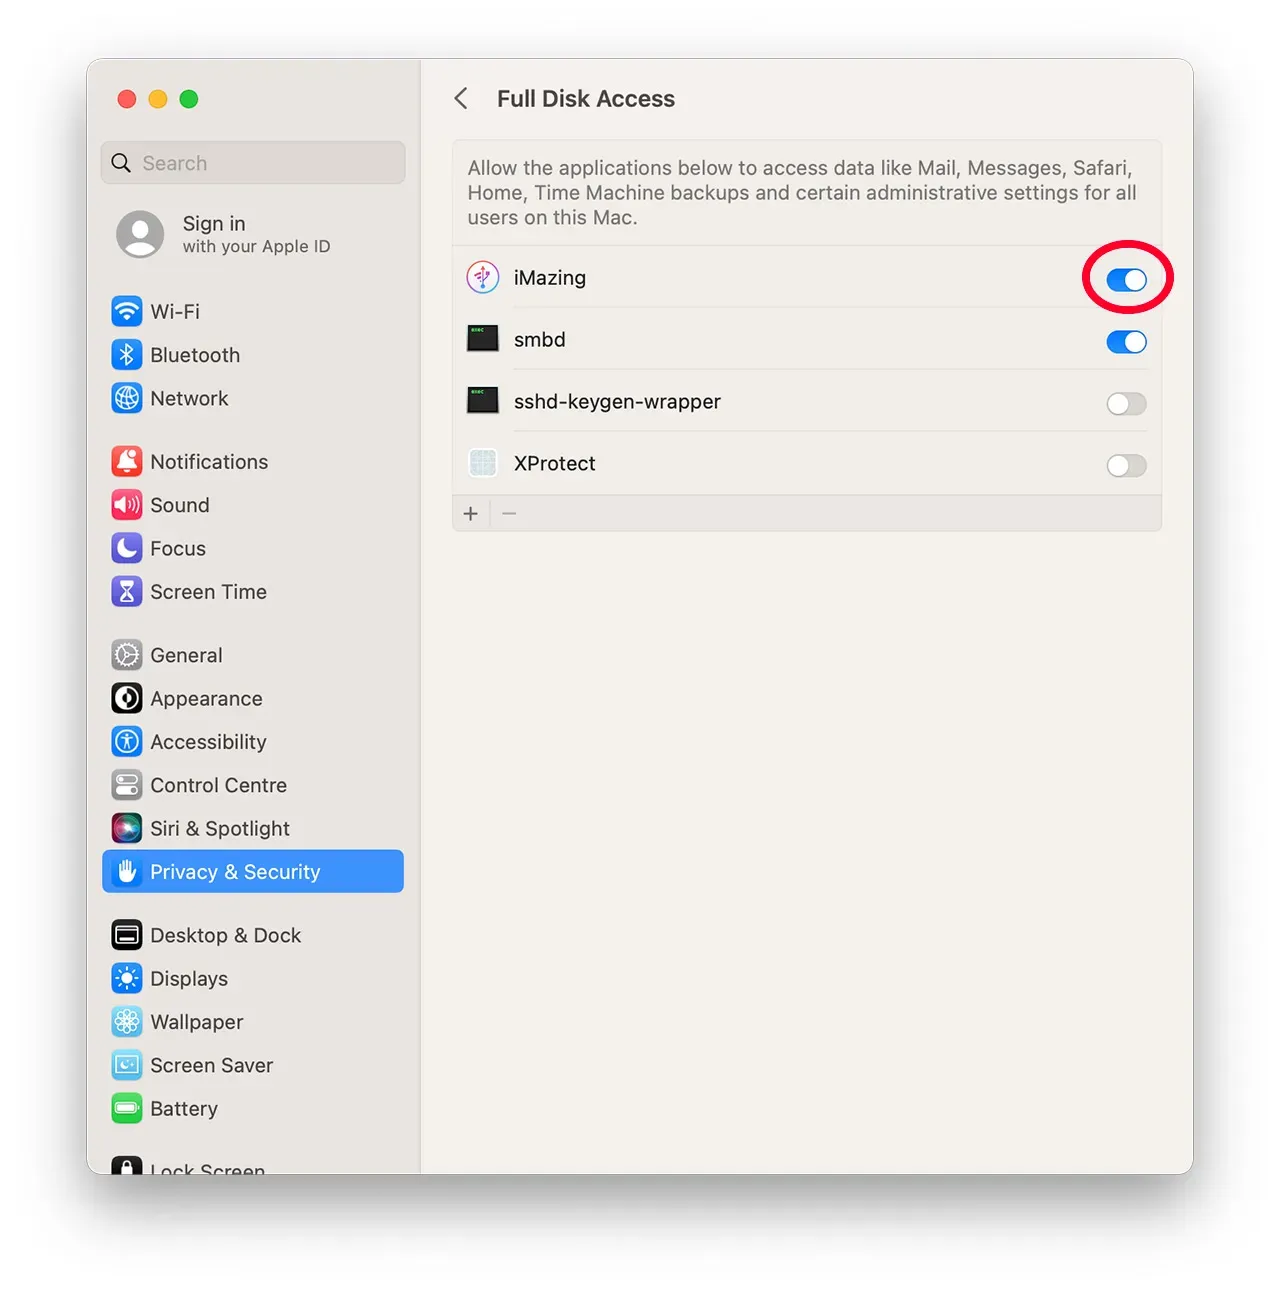
As instructed, open System Settings > Privacy & Security > Full Disk Access then enable iMazing in the list. If it isn’t listed, click the "+ button and select iMazing from your Mac' the Applications folder.
iMazing fully supports sharing backup folders with macOS. Existing Finder or iTunes backups are automatically archived before iMazing creates a new one, ensuring that previous data remains intact and integrated into iMazing’s snapshot system.
Tip: You can revoke access at any time, open System Settings > Privacy & Security > Full Disk Access and remove iMazing from the list.
Things to know
- The first time you back up your iPhone or iPad, iMazing will automatically display backup location options.
- Changing your iMazing backup location will not affect your iTunes backups' location.
- If backups are slow or not completing, see our guide on understanding and fixing slow iPhone or iPad backups.